Topics
Whether they’re blemishes on skin or stains on a surface, Photoshop has a tool to remove them quite easily. Our focus here will be on working non-destructively. That means that we don’t want to paint on the original photo at all. The added advantage working this way is that our painting will be accessible on their own layers.
- Clone Stamp Tool
- Spot Healing Brush Tool
- Healing Brush Tool
- Patch Tool
- Red Eye Tool
These are the tools we’ll focus on. They’re all made to repair photographs.
Clone Stamp Tool
![]()
The Clone Stamp Tool is often called the rubber stamp tool for a reason. It works very similarly. You take a sample on your photo, then you replicate it at another location. The goal is most often to cover up something under the cloning.
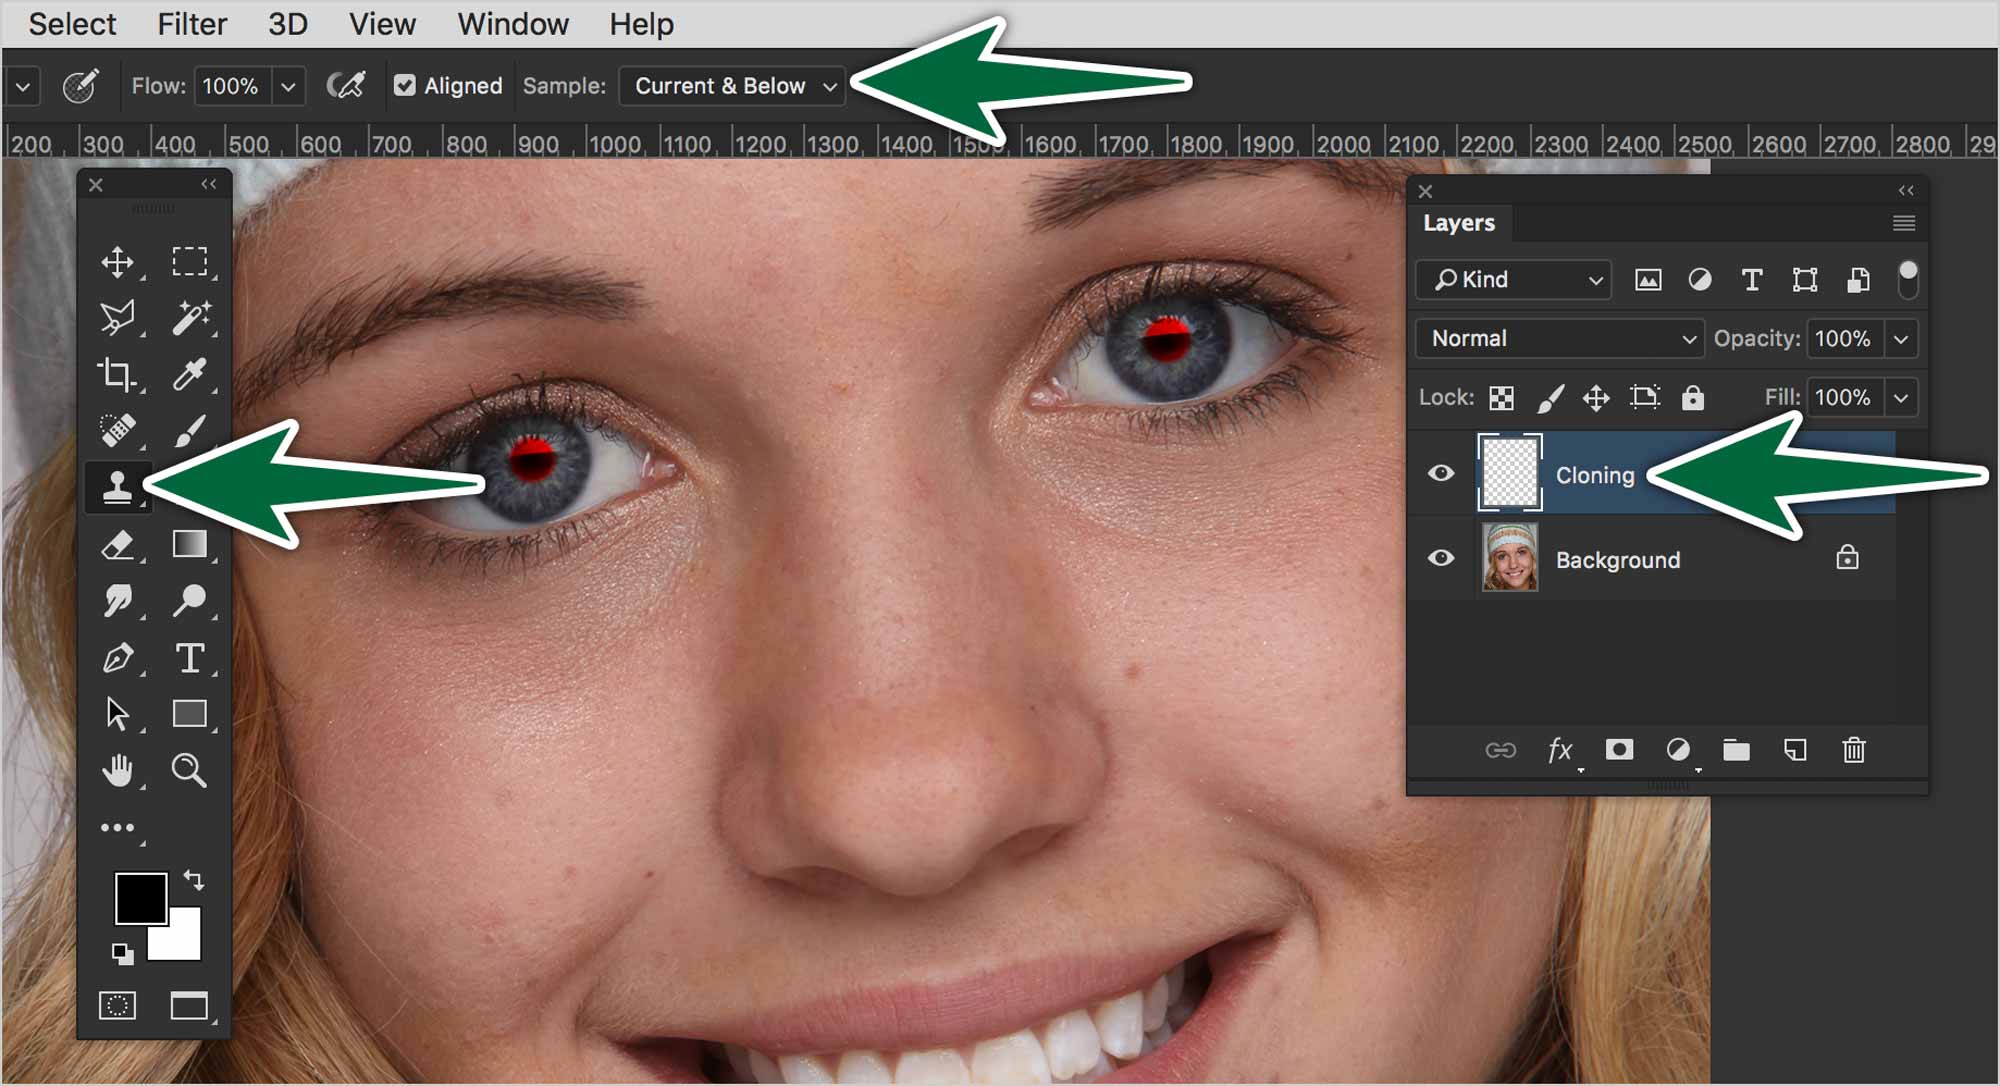
The Clone Stamp Tool doesn’t do any calculations or adjustments. It just clones the pixels you sampled, no matter whether they match or not.
Healing Brush
![]()
The Healing Brush Tool works very similarly to the Clone Stamp Tool, except that it’s a smarter tool. You need to sample an area first. When you release the mouse while cloning, it evaluates the surrounding pixels then adjusts the cloned pixels to blend into their surroundings.
Spot Healing Brush Tool
![]()
The Spot Healing Brush works by simply clicking on blemishes. There’s no need to sample pixels first. Just adjust the diameter and hardness of your brush, then click away. Just make sure you’re on a new, empty layer.
This is the perfect tool for removing blemishes on a subject’s skin. It should be your go-to tool. If you find it not bending to your will, go back to the Clone Stamp Tool.
Patch Tool
![]()
The Patch Tool is made to fix blemishes on large, rather flat surfaces in a photo. The idea is that you drag a good part of the photo on top of a damaged part of the photo. The tool does the work of blending the patch into its surroundings.
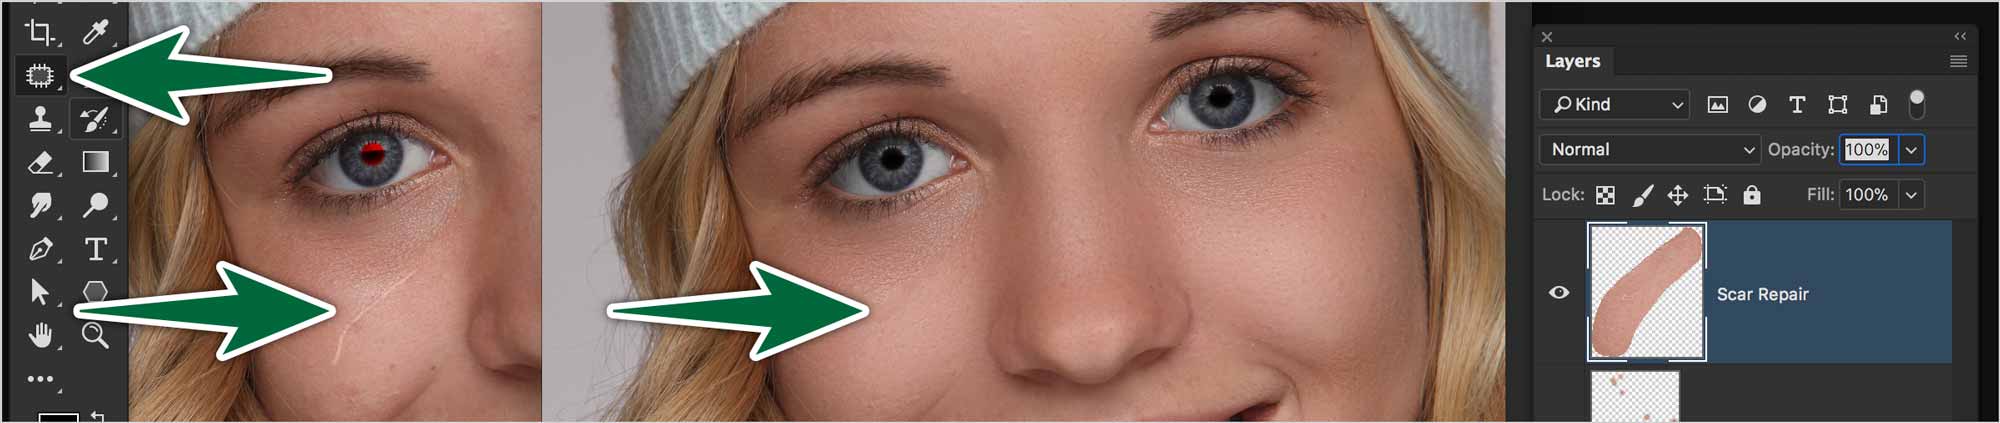
Note that if the Patch setting is at Normal, the tool doesn’t work on a separate layer. It’s best to set it to Content Aware, then work on a new empty layer named Patching.
Patch Settings
- Structure
- Enter a value between 1 and 7 to specify how closely the patch should reflect existing image patterns. If you enter 7, the patch adheres very strongly to existing image patterns. If you enter 1, the patch adheres very loosely to the existing image patterns.
- Color
- Enter a value between 0 and 10 to specify the extent to which you want Photoshop to apply algorithmic color-blending to the patch. If you enter 0, color blending is disabled. A Color value of 10 applies maximum color blending.
- Sample All Layers
- Enable this option to create the result of the move in another layer using information from all layers. Select the target layer in the Layers panel.
Red Eye Tool
![]()
Let’s avoid using this tool. We’ll use a Hue/Saturation adjustment layer instead.
We’ve all seen the red eye effect in photos. Few know that it comes from light from your flash bouncing off the blood vessels at the back of the eye to return to your camera.
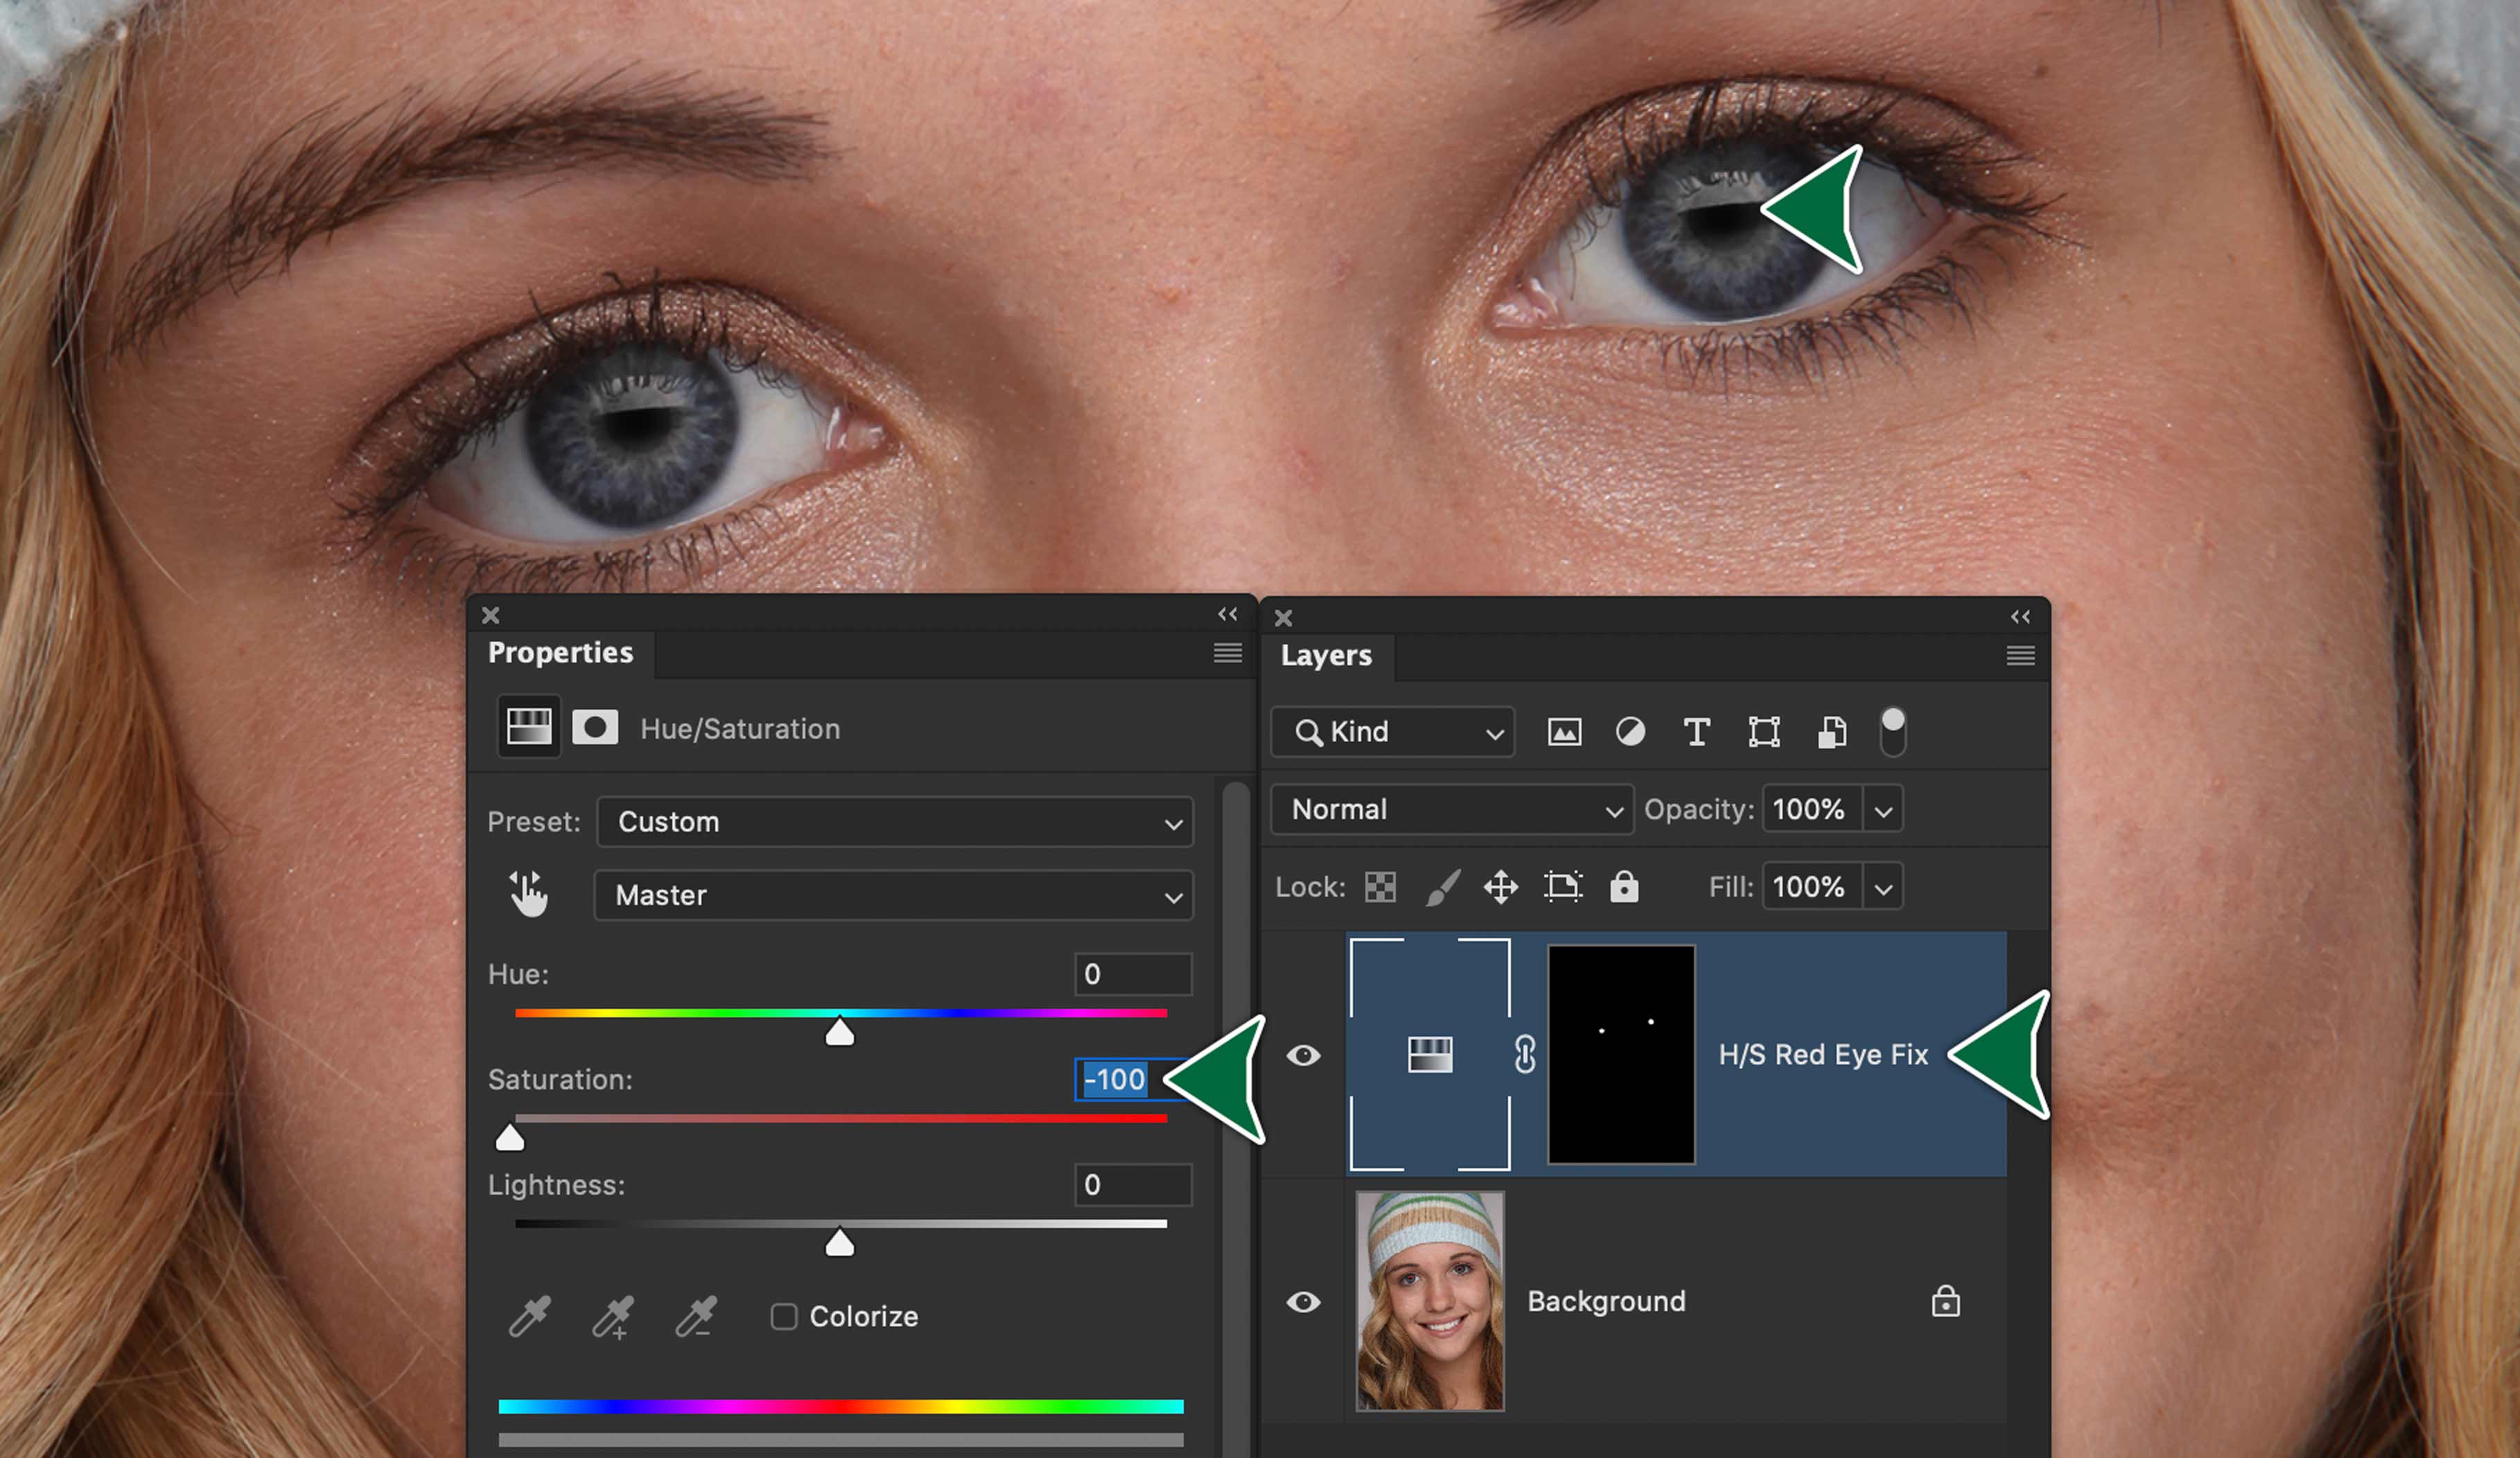
Create a Hue/Saturation Adjustment Layer. Turn the Saturation down to -100. Invert your mask to make it black. Then pain the red eyes with a very soft white brush.
A reflection of the camera flash in the subject’s retina causes red eye. You’ll see it more often when taking pictures in a darkened room because the subject’s iris is wide open. To avoid red eye, use the camera’s red eye reduction feature. Or, better yet, use a separate flash unit that you can mount on the camera farther away from the camera’s lens. From: Adobe
Skin Smoothing
We’ll explore the best process for smoothing skin. These are the steps:
Before we start, we’ll make a new composite layer by targeting all the layers, then holding Option while going to Layers > Merge Visible.
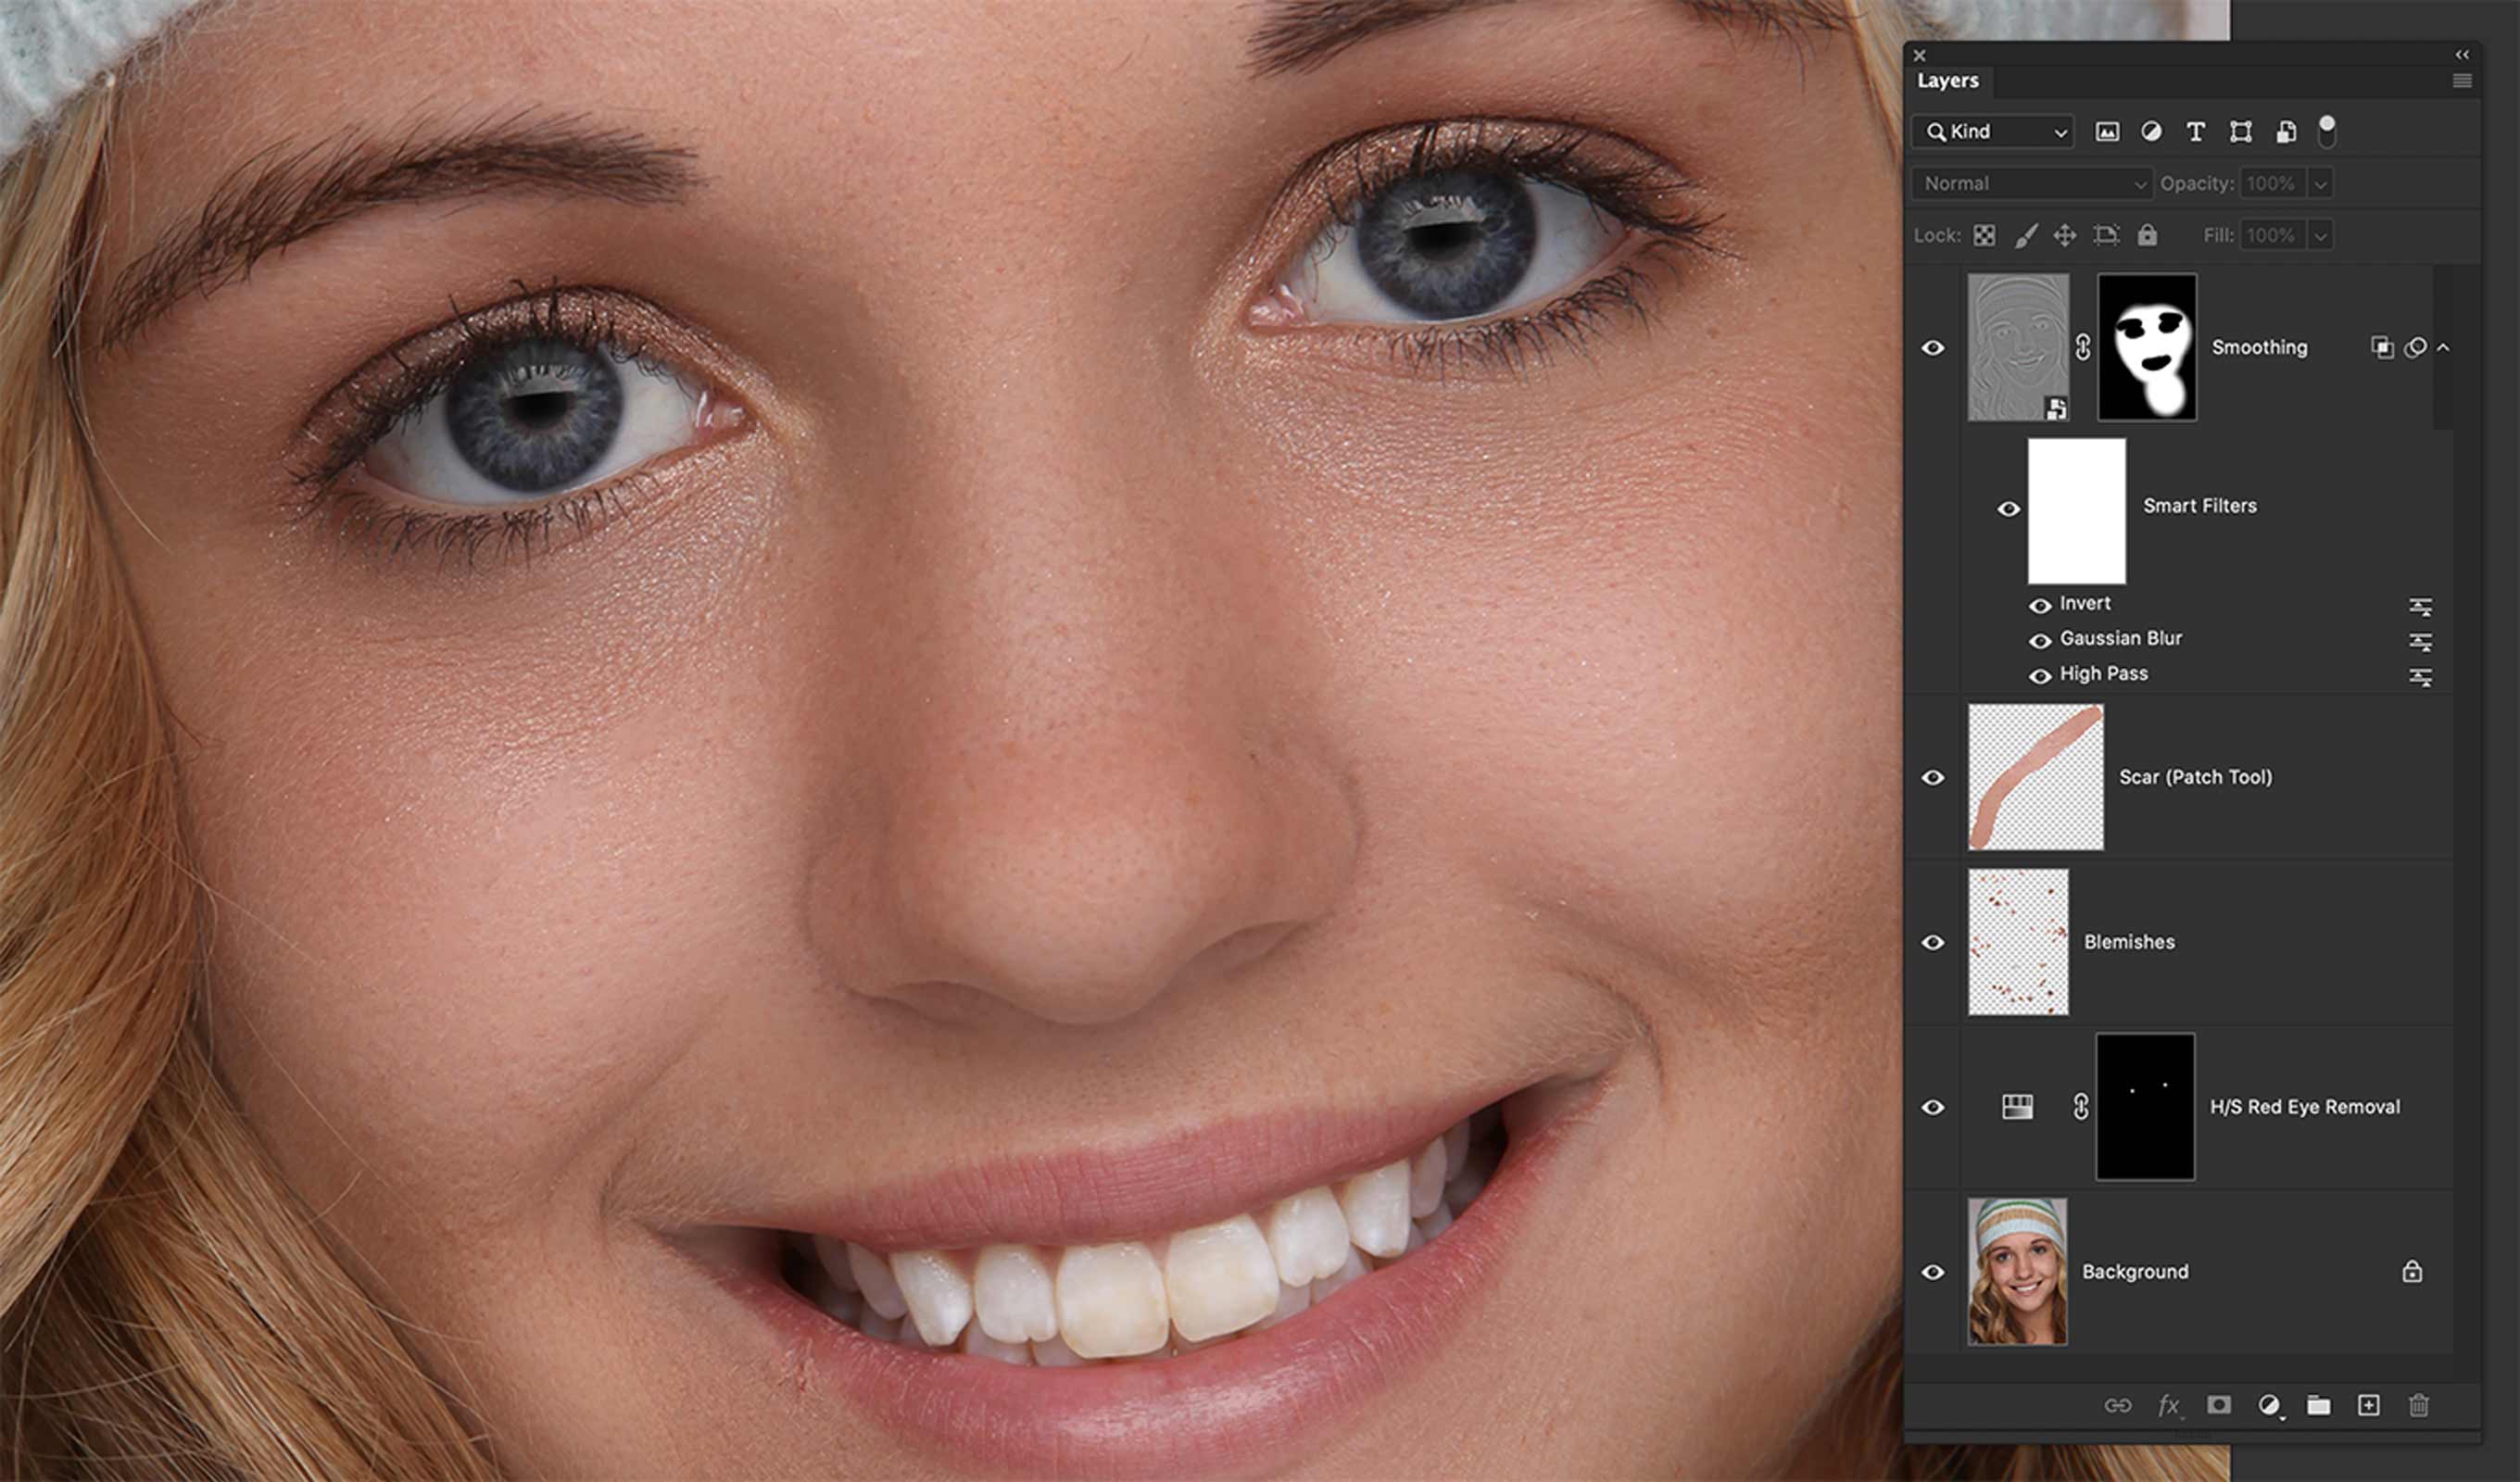
- Duplicate the subject’s layer
- Convert it to a Smart Object
- Go Filter > Other > High Pass, 24
- Go Filter > Blur > Gaussian blur, 8
- ⌘-I to invert
- Set Bend Mode to Linear Light
- Set Blending options
- Mask out unwanted areas
The Final Product
The important factor is to never touch the original photo. Make sure edits you make are on their own layers. This allows you to return to the photo to make changes. You can also turn off your new layers to see the original photo.
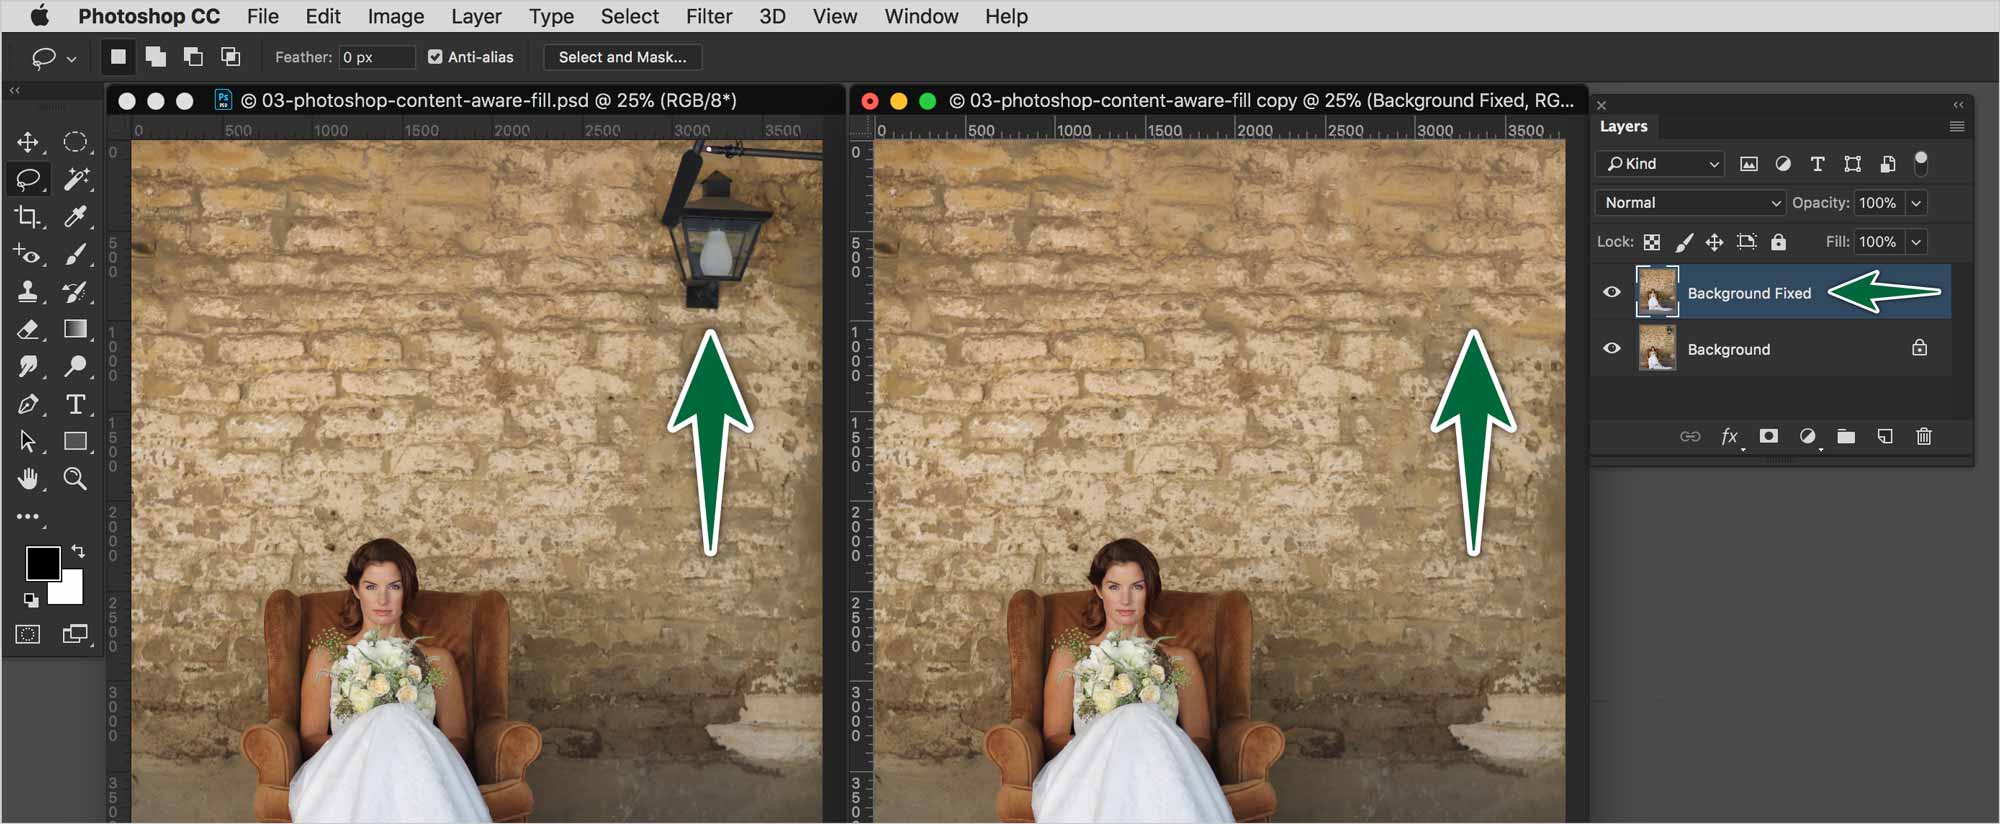
Content Aware Tools
The Content Aware Tools in Photoshop are truly magical. They make a really good guess at how you want to fill in shapes. All you do is lasso the unwanted area, then Edit > Fill > Content Aware Fill. Presto!
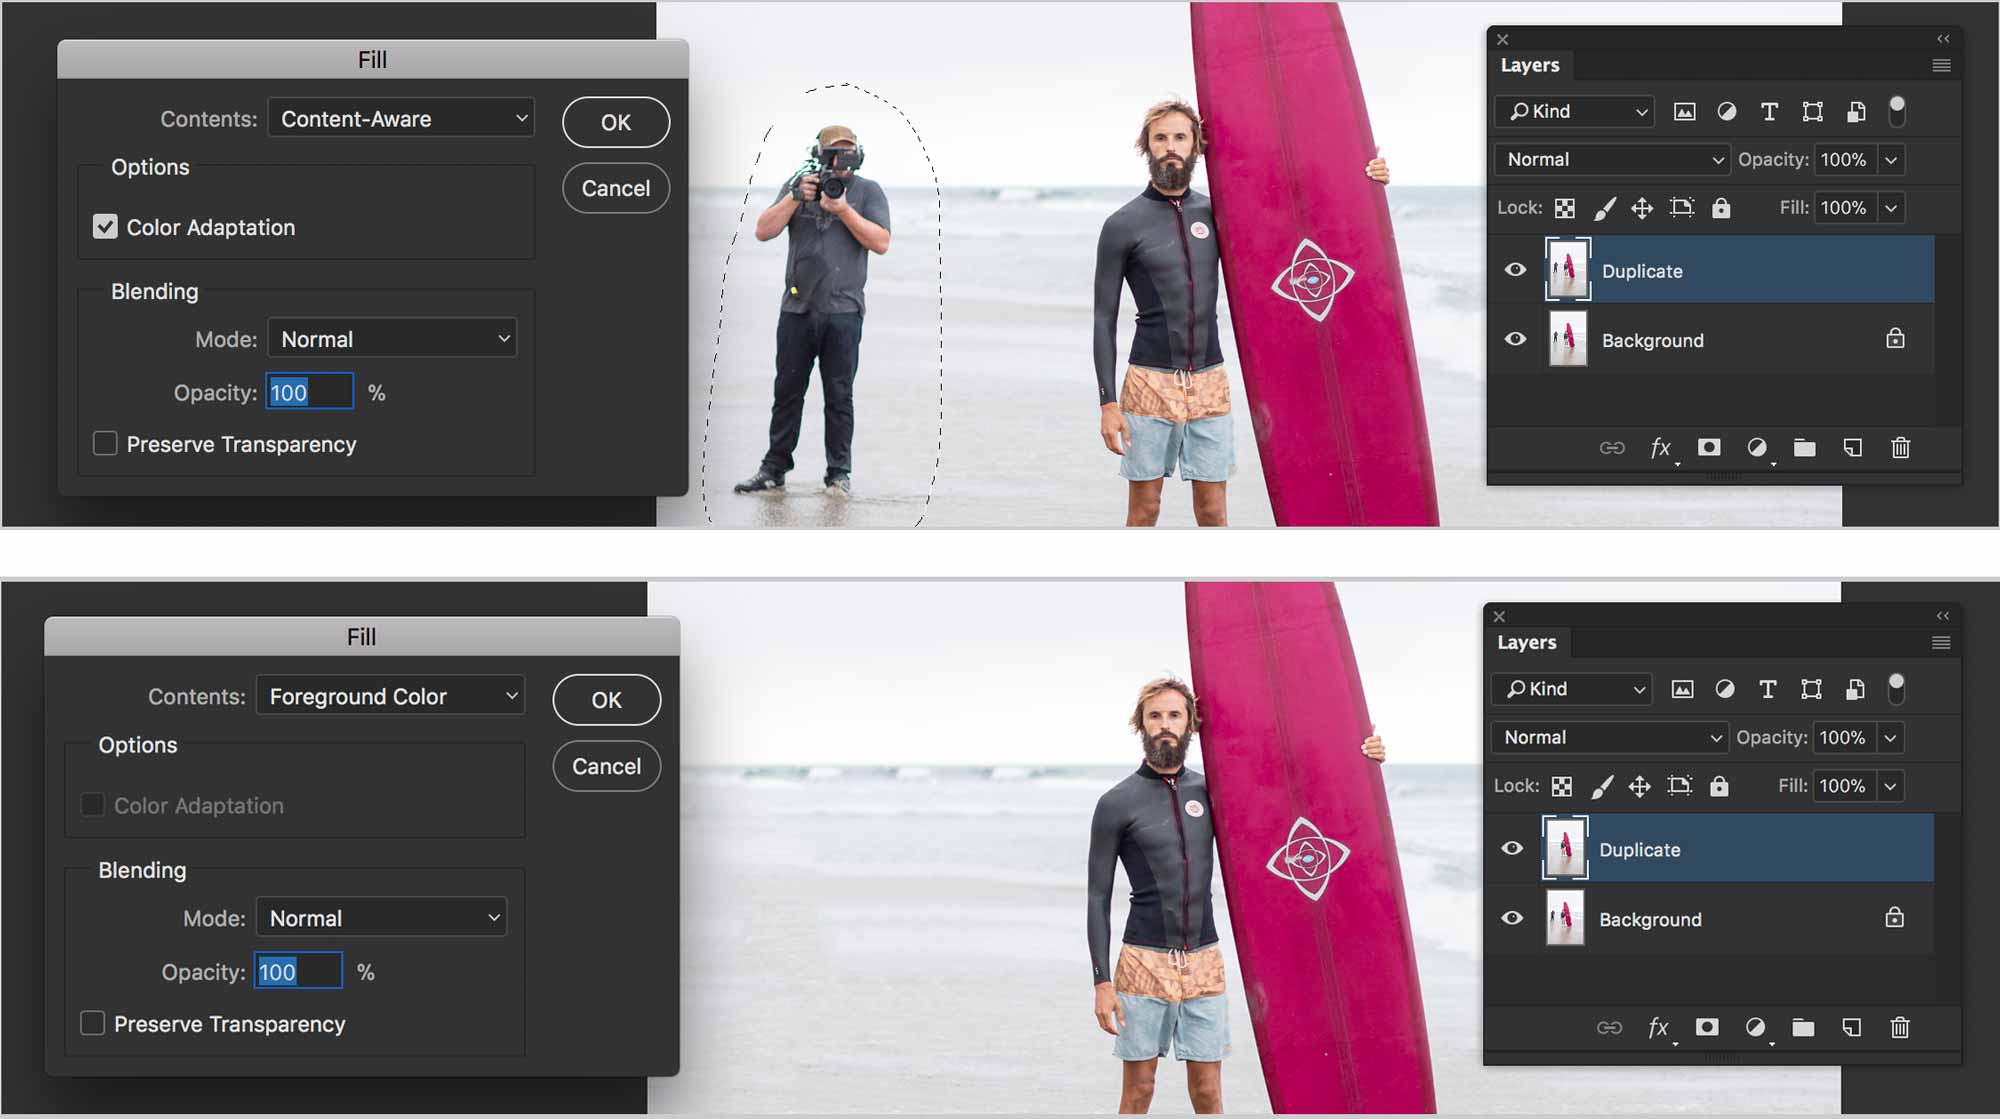
Go ahead and try. Lasso the lamp, then go Edit > Fill > Content Aware… When the surfaces differ a lot, it’s better to do it in multiple steps.
Generative Fill
The latest addition to Photoshop is the AI-driven Generative Fill tool. This allows you to not only create entirely new things from a prompt, but you can leave the prompt completely blank for the most powerful removal tool yet.
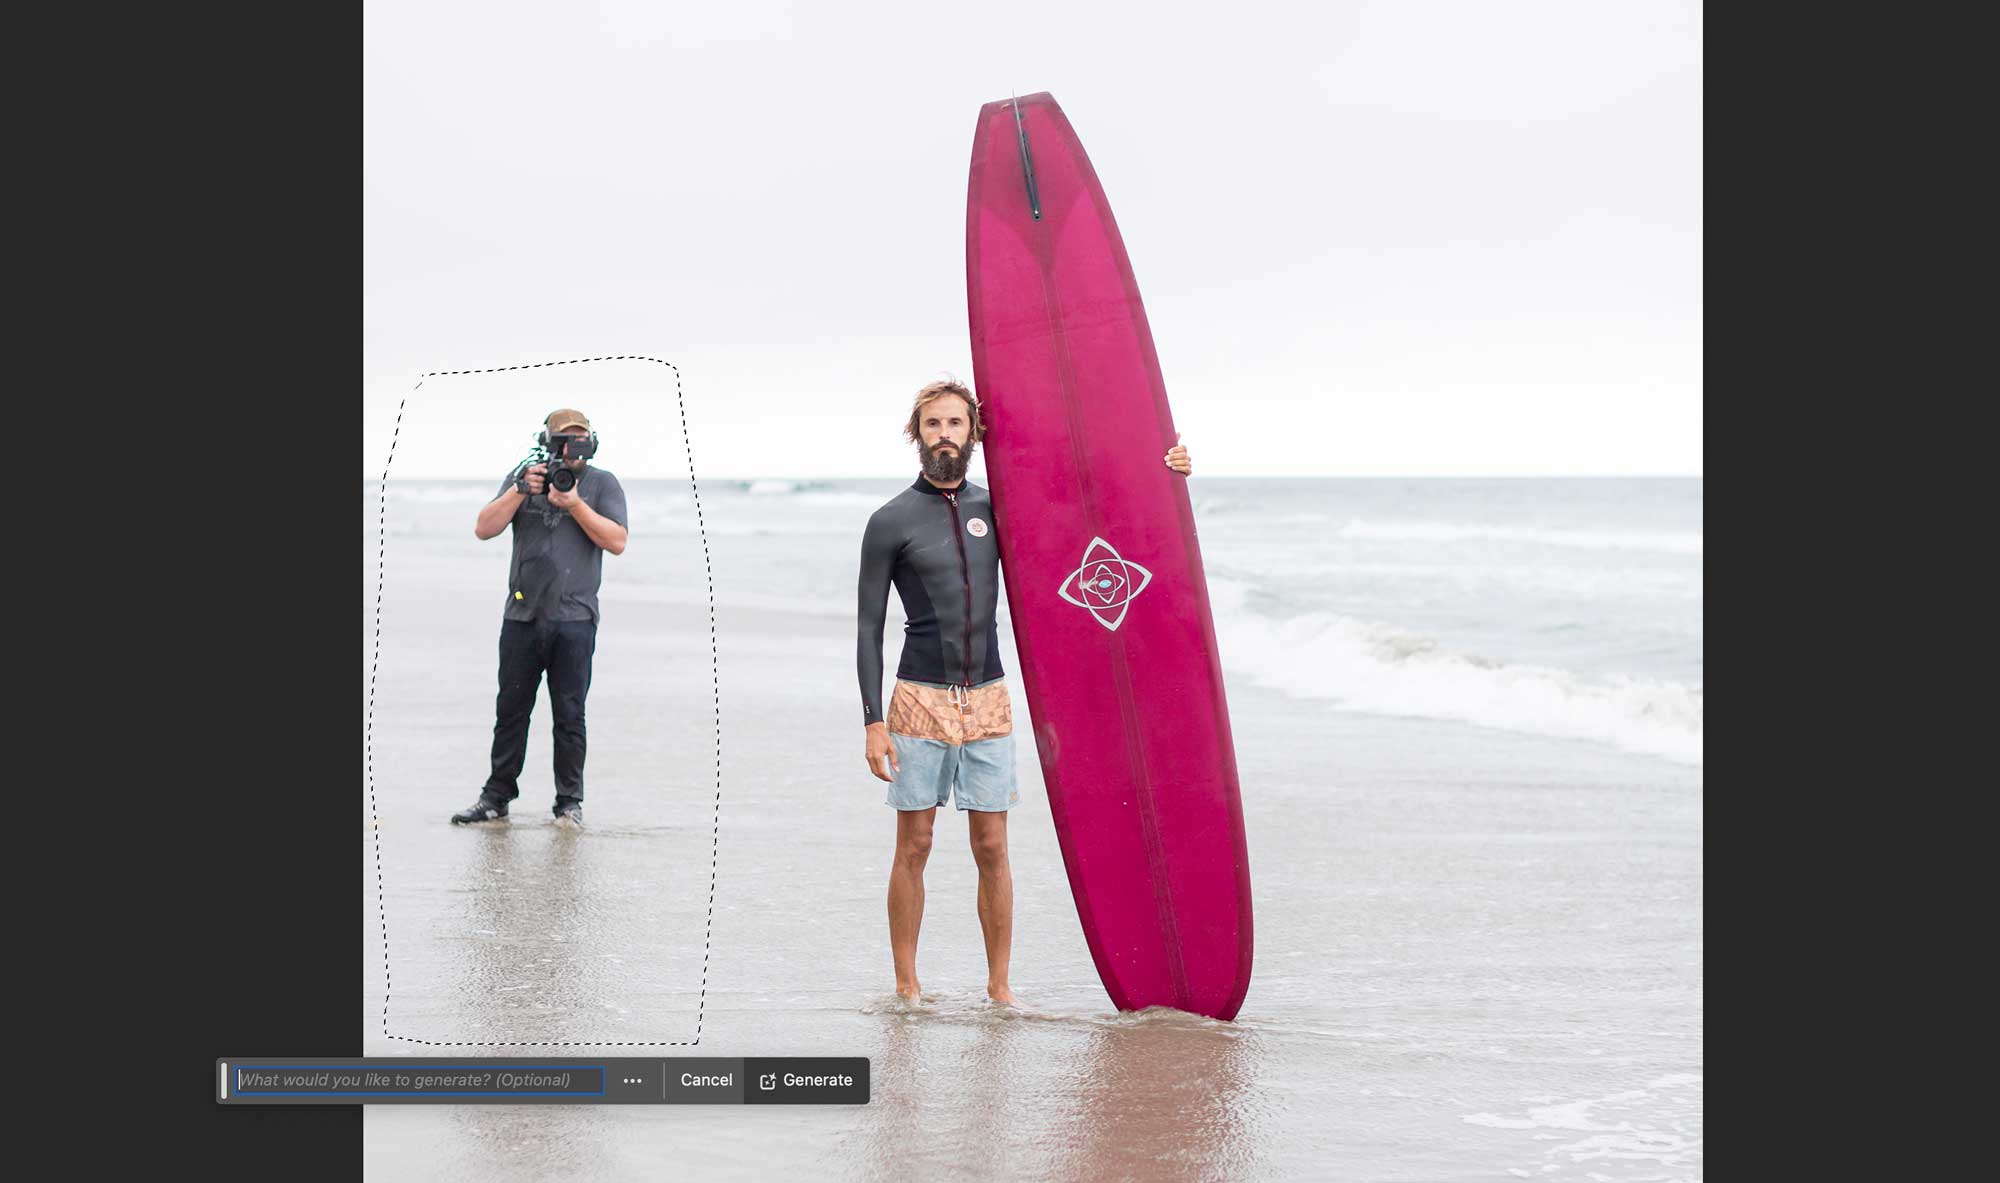
Simply make a lasso selection (Shortcut key L) around the object or person you want to remove. Make a selection around shadows and reflections with a generous buffer zone. Give photoshop enough pixels around it to make a seamless transition.
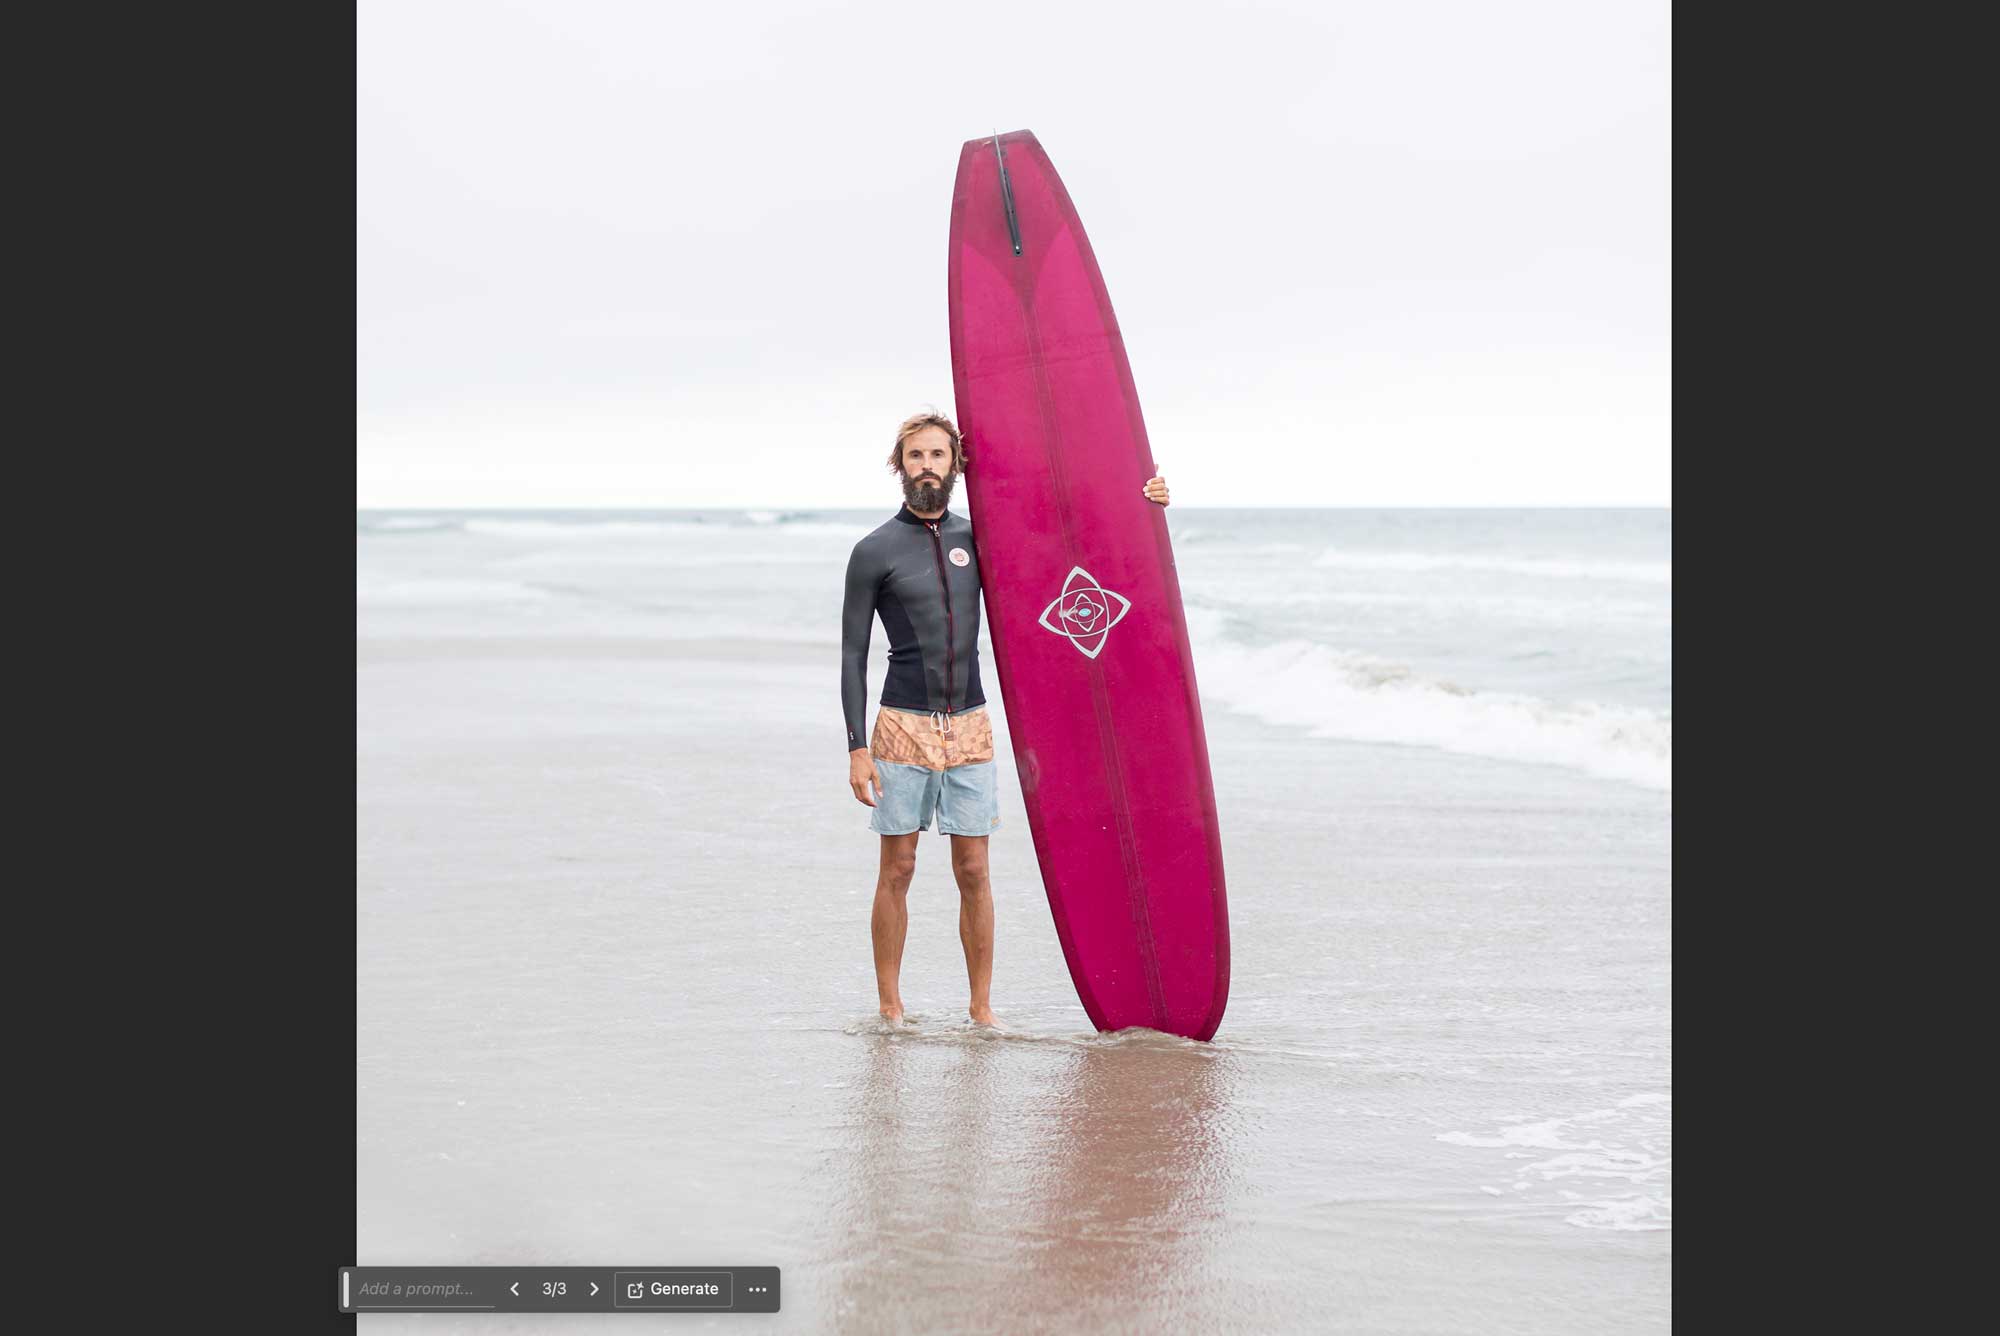
In the Contextual Task Bar (Window > Contextual Task Bar) click “Generative Fill”. Leave the prompt blank and click “Generate”. Photoshop’s AI will create a new patch that should flawlessly remove the subject in seconds. This works great 90% of the time. You get three variations to choose from in the Properties panel, or click generate to create three more.
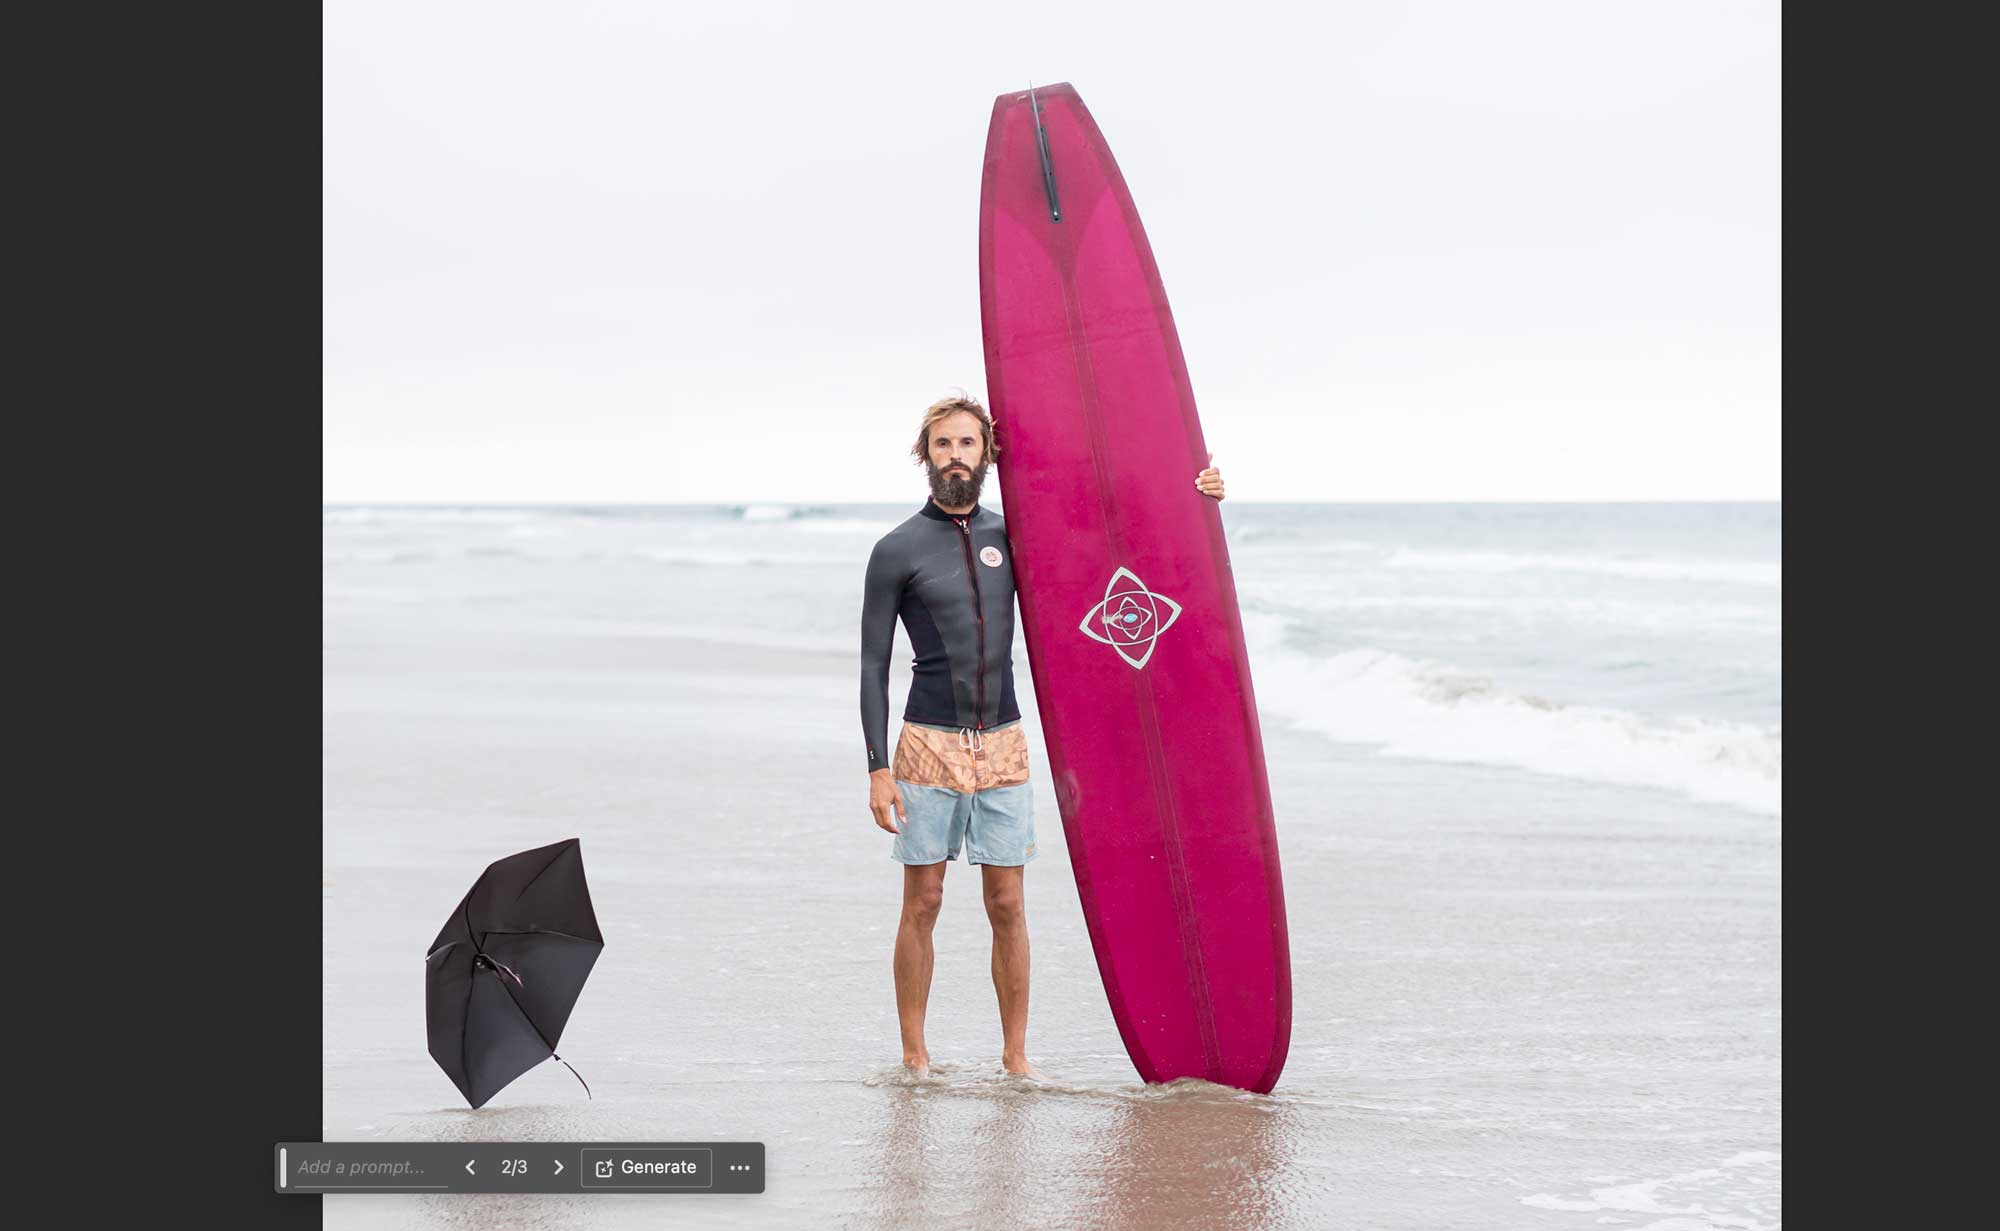
The other 10% of the time, you will get wacky variations and creepy half-formed models. Simply delete the generated layer and try again.
Formative Activity
Fix blemishes on the provided photo with any of the tools above, as needed. Feel free to use an adjustment layer. You’ll likely need them to colour her lips and maybe her eyes. You can run the skin smoothing technique. Gently.
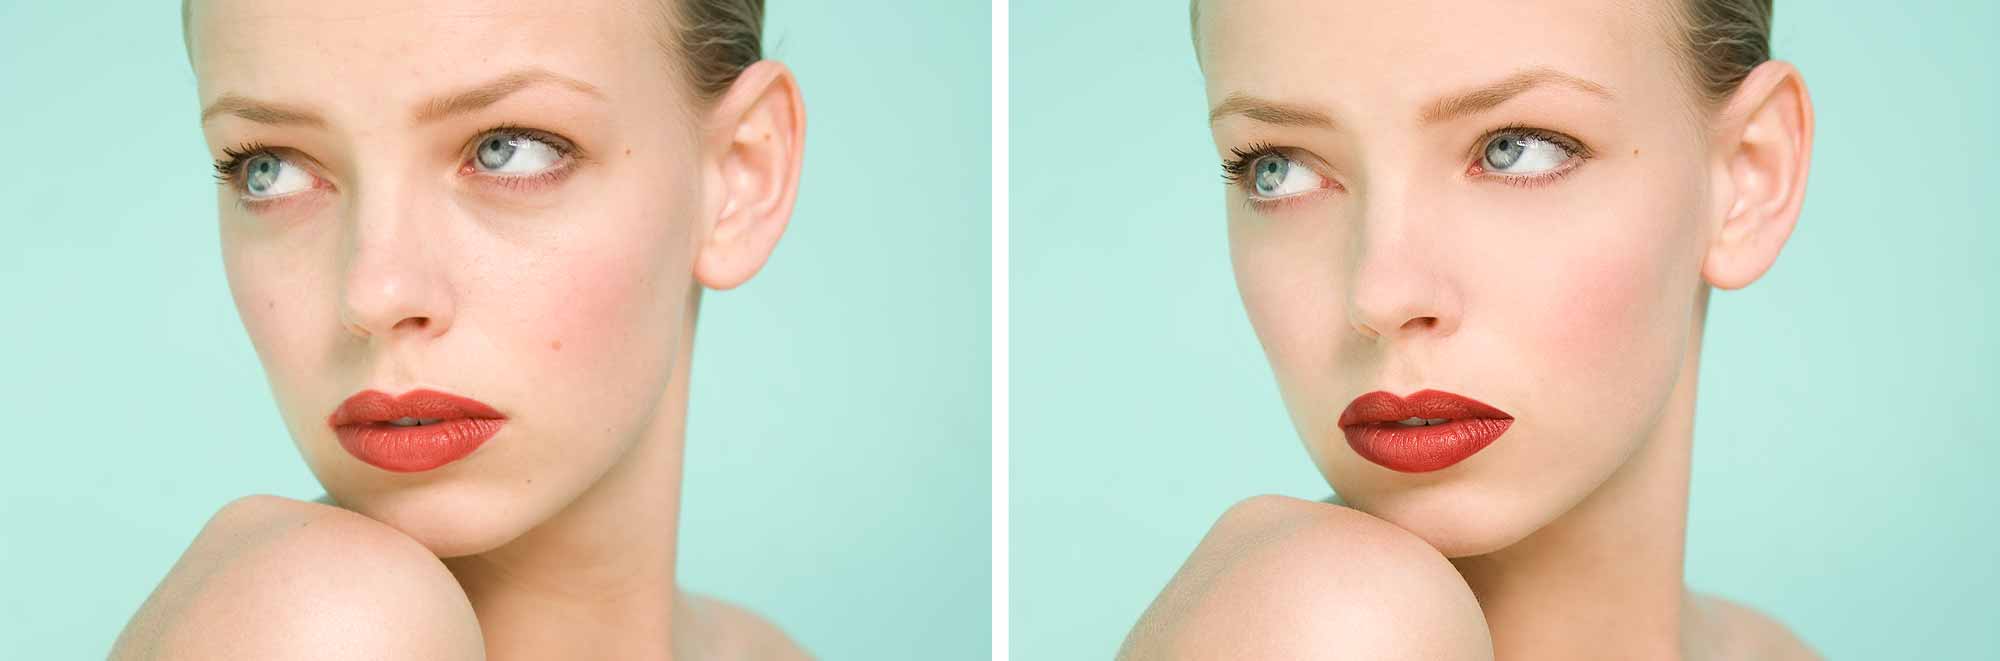
It’s very important that your work is non-destructive. The focus of this assignment is has two goals:
- repair blemishes seamlessly.
- make repairs non-destructive – do not touch the original photo.
You can create layers as needed. I usually create a layer for each separate task. Remember to name all of your layers with a meaningful name.
Blemishes & Teeth Whitening
All you need to do in this photo is remove the blemishes, then whiten the man’s teeth using the technique we practiced in class. Make sure it doesn’t look over-done.
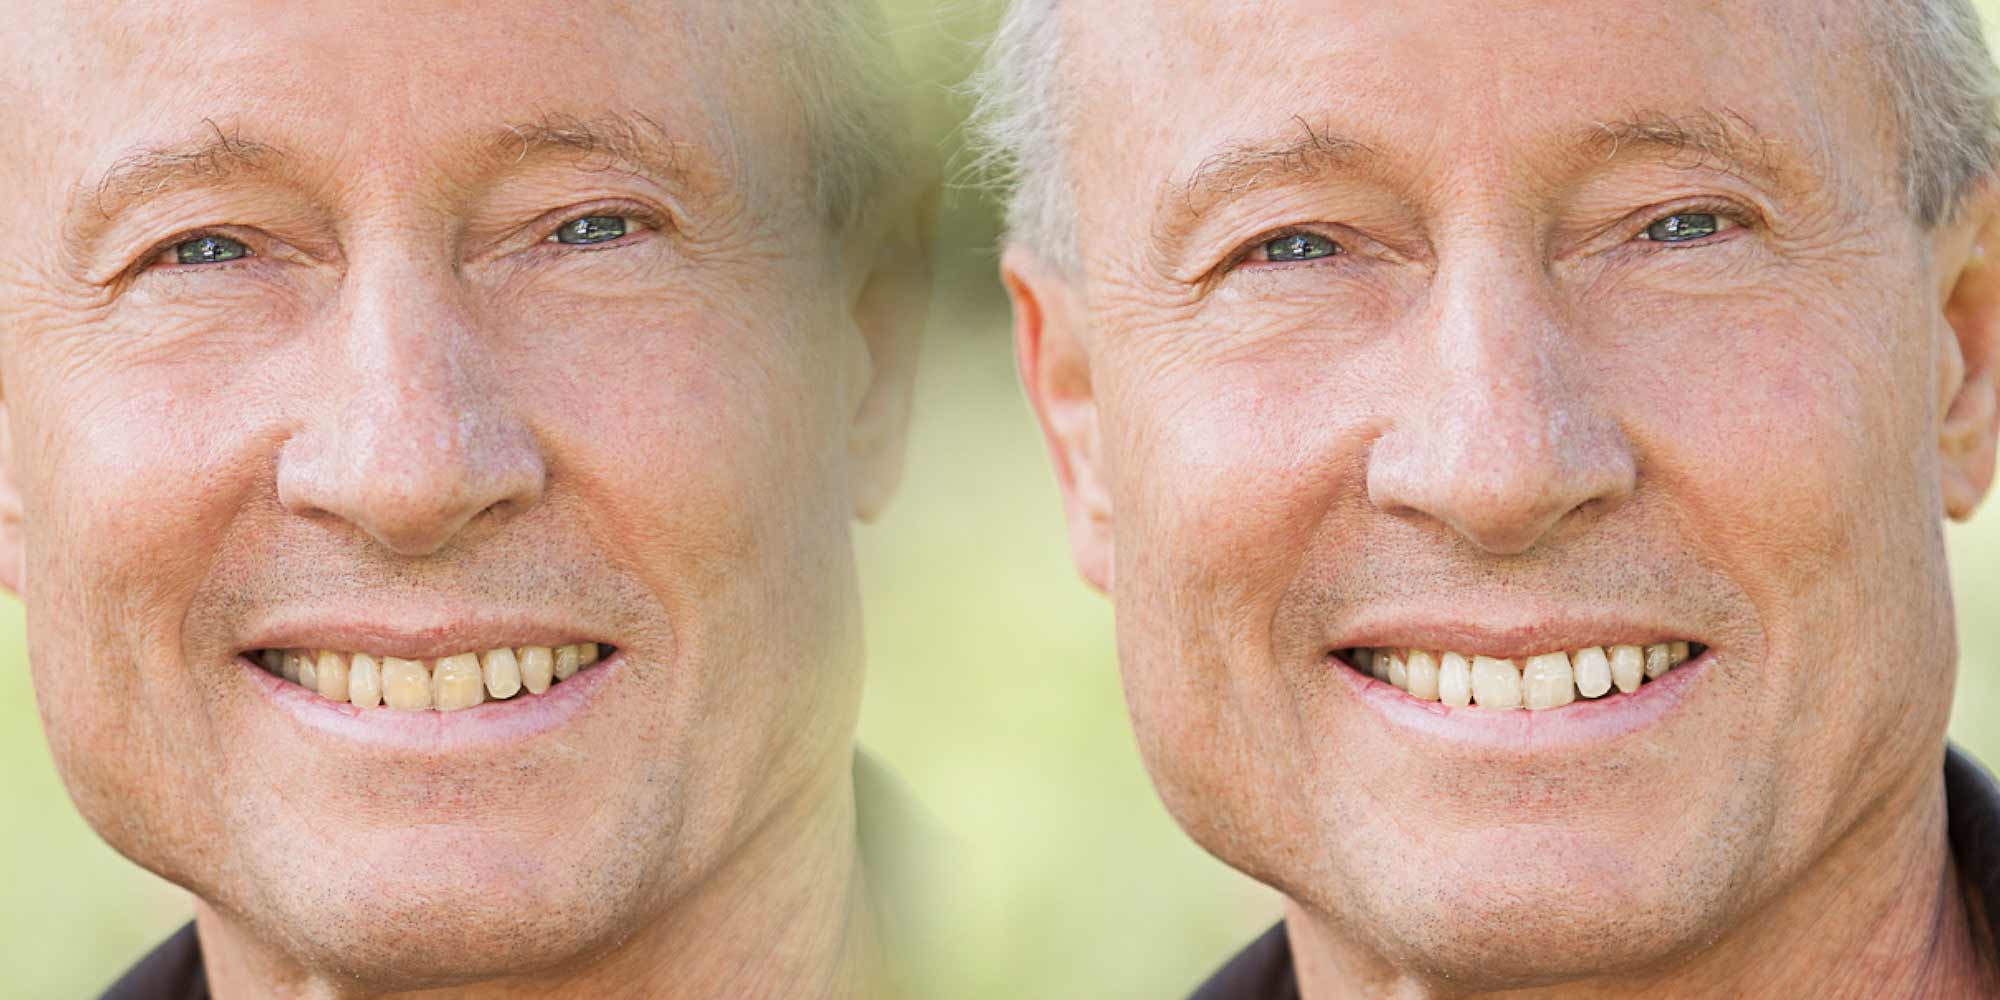
Do not use the skin smoothing on this photo.
Content Aware or Generative Fill
Use both Content Aware and Generative Fill to remove the microphone and light from the background. Keep all layers in your file so you can compare them.
Save, then close the document.
Supplemental Links
- Adobe: Retouch & Repair Photos
- Adobe: Content-Aware Patch and Move
