Topics
Basic Transforms
Before we apply transformations to a layer in Photoshop, we want to ensure our editing is non-destructive. To that end, convert your layer to a Smart Object by right-clicking on the canvas with the Marquee tool, then choosing Convert to Smart Object. Now, however you transform your layer, you can edit the settings.
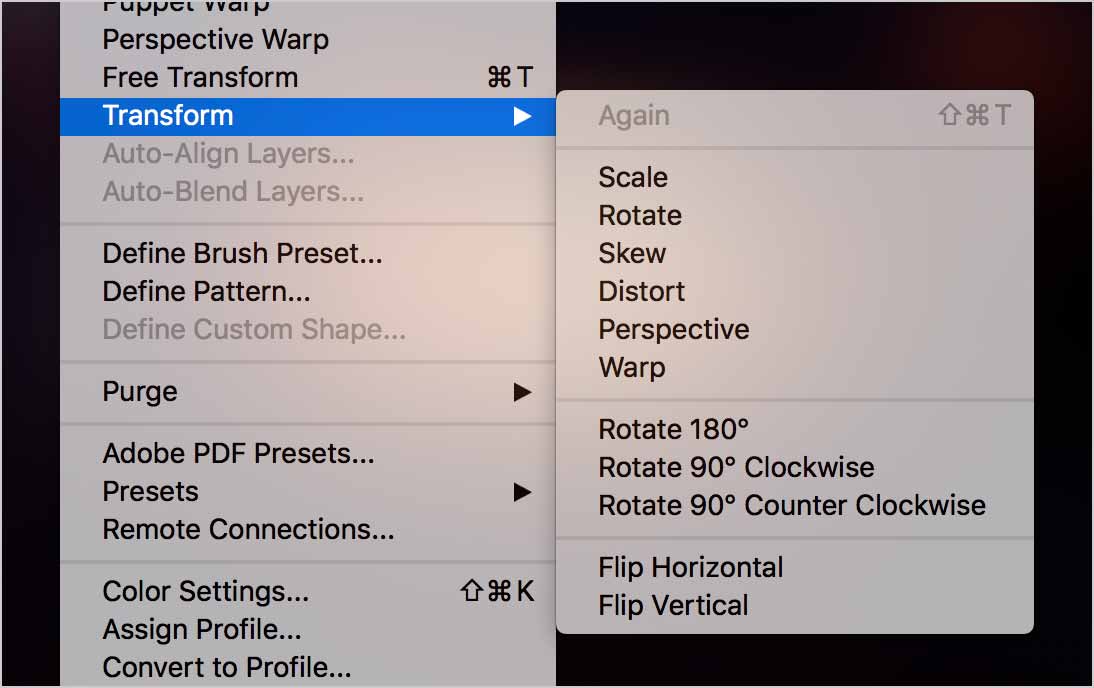
You can use the various tranform tools under Edit > Transform…. The first five types of transforms are similar. Warp is in a category of its own, so it gets a different Control bar. For the most part, the transforms keep the edges of your image straight. The Warp transformations curve the edges based on the selected envelope. Envelopes are different warp transformation shapes.
While you have an active transform bounding box, the Control bar along the top of the screen gives you transformation options.
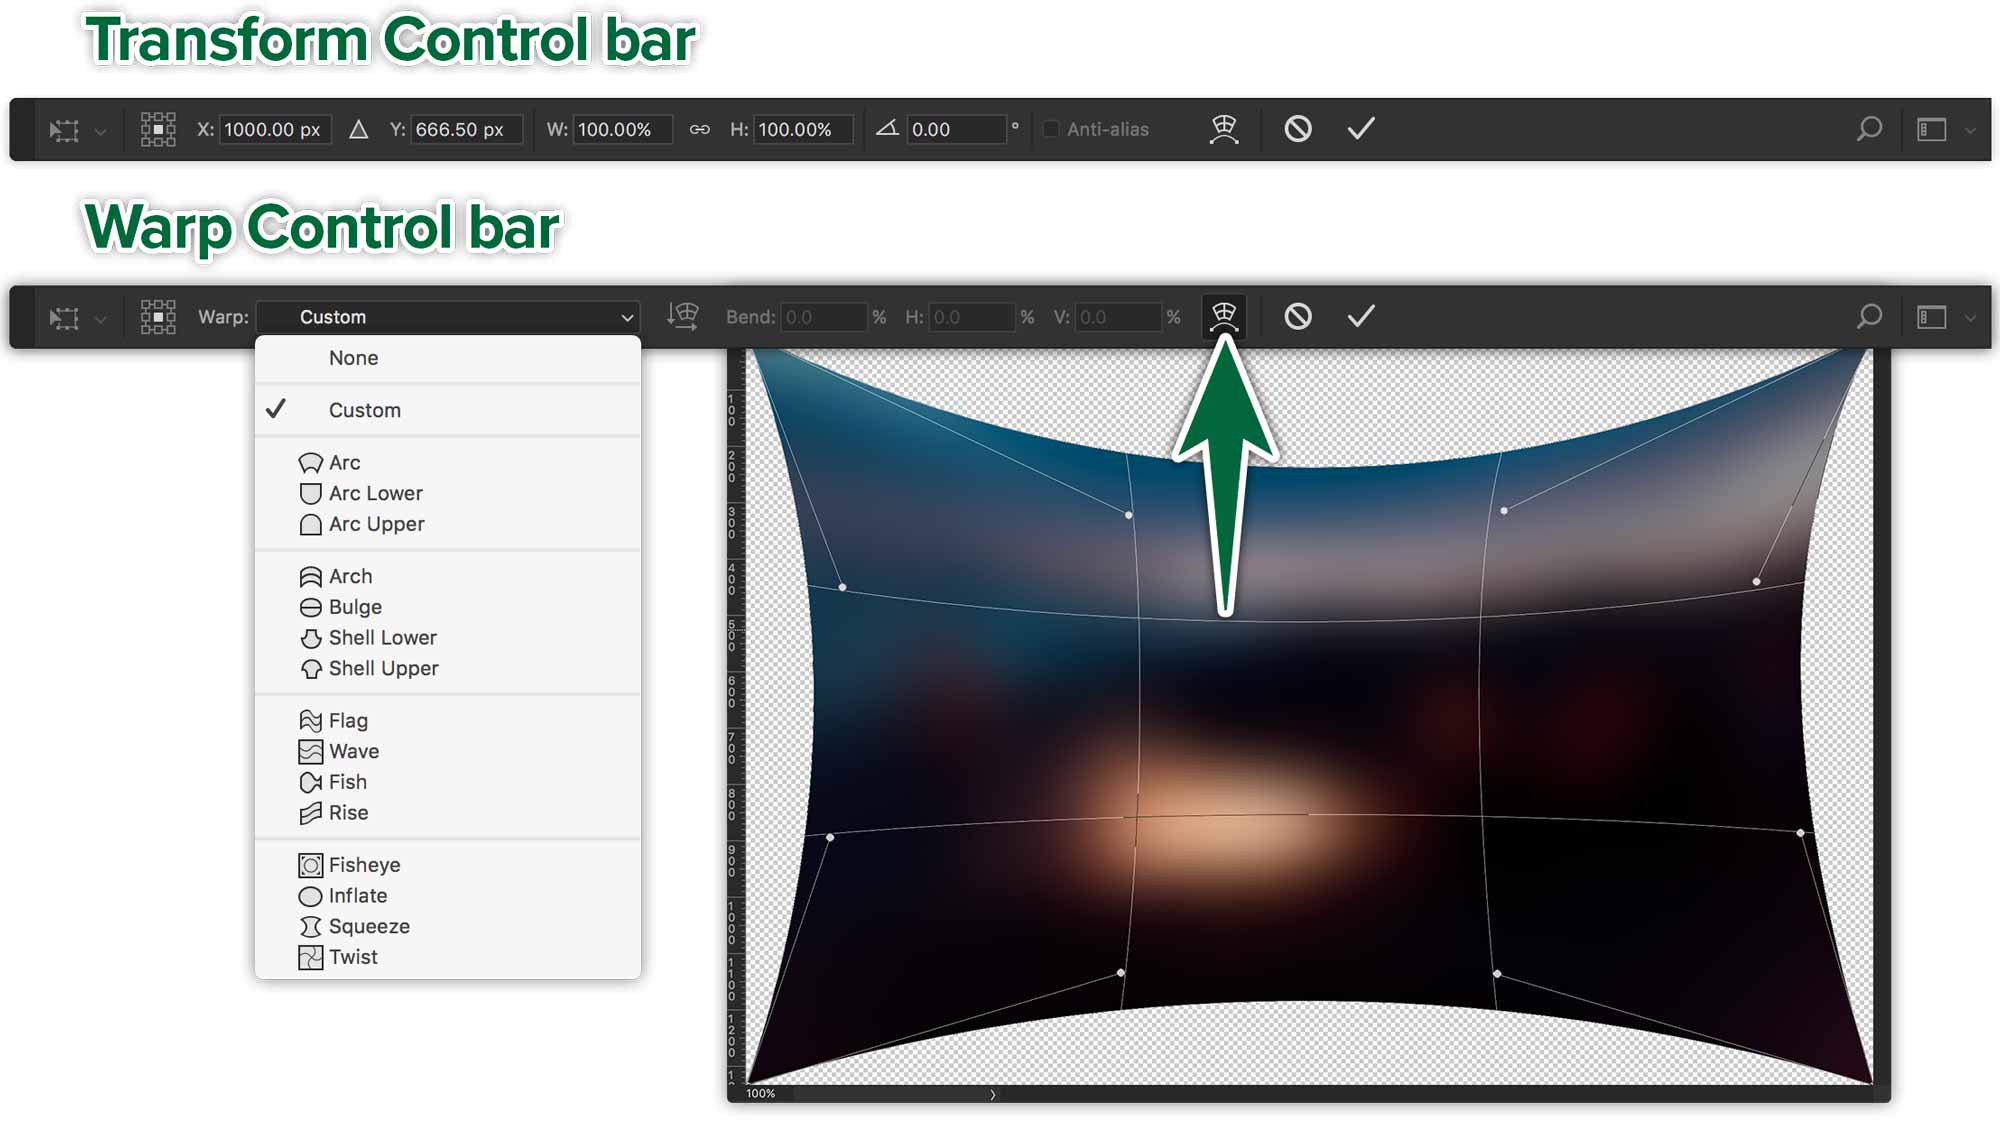
The button indicated above switches the transform bounding box between Transform mode and Warp mode. You can switch between both modes with the button. You can also do multiple tranforms in one operation by switching modes and switching warp envelopes. Once you’re done, simply click the check box in the Control bar.
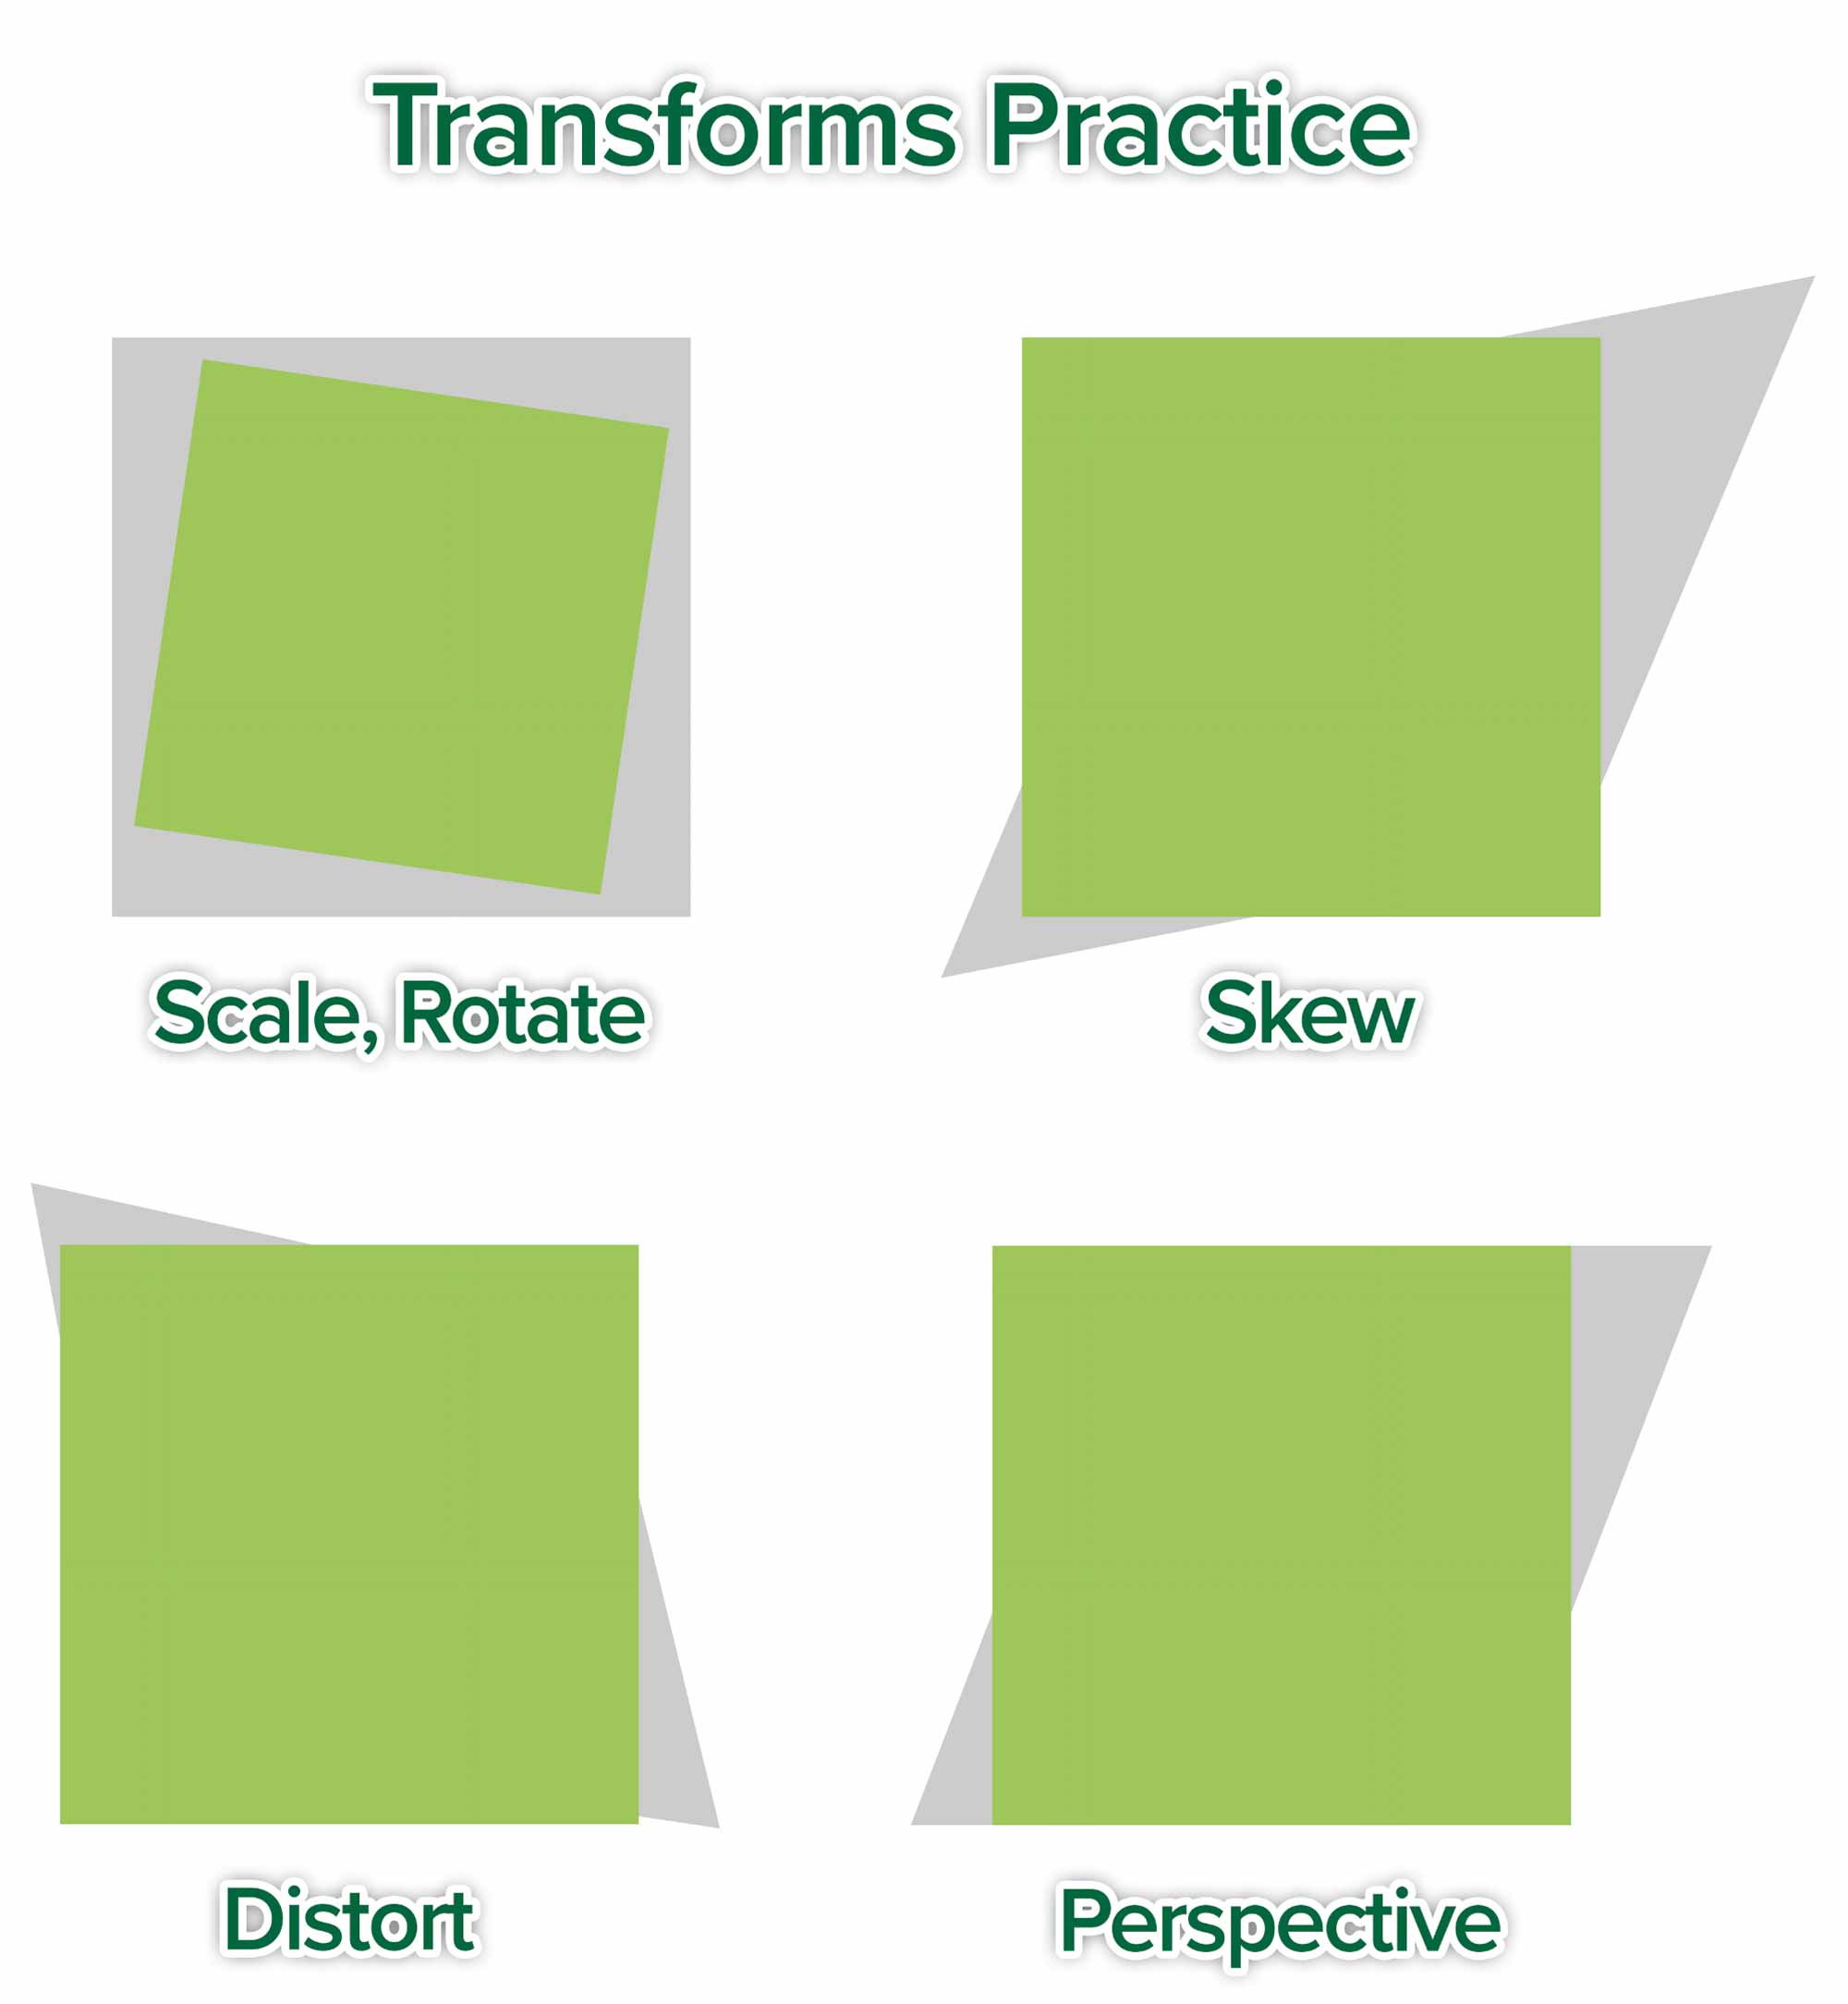
Let’s open the practice file to work with the various transform commands. We’ll perform transforms to have the green squares match the grey ones. Some key maneuvers include holding Shift and/or Option.
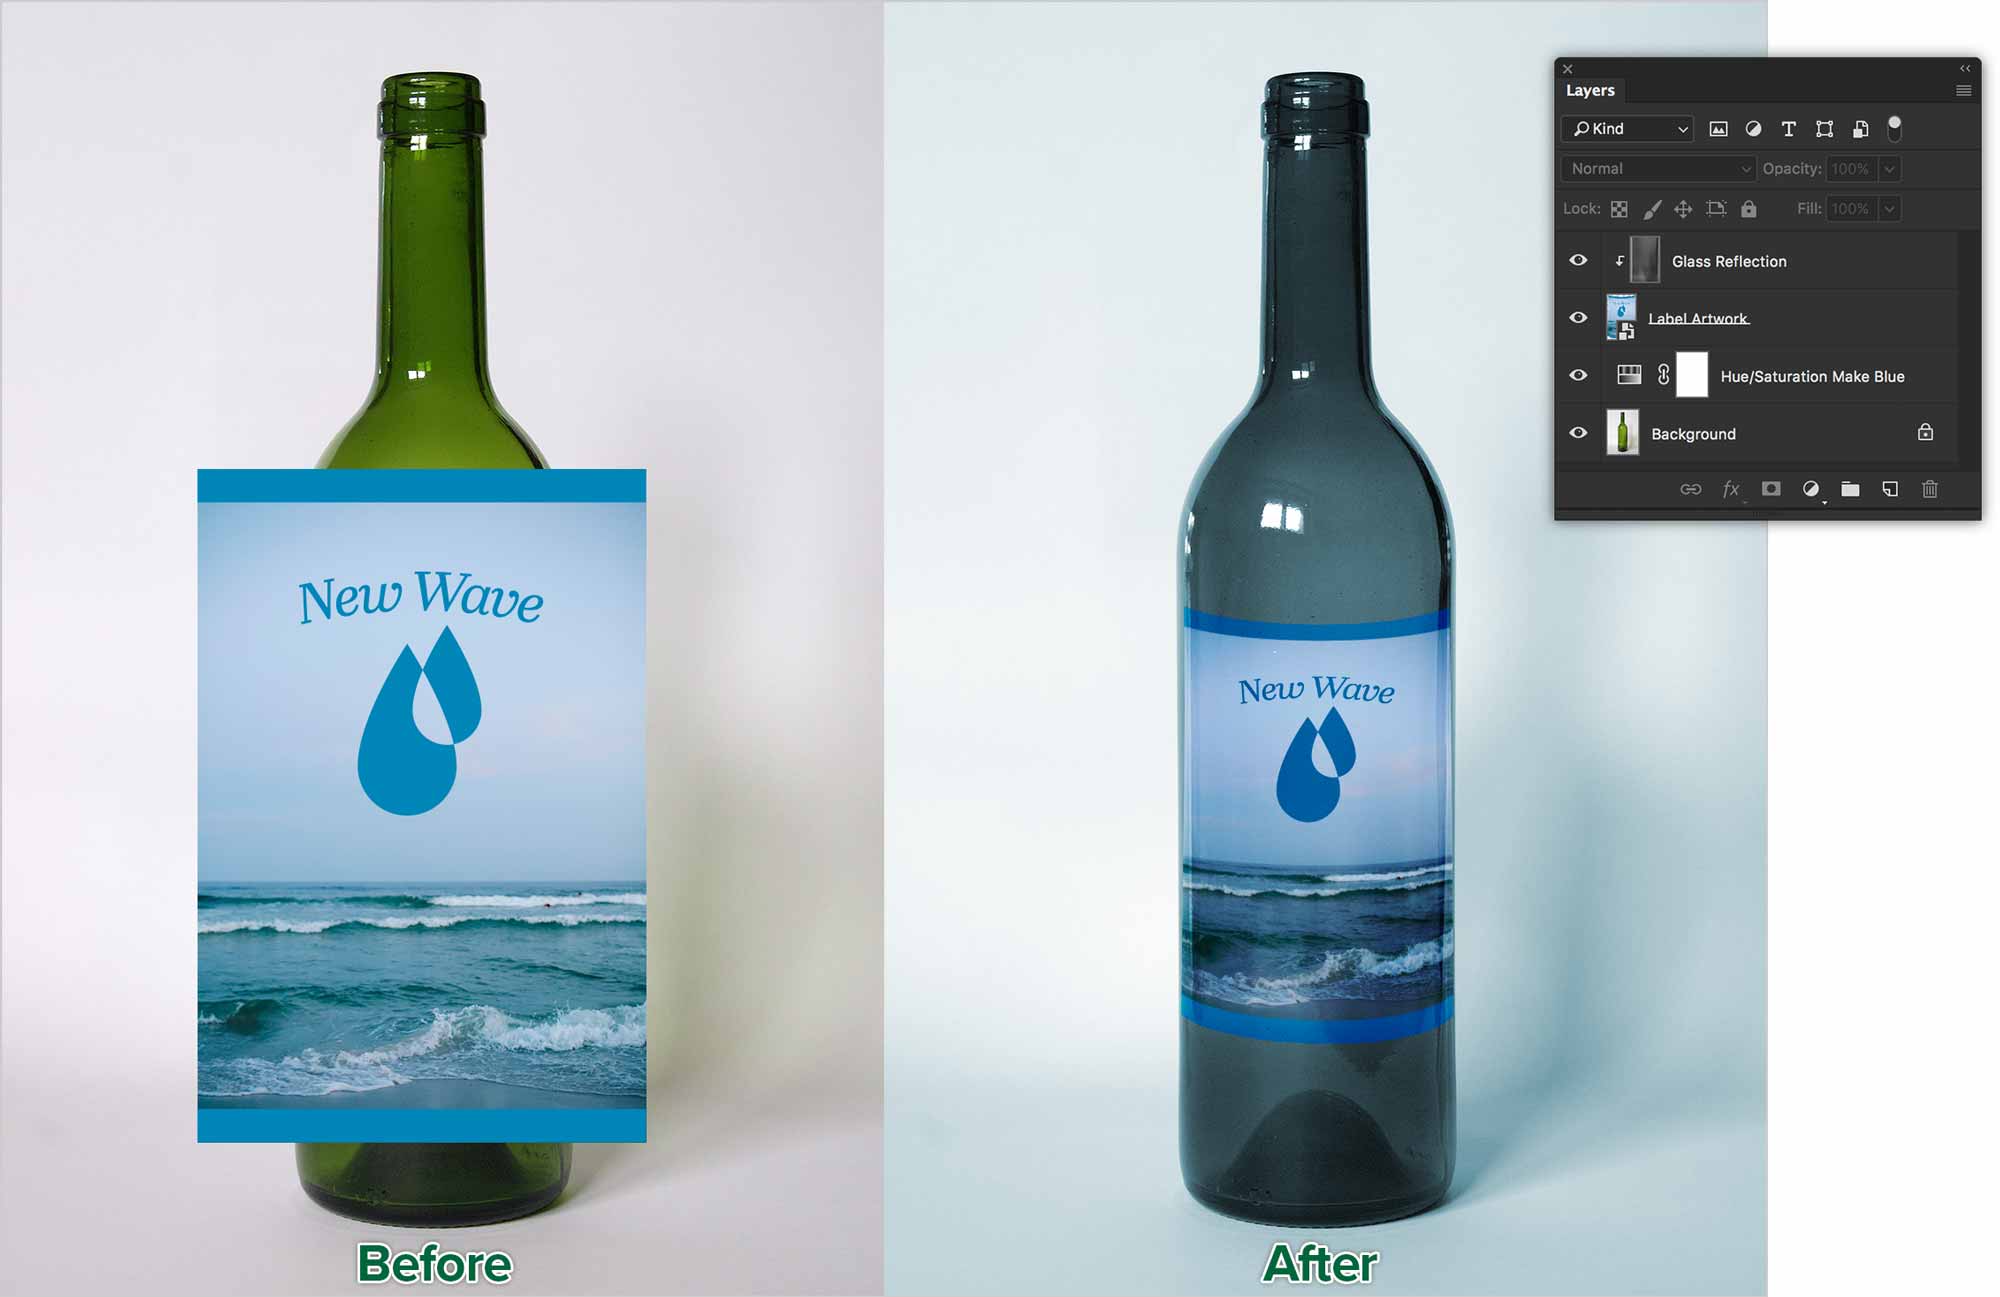
We’ll use the Warp transformation tool to fit the label to the bottle. This workflow will also include Blend Modes, Clipping Masks, Adjustment Layers and Smart Objects.
Vanishing Point
Vanishing point is a great way to introduce one image into another and match the perspective. We’ll place the image of the lizzard below on the wall of the building.

Open both photos. In the lizzard image, select all (⌘-A) and copy (⌘-C). In the building image, create a new empty layer. Now we’re ready to enter the filter. Go Filter > Vanishing Point….
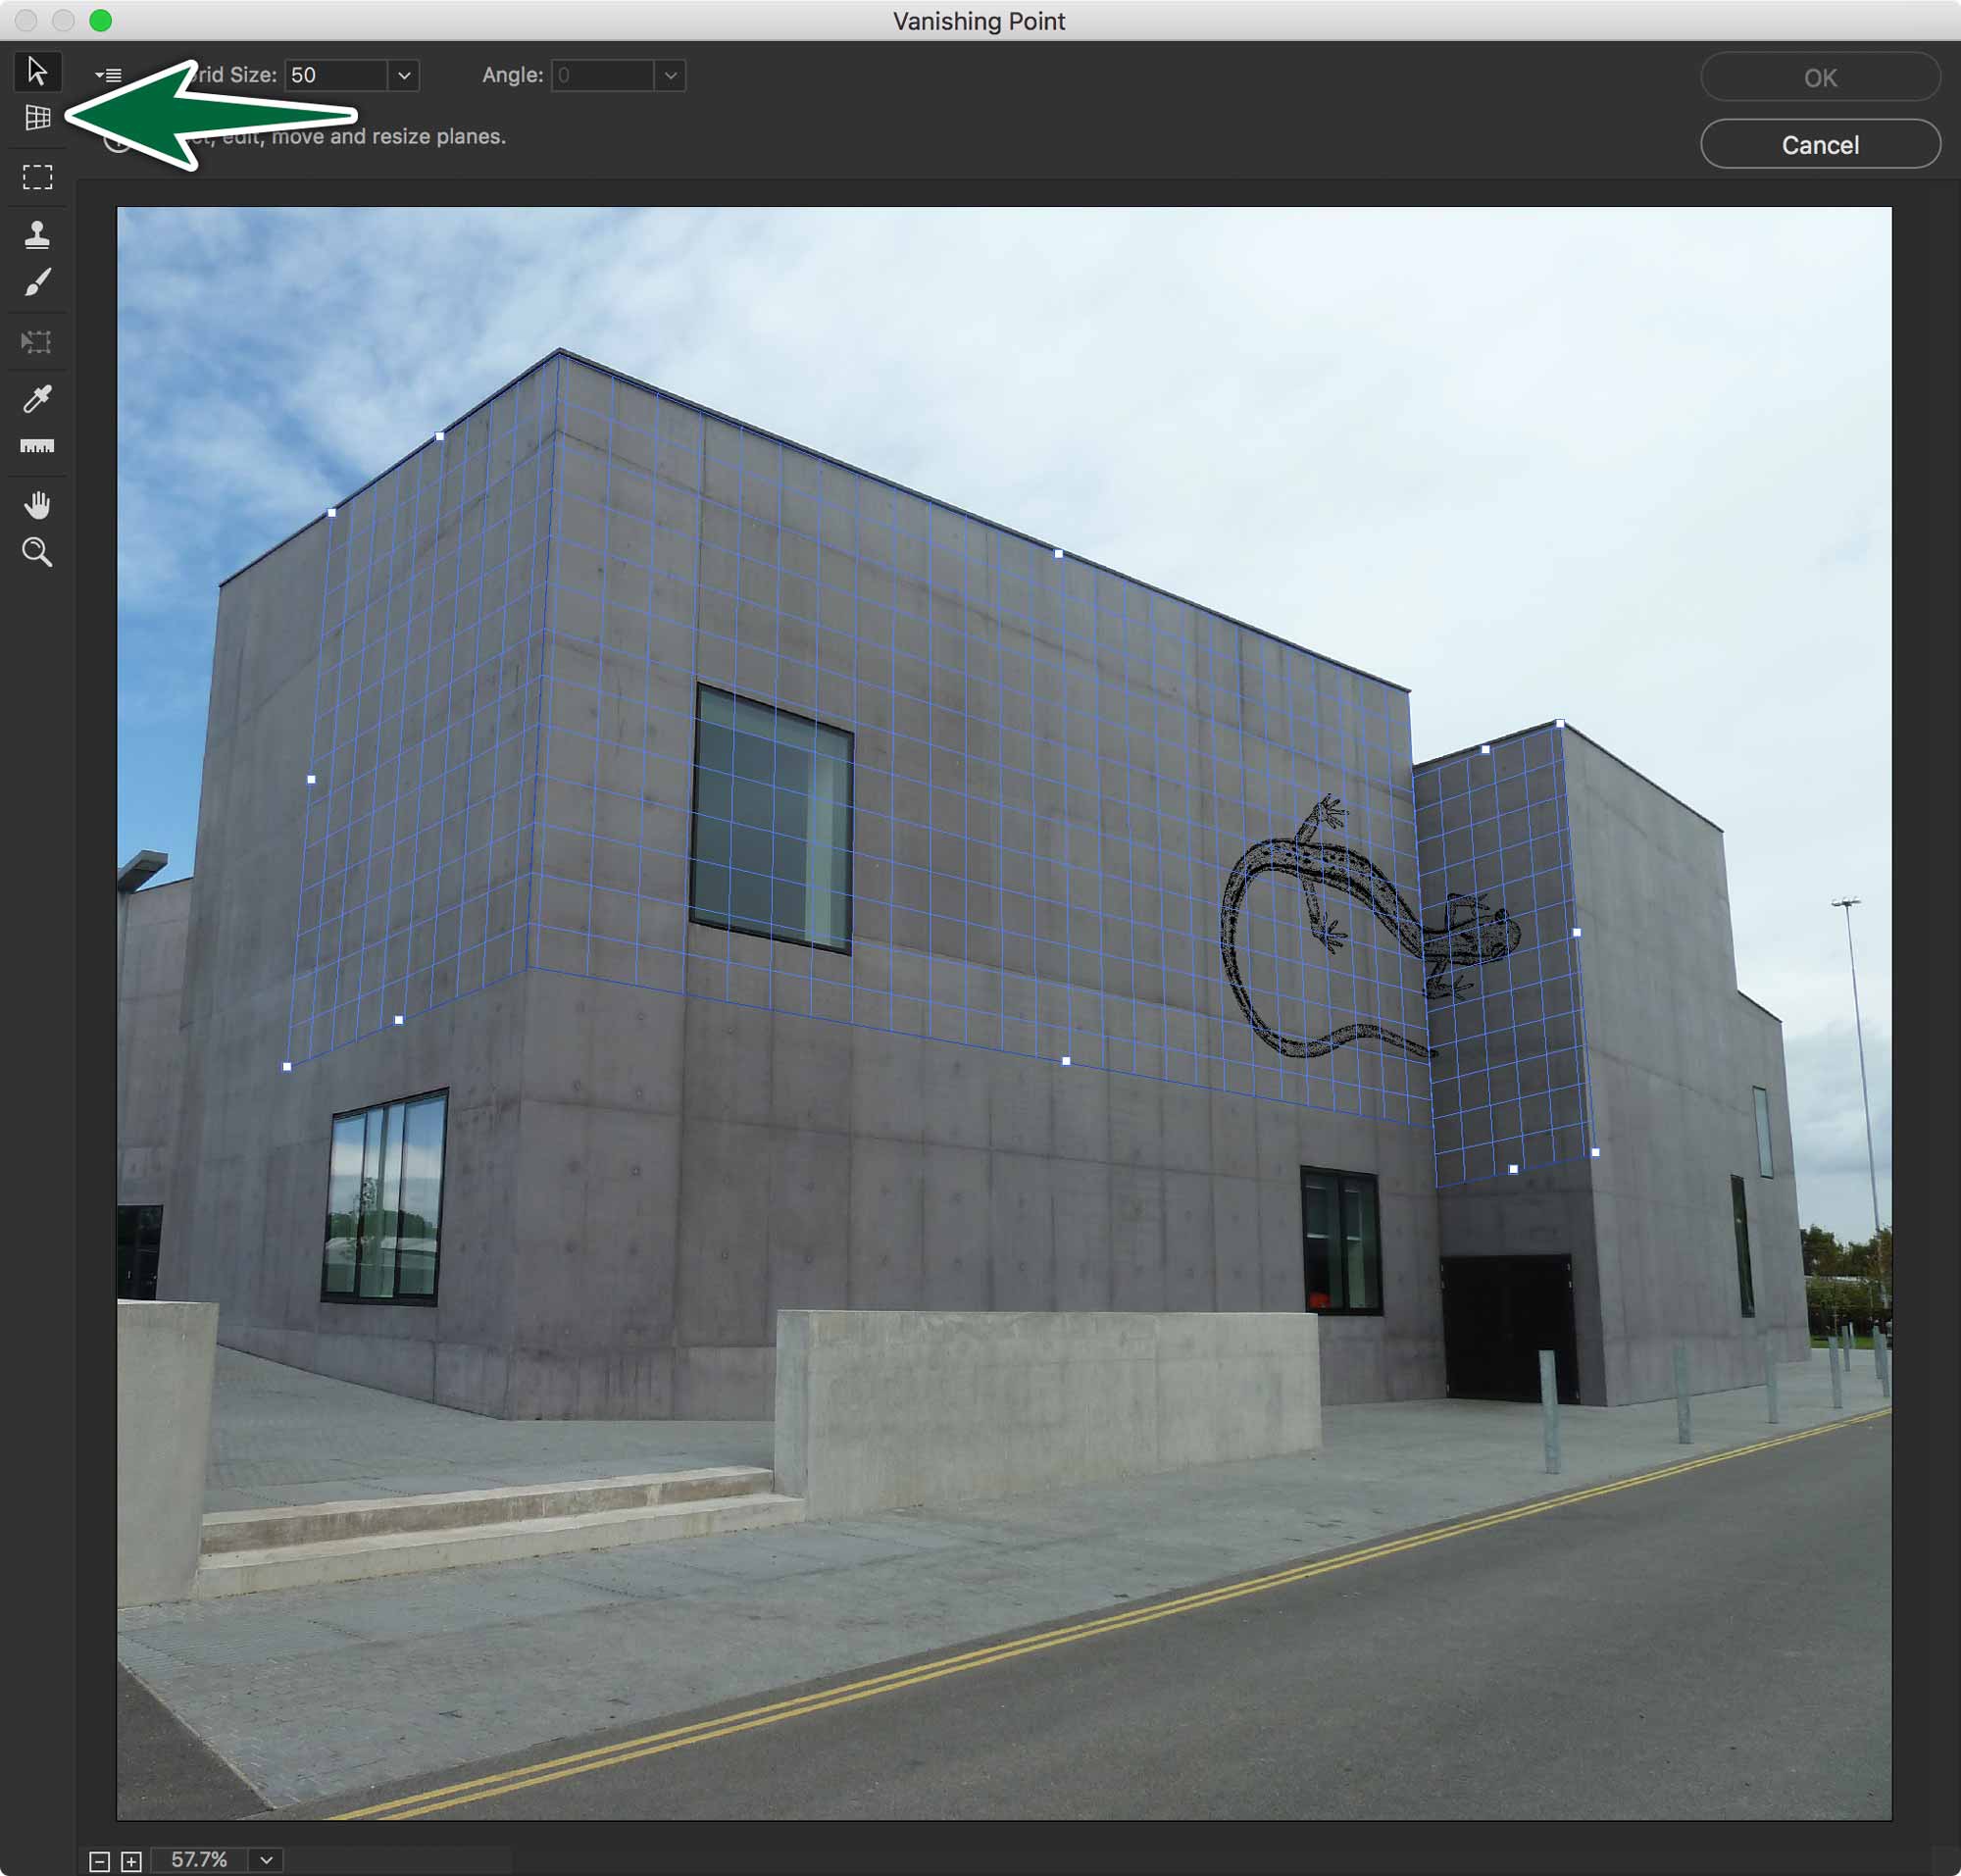
Use the Create Plane tool to draw planes on each surface of the building. The plane grids which are red don’t line up with the vanishing points. Make sure yours are blue.
You can change surfaces by ⌘-dragging the Create Plane tool. Once you have your planes in place, simply paste the lizzard into the dialogue. You can scale and move it with the Transform tool. Once the lizzard looks right, click OK.
The final step is to change the blend mode of the Lizzard layer to Multiply. If you want to place another lizzard, it’s best to repeat the whole process on a new layer.
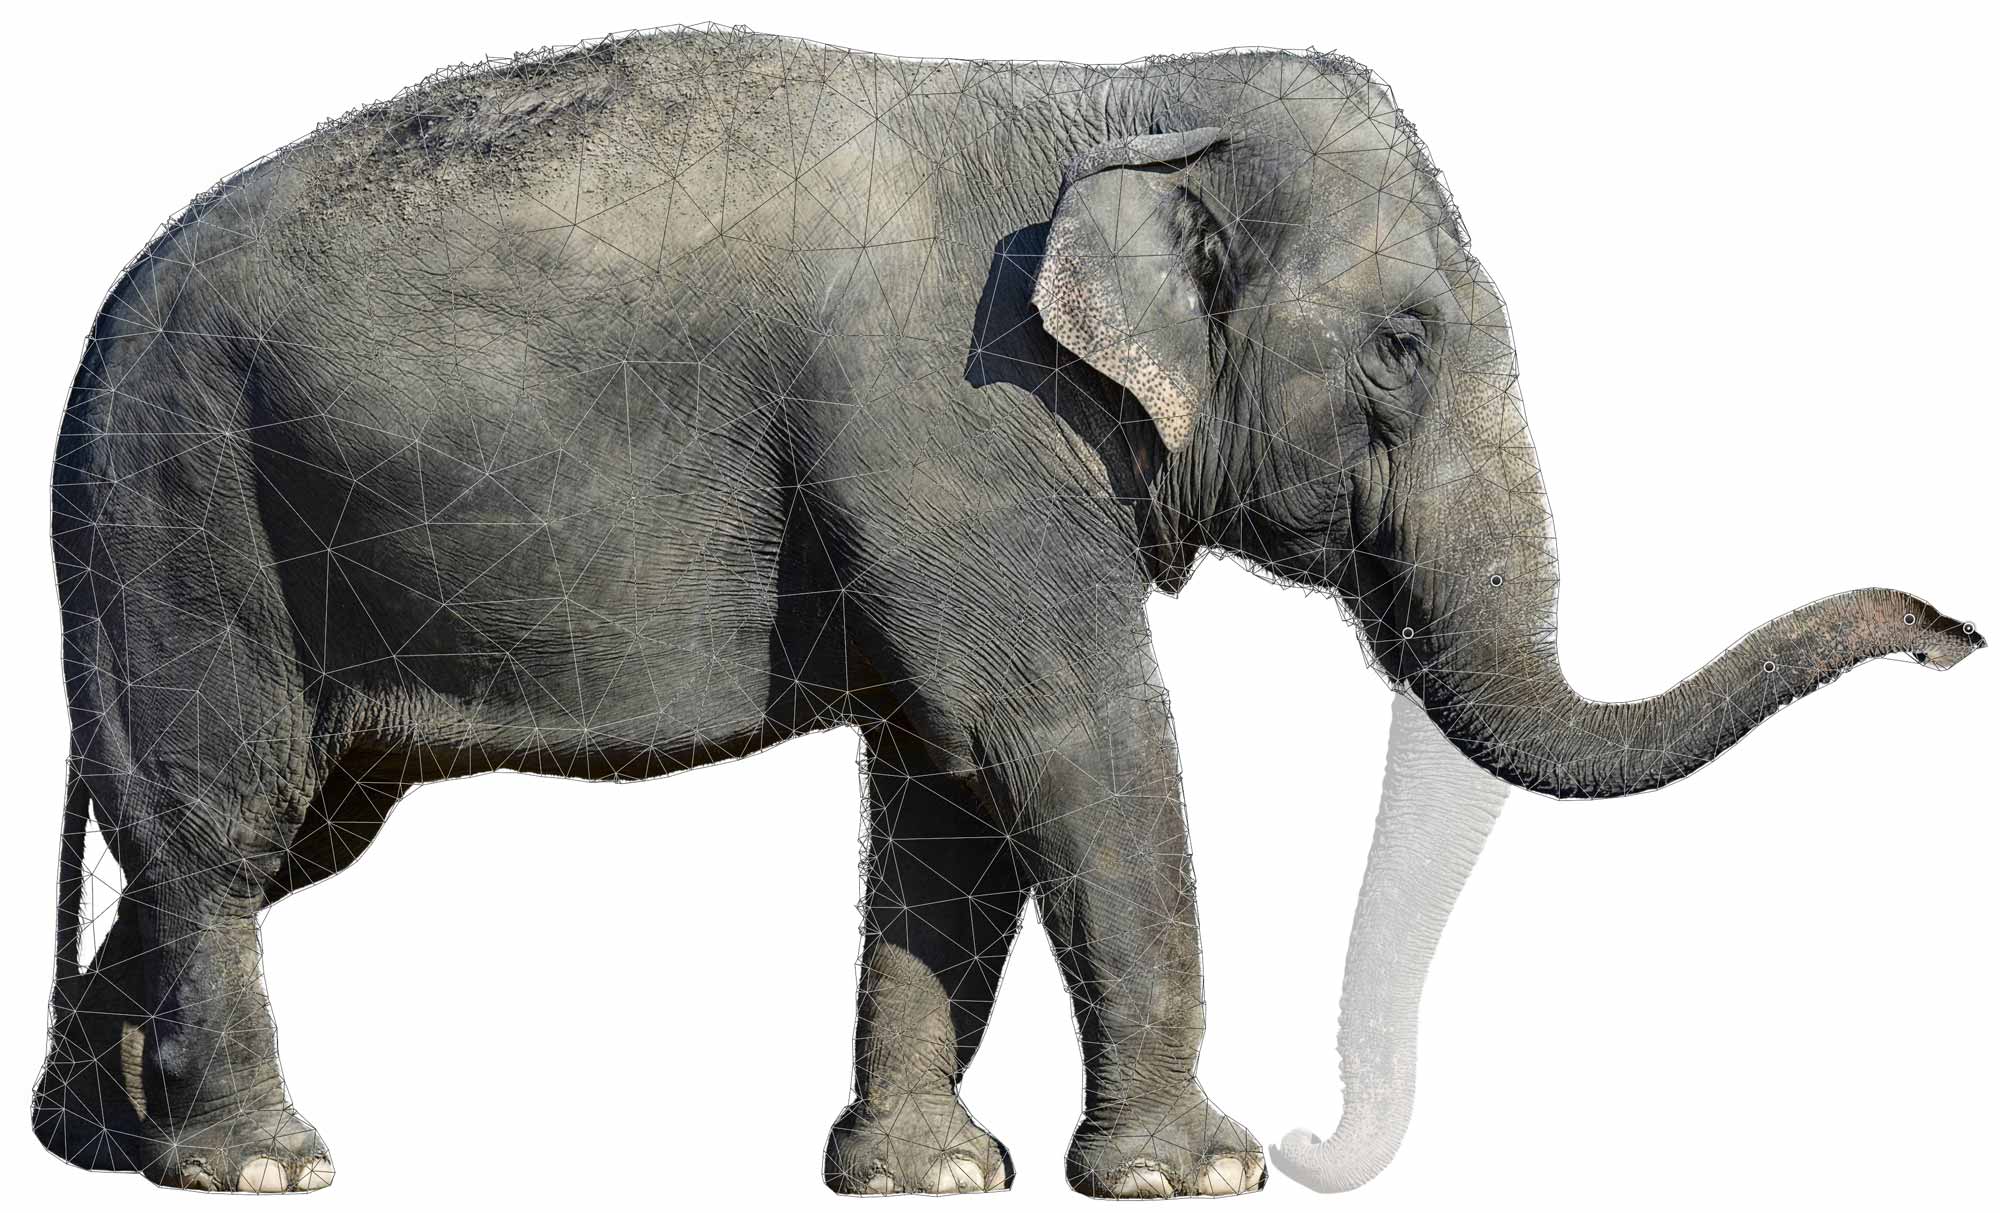
Puppet Warp
Puppet Warp bends shapes naturally. The function is available under Edit > Puppet Warp. It’s best to isolate the object on its own layer.
It’s very useful for shaping humans as an alternative to the Liquify command. You can can pull in bulges, create a smile or move a limb into position.
As always, before we use the Puppet Warp tool we want to convert our layer to a Smart Object to preserve editability.
Choose Edit > Puppet Warp… There are important settings in the Control bar. You can show/hide the mesh. You can also edit the density of the mesh to increase or decrease control points.
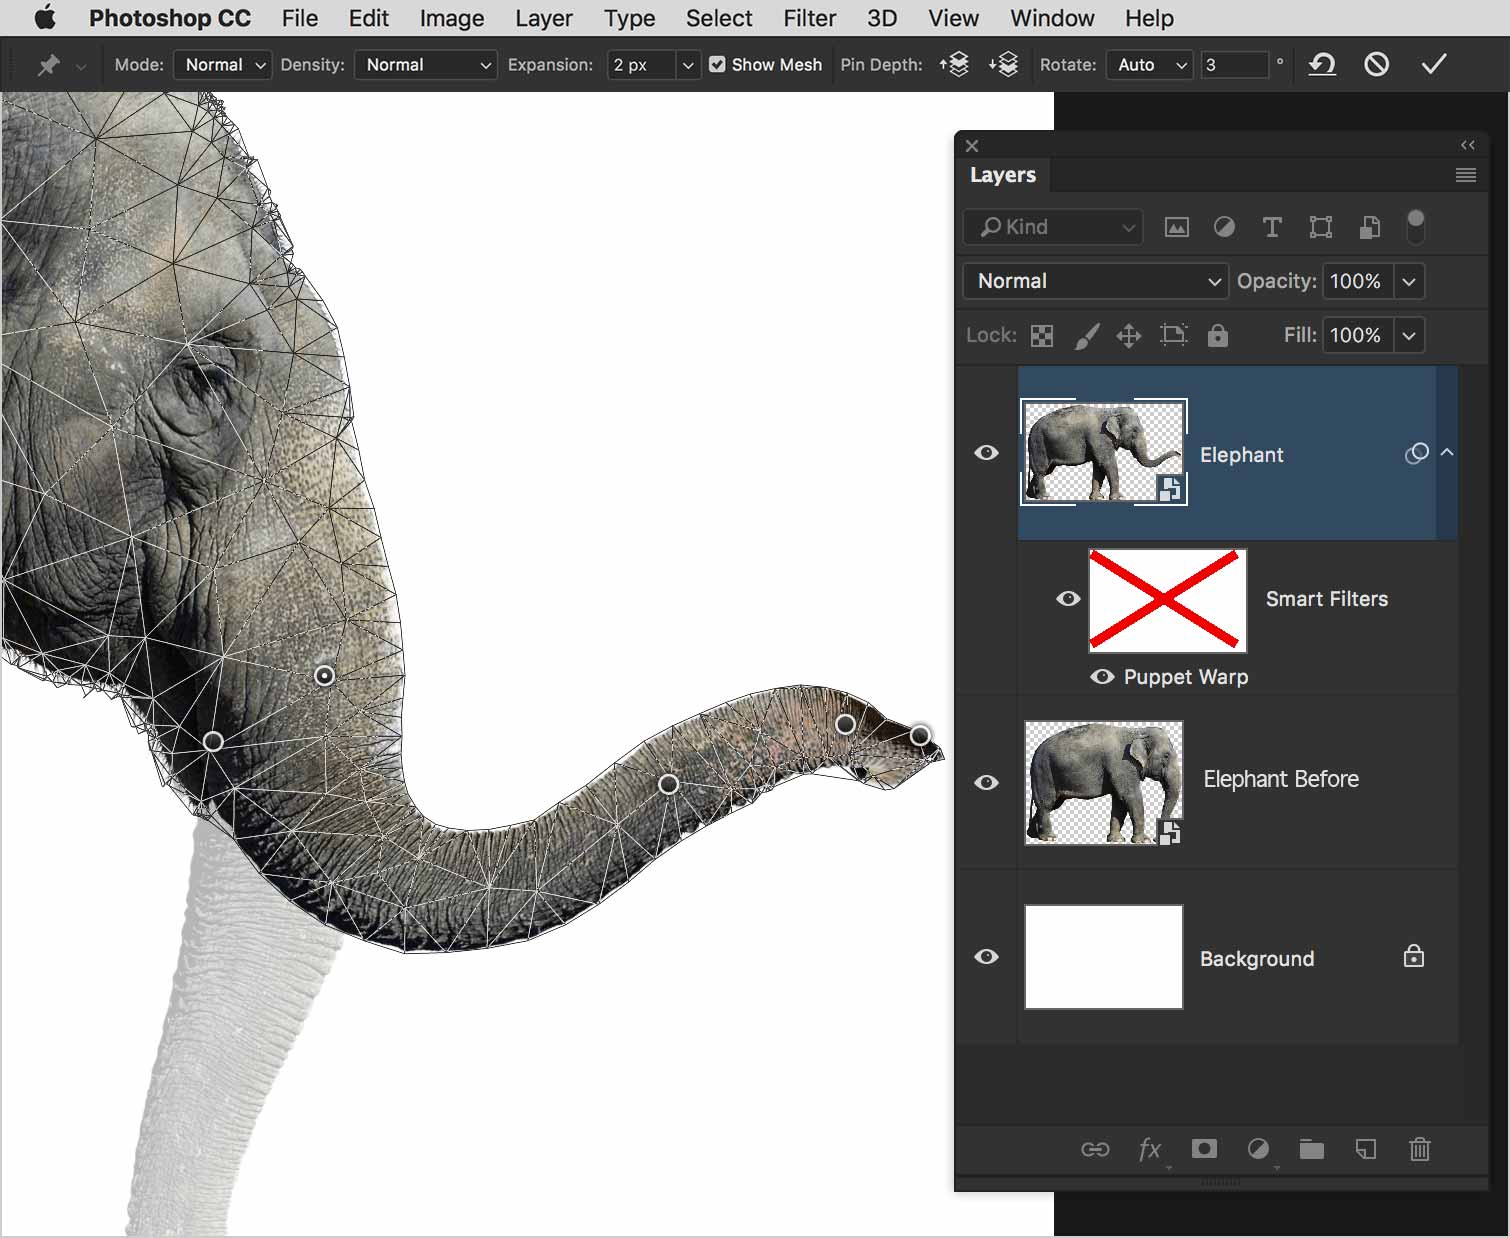
You need to click on the object to put down pins. The pins hold that area in place as an actual thumb tack would. Click and drag a pin to warp the object. The pins anchor parts of the warped object in place. You can hold the Shift key to select more than one at a time to move more of the object at once. To remove a pin, you can Option-click on one.
To rotate around a pin, hole the Option key, then hover your mouse near a pin. A circle will appear allowing you to rotate the object around the pin.
Once you have the look you want, click on the check mark in the Control bar, or hit Enter.
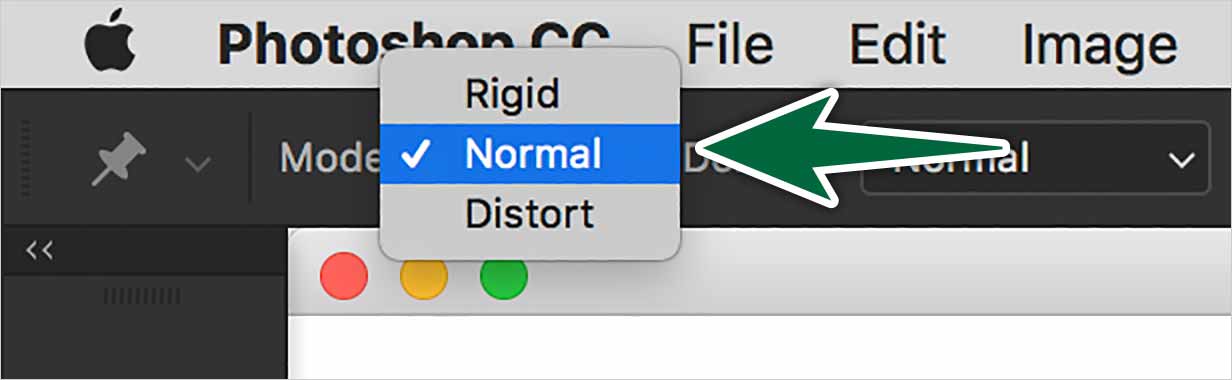
There are three warp modes:
Normal: Is normal.
Rigid: Keeps the object stiffer as it bends.
Distort: Distorts more freely. There’s more scaling going on.

If you twist your object so it overlaps itself, you can set the stacking order so it either goes behind or in front of itself as it twists.

If things get too messed up, you can click the reset button in the Control bar.
Perspective Warp
Photoshop has a really handy feature that allows you to change the perspective on a photo. This function doesn’t work with Smart Objects, so it’s best to duplicate the original layer with Option-⌘-J. Make sure to name all your layers.
Choose Edit > Perspective Warp… Define perspective of the image by dragging out a perspective plane.
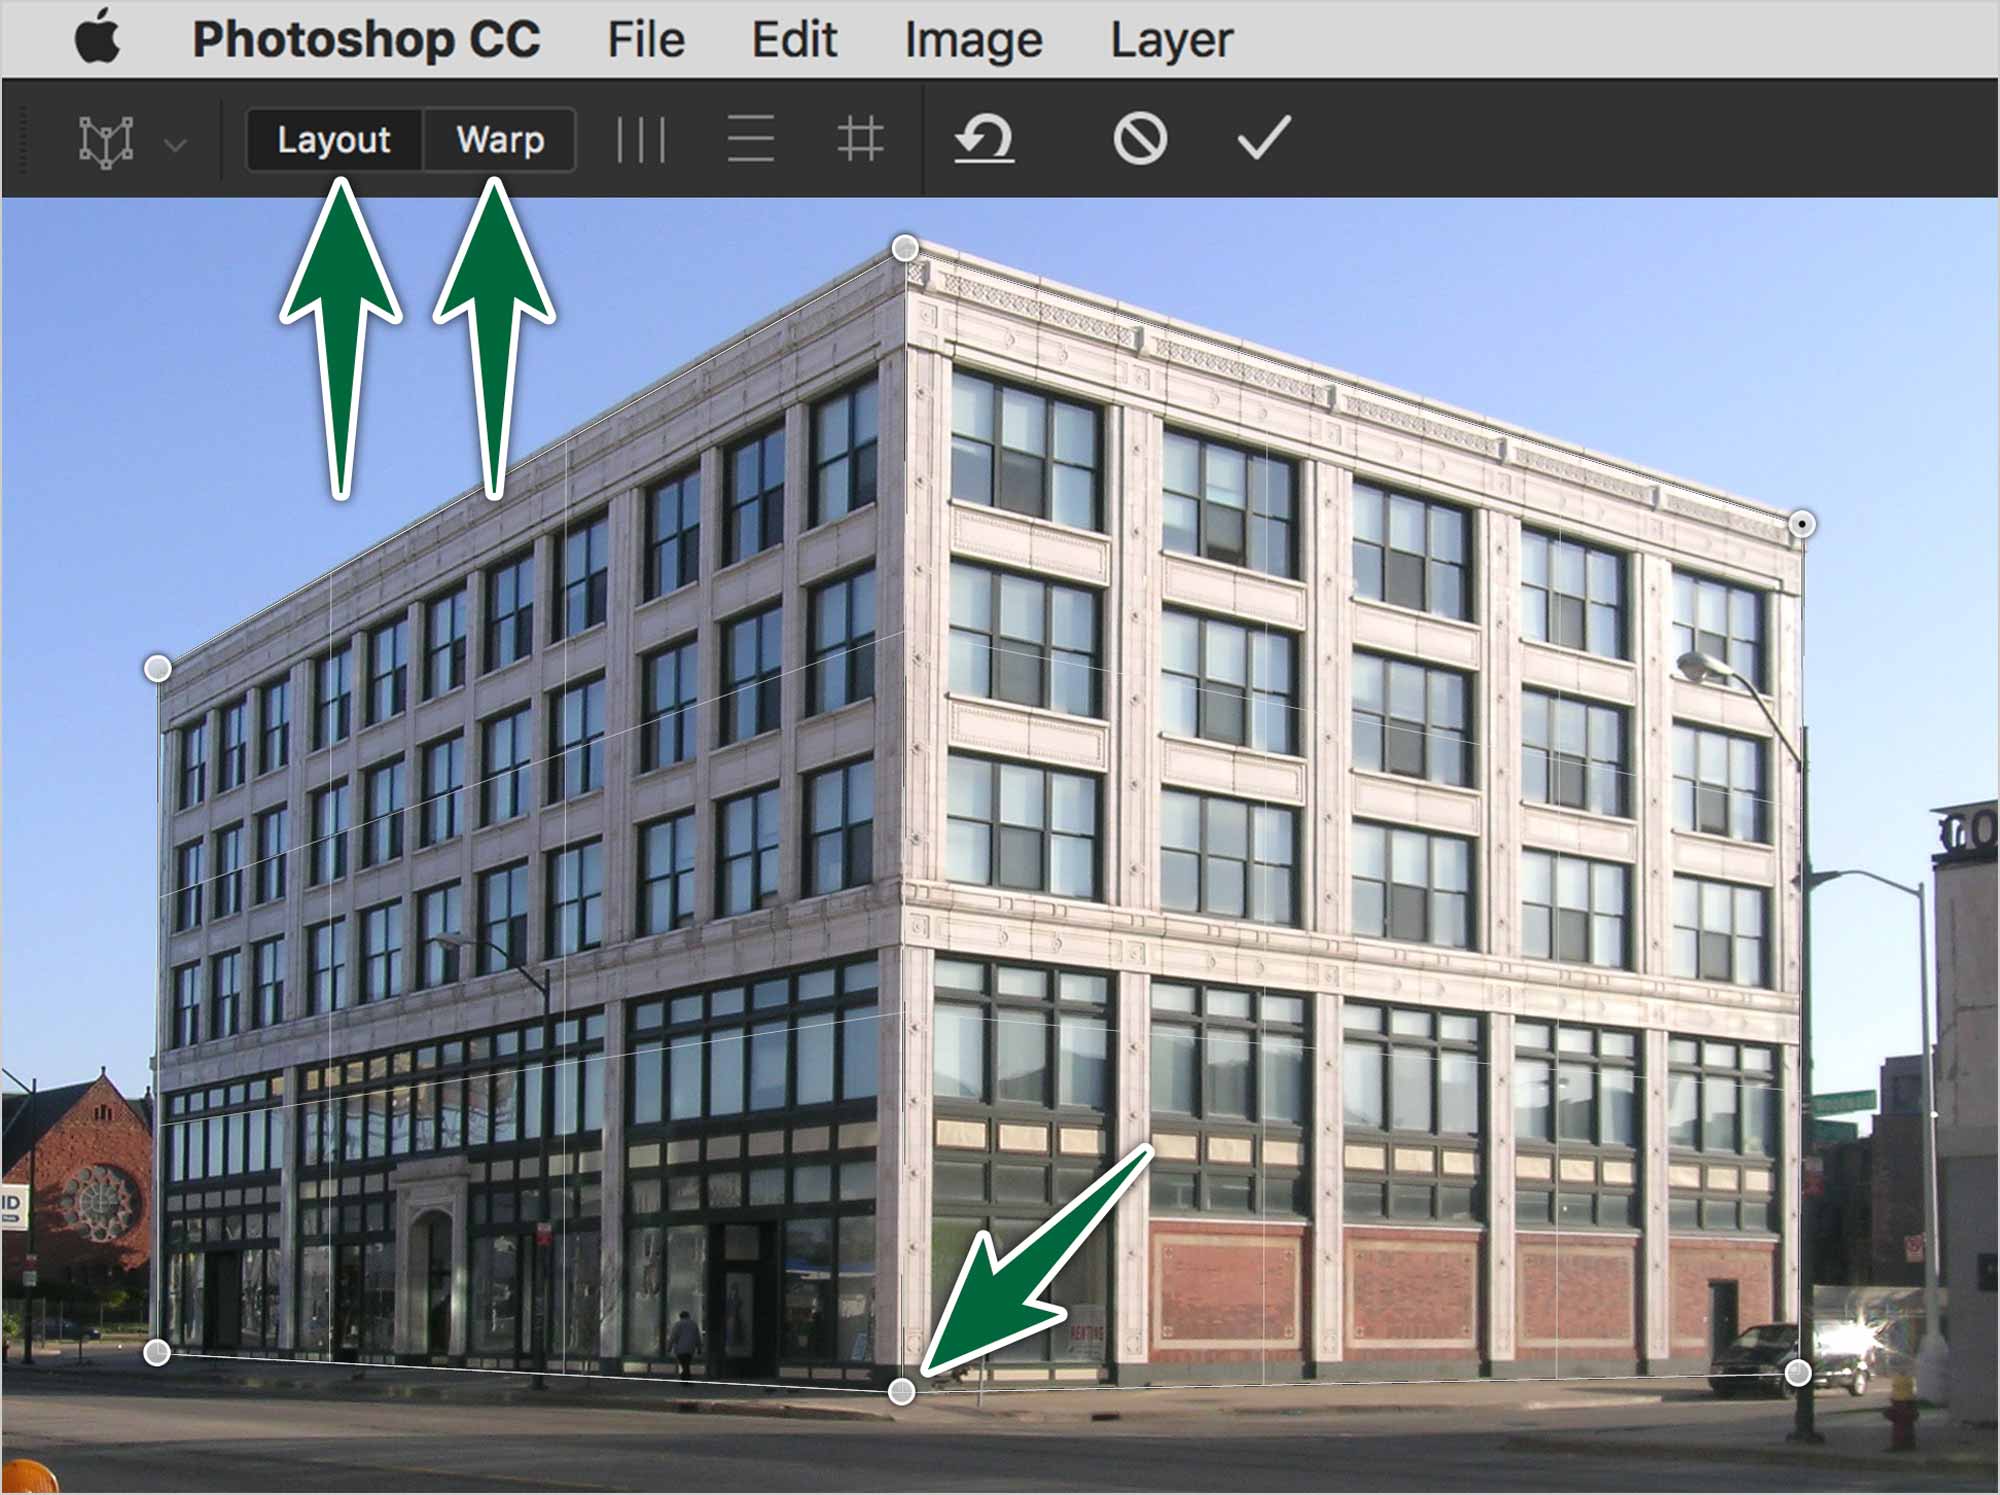
Distort the shape of the plane to match the surface in your photo. Drag a plane for each surface.
Move from the Layout mode to the Warp mode in the Control bar. To straighten the vertical lines, click the first icon in the Control bar. There’s a horizontal button to fix horizontal lines. Hold Shift, then hover over the perspective lines. This will constrain the lines while adjusting.

Formative Activity
Basic Transforms
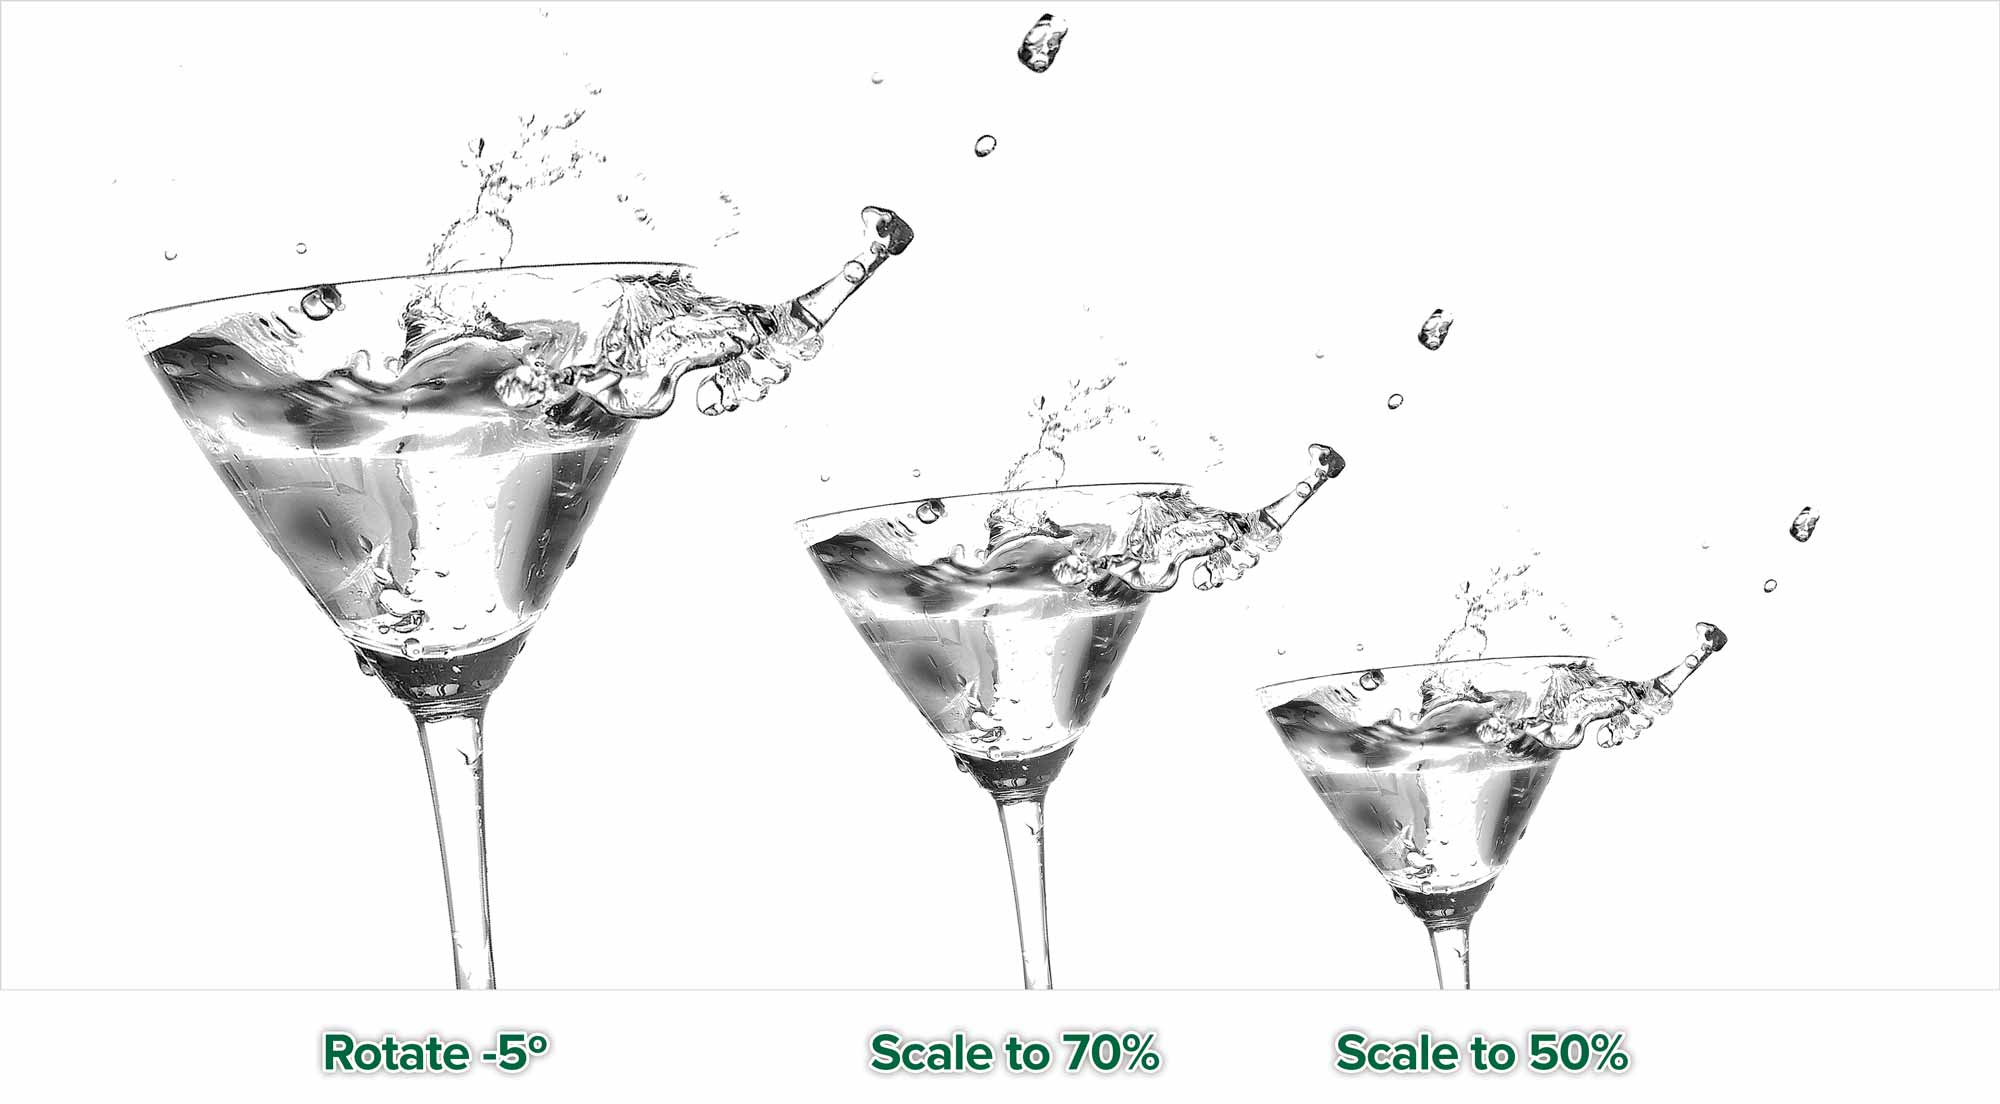
Open 01-transforms-scale-and-repeat.psd. Perform the transforms on the glass as indicated in the image. You should end up with one glass per layer. Make sure you make each layer a Smart Object to ensure your edits are non-destructive and editable.
Warp Transform
Open 02-transforms-warp.psd. Use warp envelopes to make the label wrap around the bottle as a Smart Object.
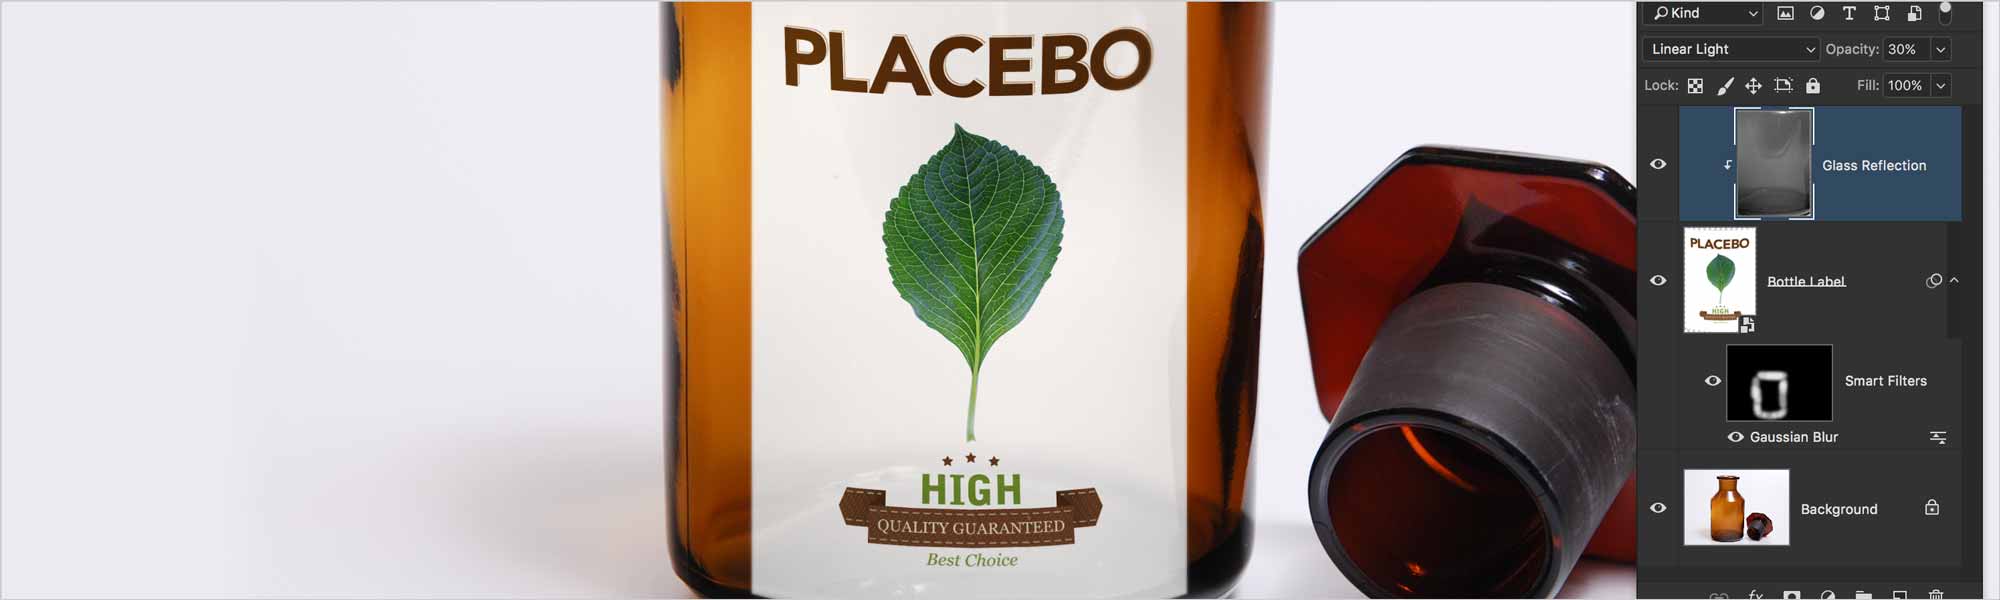
As you can see, there’s a glass layer on top of the layer stack, with a Linear Light blend mode. The label was also made more realistic with gentle Gaussian Blur Smart Filter. Paint on the filter’s mask to edit it.
Vanishing Point
Use the Vanishing Point filter to move the banner art onto the wall in perspective.
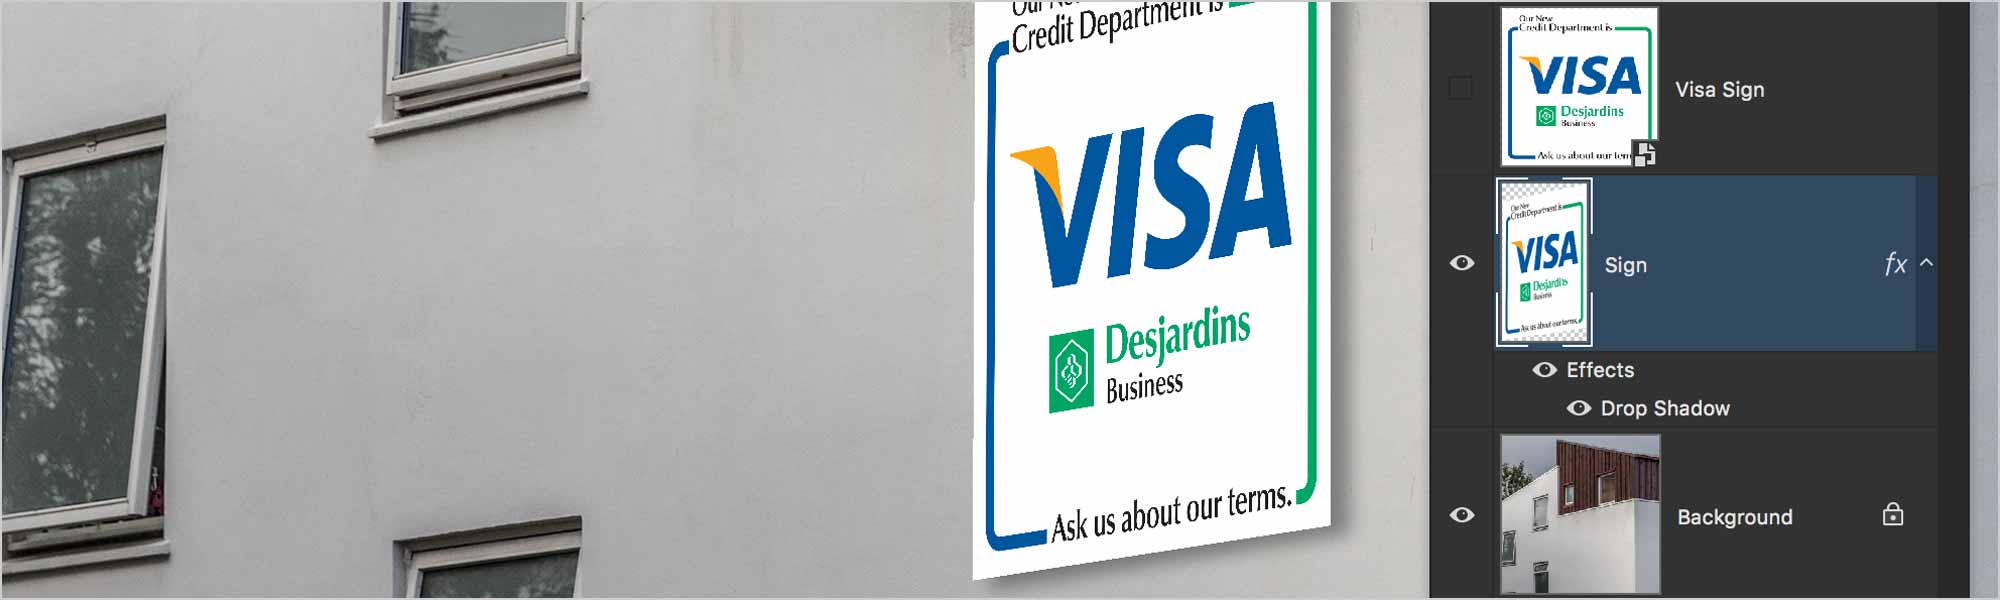
As you can see, there’s a drop shadow on the sign. You can access this effect from the fx button at the bottom of the Layers panel.
Puppet Warp
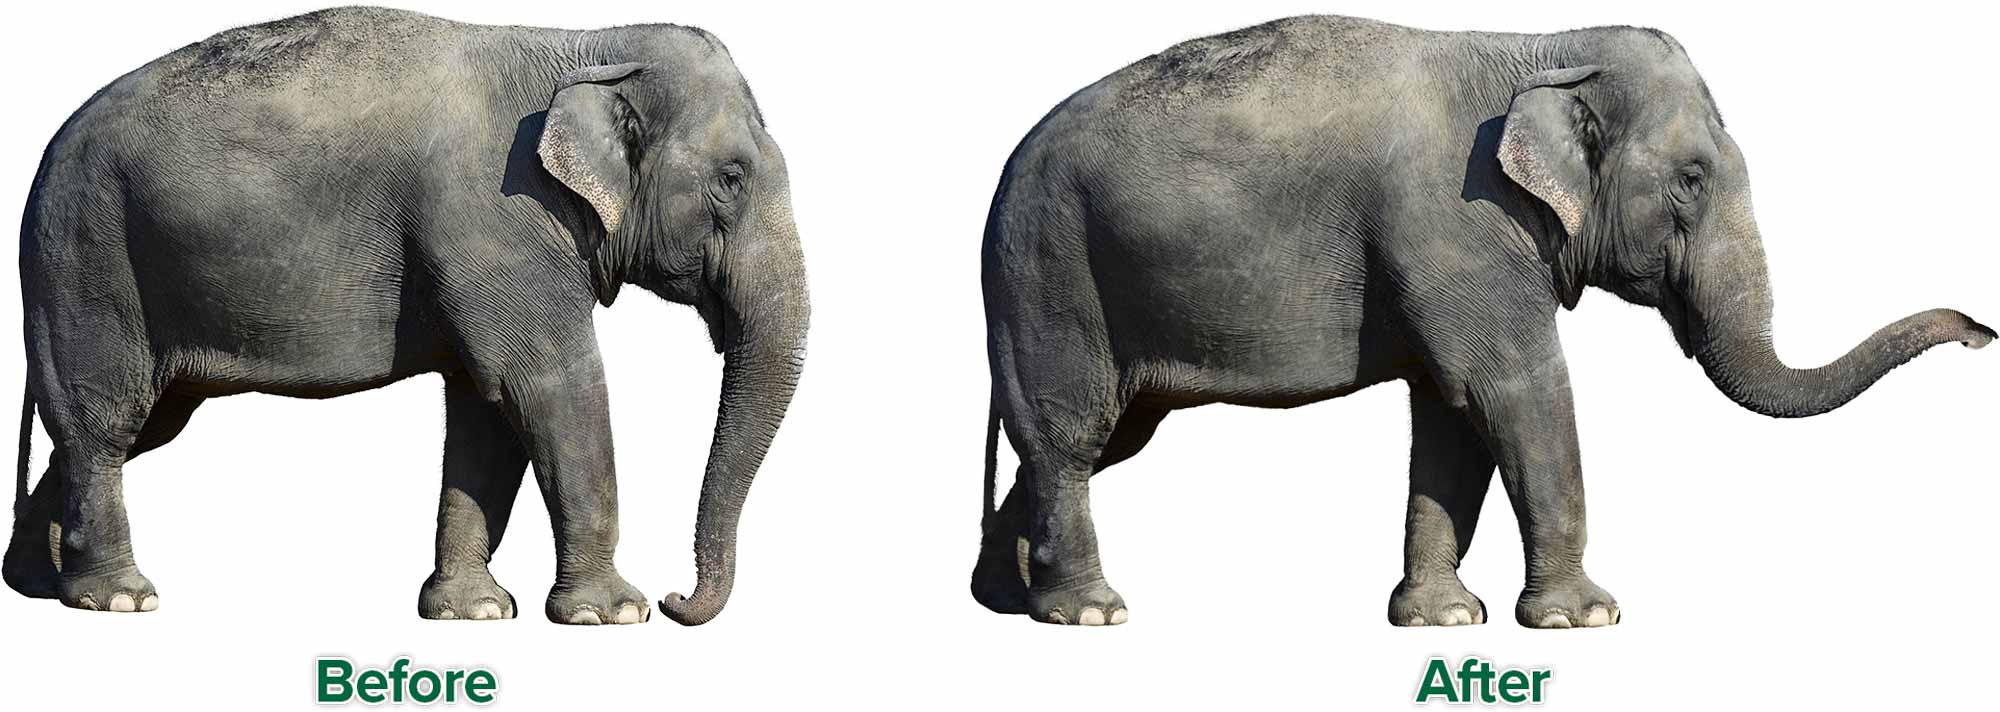
Find a photo on which you’ll perform a puppet warp. This could change someone’s facial expression. It could change their stance or body position. Your effect needs to be realistic, obvious and non-destructive.
Realistic: This means that we shouldn’t really be able to tell you’ve modified the photo without looking at the original.
Obvious: The edits need to be very obvious when we compare the before and after states.
Non-destructive: Duplicate your subject onto a new layer. Make that duplicate layer a Smart Object. We want to be able to see the before and after. We also want to be able to go back into the warp settings to edit them.
Once you’re done, save and close.
Perspective Warp
Open 04-transforms-perspective-warp.psd. Use the Perspective Warp tool to remove the lens distortion on the building, as shown. Make sure you duplicate the building layer, then make it a Smart Object.
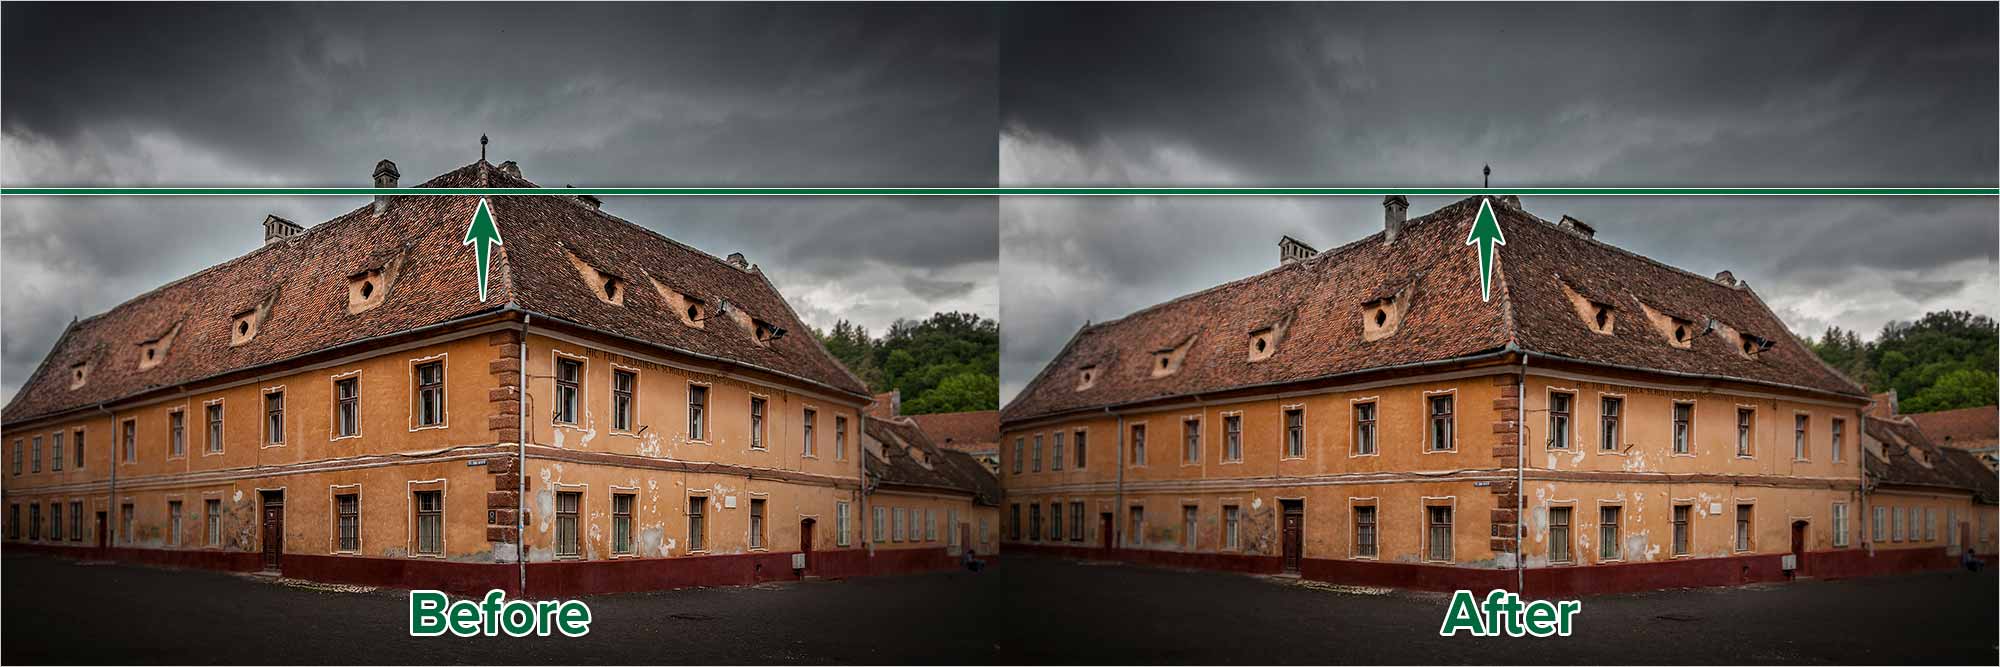
Once you’re done, save and close.
