Topics
In your spreadsheet, each column represents a variable. This means that it’s one bit of data that will be replaced in Photoshop, one spreadsheet row at a time. Each row represents a record. As Photoshop generates the graphics, it works its way down the spreadsheet row by row.
We need to format the data for the three types of variables Photoshop understands:
- Text Variables: Swap out text pulled from your spreadsheet.
- Pixel Replacement: This fetches a photo from a folder. You need to enter a path from the spreadsheet to the photos in the cells.
- Visibility Variables: This simply shows or hides a layer based on a TRUE or FALSE entry in the spreadsheet.
A Note on Images
As you can see in the spreadsheet pictured above, the images variable is a path from the spreadsheet file to the folder of images. It’s not simply a list of images. You need to handle this intentionally. The cleanest way is to place the spreadsheet close to the images in your file organization. You can actually put it in the images folder. If you do, all you’ll need in your spreadsheet file is the full image name itself. If you put it outside the images folder, you’ll need to provide the path, as pictured.
Once you’re done editing your data in your spreadsheet application, you’ll need to export or save as a .csv file. That’s a Comma Separated Values file. It means that each column cell will be separated by a comma.
The First Column
It’s important to use the first column for the key information. We’ve used the individuals’ names. In a couple of steps from now, we’re going to choose that column as the name of our data sets. That will make it that the files we output will be named with their names. This is useful.
Building your Photoshop File
You’ll need to create a layer in your Photoshop file for each column in your spreadsheet. Naming them the same as your column header titles is useful to be able to keep track which column relates to each layer.
This is the model of the practice file you’re going to create.
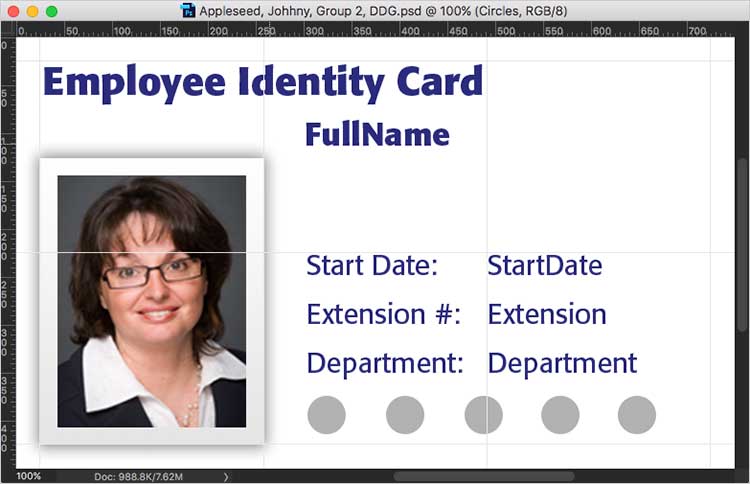
Note that the circles are vector shapes. The white frame on the photo is a Graphic Style. This is all just point type. There’s no area type in this file.
Layer Organization
When you create your Photoshop file, make sure you organize your layers properly. It’s not technically necessary for the names to match for this to work. It’s just easier to make sense of everything if they do.
Assign Variable to Layers
Now that Photoshop is aware of our data source, we need to link each layer to a variable from our spreadsheet. We do this under the Variables > Define function.
Now, you need to switch to Define in the Variables dialogue.
Associate each of your layers to a variable from the dropdown menu for the right type of variable.
Text Replacement
The Text Replacement variable does just that. It will replace the text on the Photoshop canvas with text in a column of the .csv file row by row.
Pixel Replacement
![]()
The Pixel Replacement variable swaps pixel-based layers by finding a folder of replacement images with the help of the path provided in the spreadsheet.
As far as the Method dropdown options are concerned, you’ll likely use either Fit or As is. It depends on your design.
Visibility
A Visibility variable turns the visibility of a layer in Photoshop on or off, depending on the TRUE or FALSE entry in the .csv file.
Importing Your Data
By now we have the two parts of our project complete. The spreadsheet and our Photoshop file. Using Define Variables is where we tie the two together.
Now that we’ve done all the data mashing necessary and we’ve built our Photoshop file, we need to go Image > Variables > Define…
In this dialogue, we’ll ‘attach’ each layer to a column in our spreadsheet. Choose Data Sets from the dropdown menu to select the .csv file.
Once you’ve selected your .csv file, the path will show in the dialogue. You can leave the Encoding to Automatic. Check the two boxes below.
Use First Column for Data Set Names
In our spreadsheet files, it’s a good idea to make the first column of data one with key information. In our practice and exercise files, we’ve used the individuals’ names. This makes it that this data will be used to name the files, which is useful.
Review Variables
Before we go any further, it’s a good idea to check that everything’s working with our data driven graphics. You can check that variables are properly linked to layers from this dialogue.
Your Photoshop file is now bound to the data. It’s a good time to take a moment to ensure the variables are correct.
 Click the forward or back arrows to cycle through all of your variables. You can verify that everything is changing the way you want it to.
If there’s a problem, you can click OK to dismiss the Variables dialogue to go fix it. This won’t produce any files.
Export Your Data Sets
We’re ready to actually create the multiple files from our Photoshop file and our .csv file. To do so, we use File > Export > Data Sets as Files…
Once you’re ready, go File > Export > Data Sets as Files… This is where you’ll create your dozens or even hundreds of separate files from the one master design.
You have a few decisions to make upon exporting your files.

You need to tell Photoshop where to put all of the files. Make sure you don’t put them in the folder with source images. This will cause an error.
You can then choose a specific data set to export. This means you’ll only be creating one file for the single record in your .csv file. We want to choose All Data Sets to output all of our records.
Configure the File Naming section carefully. It’s quite versatile. If you choose your data set name, it will name it more contextually.
The Export function can only produce native Photoshop files. The only choice is whether the file extension itself is upper or lower case, which is inconsequential.
Finally, you can choose operating system compatibility, which also has litte effect on the file, since Photoshop is the same on all operating systems.
Once you’re ready, click OK. Your files will all be generated in the designated folder. You can’t do anything else in Photoshop while it’s working, but you can switch to another app to keep working. You can also switch to Finder to see the files appear in the folder. Fun stuff!
Next Steps
Now that you have a folder of .psd files, you’ll need to take next steps to actually use them. If the files are destined for the web, you’ll need to create an Action to save them all as web-optimized graphics. If they’re going to be printed, you’ll need to flatten copies of them to be placed in InDesign.
Either way, the next step would be to create an Action to do what you want with these files. You would then run a Batch command on the folder to do so.
Alternatively, you can use the Image Processor to create versions in different file formats.File > Scripts > Image Processor
Formative Activity
The NDP party want banners created for each member. There are about 100 in total. You’ll design and produce a banner which will be replicated for each member.
You’ll be given a larger number of data sets for which you will design web a banner. They are for the New Democratic Party. They need to include:
- A title/slogan
- The party logo
- A mug shot of the party member
- The member’s name
- The member’s constituency name
- The member’s province
- A short paragraph of issue-based text.
- Graphics related to the topic.
You’re to mimic my practice file with a different layout and content. The NDP web site is a great source for issue-based copy. Start with setting up a Photoshop file measuring 300 pixels X 600 pixels, either tall or wide. You’ll gather messaging from the NDP web site. You’ll need to adapt the provided spreadsheet to suit your design’s Photoshop layers.
Deliverables
Submitting all those native, layered Photoshop files is going to be too big. What we need to do is produce them, but then use an Action or the Image Processor to create jpeg files to submit. So do not submit the .psd files you generated. Only submit your original design file.
Use only Adobe Fonts, so you don’t need to worry about submitting them.
This is what you’ll submit.
- Your design in a layered .psd file.
- All the generated jpeg files.
- Your edited .csv files.
You’ll be graded on successfully creating the data driven graphics. Make it a professional design that’s consistent with the NDP brand.
