Topics
Why Use Actions?
There are quite a few tasks a Photoshop user is required to do on a regular basis. Tasks like sharpening or resizing photos are done really often. Well, imagine if you could create your own custom sharpening workflow that’s triggered with the click of a button. That’s what Photoshop Actions bring to the table
When you click the Record button at the bottom of the Actions panel, Photoshop will record all the menus you access, all the buttons you click and all the values you enter. It will not record some things, like painting with a brush or the passage of time while it’s recording.
The Actions Panel
The Actions panel contains sets. In the sets are the individual actions. In the actions are the steps you’ve recorded.
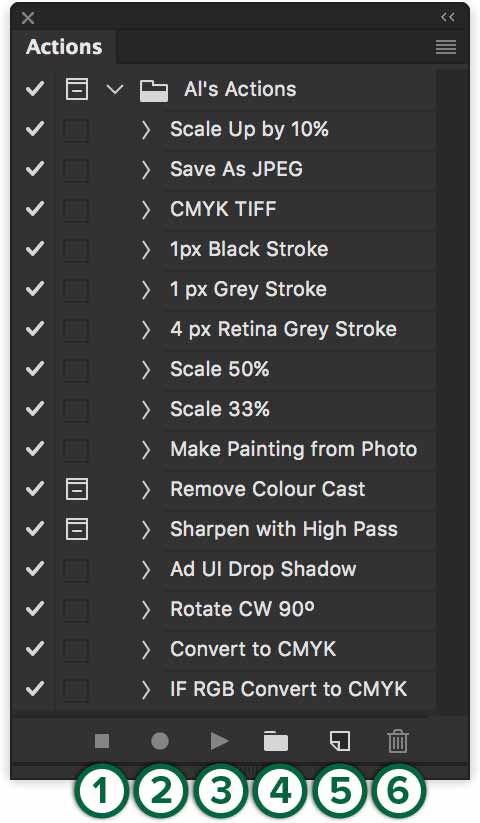
- Stop playing or recording
- Begin recording
- Play Selection
- Create a new set
- Create a new Action
- Delete
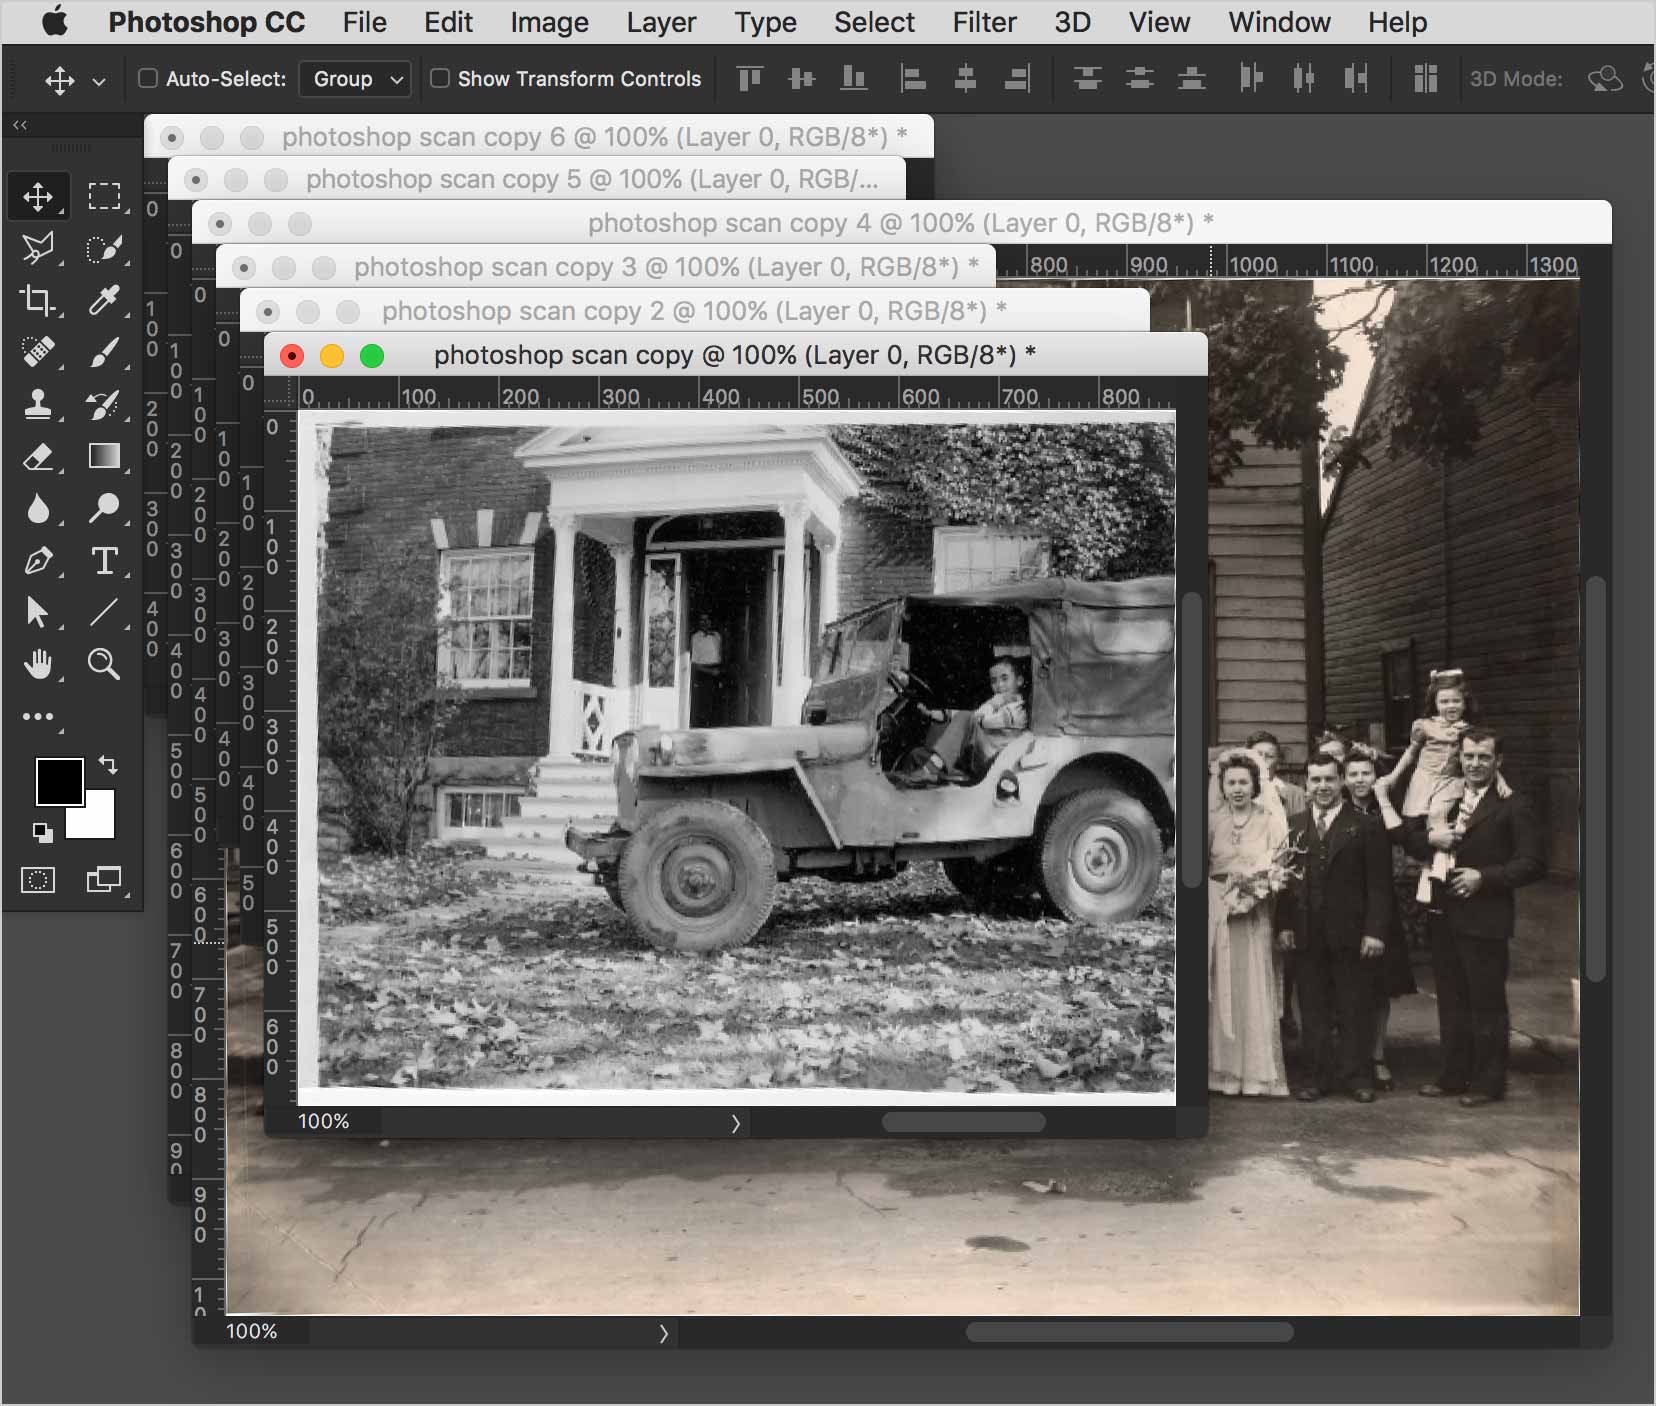
This is my current Actions panel. You can see my actions are in a set called Al’s Actions.
If you want a clean panel, you can delete the default set of actions Adobe has included with Photoshop. They’re really useless.
The Actions Panel
To create a new Action, click on the button at the bottom of the panel, or use the panel menu.
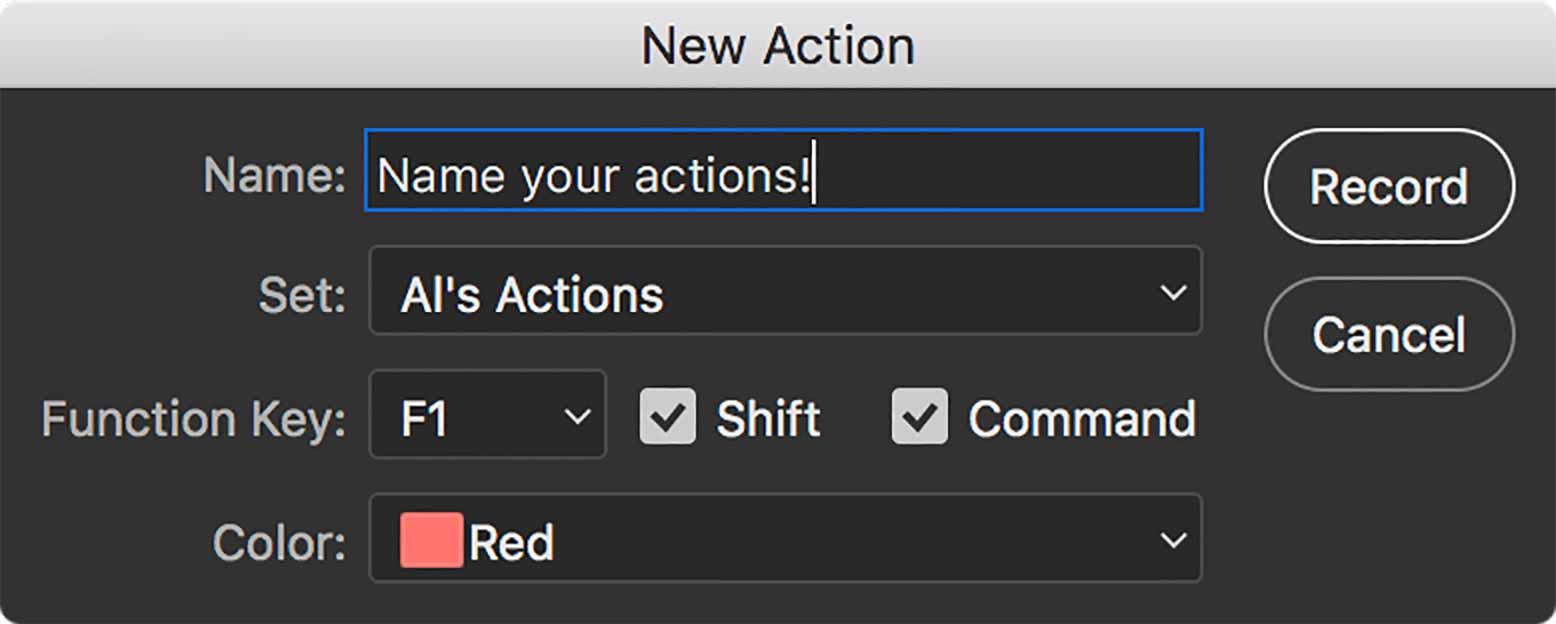
The New Action dialogue allows you to name your action. Choose the actions set you want to store it in. You can attribute a keyboard shortcut to your action. A colour can also be given to the action. This colour shows when you set your Actions panel to Button Mode.
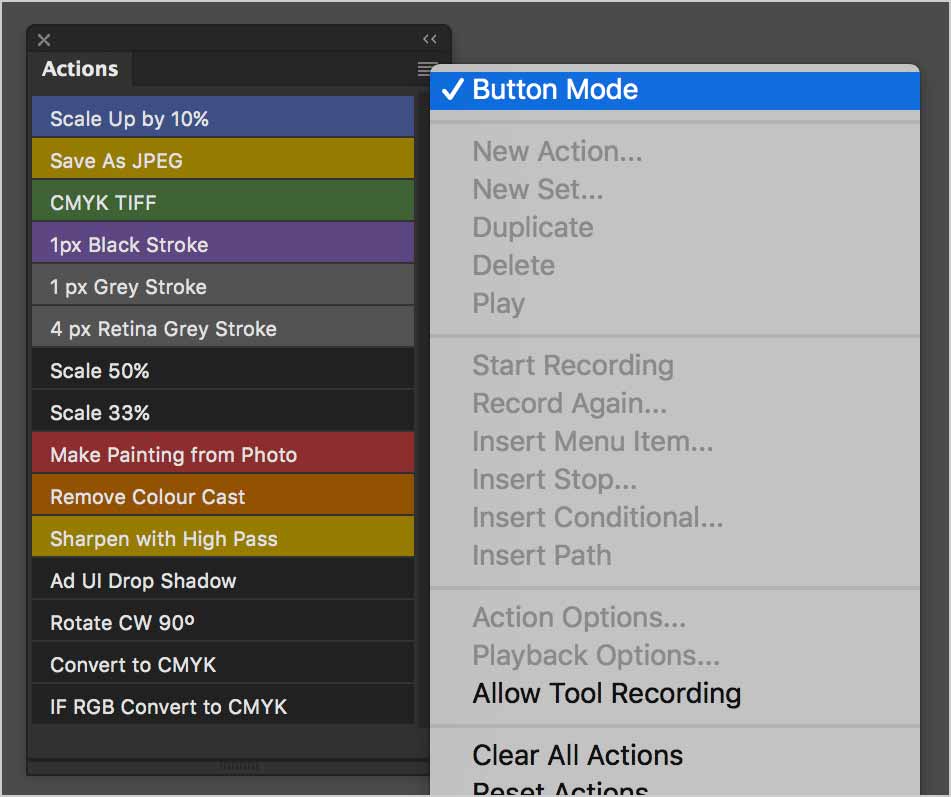
When the panel is in Button Mode, you simply need to click on an action once to have it play. Notice the Play button isn’t even there.
# Our First Action
Sharpening photos is a common task which lends itself to automation. We’ll set up a workflow which runs through a series of actions, but asks for parameters along the way.
We’ll use the Sharpen with High Pass technique to sharpen a photo. All you’ll need to do in the future is to hit the Play button in the Actions panel to sharpen any photo.
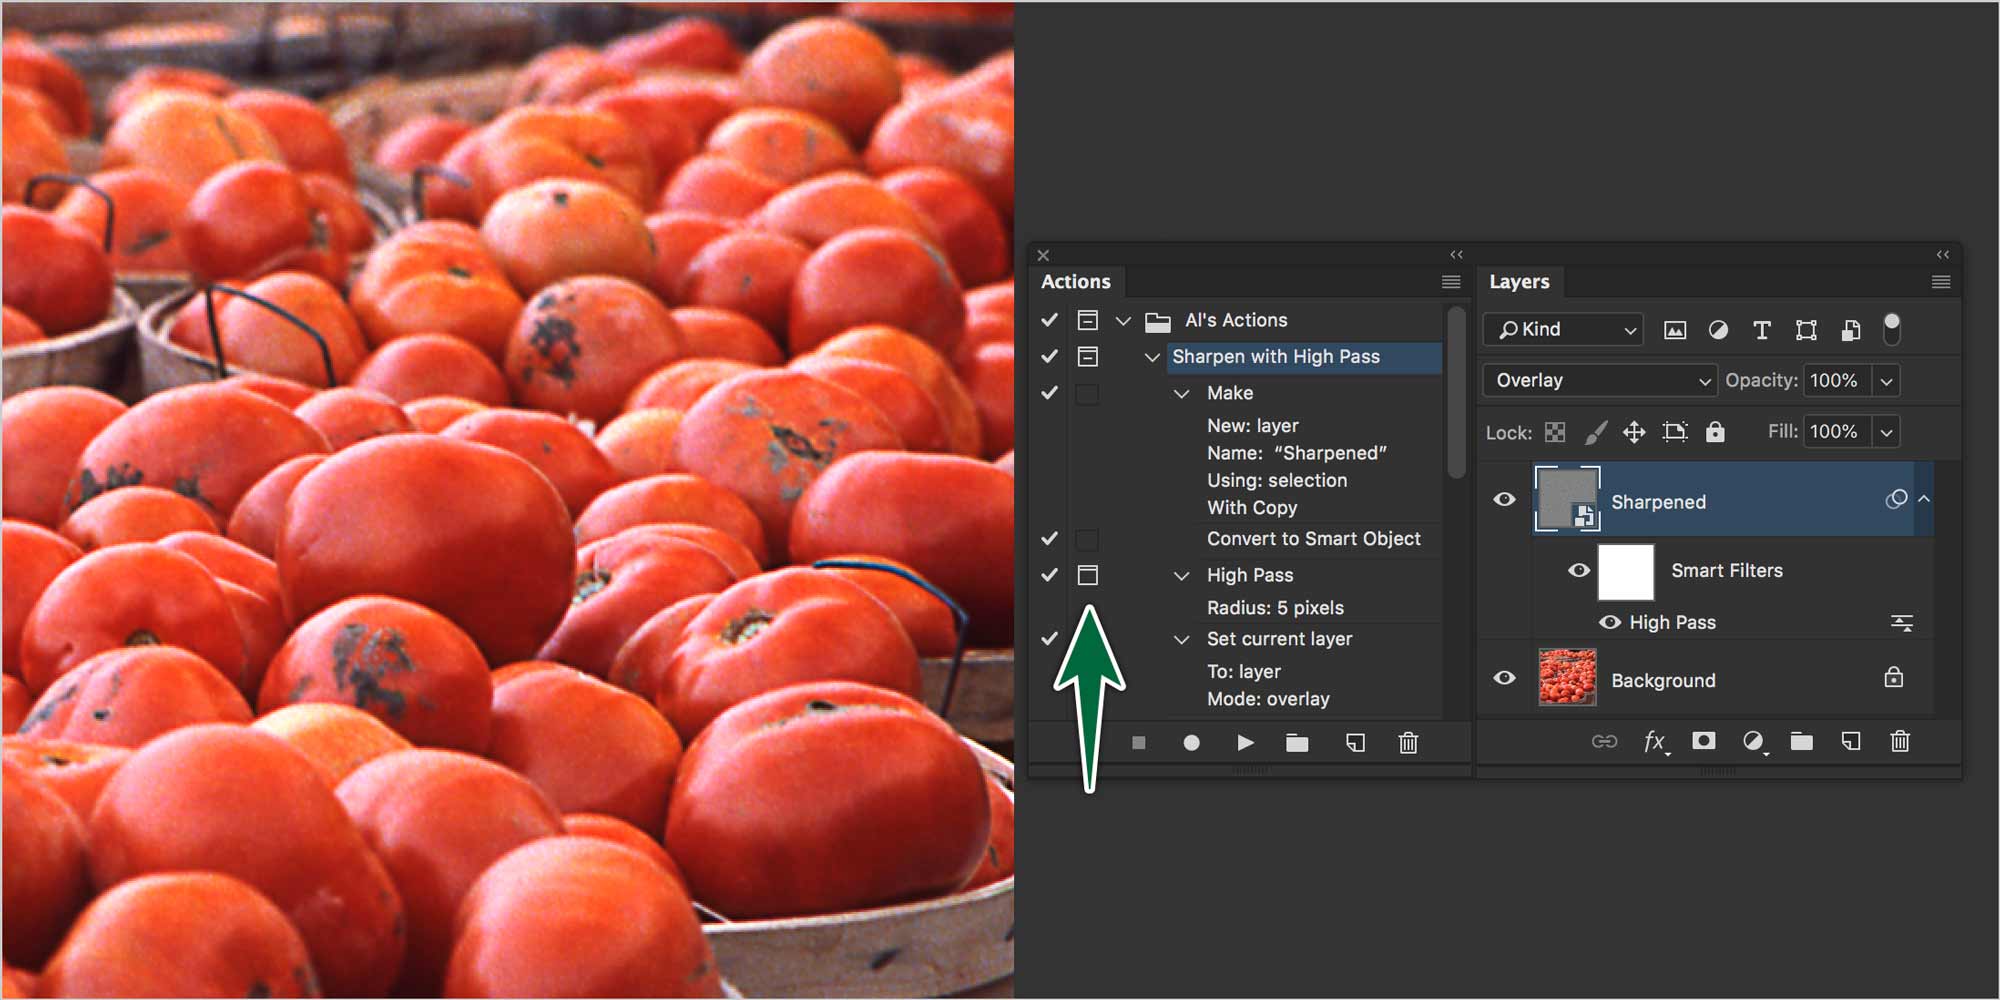
Note that the Toggle Dialogue On/Off button is turned on. This makes it that when the action runs, the High Pass dialogue will prompt you for a setting. Every photo needs a different value in the filter, so it’s convenient to have this option.
If you make a mistake while recording an action, you can continue recording, then fix it after. Complete your recording. Target the step with the error, then hit delete. Click the record button, then perform the corrected step. Stop recording. Done!
The Image Processor
Photoshop’s Image Processor is a built-in automation powerhouse. You can batch-export images and much, much more.
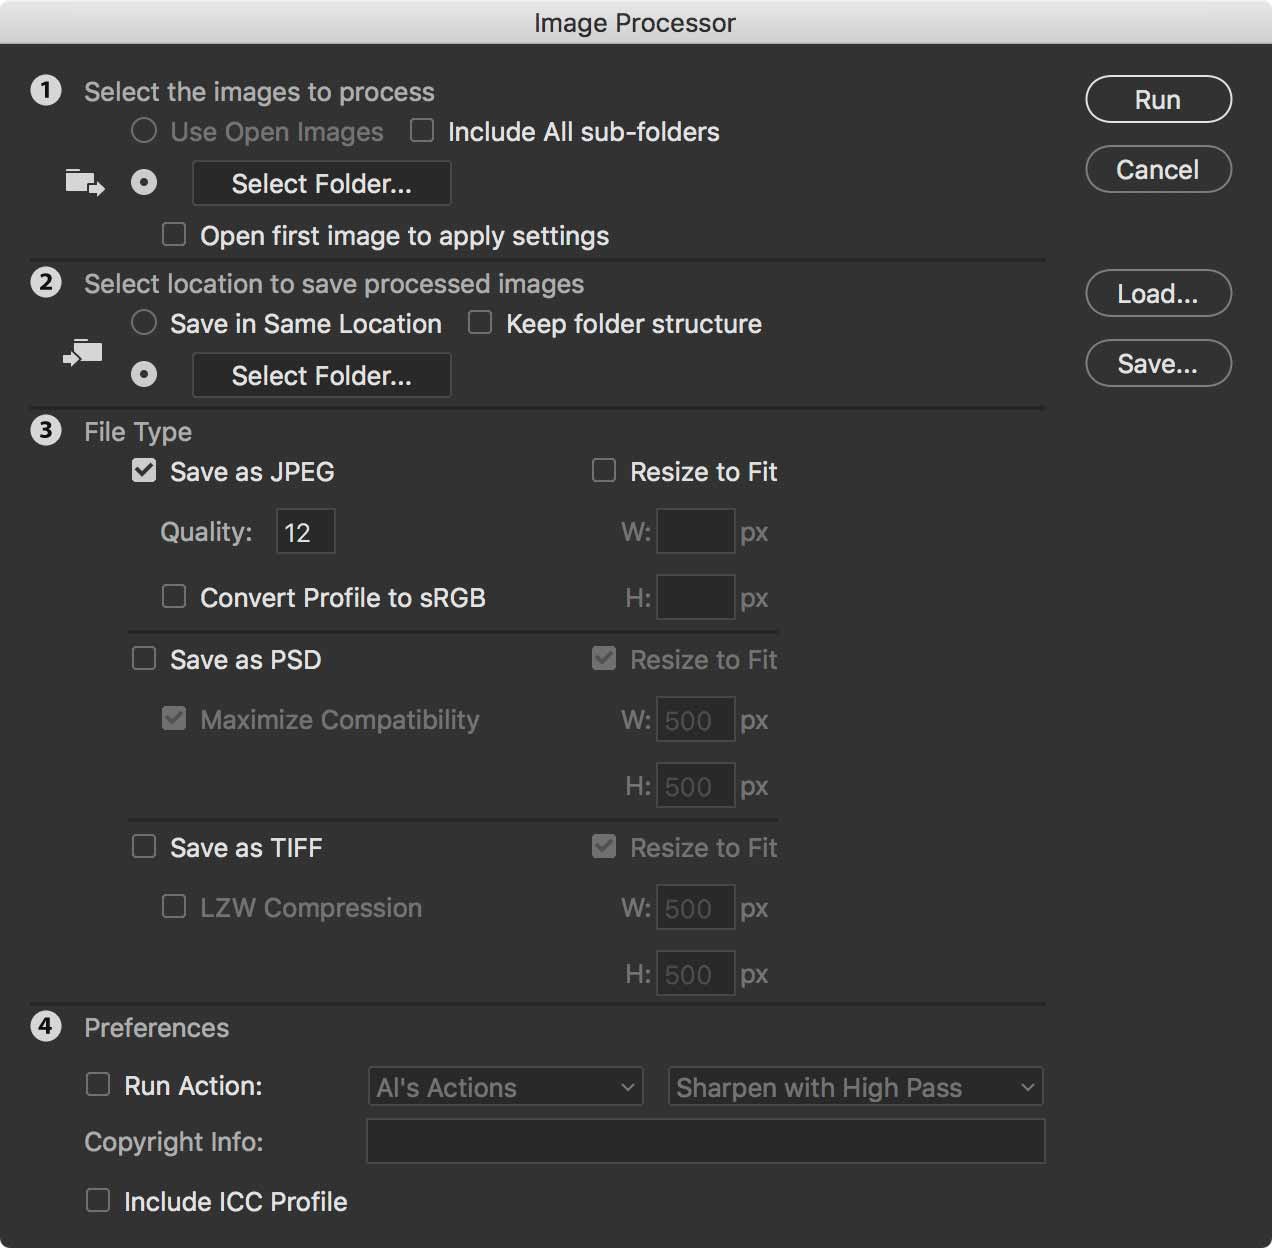
- Feed Image Processor a folder of images.
- Tell Image Processor where to save the output of the processing.
- Choose one or more file formats and settings in which to save your images.
- Run an action on the processed images.
The Image Processor converts and processes multiple files. It lets you process files without first creating an action.
You can do any of the following in the Image Processor:
- Convert a set of files to either JPEG, PSD, or TIFF format; or convert files simultaneously to all three formats.
- Process a set of camera raw files using the same options.
- Resize images to fit within specified pixel dimensions.
- Embed a color profile or convert a set of files to sRGB and save them as JPEG images for the web.
It works with Photoshop (psd), JPEG, and camera raw files.
Image Processor + Actions!
We’ve covered Image Processor and Actions on their own. Now let’s see how powerful they can be when combined.
Photoshop’s Image Processor is a powerful tool. What really amps up it’s juice is the Actions menu at the bottom. On top of changing file types and resizing on the fly, you can have it run an action. Knowing that an action can do pretty much anything in Photoshop, makes the Image Processor your go-to automation tool.
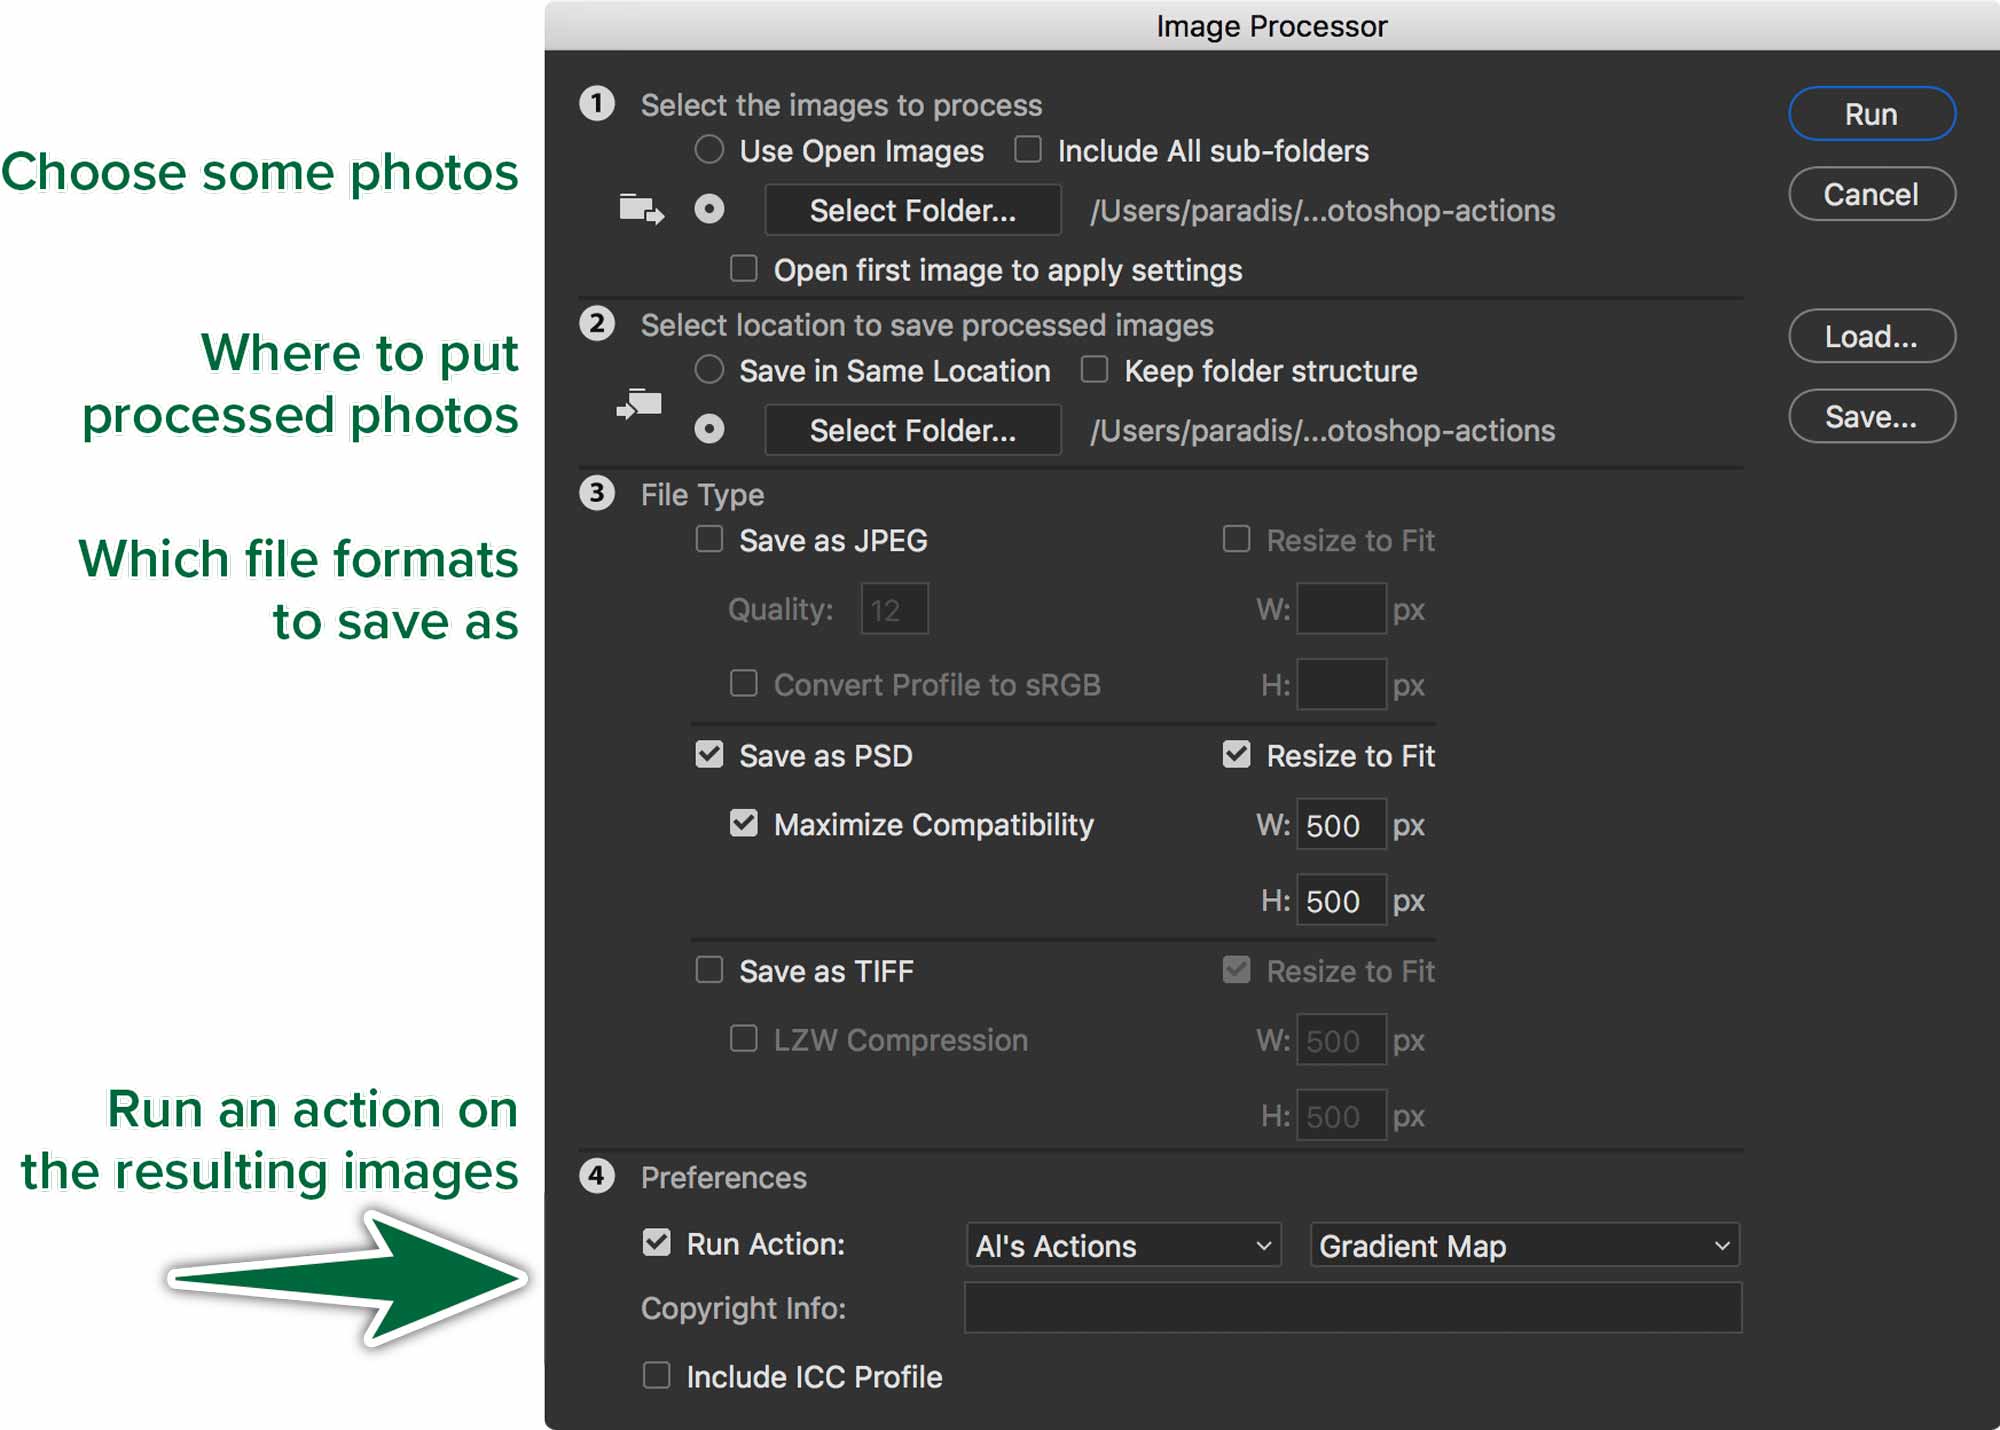
Let’s create a new action that makes the images look monochromatic, with an orange colour cast. We’ll use a “Gradient Map” adjustment layer to achieve this.
We’ll apply the Image Processor to the provided photos. While we’re at it, let’s make the images 500 pixels wide and save them as native .psd files. Save them into the 03-image-processor+actions-output folder.
Batch Workflows
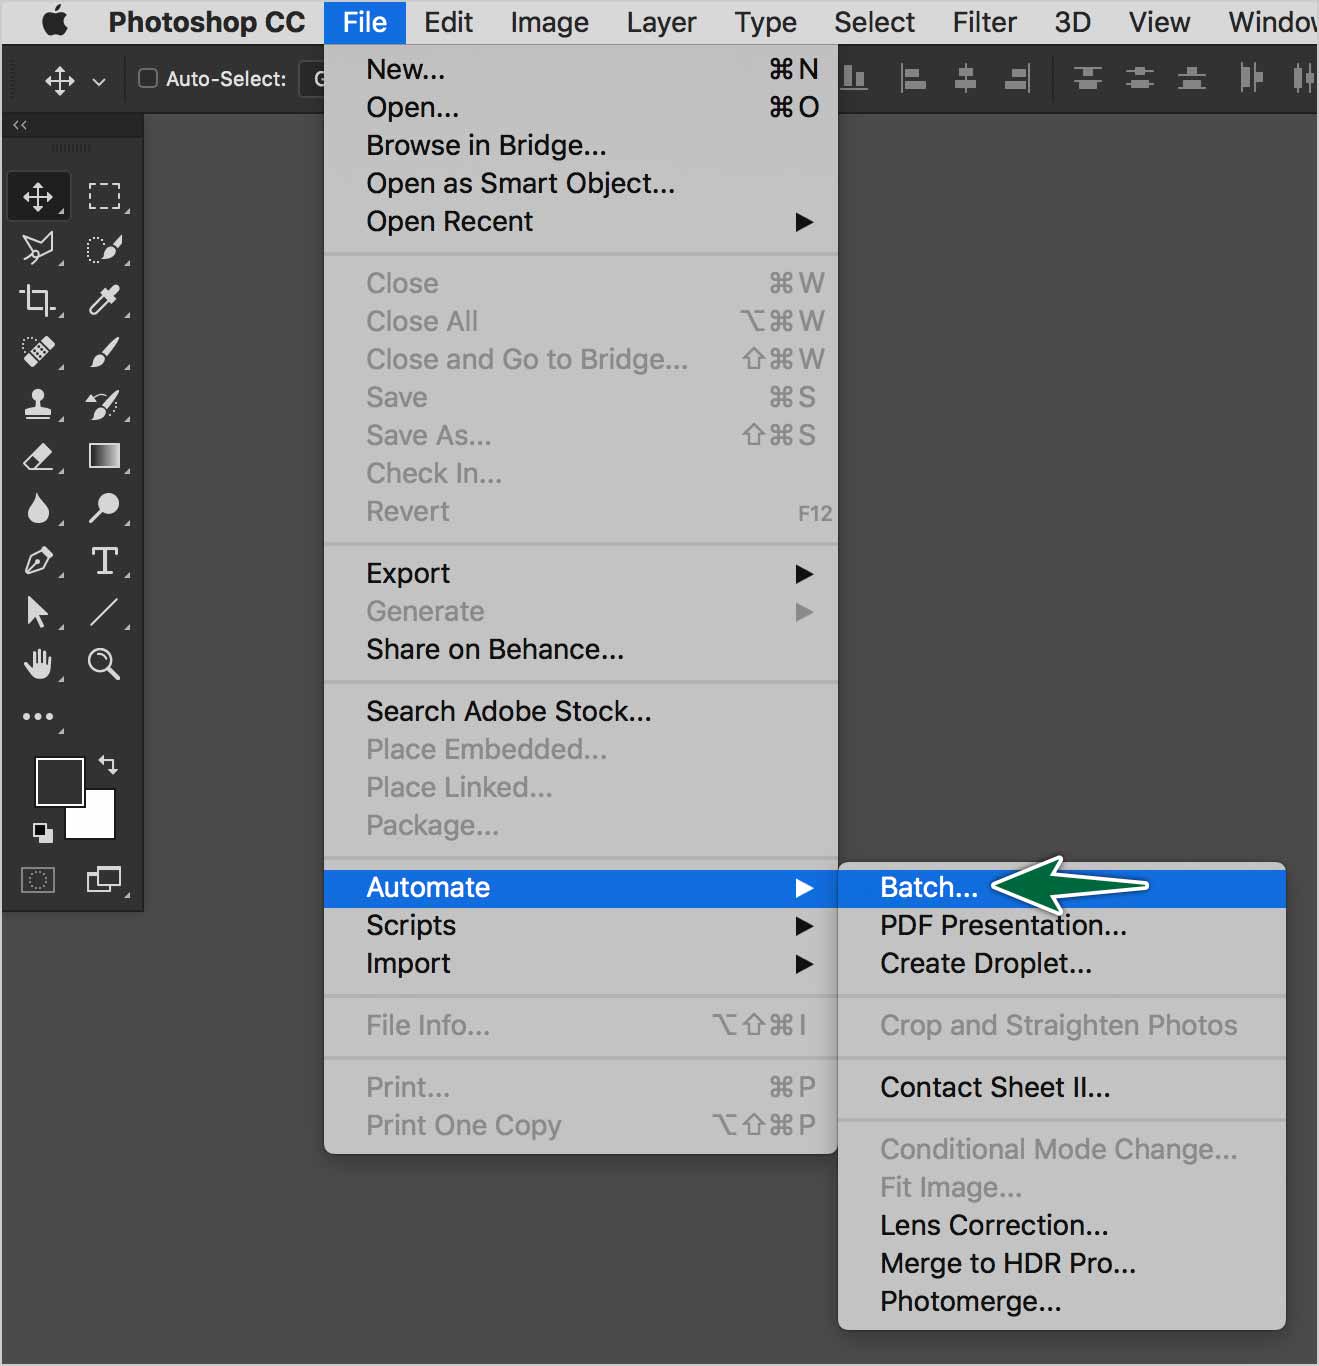
Once you’ve recorded a workflow, you can apply it to as many image files as you wish. This is what File > Automate > Batch… does.
A single action is very practical for affecting one or a few images. You just open the image, click the Play button in the Actions panel, sit back and watch the magic happen. But what if you have 20 images, or 200, or even 20,000?
Batch processing is key to applying an action to a large number of images. You set up your action beforehand. Go File > Automate, Batch… In the Batch dialogue, you get options for locating the files and re-naming them.
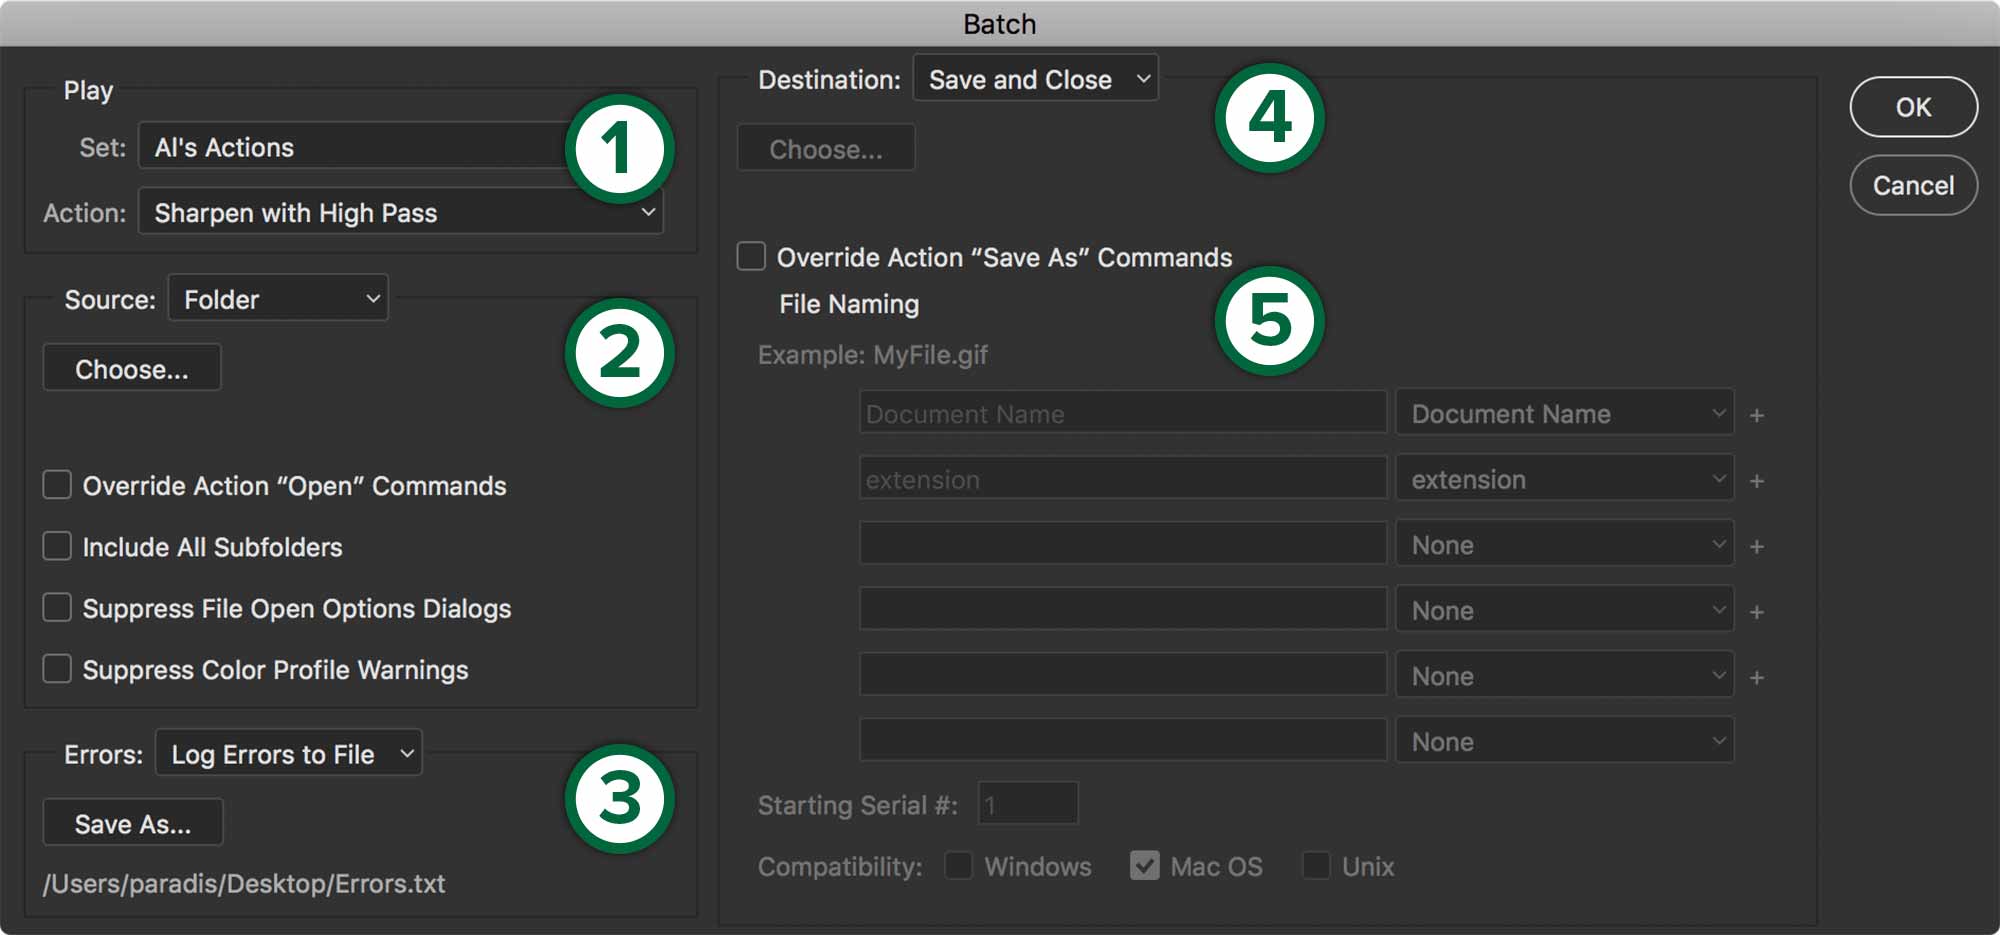
- Play: Which action are you going to run on all your images?
- Override action “Open” commands: When checked, this will process the images specified above rather than images your action may ask for.
- Suppress File Open Options Dialogs: Sometimes, when a file is opened, Photoshop presents a dialogue. When checked, this will suppress that dialogue and continue processing.
- Source: Give the command a folder of images to process.
- Errors: If Photoshop encounteres a problem while it processes the images, it can log the errors in a text file, then continue with the rest of the images.
- Destination: Tell Photoshop where to put the completed images.
- File Naming: Set up costom a file naming convention for the processed files.
- If the action you’ve recored has a Save As… command in it, this option will ignore it. It will save the files where you tell it here, with a custom name.
Let’s run our Sharpen with High Pass action on our source photos. Save them to the the 04-batch-processing-output folder.
Crop & Straighten Photos
The Crop and Straighten script in Photoshop can be a real time-saver if you have a series of photos you need to crop and straighten.
If you’re in the process of digitizing old photos, you may think you’re stuck with scanning only one print at a time. Photoshop can help you if you scan more than one.
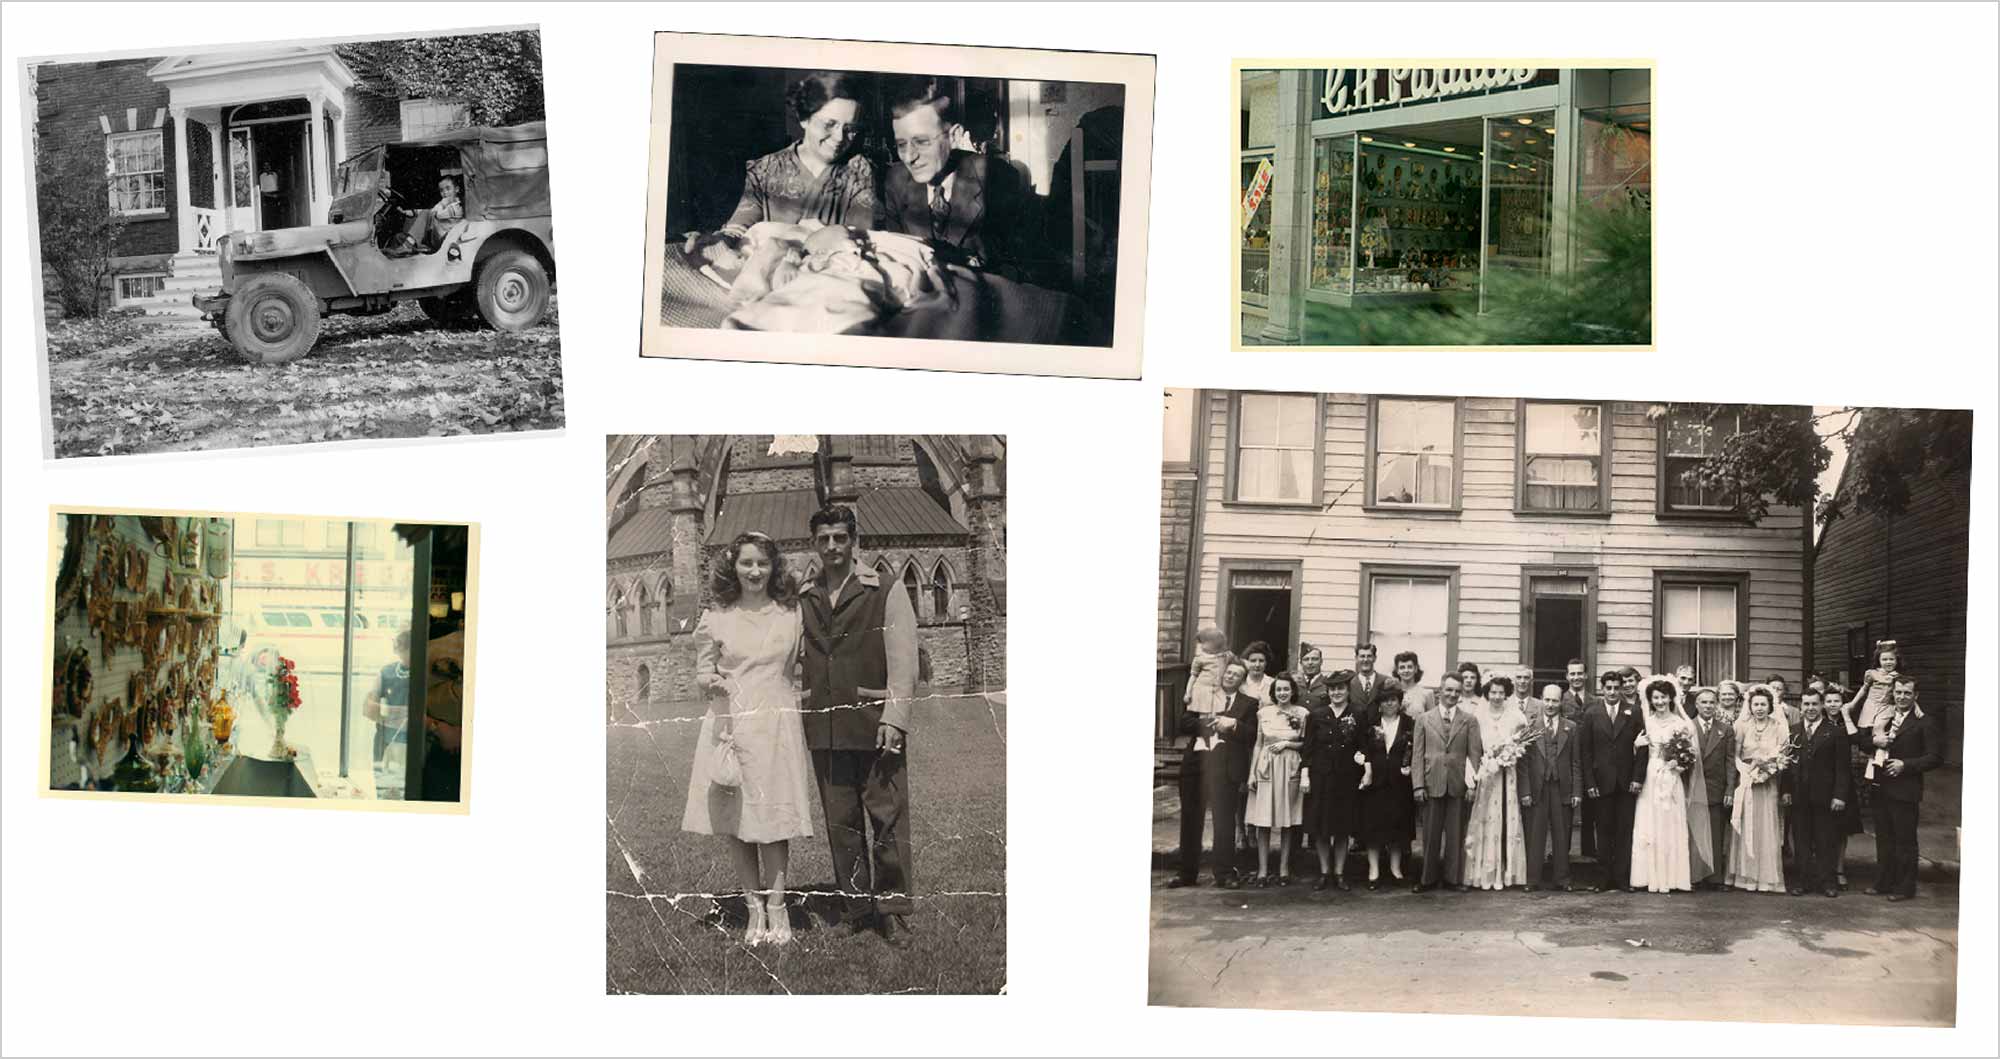
Place as many images on your flatbed scanner as can fit. It doesn’t even matter if they move a bit when you close the lid. Just make sure the photos aren’t overlapping. Go ahead and scan your photos into one file.
Once you have your scan, you can use File > Automate > Crop and Straighten. This script will magically create a separate file with each photo in it.
The one condition for this to work is that the backgrounds of the photos are not completely white. When Photoshop produces the separate file, it detects the edges of each one. If the background of your photo is completely white, it may not be able to differentiate it from the scanner’s white lid.
Run the script on the 05-crop-and-straighten.jpg photo. Save the resulting images in the 05-crop-and-straighten-output folder.
Using Photomerge
Photoshop includes a function called Photomerge. It’s under the File > Automate menu. It receives a series of photos. Your source photographs play a large role in panoramic compositions. You need to have enough overlap between the photos for Photoshop to know how to stitch them together.
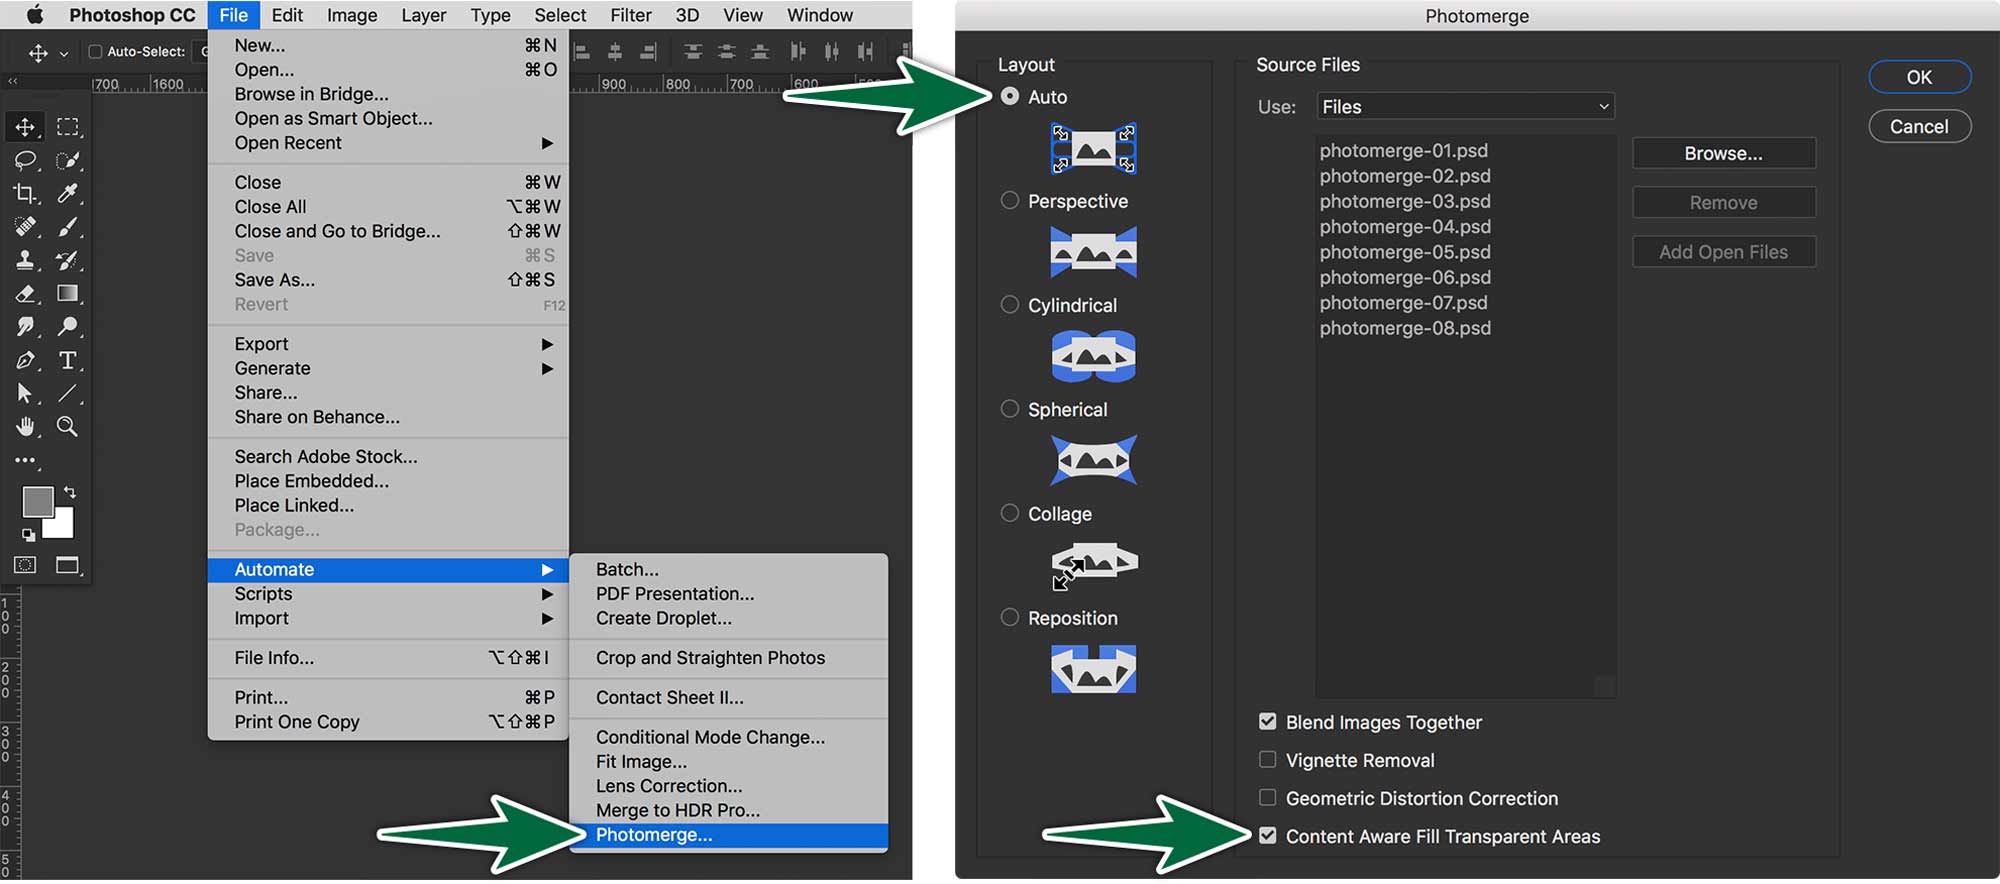
Create a panorama with the photos in the 06-photomerge > 00-photos-to-merge folder. Save the resulting file in the 06-photomerge folder.
Creating a Droplet
A droplet is a file you can keep anywhere on your computer. When you drop image file on it, it will perform a workflow. A droplet applies an action to one or more images, or a folder of images that you drag onto the droplet icon.

Actions are the basis for creating droplets — you must create the desired action in the Actions panel before creating a droplet.
- Choose File > Automate > Create Droplet.
- Specify where to save the droplet. Click Choose in the Save Droplet In section of the dialogue box and navigate to the location.
- Select the Action Set, and then designate which action you intend to use within the Set and Action menus. Select the action in the Actions panel before you open the dialog box to pre-select these menus.
- Set processing, saving, and file naming options.
Let’s create a droplet which will perform the Sharpen with High Pass workflow on our photos.
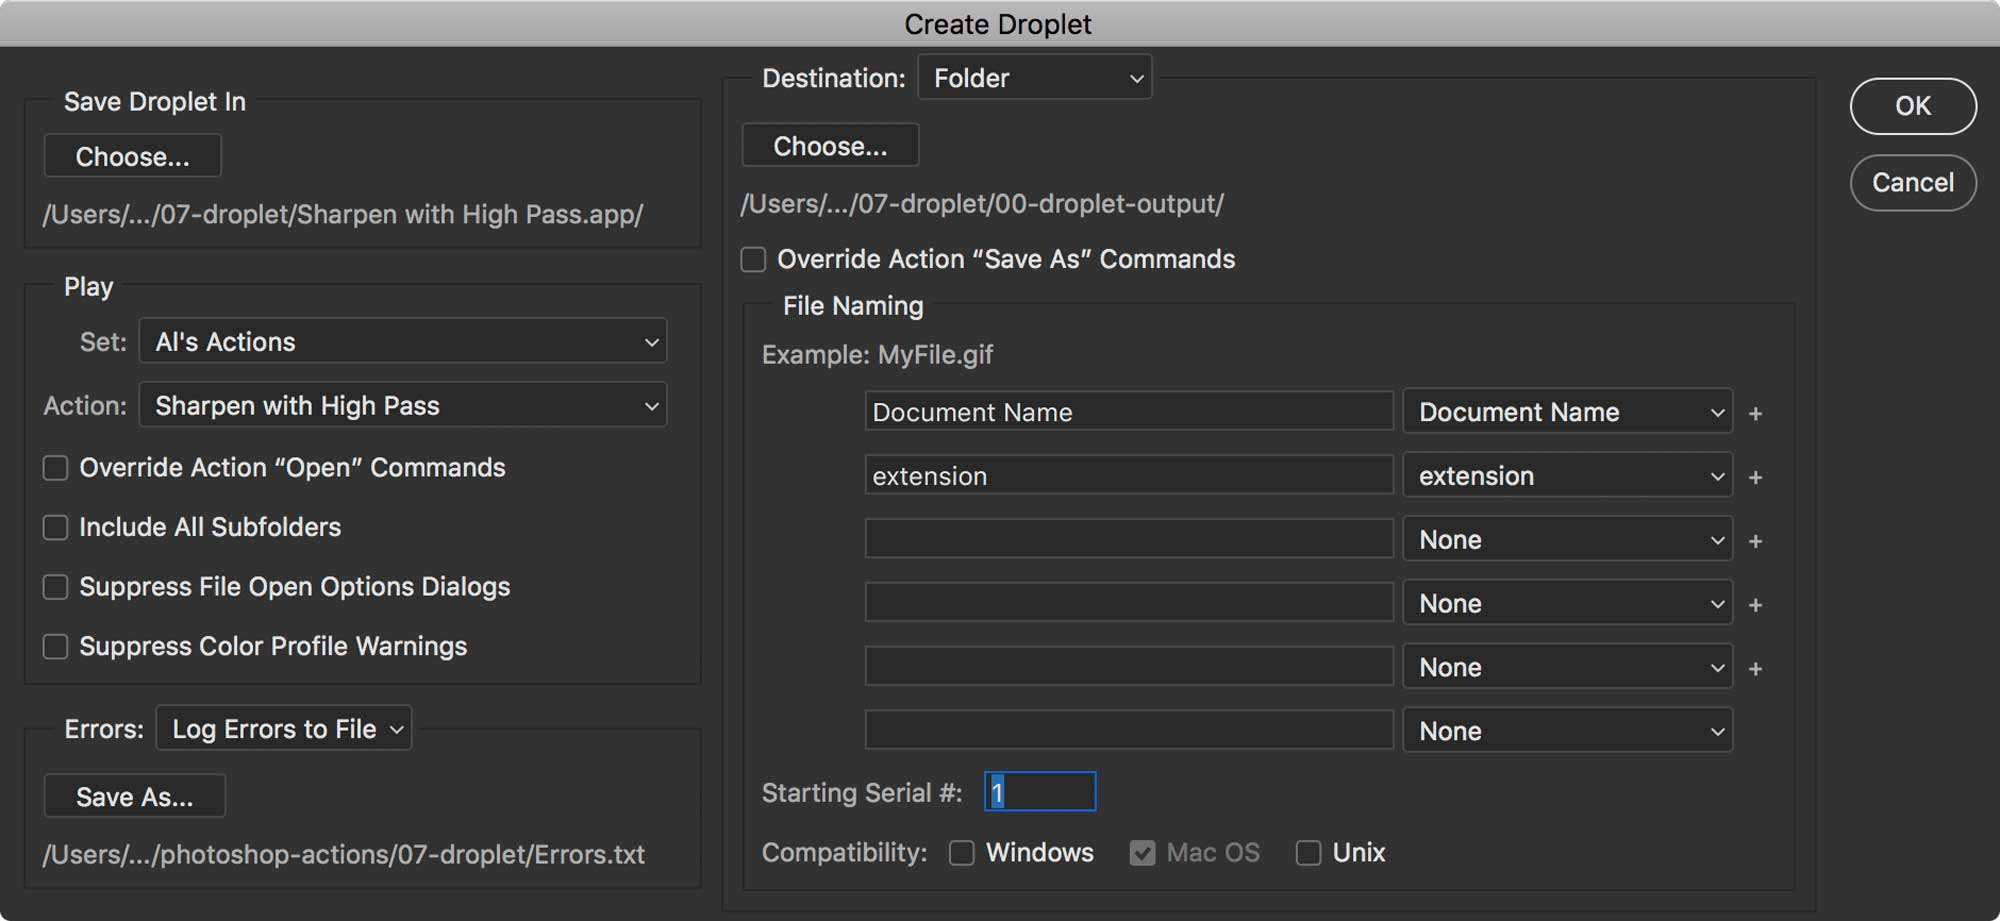
Save the droplet in the 07-droplet folder. Run the sharpening workflow. Log your errors to a text file in the same folder. Output the resulting files into the provided 00-droplet-output folder.
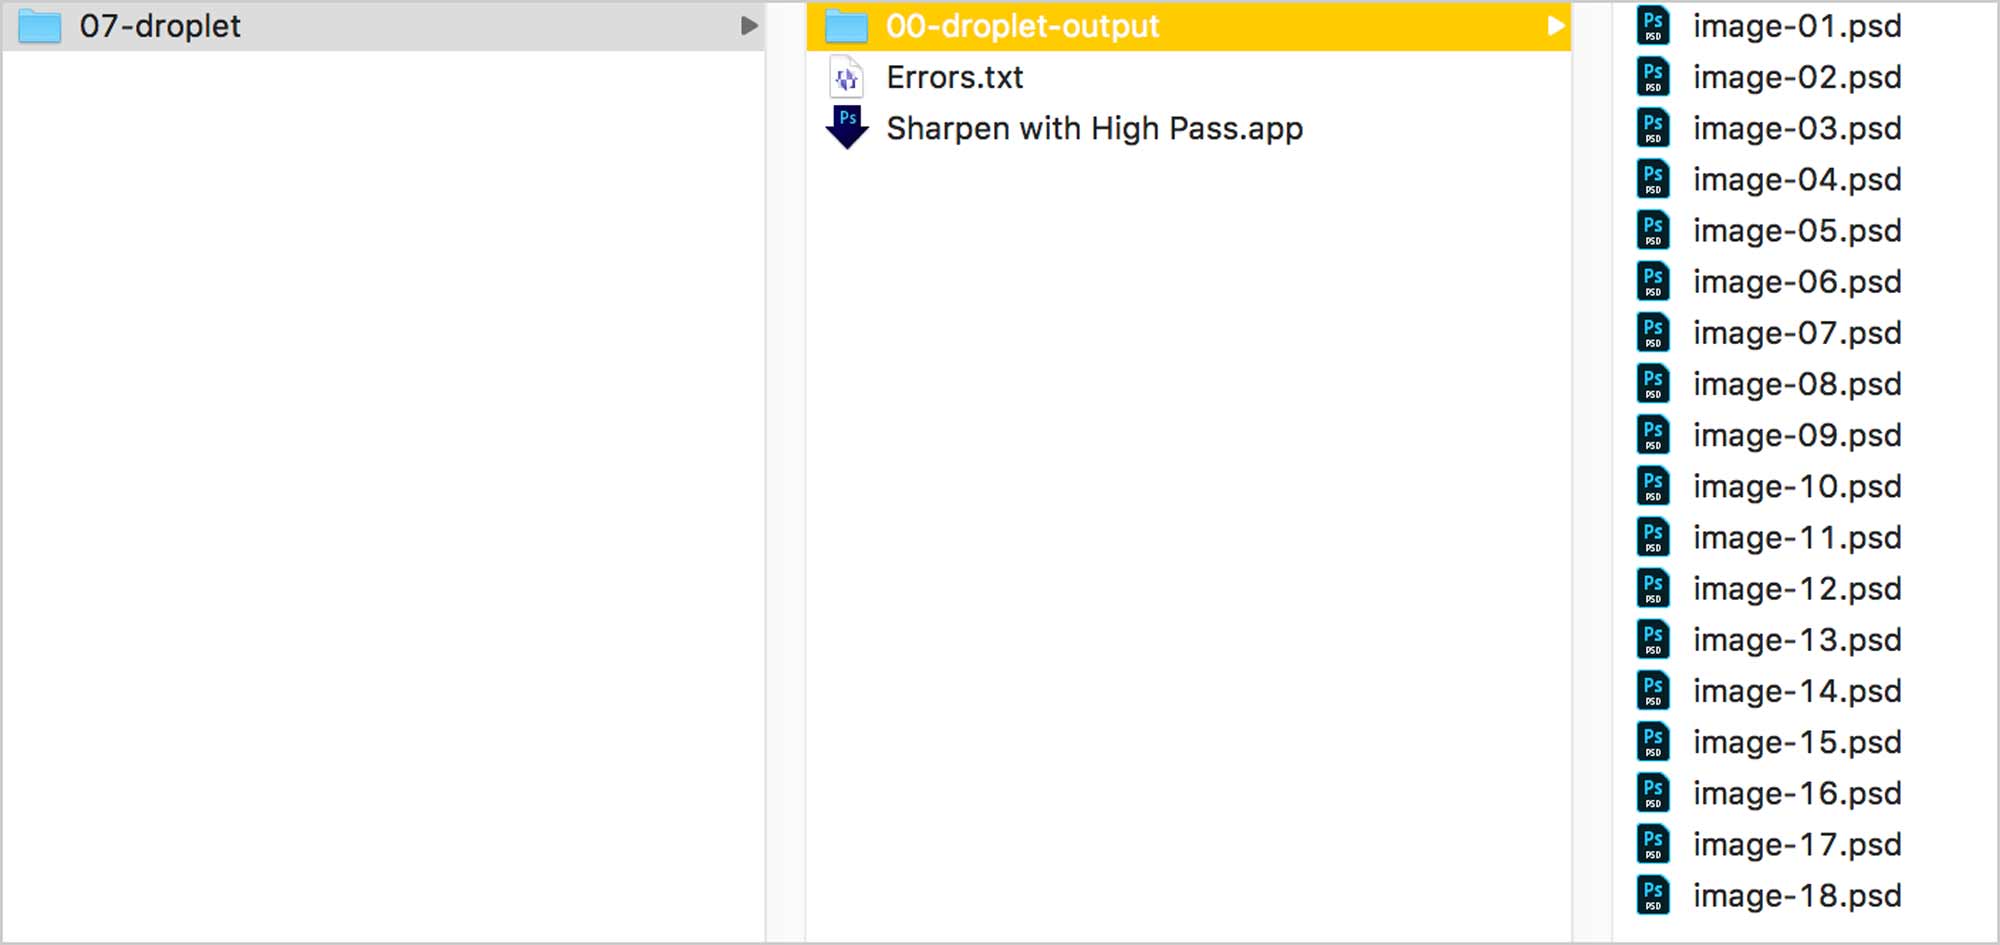
Processing files with droplets
Drag files or a folder of images onto the droplet icon. Photoshop will launch if it is not already running. It will open and process each file, one after the other. You can work in other applications while it’s running, but they will likely perform more slowly, since Photoshop is working as hard as it can.
Back Up Droplet Actions
A droplet is based on an action. Let’s say you create your action, then create a droplet. You delete the action from the panel. You then lose the droplet. You’ll need to re-record the action to create the droplet from it.
In order to not lose anything, record the action, then go to the panel menu. Choose Save Action…. This will save a file on your computer with the whole set of actions in it, which you can re-load in the panel.
Creating Contact Sheets
Contact sheets can be used to aid photo selection after a shoot. They can be presented to clients for approvals. In other words, they’re very convenient to have around. The challenge is that creating them manually would be very tedious.
The dialogue is big, but pretty easy to use. The options are clear. Note that you can preserve layers, which makes the contact sheet easily editable.
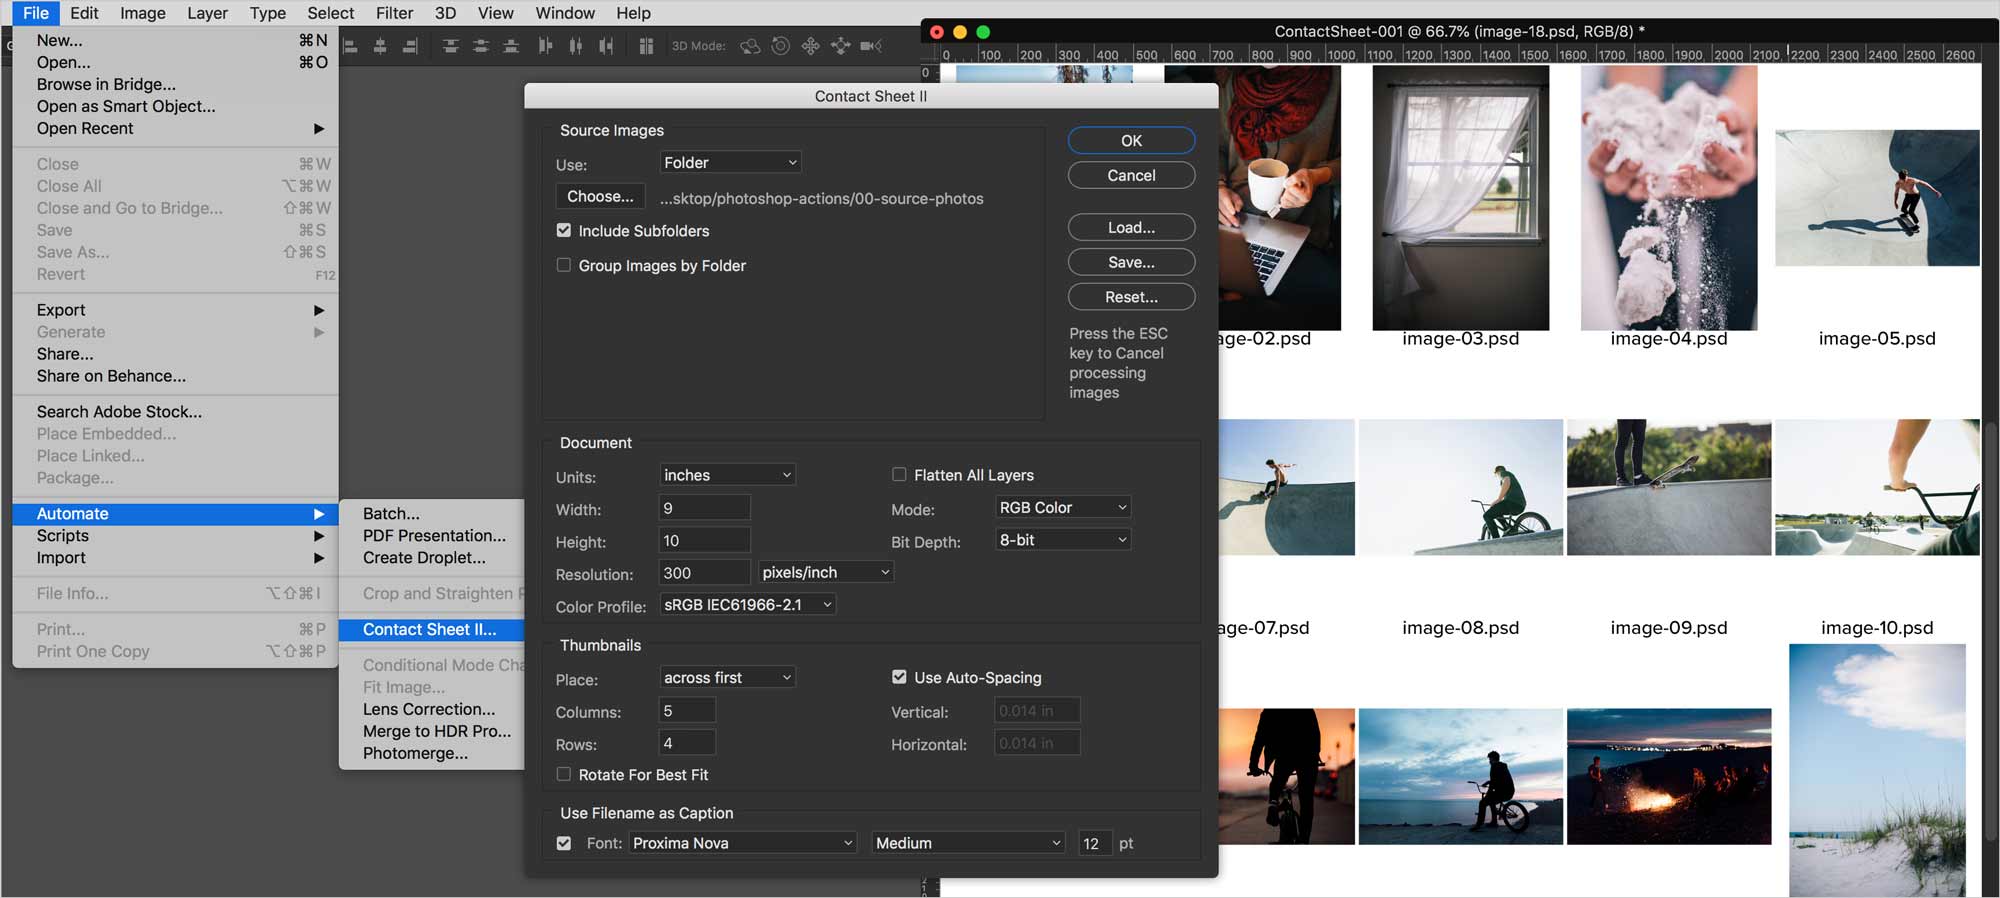
Run the Contact Sheet script on the provided images. Save the resulting files into the 08-contact-sheet folder.
Formative Activity
Image Processor
- Feed the Image Processor dialogue the source images.
- Convert the images to jpeg, psd and tiff files.
- Resize the images to 512 pixels.
- Do nothing in the section 4 at the bottom of the dialogue.
- Have the processed photos put in the 01-image-processor-output folder.
Crop & Straighten
Run the Crop & Straighten script on the 02-crop-and-straighten.psd image. Save the results in the 02-crop-and-straighten-output folder.
Photomerge
Use the images in 06-photomerge > 00-photos-to-merge to create a panorama using Photomerge. Let’s turn on Content Aware Fill Transparent Areas.
Save the resulting panorama into the 03-photomerge > 00-photos-to-merge folder.
Contact Sheet
Create a contact sheet with the provided photos. Save the file(s) in the 04-contact-sheet folder.
