Topics
How Otto Works
You don’t have an employee on which you can hand off tedious tasks like renaming hundreds of files or resizing a folder full of images. Well, actually now you do have one. Otto will save time and he won’t make any mistakes.

The Automator app creates documents. Each time you go File > New, it will create a new document, then ask you what type of automation you wish to create. This is what this looks like.
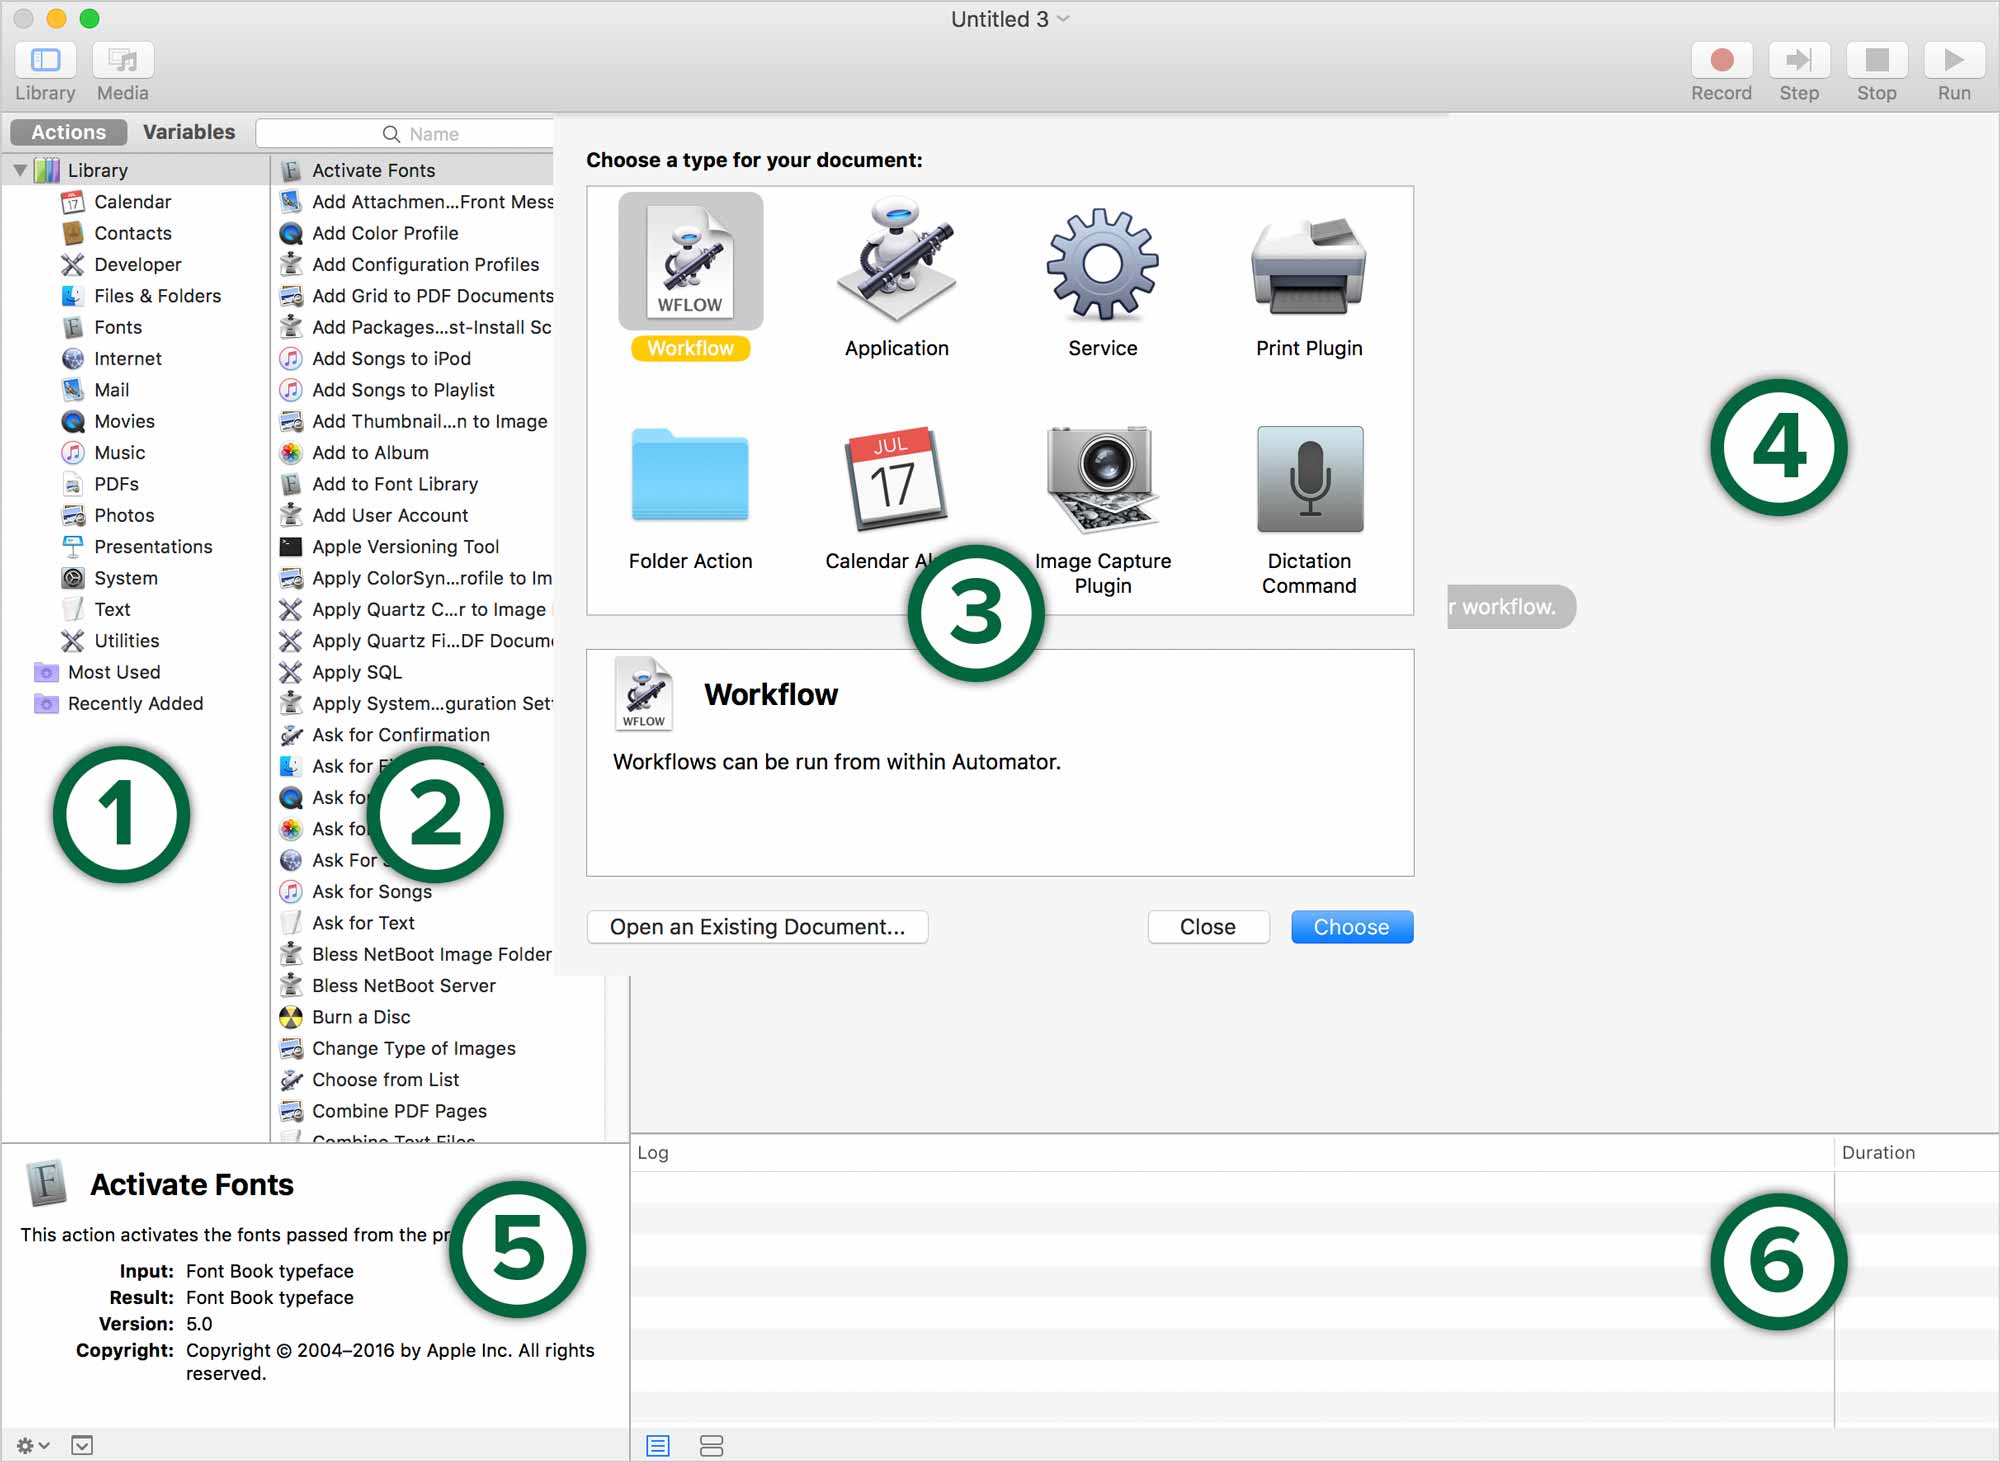
- Library: These are the areas that Automator can automate.
- Actions: These are all the actions Automator can do.
- Types: These are the different types of automations.
- Workflow: This is where you stack actions so that they run sequentially.
- Description: This is where Automator describes the action you’ve targeted.
- Log or Variables: This area displays a log of your workflow after it has run. It’s also the variables area.
To create a workflow, drag one or more actions into the workflow pane. The order in which you stack them counts because one action feeds the next. If your workflow doesn’t work, there will be an error message in the Log pane at the bottom of the window.
Types of Automations
- Workflows:
- These are the simplest types of automation. Simply drag actions into the workflow pane, then click the Run button.
- Application:
- This creates a macOS application from your workflow. You double-click on its icon like any other app and your workflow will run.
- Service:
- This makes your workflow accessible from a right-click menu in Finder.
- Print Plugin:
- Workflows created from here are accessible from within the Print dialogue.
- Folder Action:
- These workflows are attached to a folder so that it’s run when you add something to the folder.
- Calendar Alarm:
- These are scheduled workflows. Create the workflow, then schedule it in Apple’s Calendar app. So, they can be recurring.
- Image Capture Plugin:
- Workflows are applied to images from within the Image Capture application.
- Dictation Command:
- This makes your automation workflows triggerable with speech commands.
A Simple Workflow
Let’s rename a large number of files using a simple workflow. Launch Automator, then choose to create a new workflow. Save it into the provided 01-simple-workflow folder named Rename Finder Items.workflow.
![]()
All you need to do is drag all the provided files into the workflow pane for Automator to act only on these files. It will add its own Get Specified Items action.
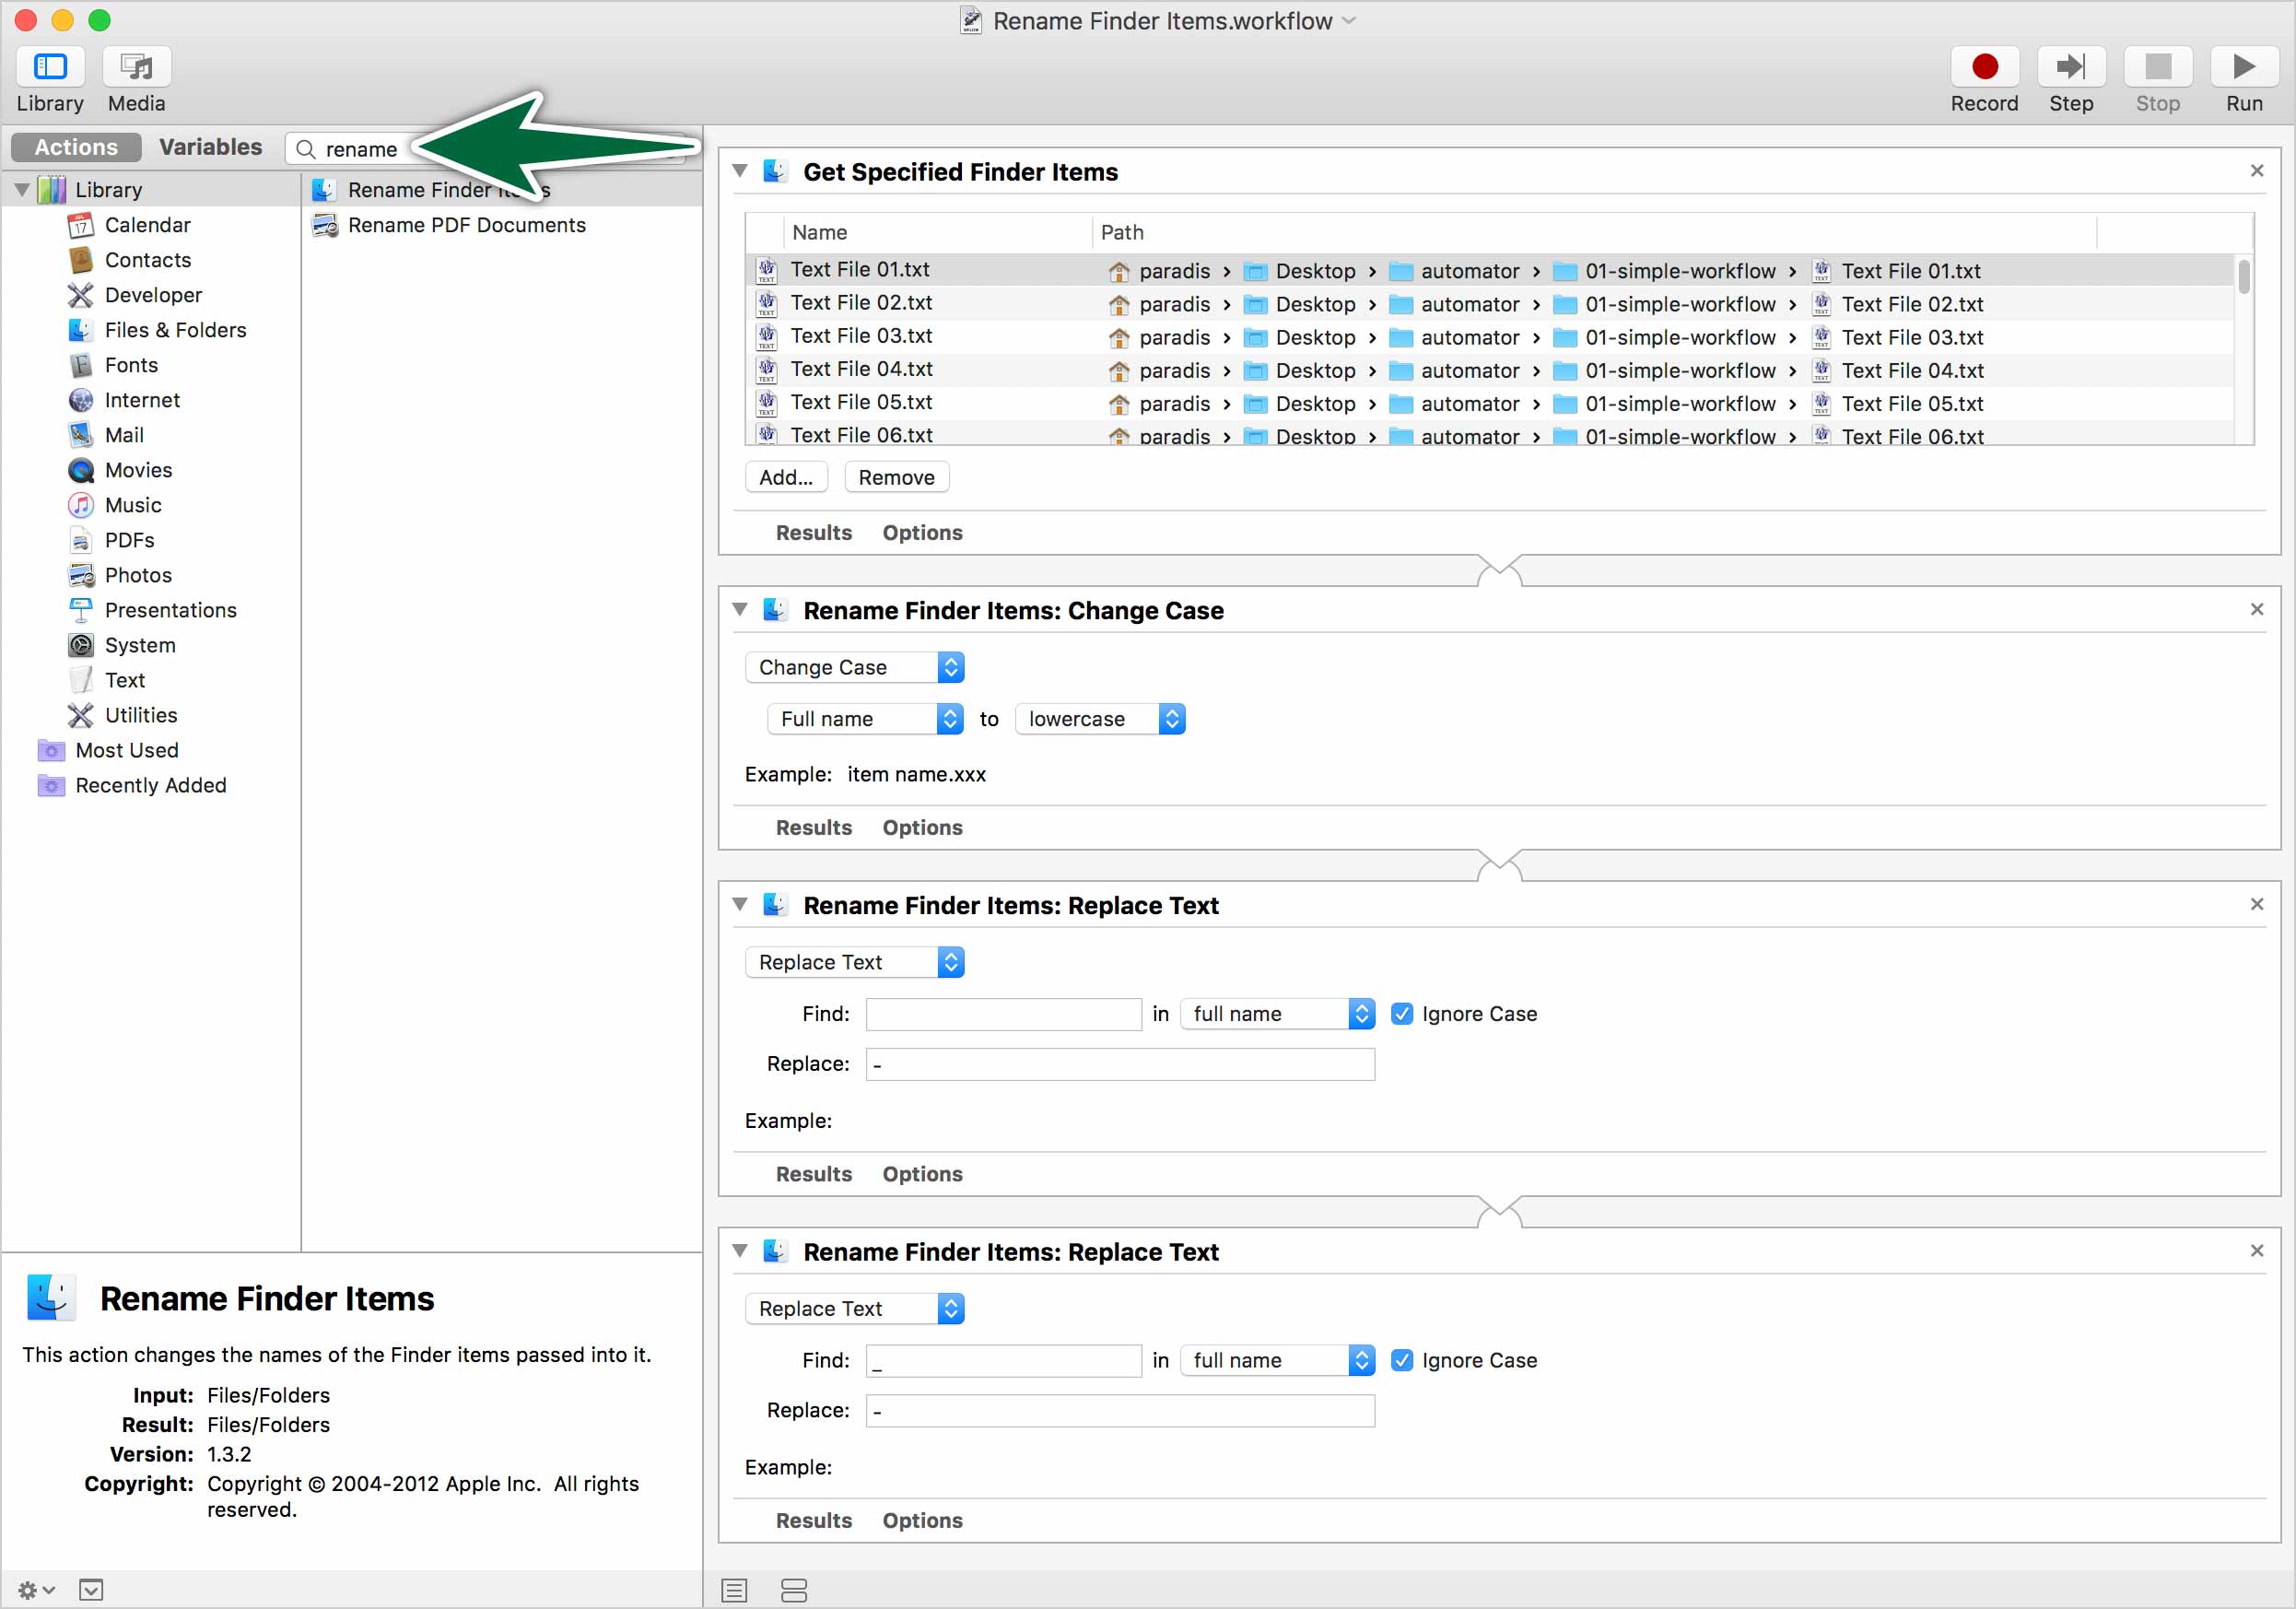
Do a search for rename. Drag the Rename Finder Items action into your workflow. Set it up as shown above. This means you’ll drag it in a few times. You can see that we’re going to make the file names lower case. We’ll replace all spaces and underscores with hyphens.
So, this
Text File 31.txt
will become this
text-file-31.txt.
Do you see how this could be useful for web design? All your web site pages and images should be named without spaces and all lower case. Now you don’t need to do this manually anymore. Otto can act on many files at once for you.
Save this workflow file into the 01-simple-workflow folder named Rename Finder Items.workflow.
A Finder Service
![]()
The above workflow is all well and good, but it’s quite a bit of work to create such a workflow each time you want to rename files and folders. To this end, we’ll create a Finder Service.
Let’s create a Finder Service which we can envoke with a right-click in Finder. We’ll make it a workflow that we can have rename files and folders however we want.
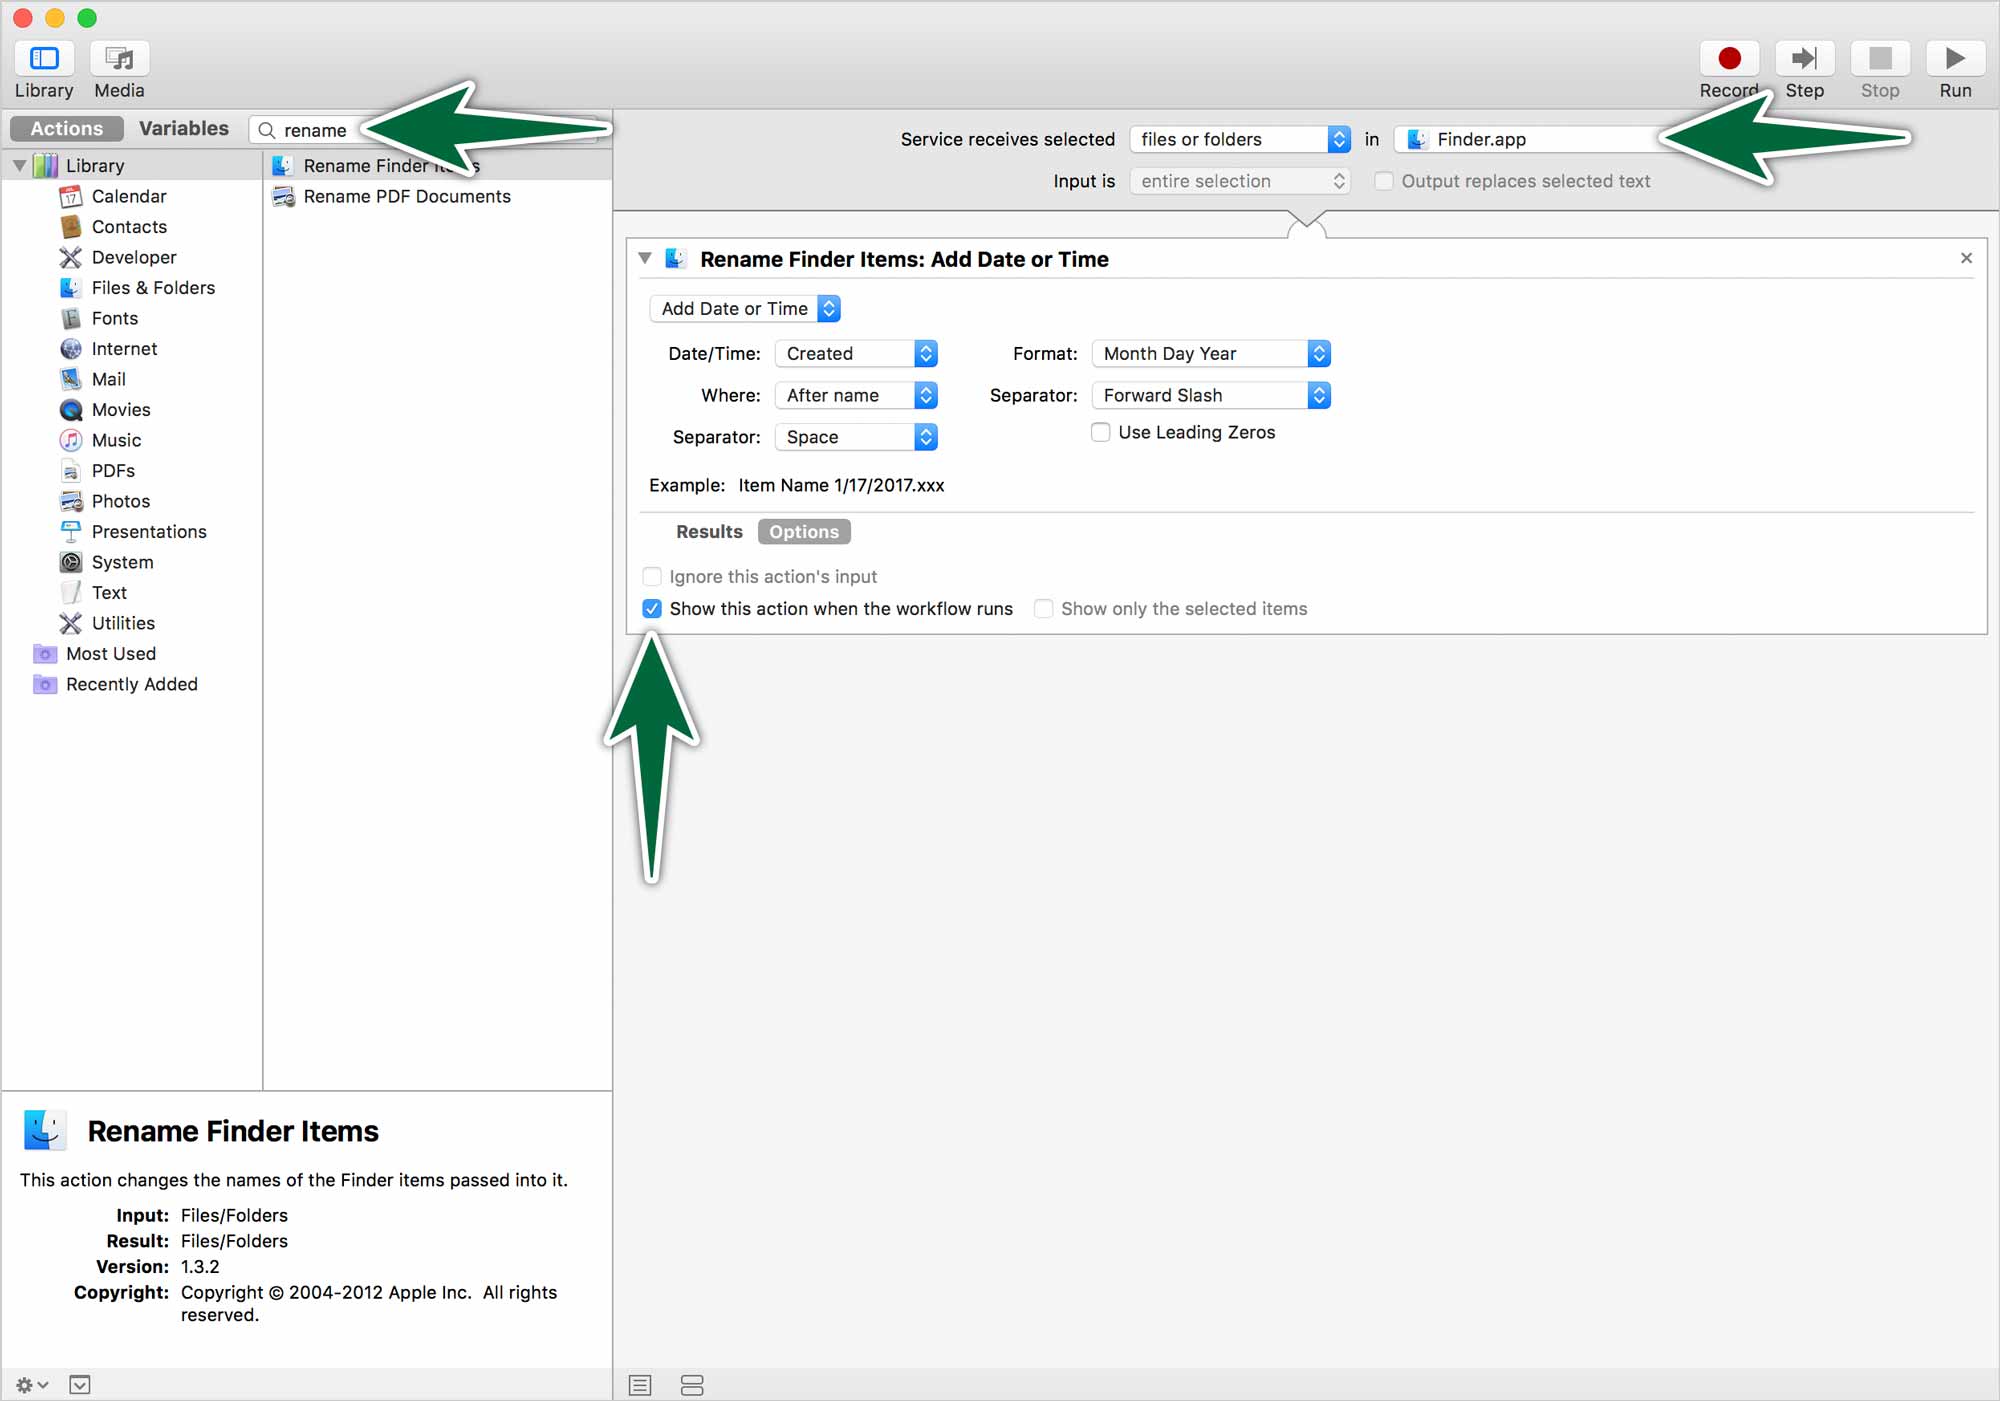
Save this file as Rename Finder Items. You don’t choose the location where it’s saved. All Finder Services are stored in Home Directory > Library > Services. If you need to edit your service, you can find it there, then open to edit.
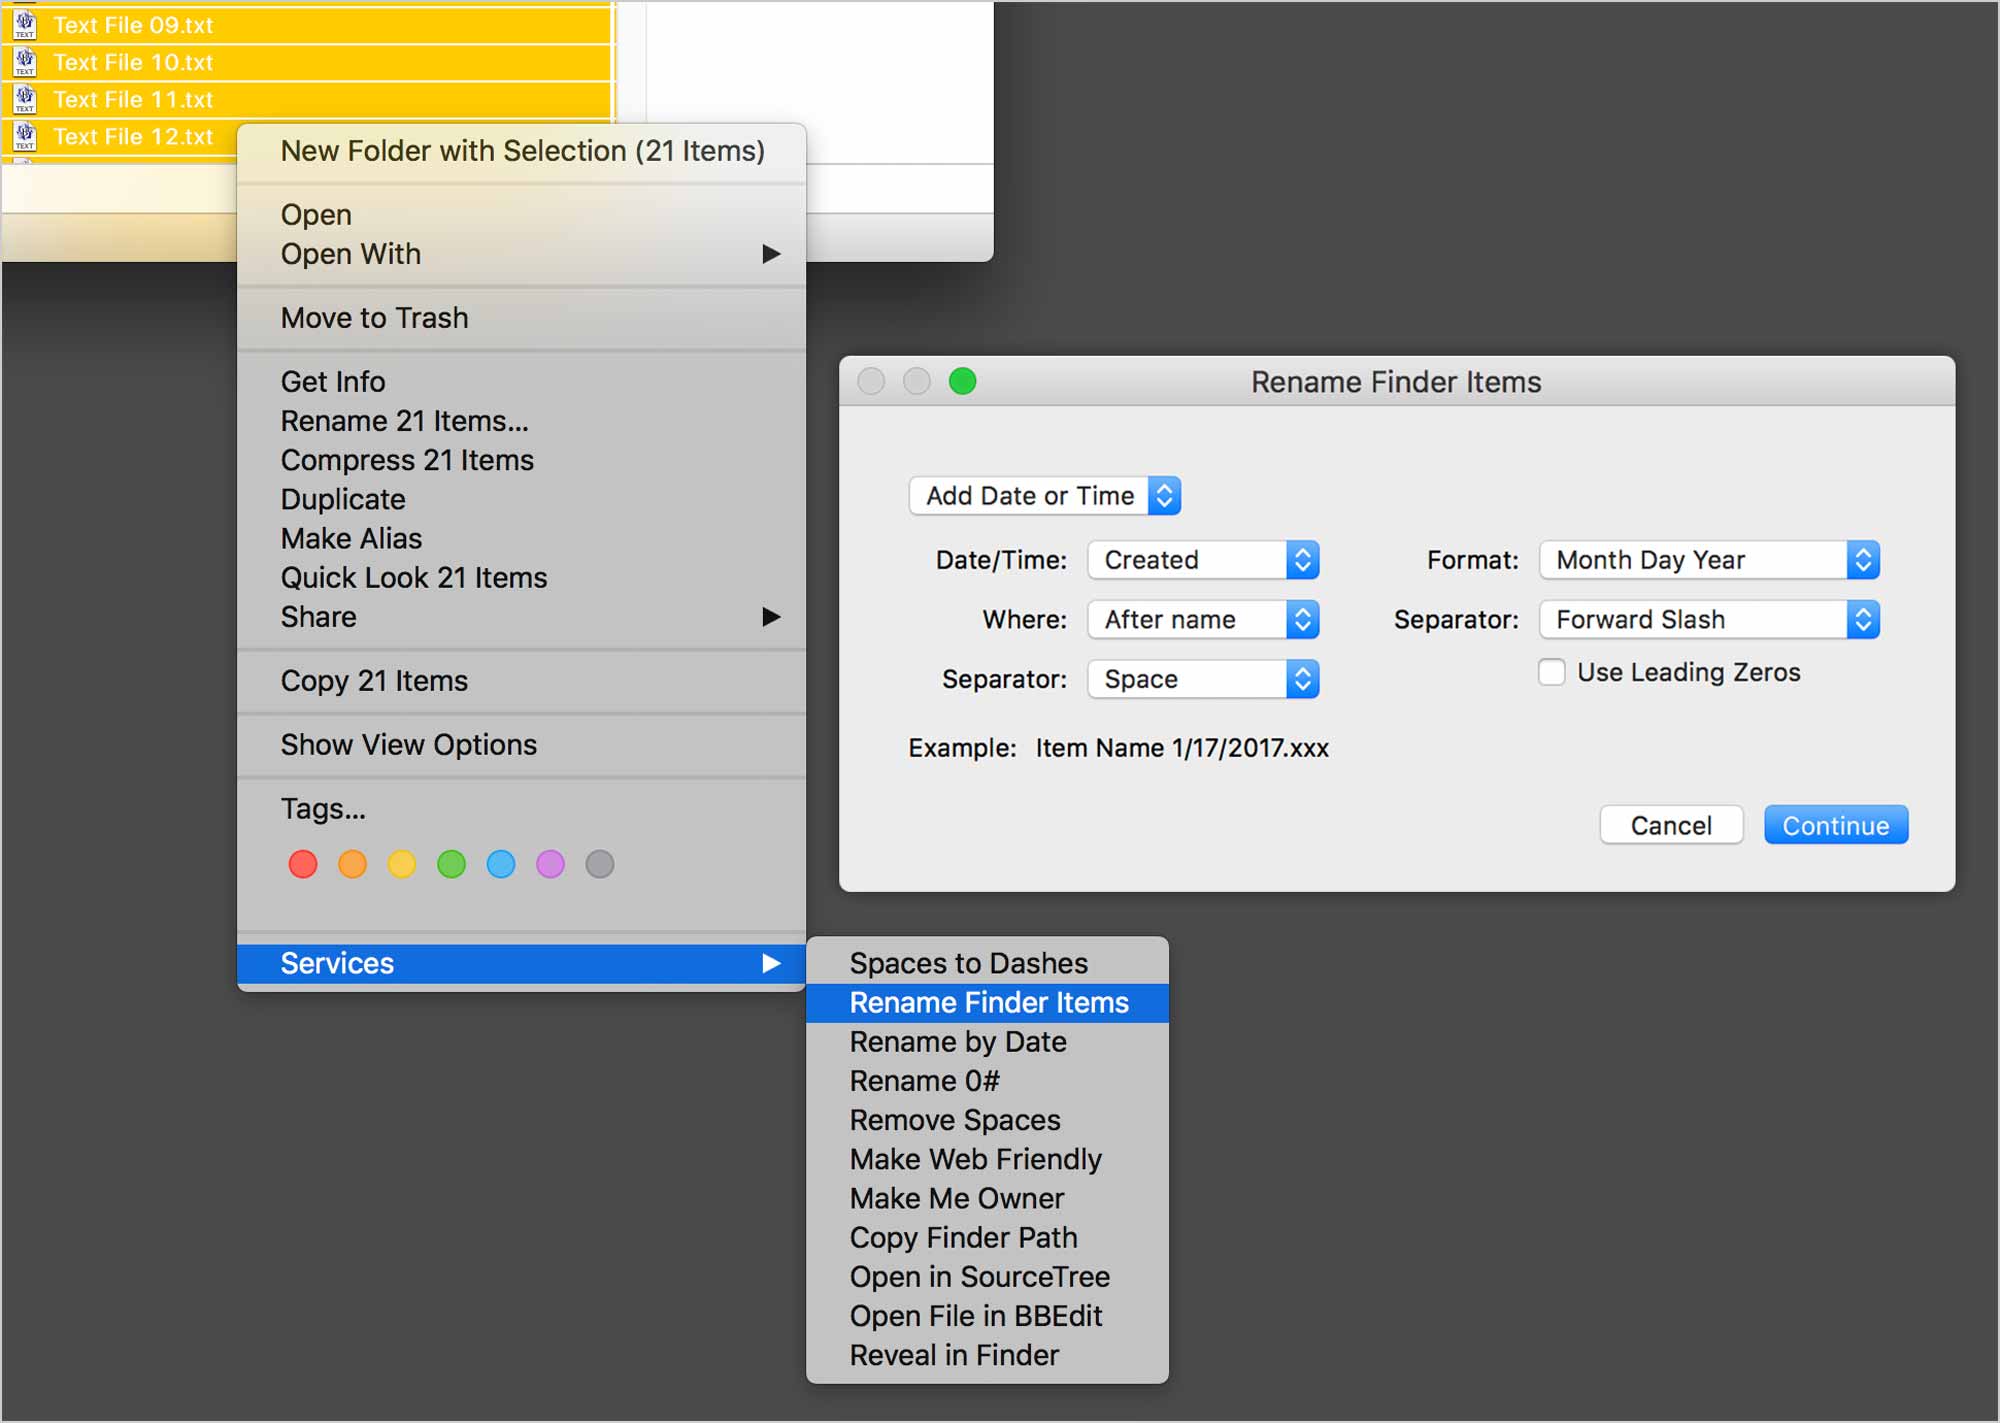
To envoke the action, simply right-click on files and/or folders in Finder. Go Services > Rename Finder Items. The beauty of this is that the action asks you how you want to rename the selected files. The action asks because you’ve checked Show this action when the workflow runs when you created the service.
Make Web Friendly Service
Let’s make a Make Web-Friendly service so you can quickly renamed batches of files for your web dev projects. Create a new Automator document. Add these actions:
- Rename Finder Items: Replace a Space character with a hyphen.
- Rename Finder Items: Replace and Underscore character with a hyphen.
- Rename Finder Items: Make the whole file name lower case.
Save the Automator document as Make Web-Friendly. Now, when you need to rename a batch of files or folders, you can do it with a right-click.
A Folder Action
![]()
You can create an Automator workflow, then attach it to a specific folder. When you add files to the folder, the action does its thing.
Let’s create an workflow which will resize images. The workflow is meant for really large image files which you want to make smaller to post online or send via e-mail.
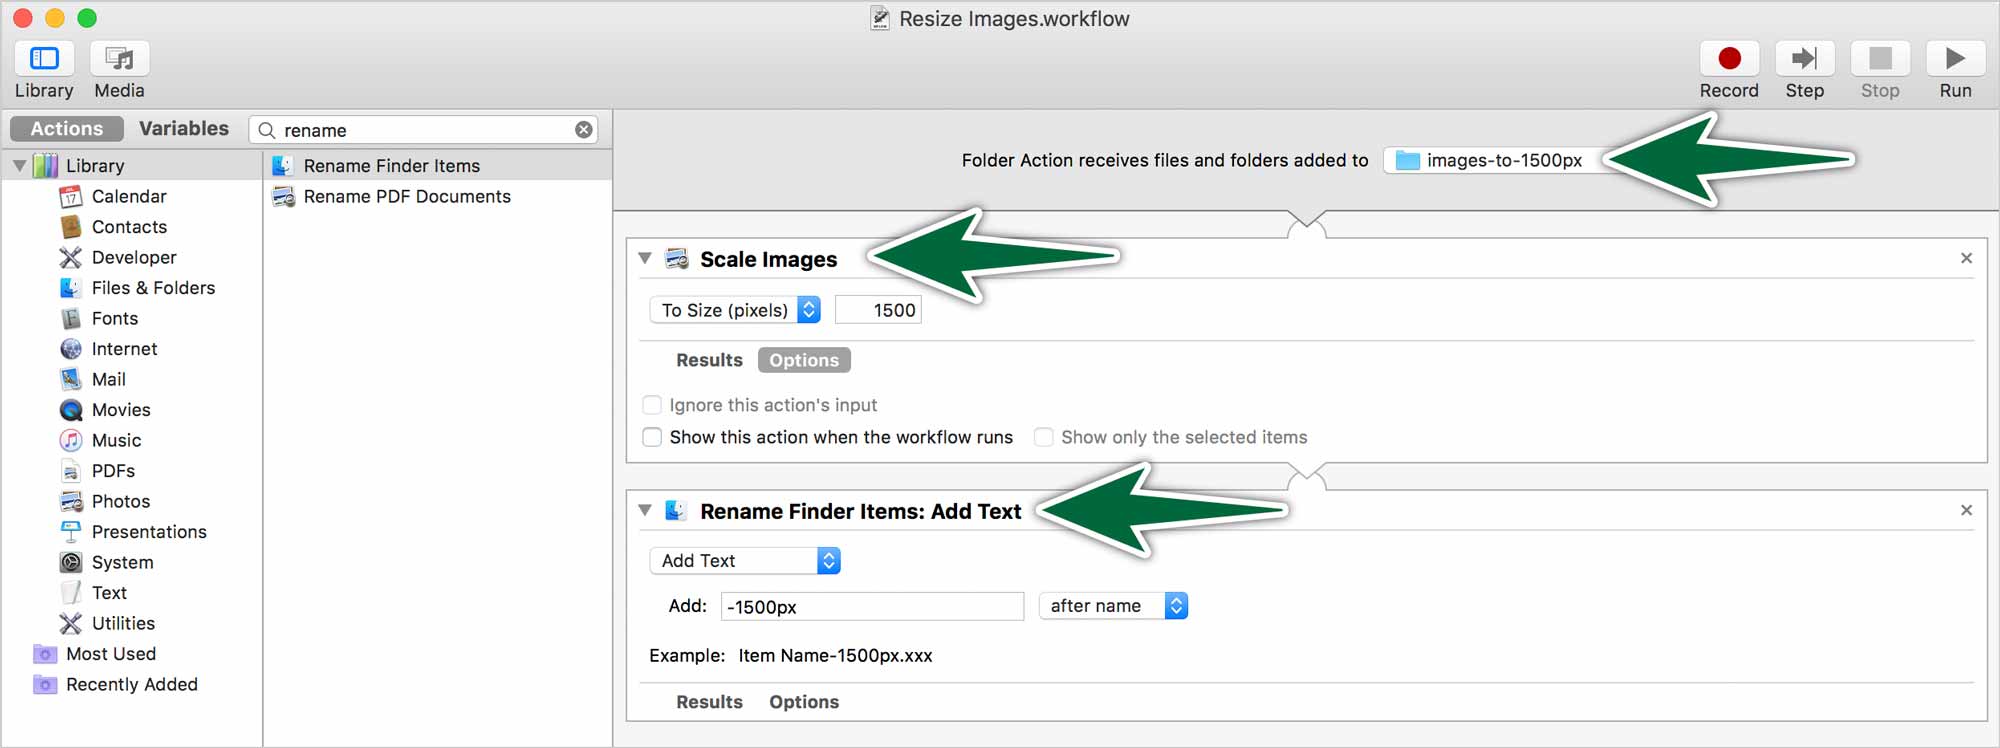
Note that this workflow is destructive. It’s going to resize the originals of any images you put in the folder. Point the action to the provided 02-images-to-1500px folder. Copy the provided images into that folder, then watch the magic happen. All images copied into this folder will be resized to 1500 pixels wide. -1550px will be appended to the file names, then they get moved to the 03-processed-images folder.
You can edit a Folder Action after the fact by right-clicking on the folder itself.
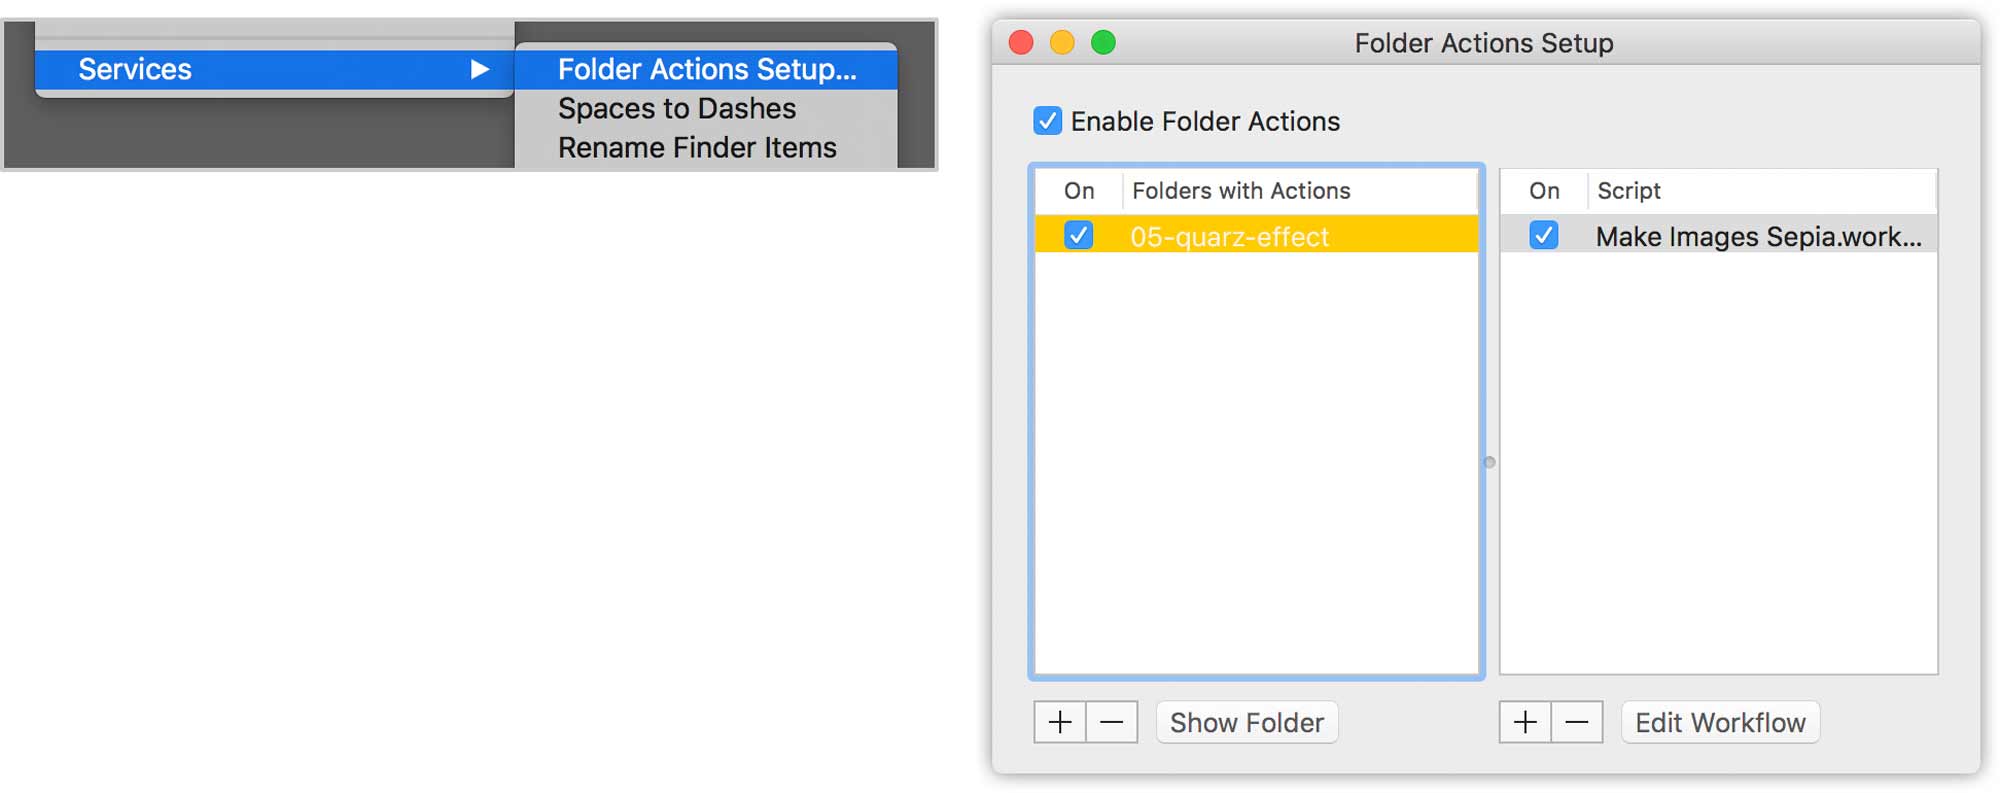
On the left is a list of folders on your computer which have actions attached to them. On the right is a list of all the folder actions you’ve created.
A Calendar Action
![]()
You can create a workflow, then have it triggered by a calendar event. Let’s set up a backup schedule for a specific folder. This workflow will copy a folder from one place to another daily.
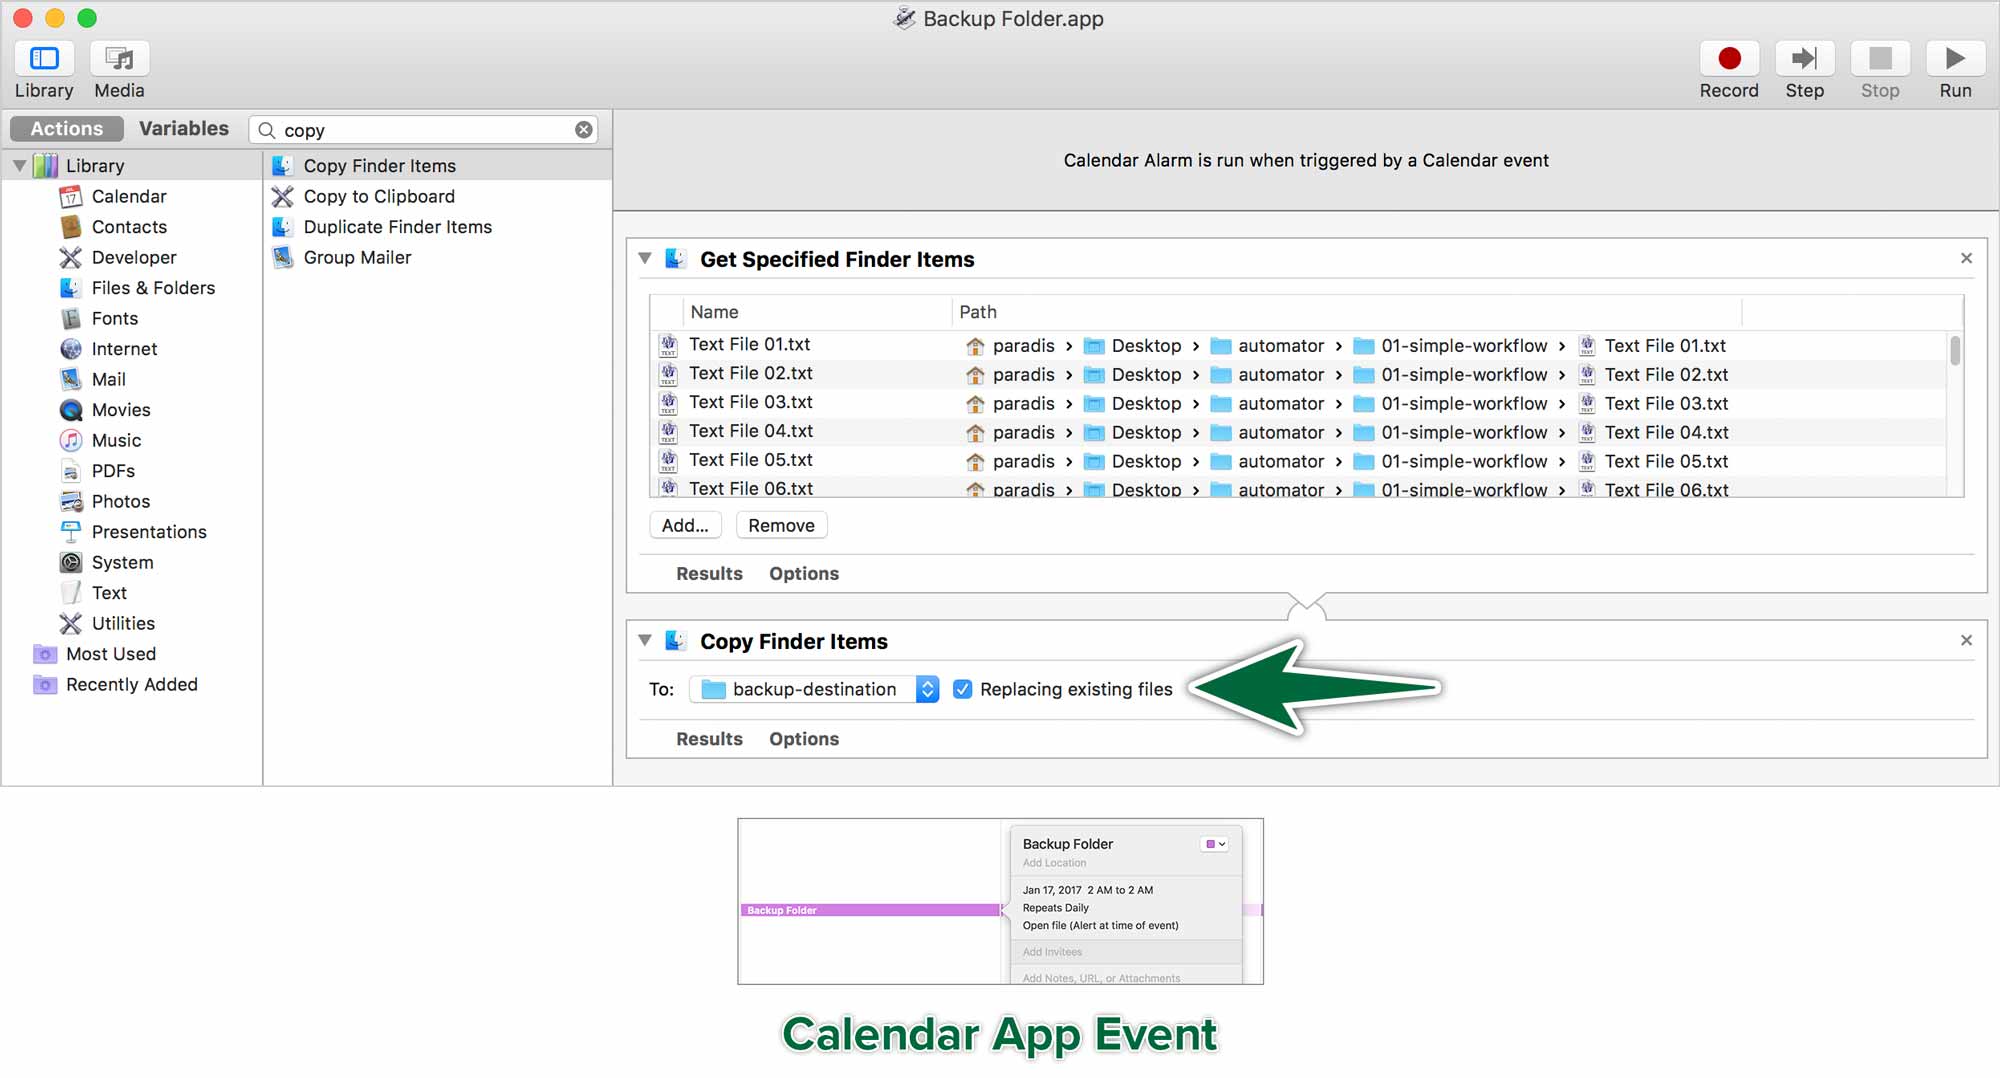
As you can see, the workflow copies the files from the original location to the folder called 03-backup-destination. Once you save the workflow, the Apple Calendar app launches. It allows you to enter the time and frequency of the backup action.
Supplemental Links
- Apple Support: Automator