Topics
Document Setup
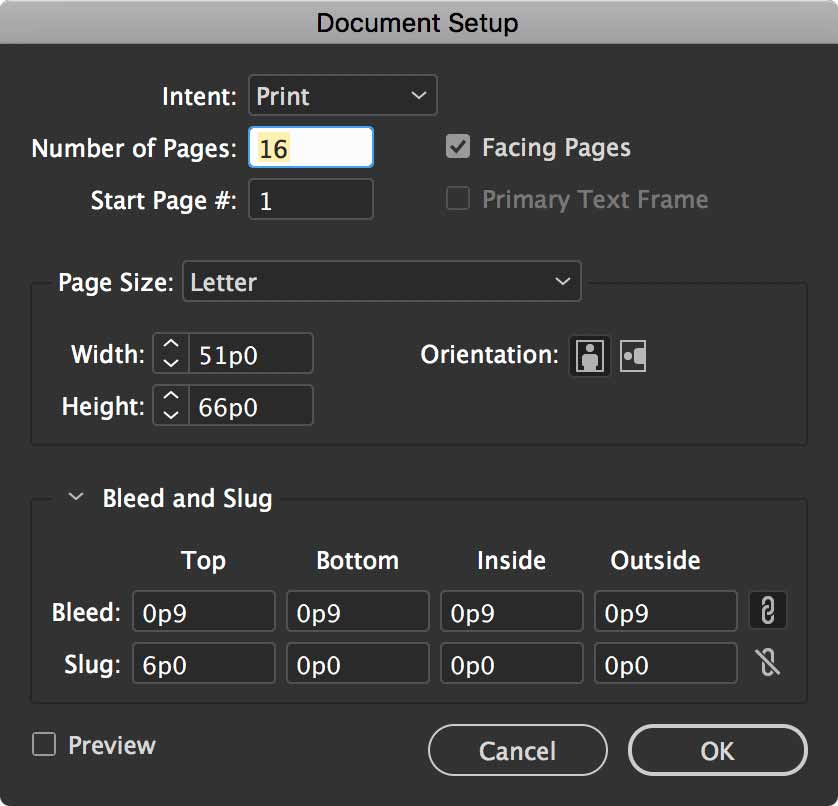
Create a new document as shown, with 16 facing pages. Note that 16 is divisible by 4. Publications always need to have a number of pages divisible by 4 because one signature has four sides.
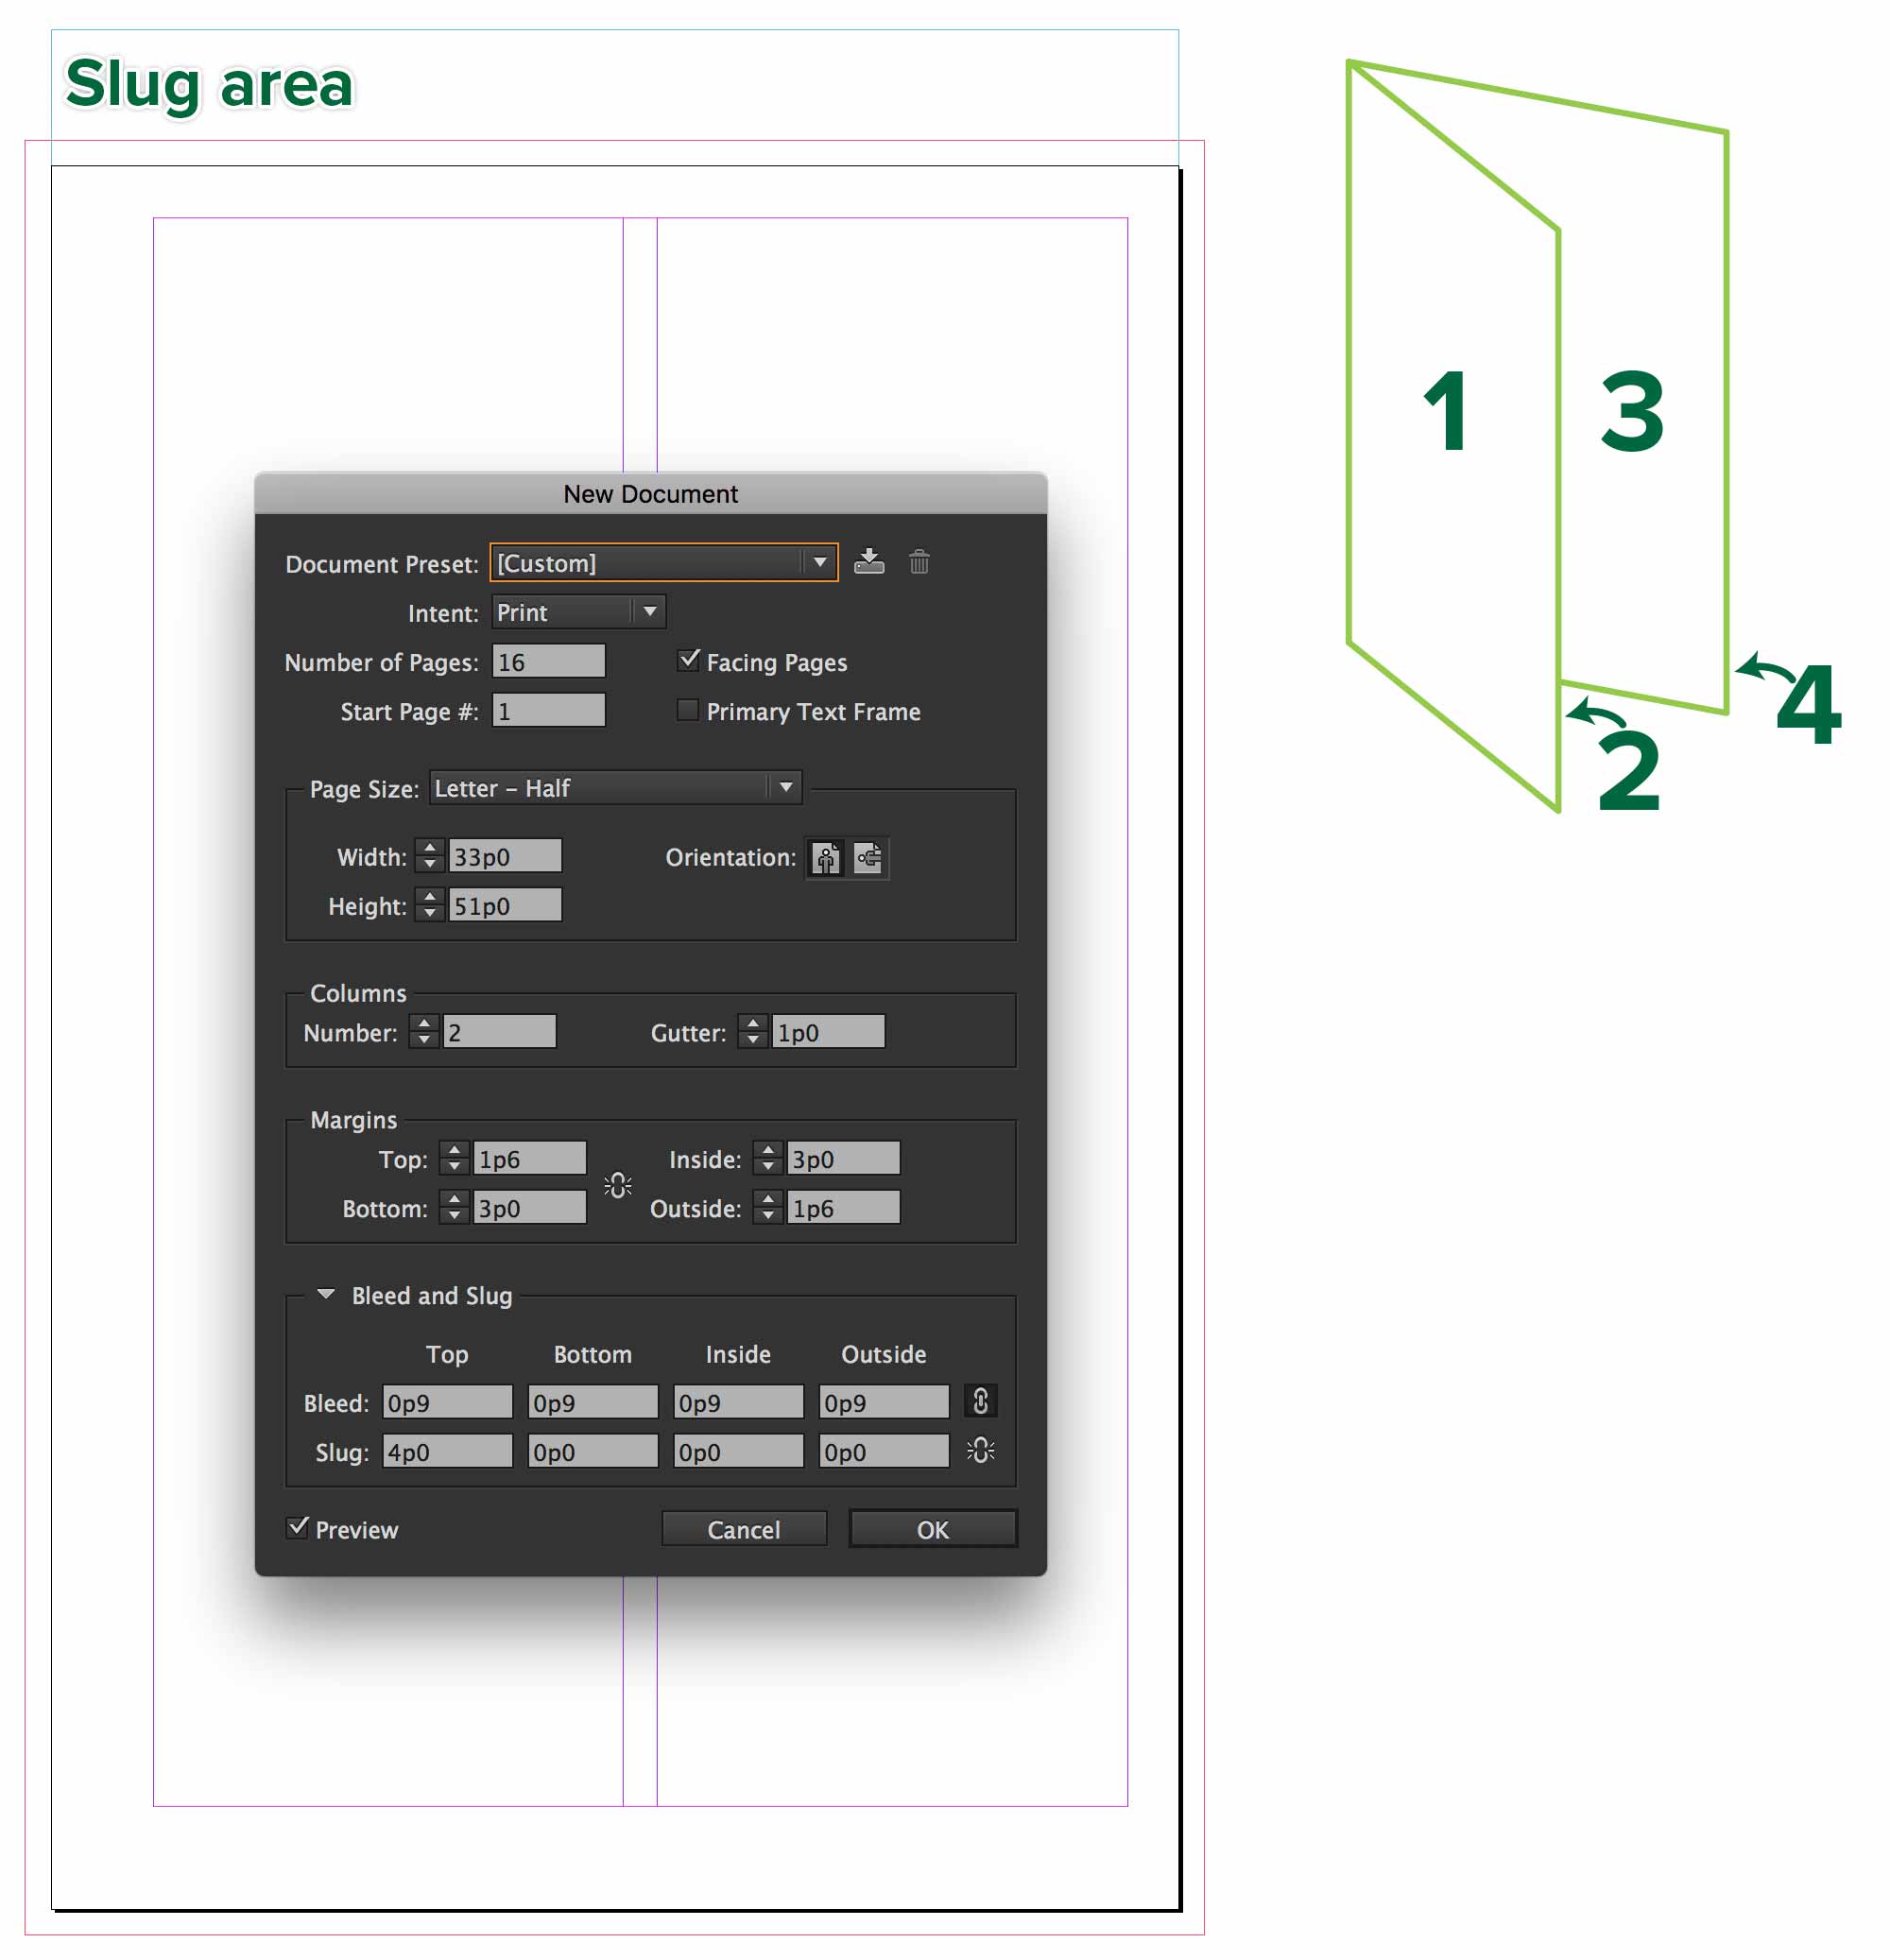
Double-check that you’ve entered all the other values in the dialogue properly. Once our document is created, we want to edit our base paragraph styles.
Paragraph Styles
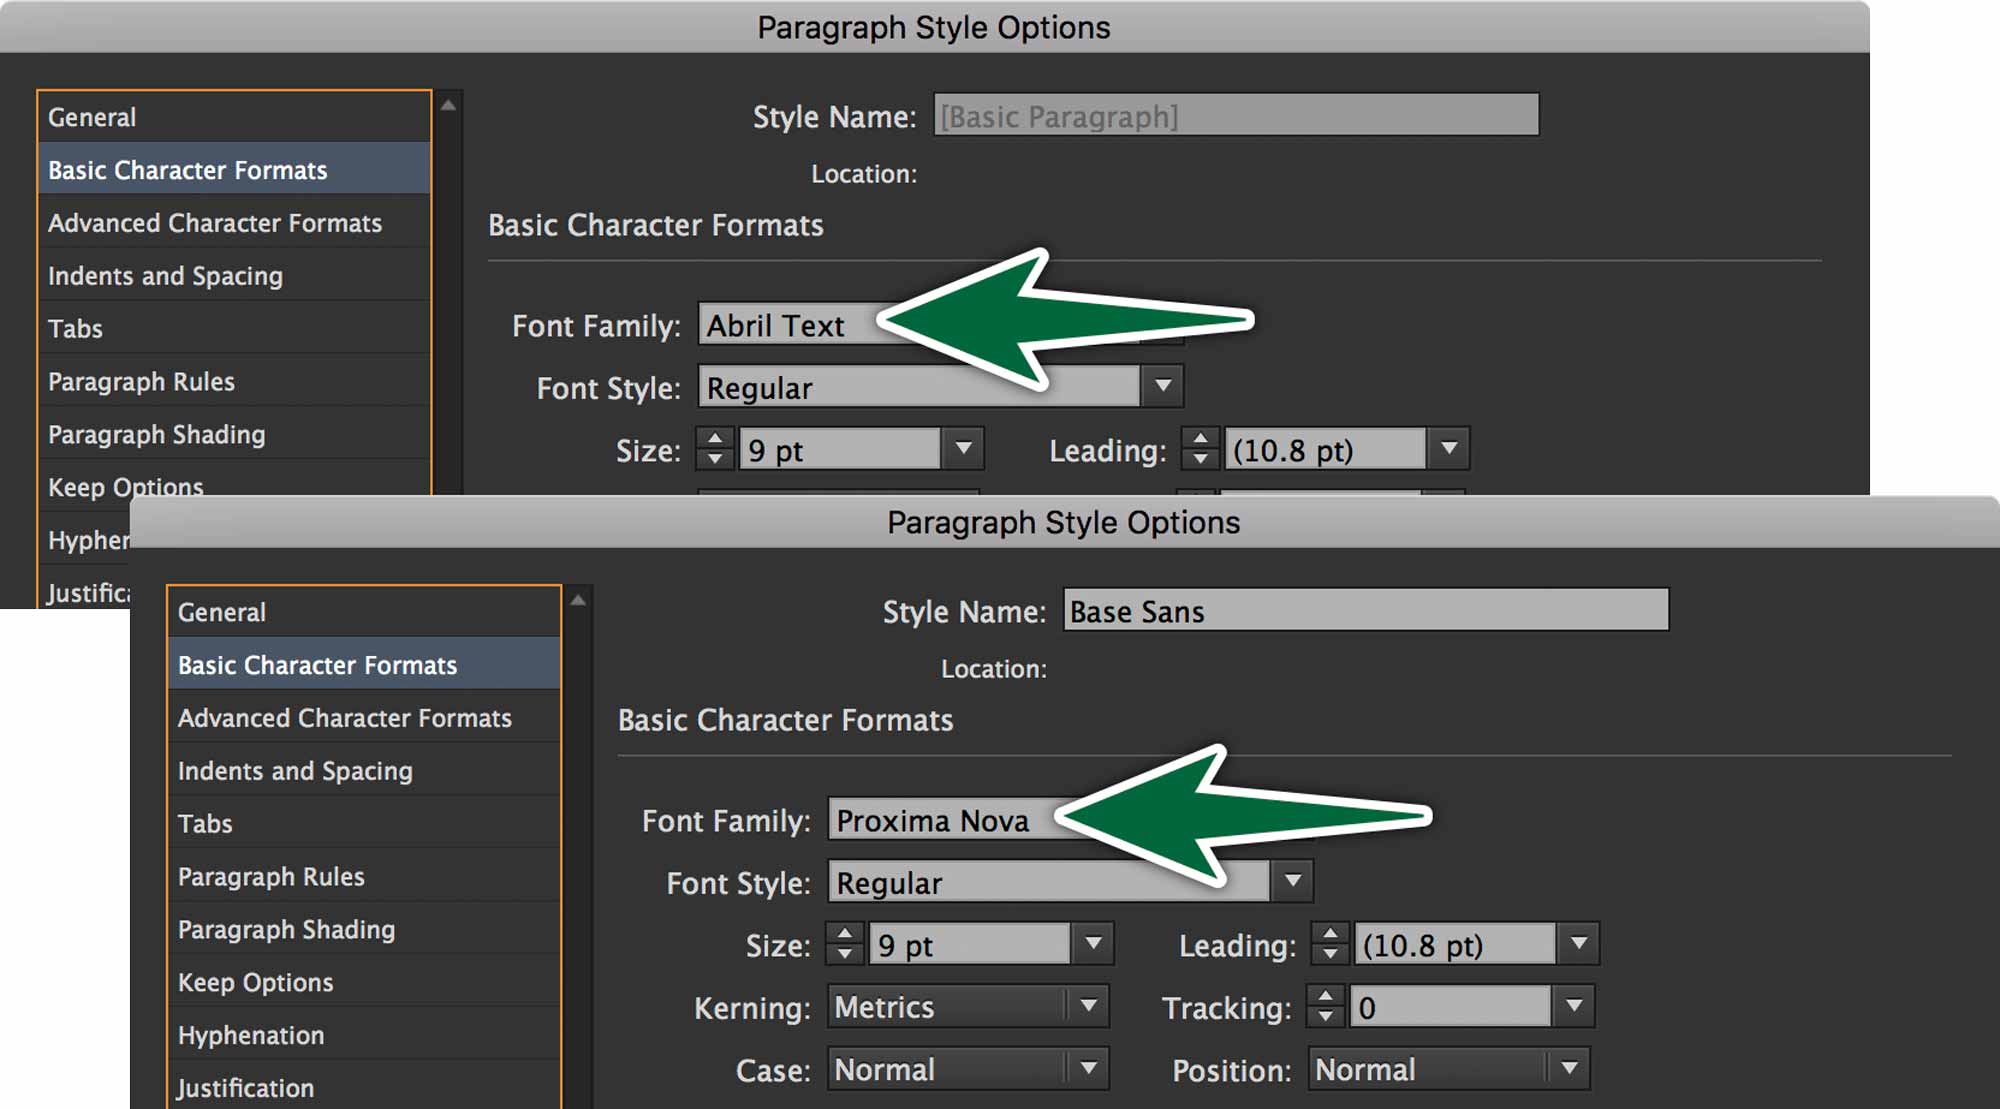
Start by opening the Basic Paragraph style. Change your font to Abril Text Regular. You’ll need to activate this on Adobe Fonts. You also need to create a Base Sans paragraph style. Let’s use Proxima Nova Regular. Go activate it on Adobe Fonts.
The client styled the text in the provided Word document. We’ll use these to style the text automatically. It’s easier to create the appropriate styles in InDesign beforhand. Let’s do that. Create:
- Body Copy, based on Basic Paragraph
- Chapter Numbers, based on Base Sans
- Chapter Names, based on Base Sans
- Recipe Names, based on Base Sans
Parent Pages
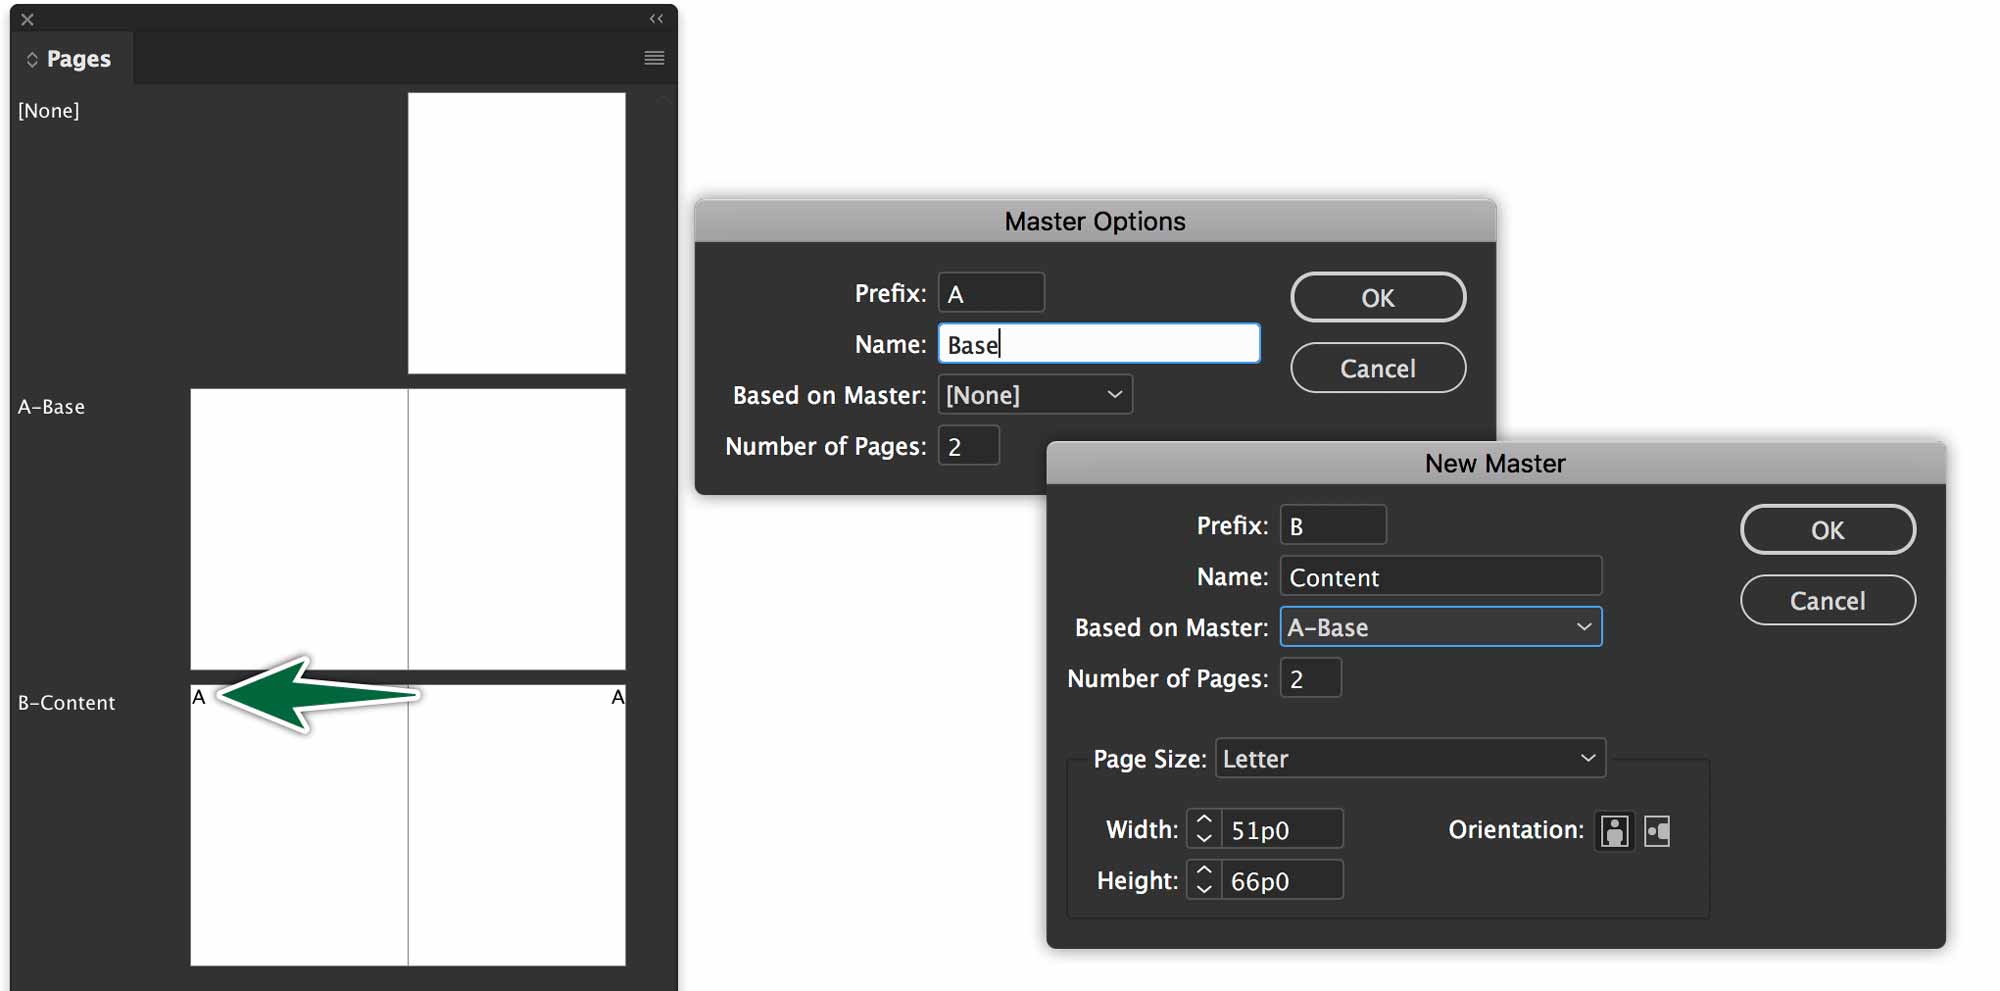
Rename A-Parent to A-Base. This is the page that will contain any elements which repeat on all pages of the document.
Create a second page called B-Parent which is based on A-Base. This will contain all of our content.
See the images just below…
Numbering & Sections
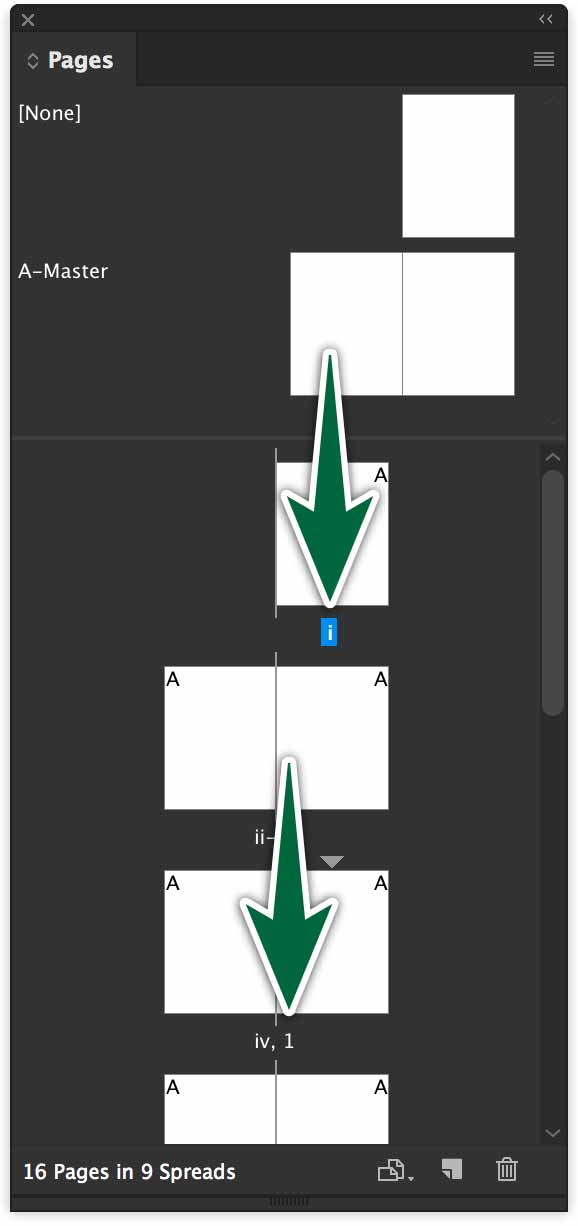
We’re going to create sections for our document. The document page numbers will start on the third page. We’ll start by making the pages numbered with lower case roman numberals. Right-click on page one, then choose Numbering & Section Options…. Make the page numbering style roman numberals.
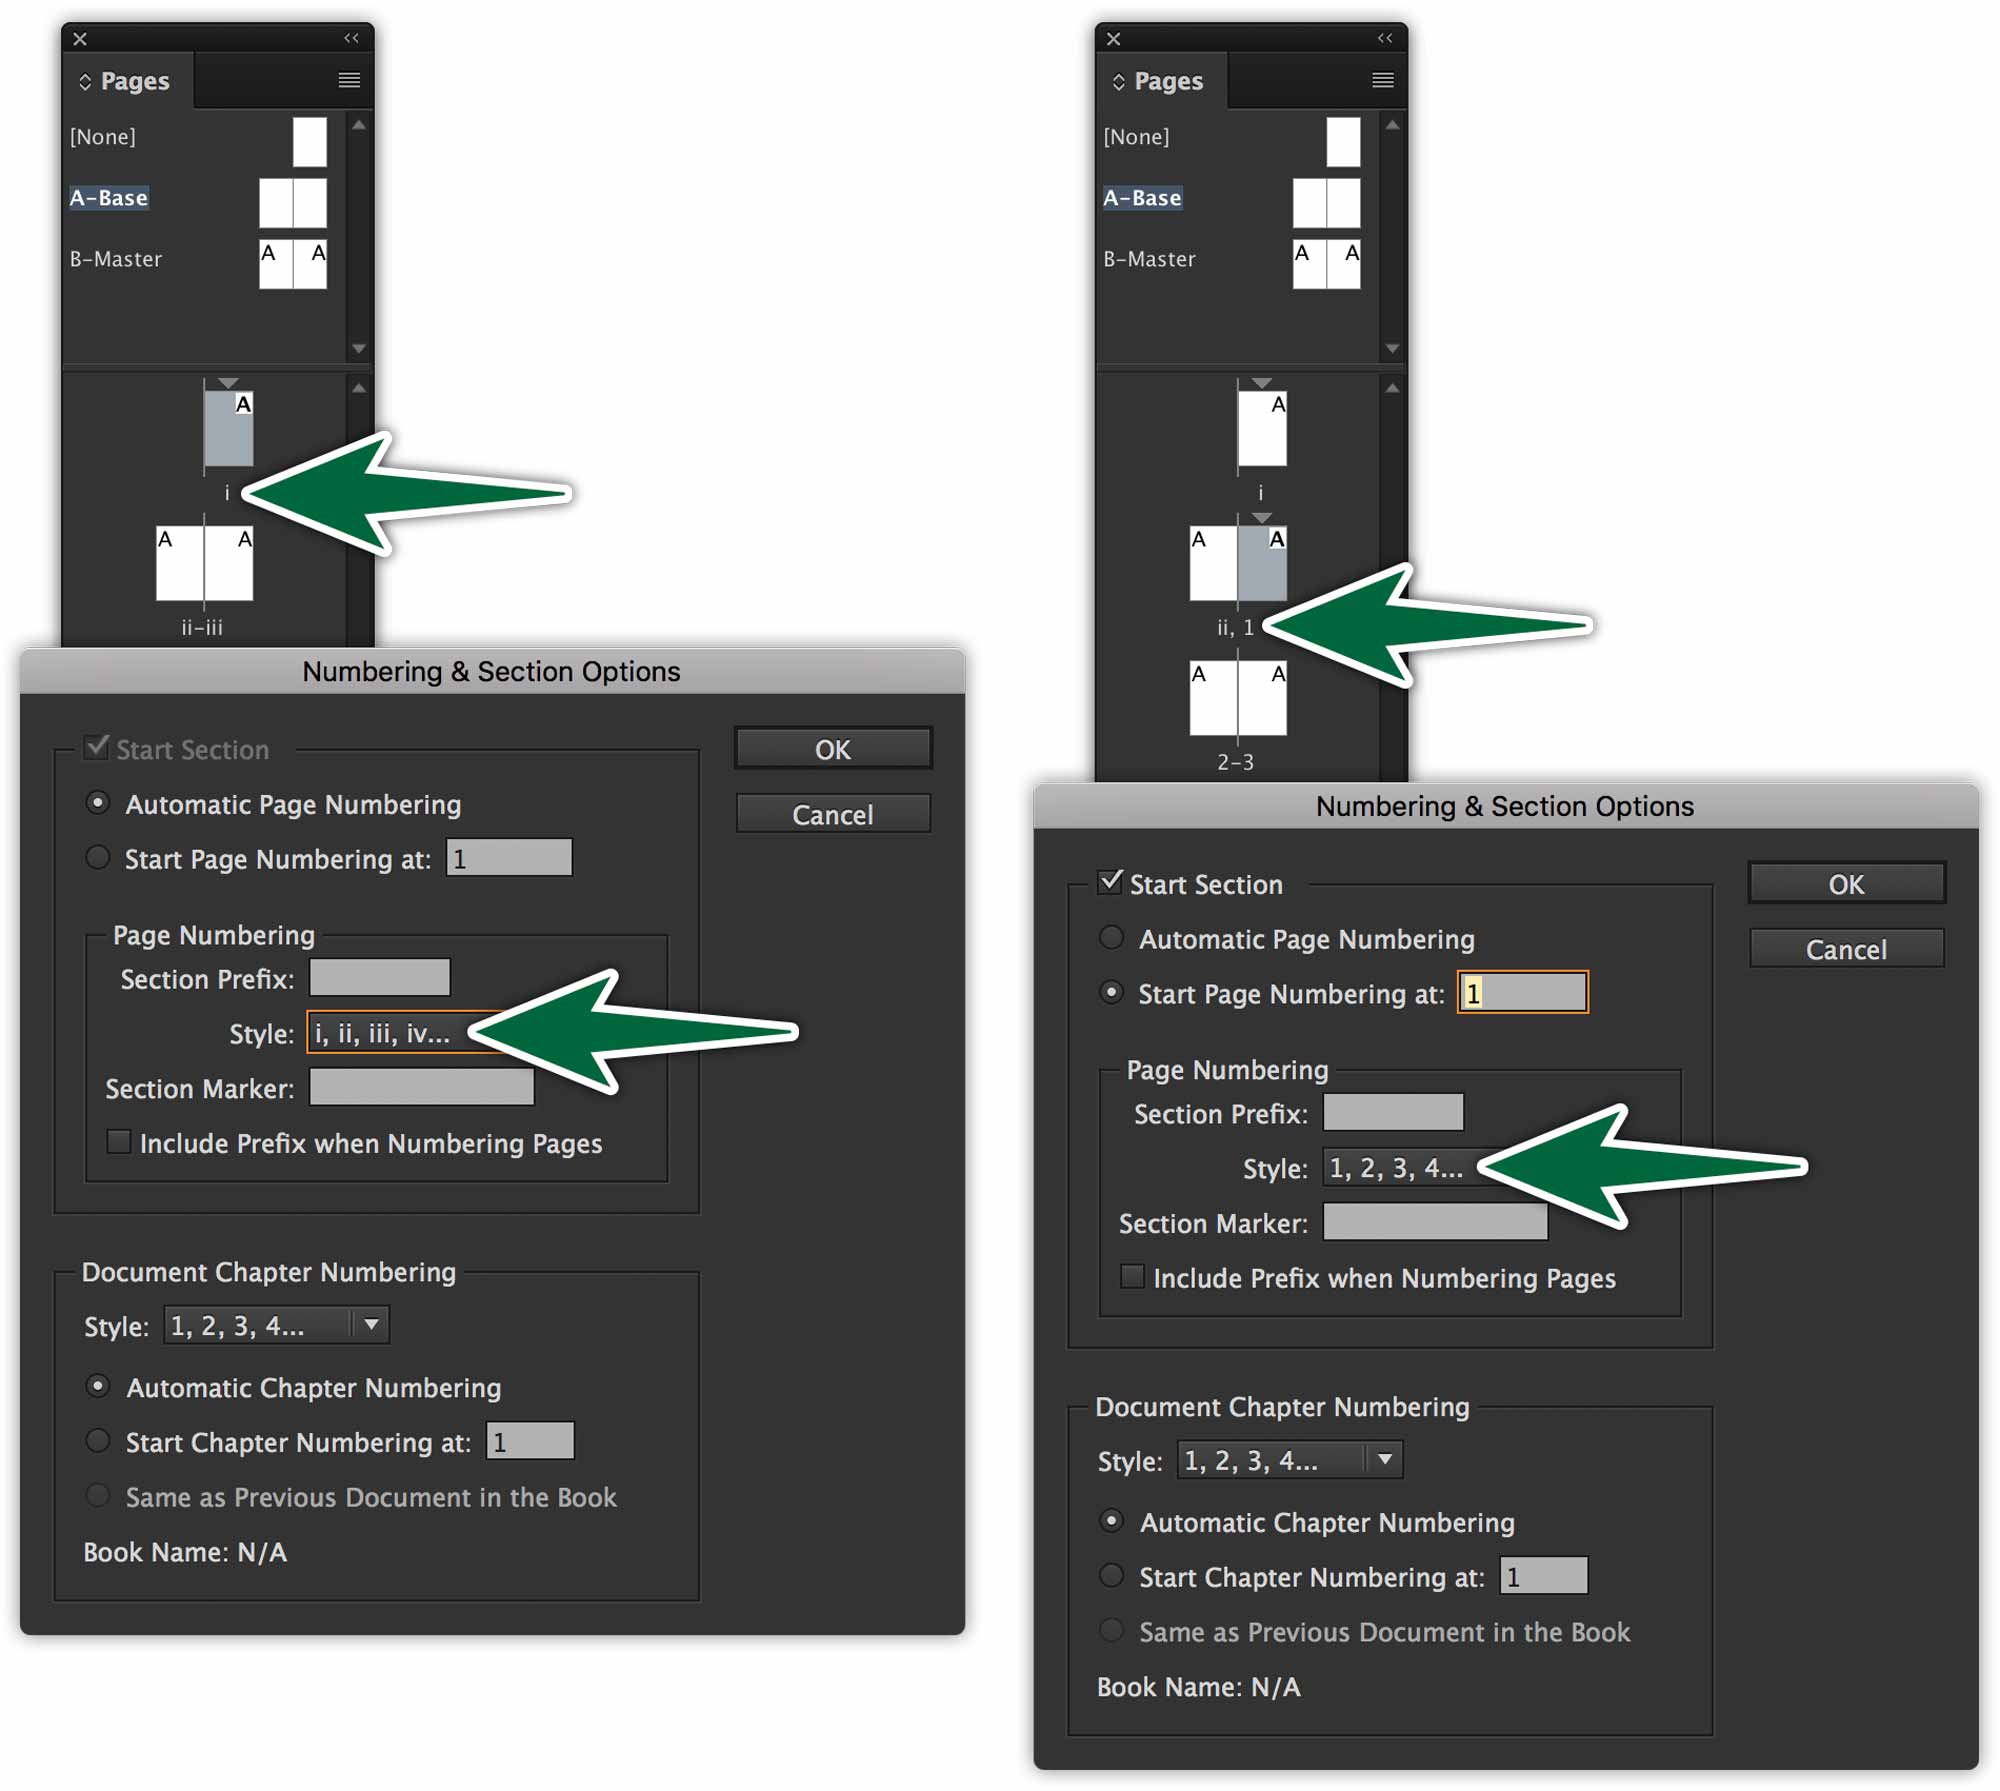
Right-click on page three. Go to Numbering & Section Options… Change the numbering style to arabic numerals. Make sure you set the starting numbering to 1.
Place Text
Put threaded primary text frames on the B Parent pages. Let’s apply the pages from the third page to the last. The best way to do this is select the page icons in the Pages panel, then option-click on the parent page you want to apply to them.
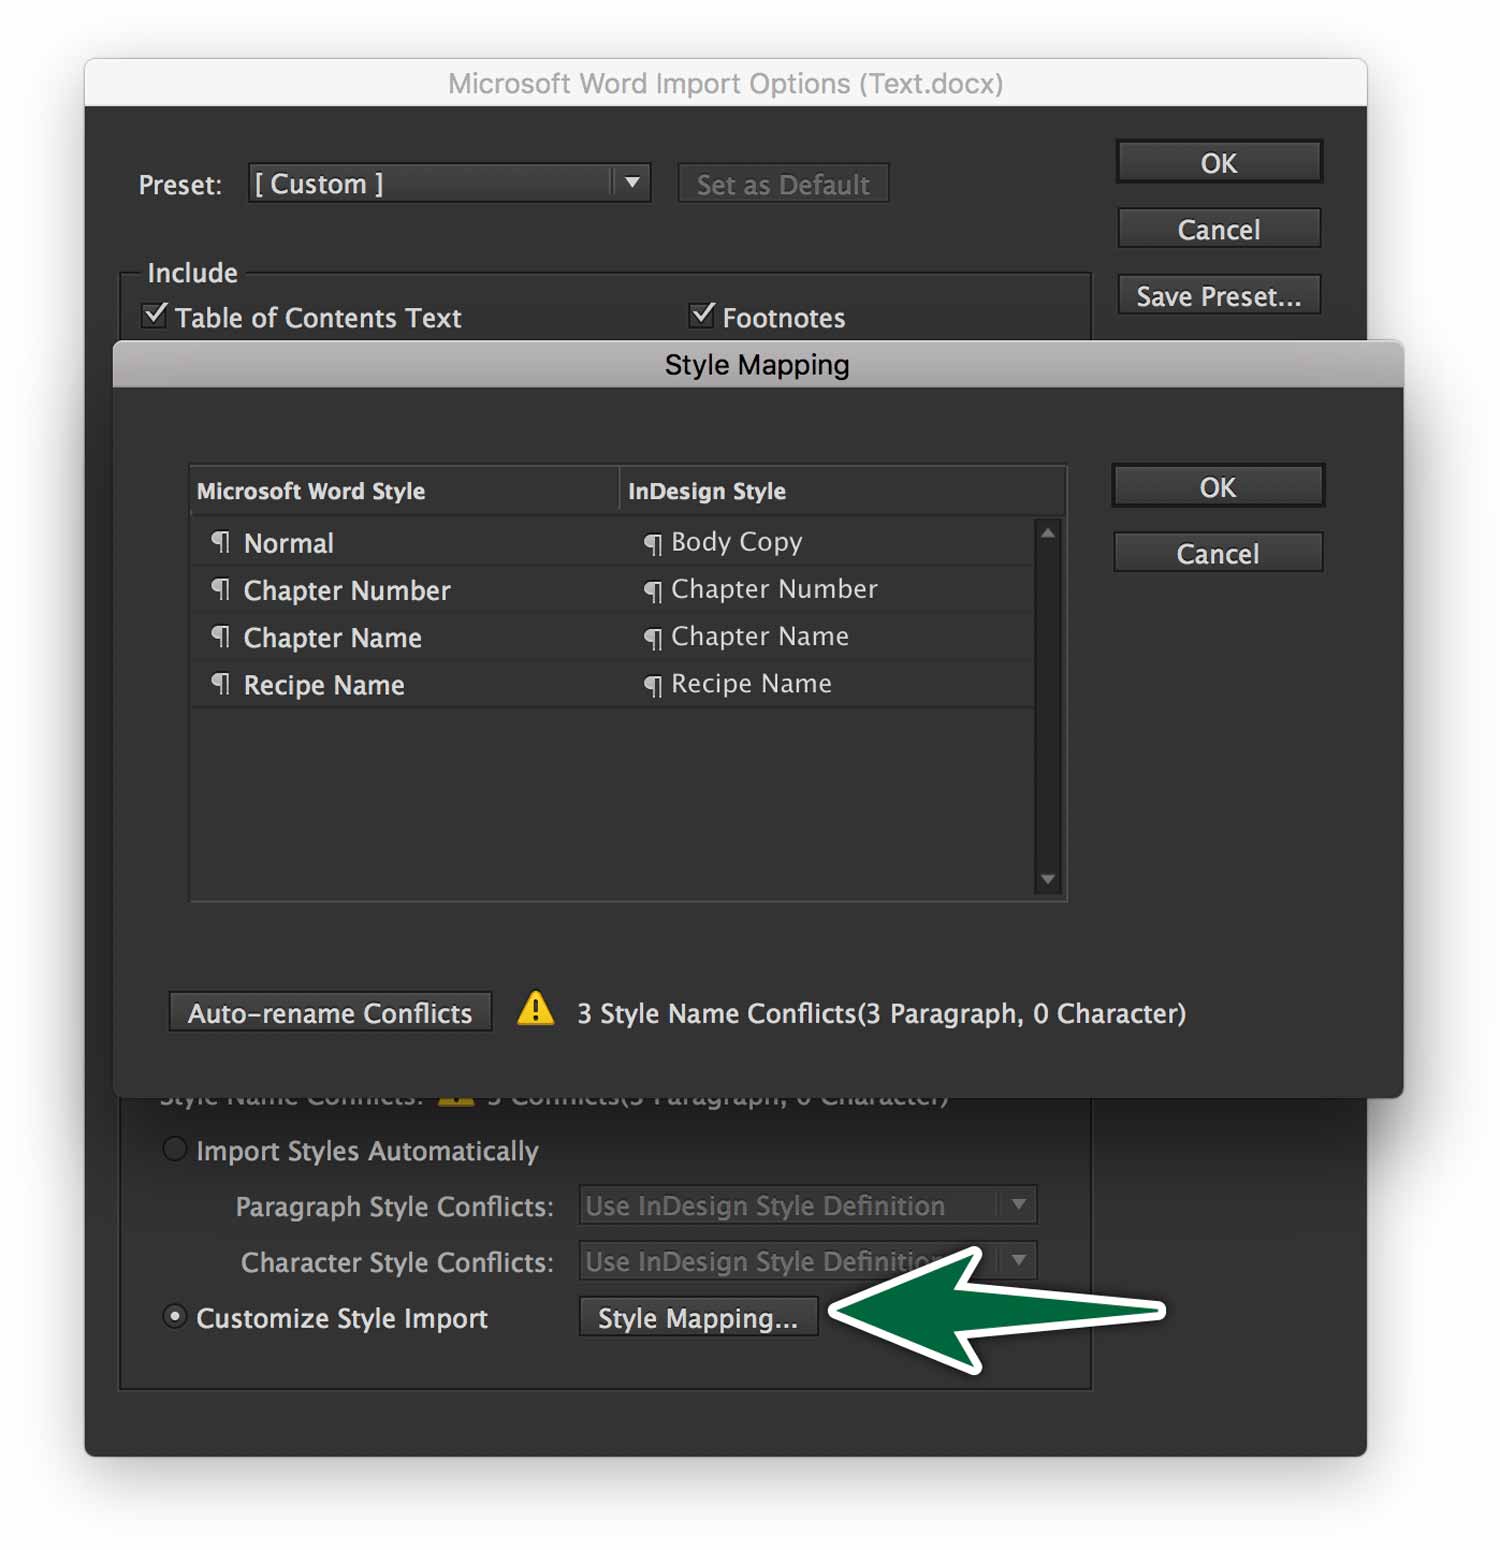
Use File > Place… to flow the text for chicken, beef and fish recipes. Shift-click on the Open button to access import options shown below.
If your source Word document is formatted with Word text styles, you can map them to existing InDesign styles on import.
Page Folios
Page folios can be at the top or bottom corners or centers of the pages. They can figure on every page of the publication or change depending on the content. They can include: page numbers, chapter numbers, publication title, section title, story title, issue date, web address and more.
We create them on the Parent Page. They should be distinct from text and consistent in appearance. Make them on a new layer so the stacking order can be changed.
Let’s place page numbers on our A-Base. They’ll automatically appear on all pages of our document.
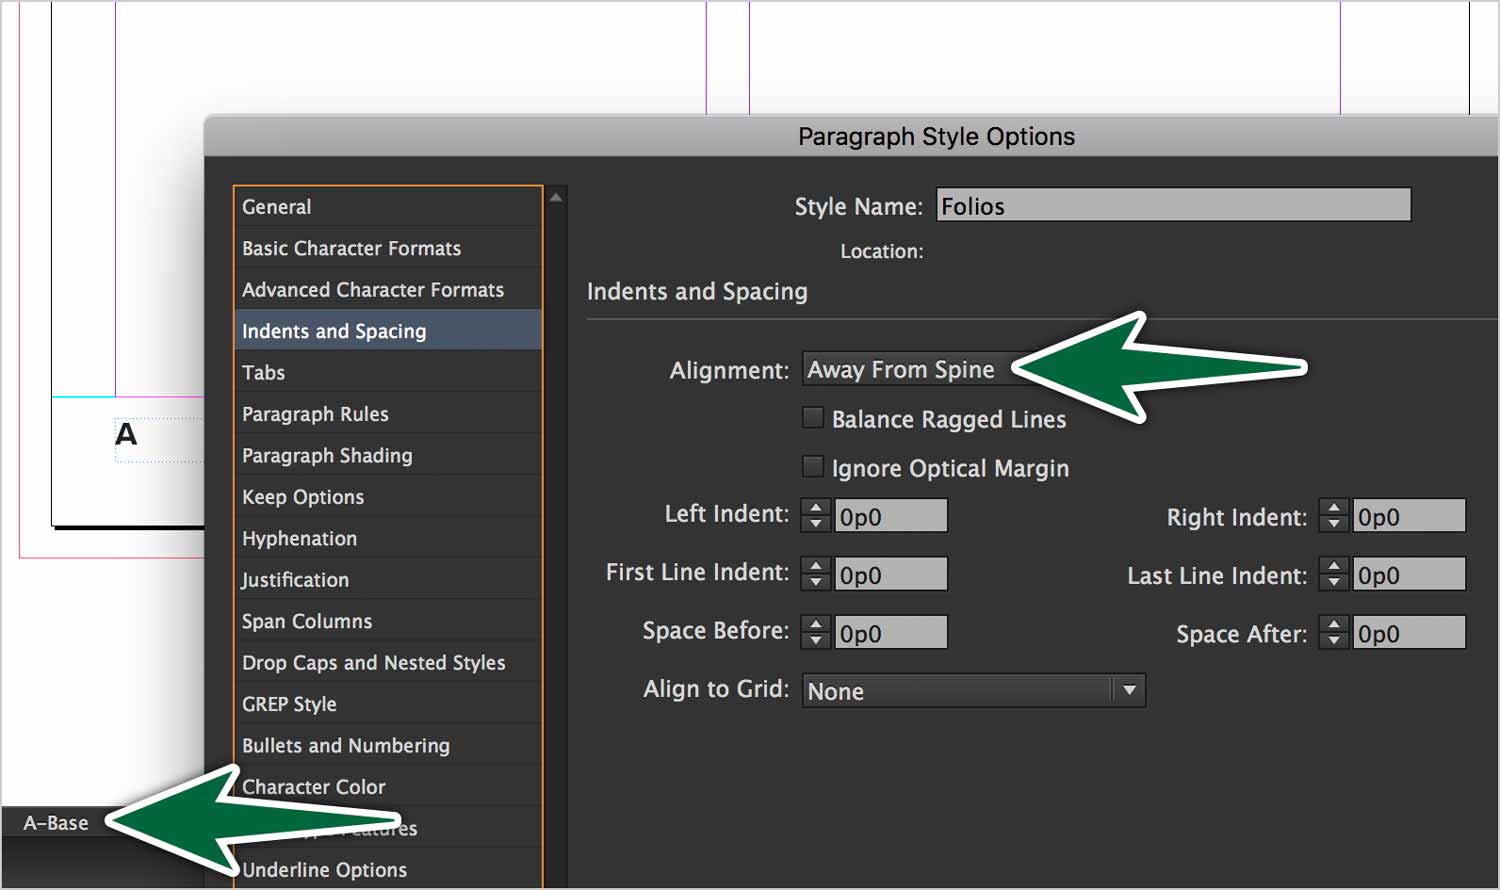
Let’s type ⌘-Option-Shift-N to enter an automatic page number. Create a Paragraph Style called Folio to style it at 9pt Abril Regular. Add an m-dash after the number. You get an m-dash with Shift-Option-hyphen.
Footer Text Variables
We’re going to add content to the footer based on the titles on the pages using Text Variables. We want to more than only a page number in the folio. We want food types and recipe titles. In order to do this, we’ll create and define two text variables.
Let’s go to A-Base.
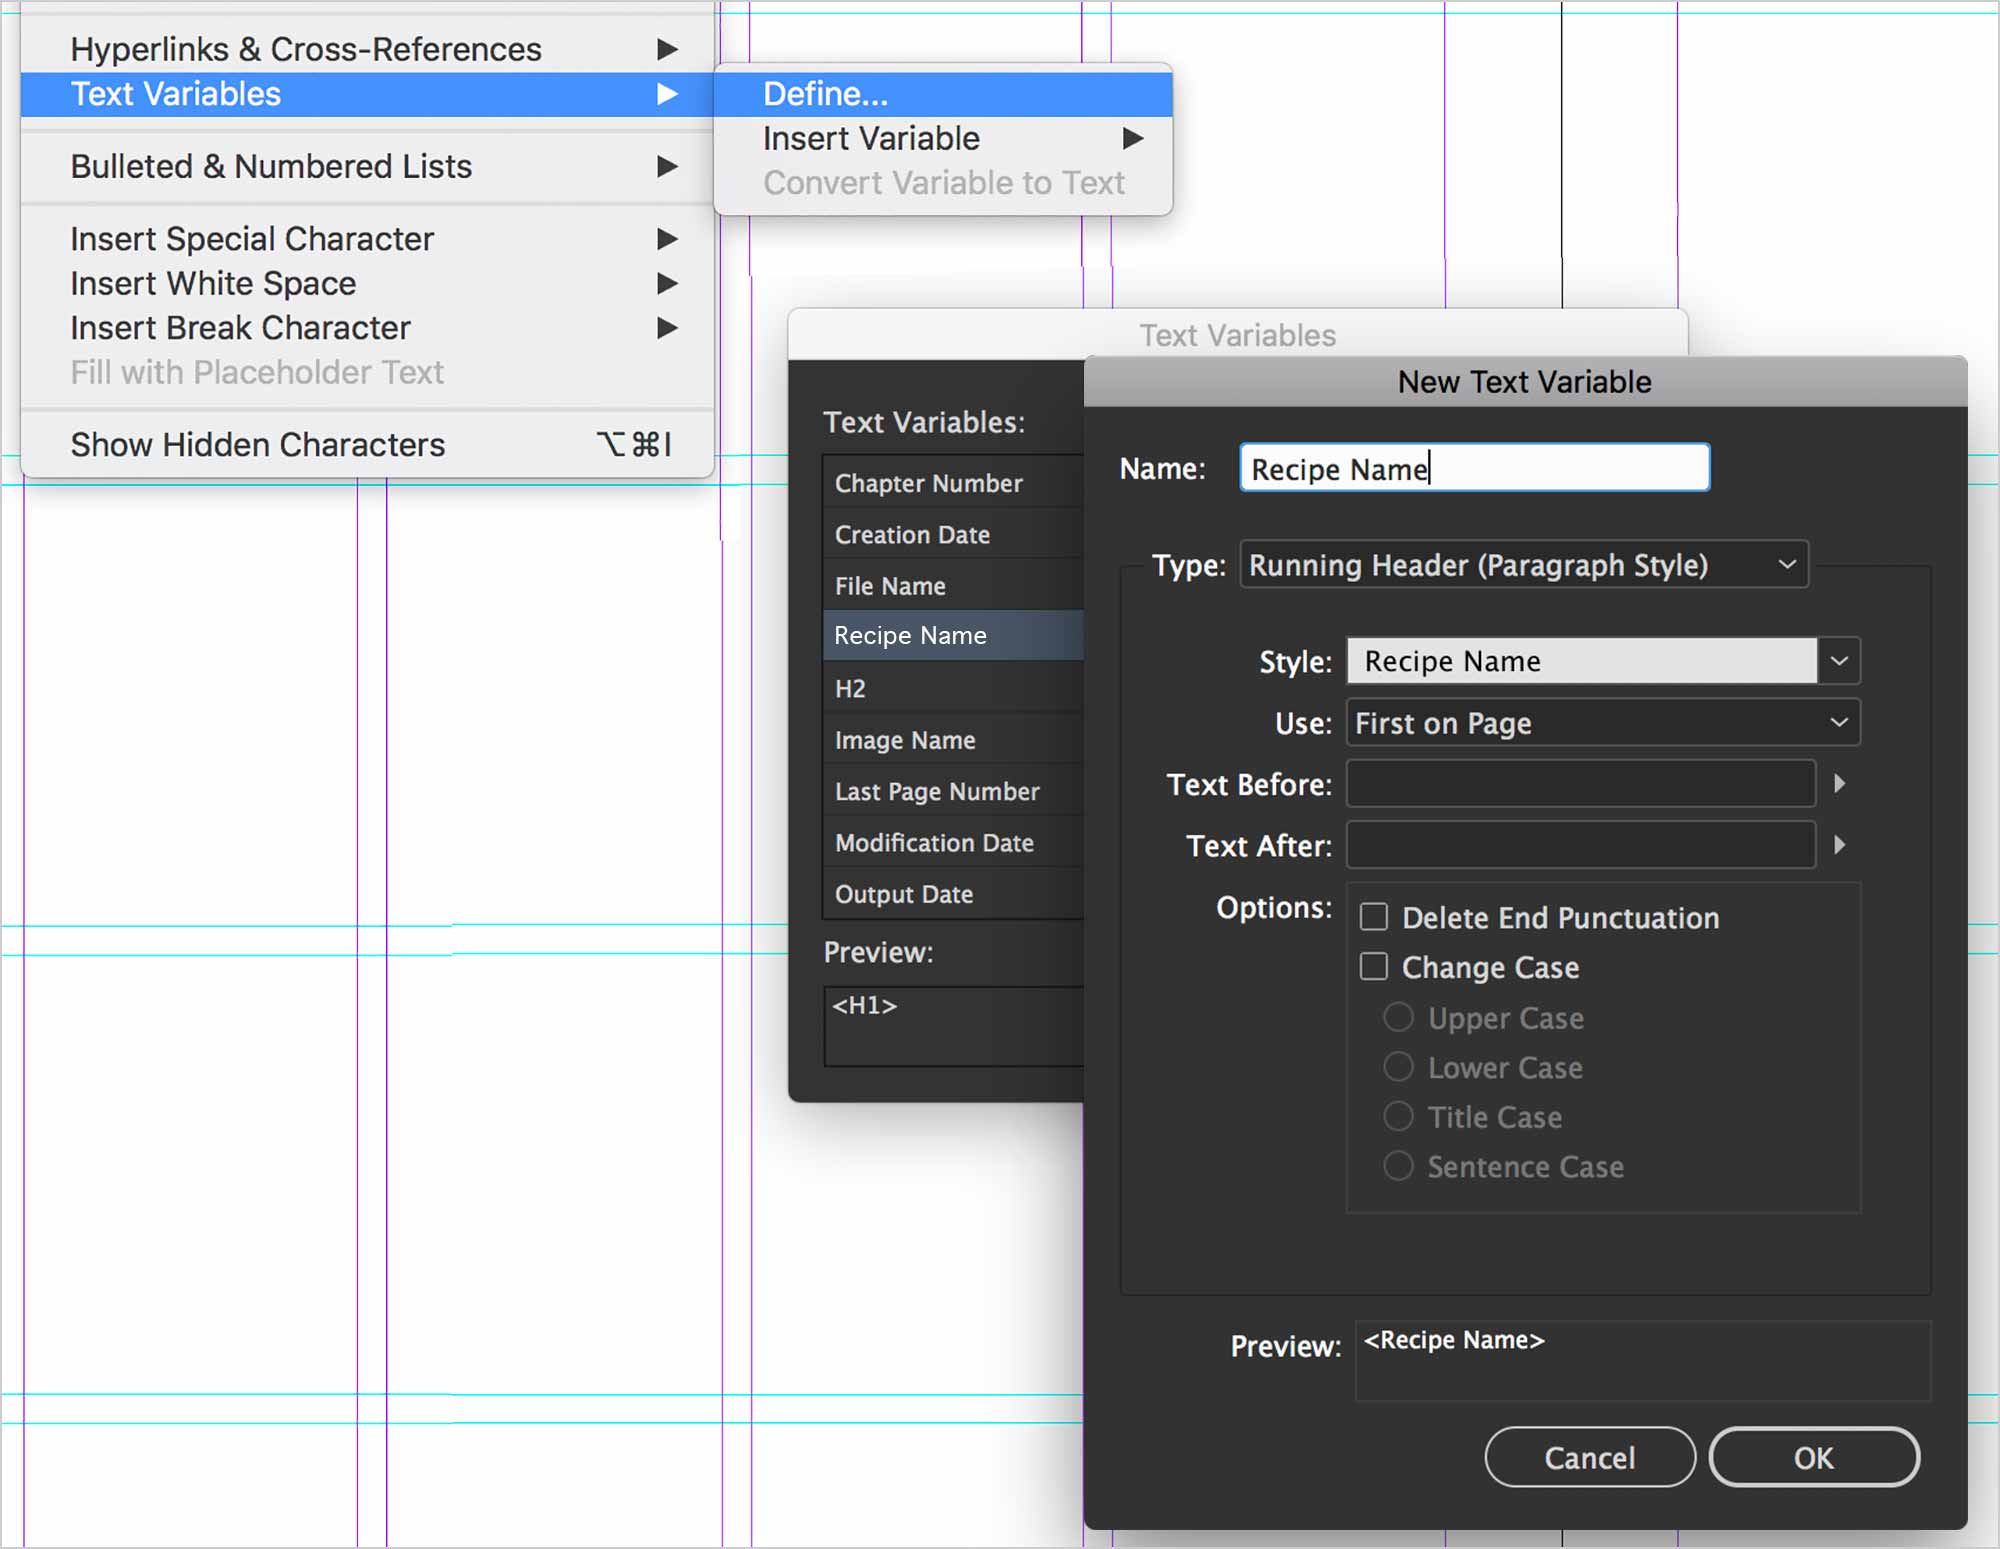
After the page number, add — Recipe Name as a custom text variable.

We’ll also add the chapter name near the spine. Hit Shift-tab to get a right-aligned tab. Add a custom variable for the chapter’s name.
Slug Info
Let’s use our document’s slug area to leave important document information for all collaborators on the document. The information will update automatically.
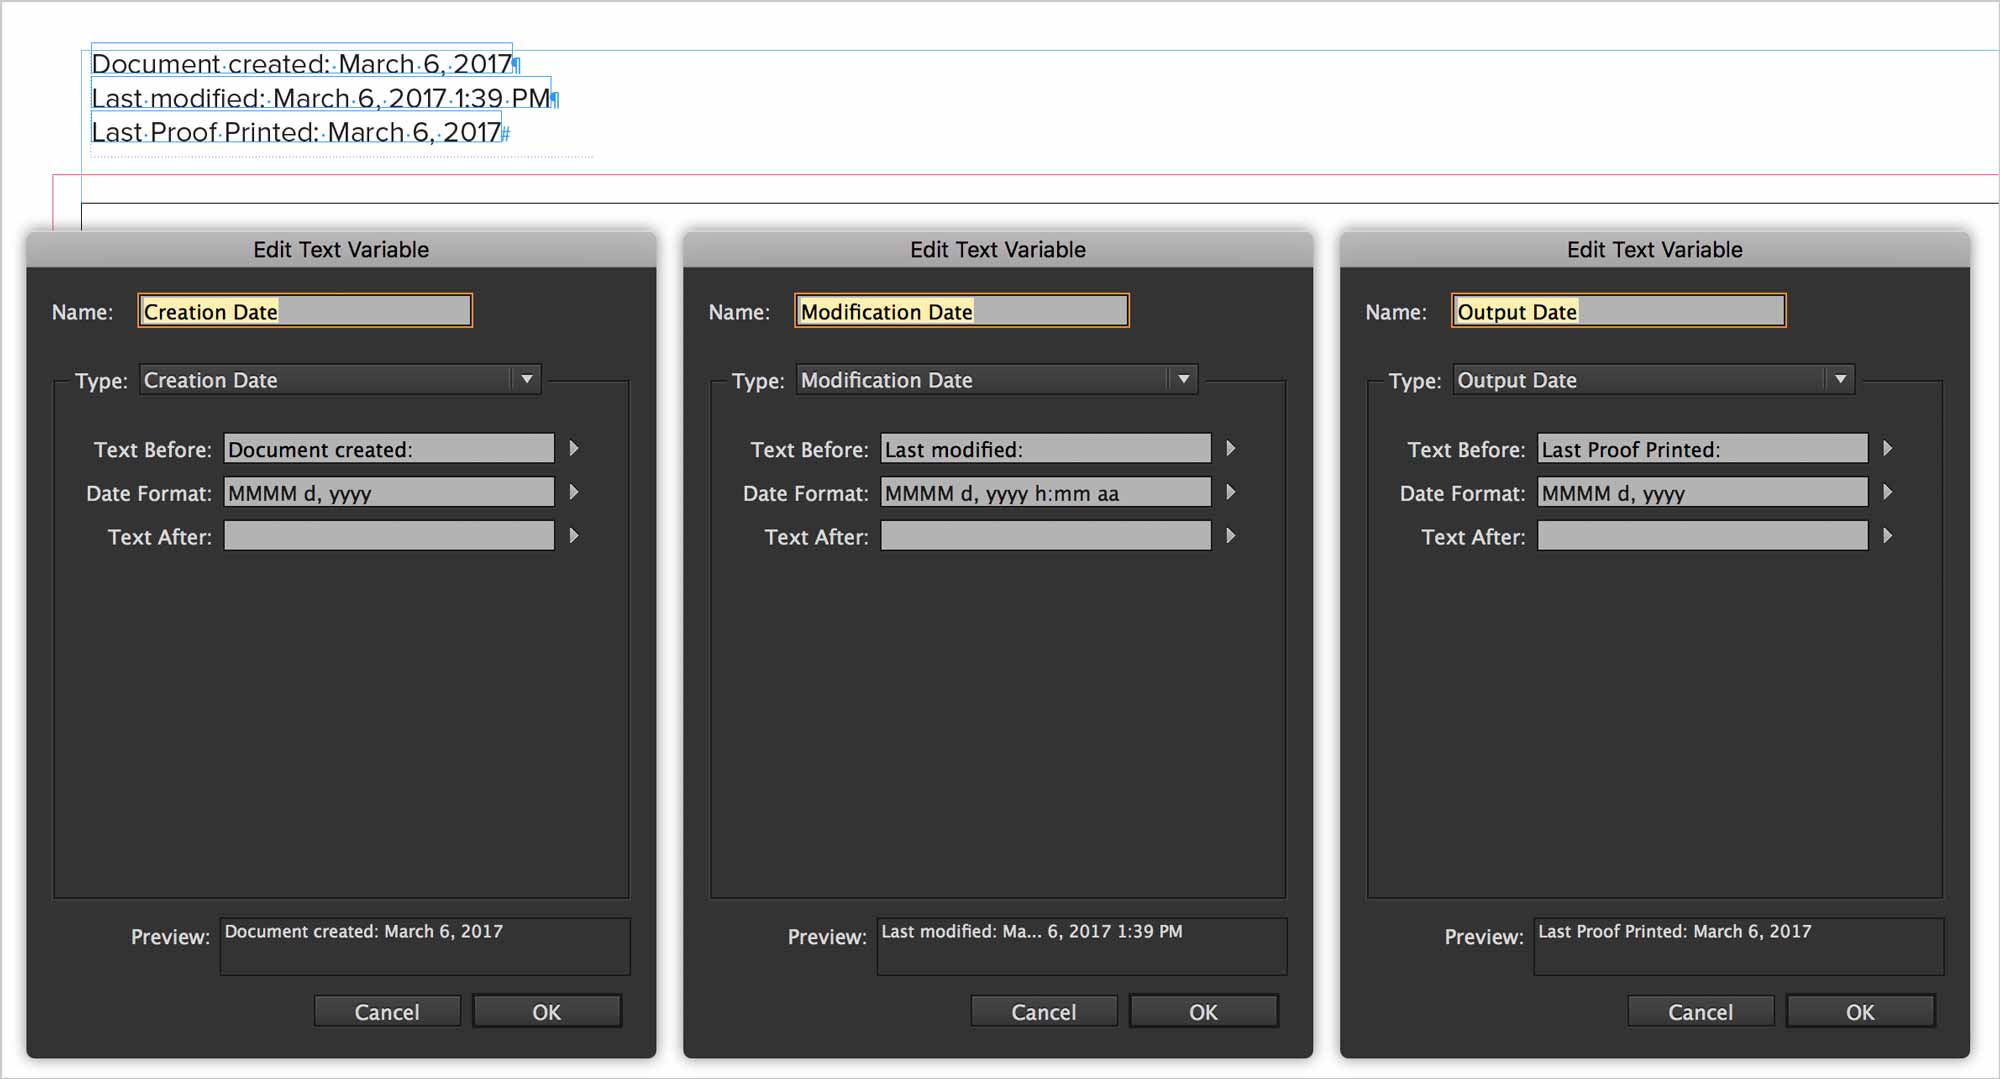
On A-Base, create new text frame in the Slug area. Don’t touch the bleed with the frame. Create a Paragraph Style for the slug text called Slug Text.
With your cursor in the frame, go Type > Text Variables > Insert Variable > Creation Date. Let’s do this two more times to match the example above. This will keep a good record of the last state of the document for all those contributing to the design.
Automatic Story Jumps
When you read a magazine, you often encounter stories that continue on a page further in the publication. It’ll usually says Continued on page x. This is called a Story Jump. InDesign can deal with these automatically.
Create a text frame on one page, then thread it to a second text frame created on another page. Right-click to fill them with Fill with placeholder text.
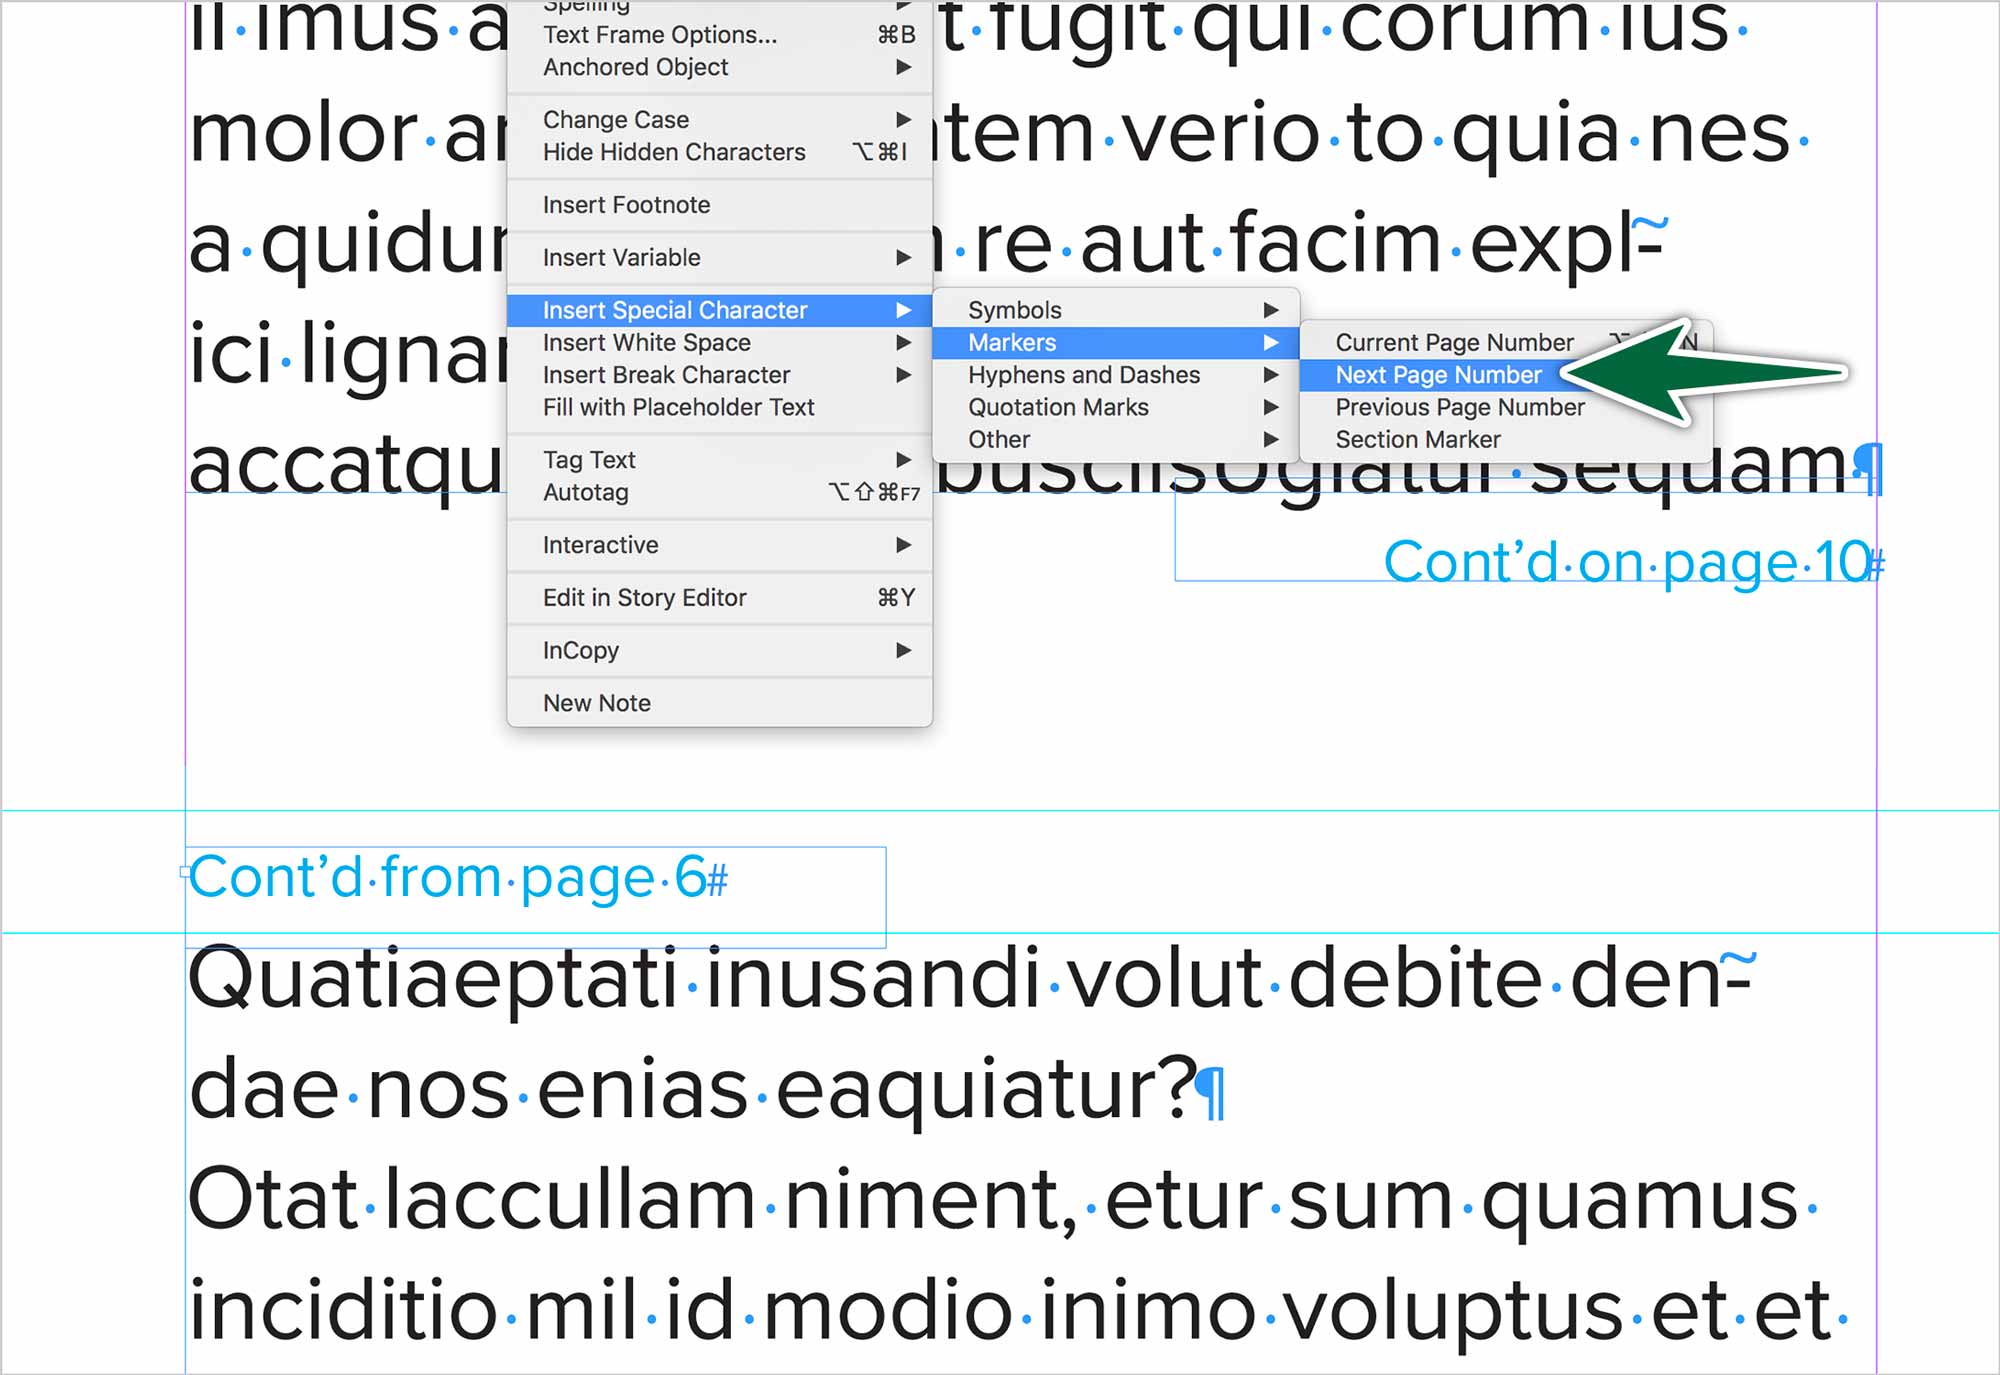
To create an automatic story jump, we create a separate text frame. Type the text you want in it, then right-click to choose Insert Special Characters > Markers > Next Page Number. Do the same with Previous Page Number.
The key to making this work is that our story jump text frame physically touches the related text frame.
Live Captions
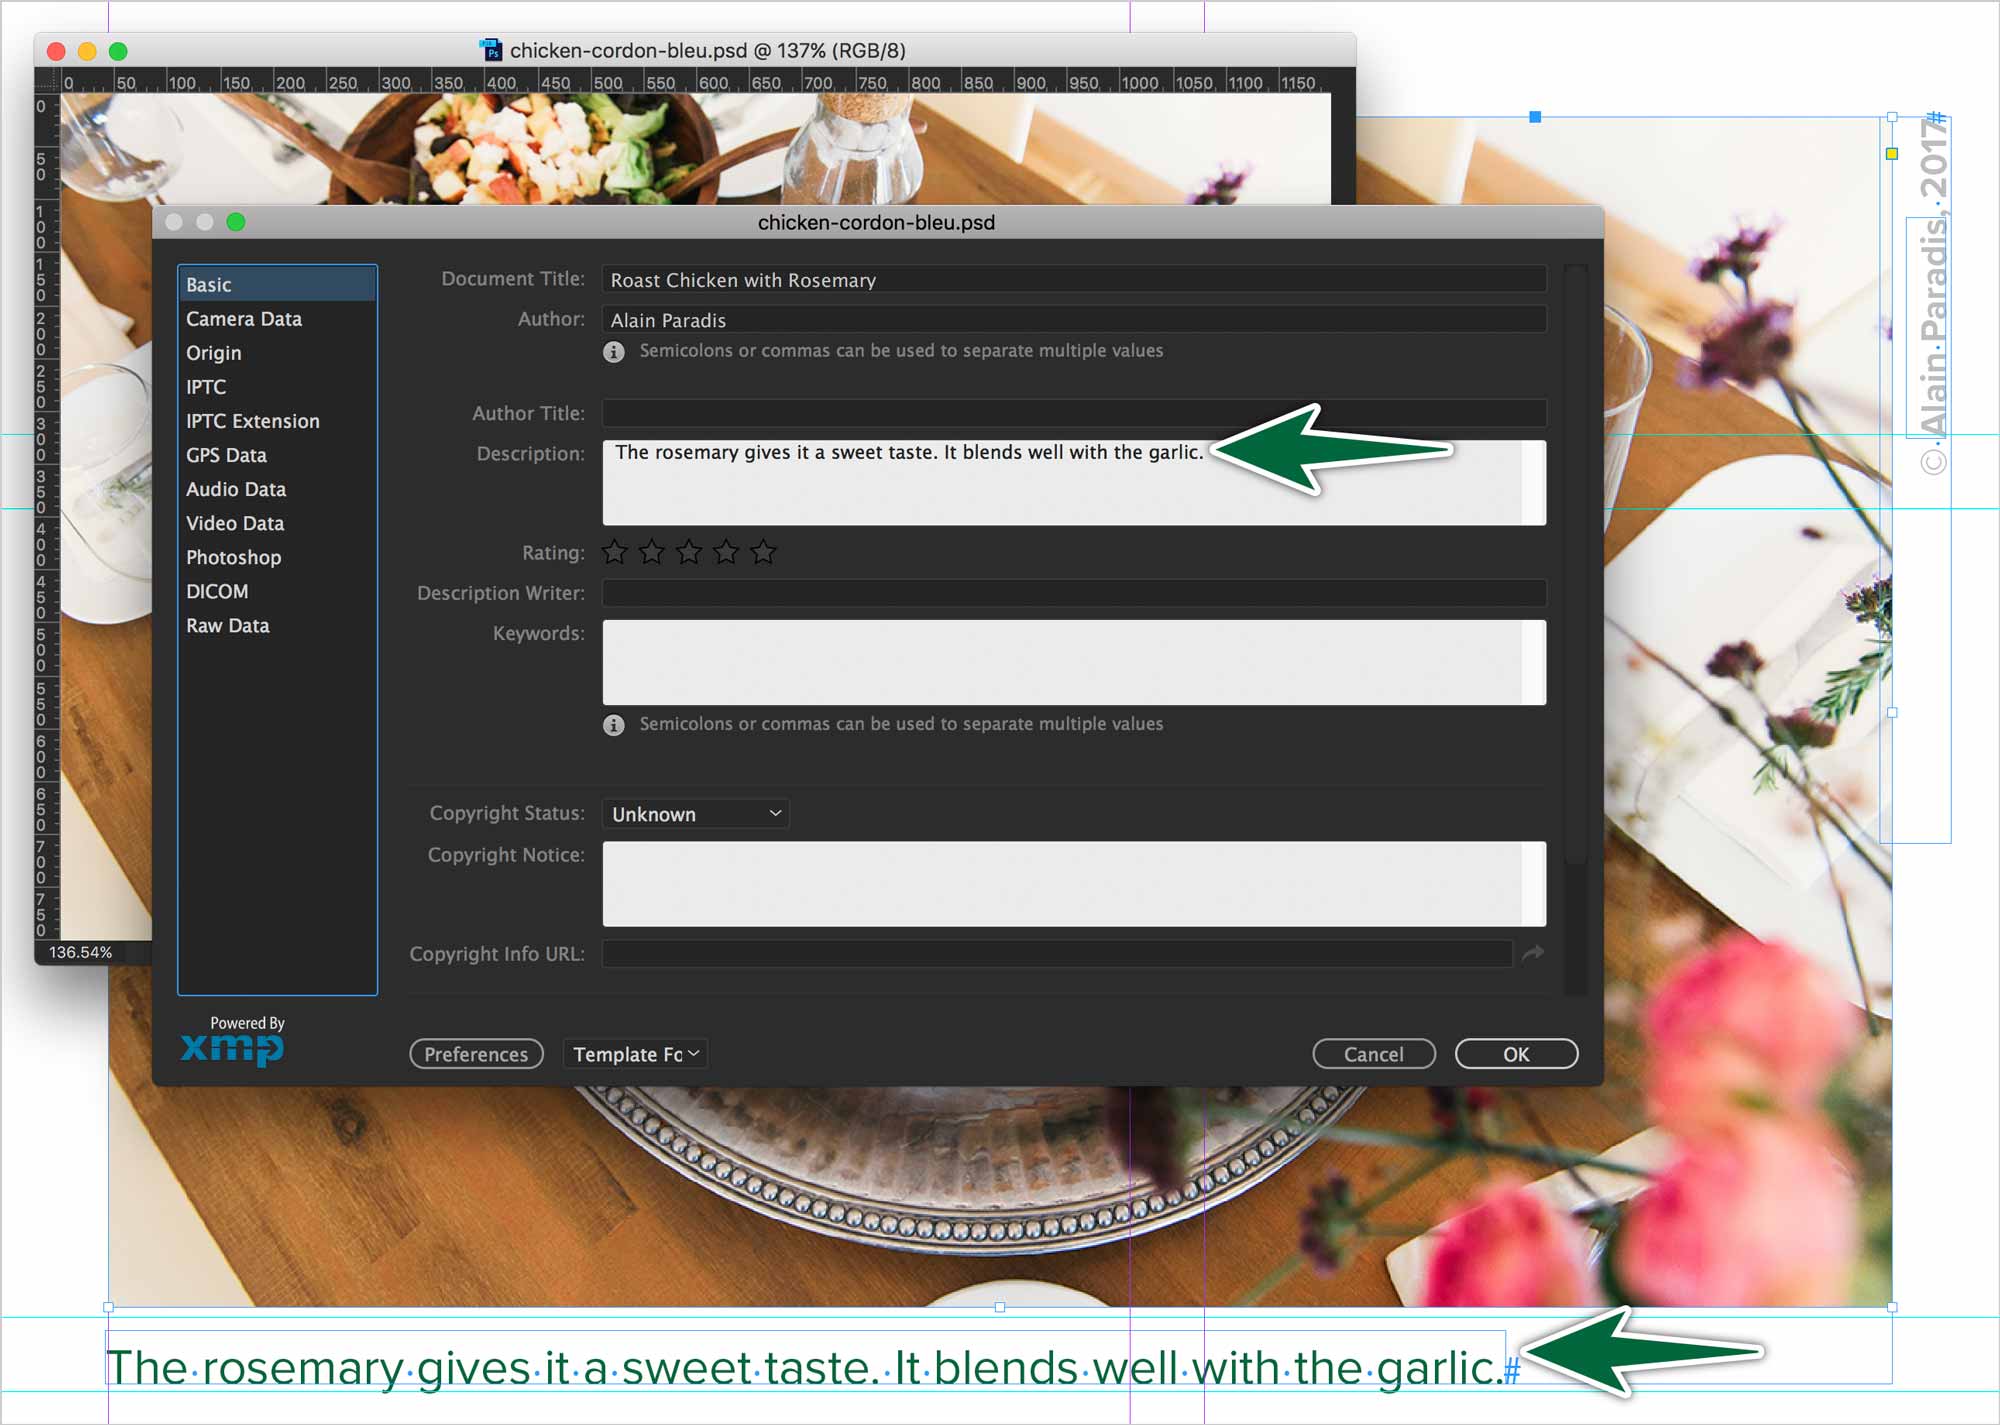
InDesign is capable of pulling meta-data from a placed photo to use it as a caption. This is really a great solution when you work in a team. The photographer in the field or the photo editor can type a caption in the photo’s meta-data from Photoshop. InDesign will generate a Live Caption based on that meta data automatically on the page.
We need to start with taking on the role of the photographer by adding the meta-data to the photo in Photoshop. Go File > File Info… or Shift-Option-⌘-i. The text would be entered in the Description field and any other field you choose. Lets’ enter:
First image:
- Document Title: Roast Chicken with Rosemary
- Description: The rosemary gives it a sweet taste. It blends well with the garlic.
- © Your Full Name, 2017
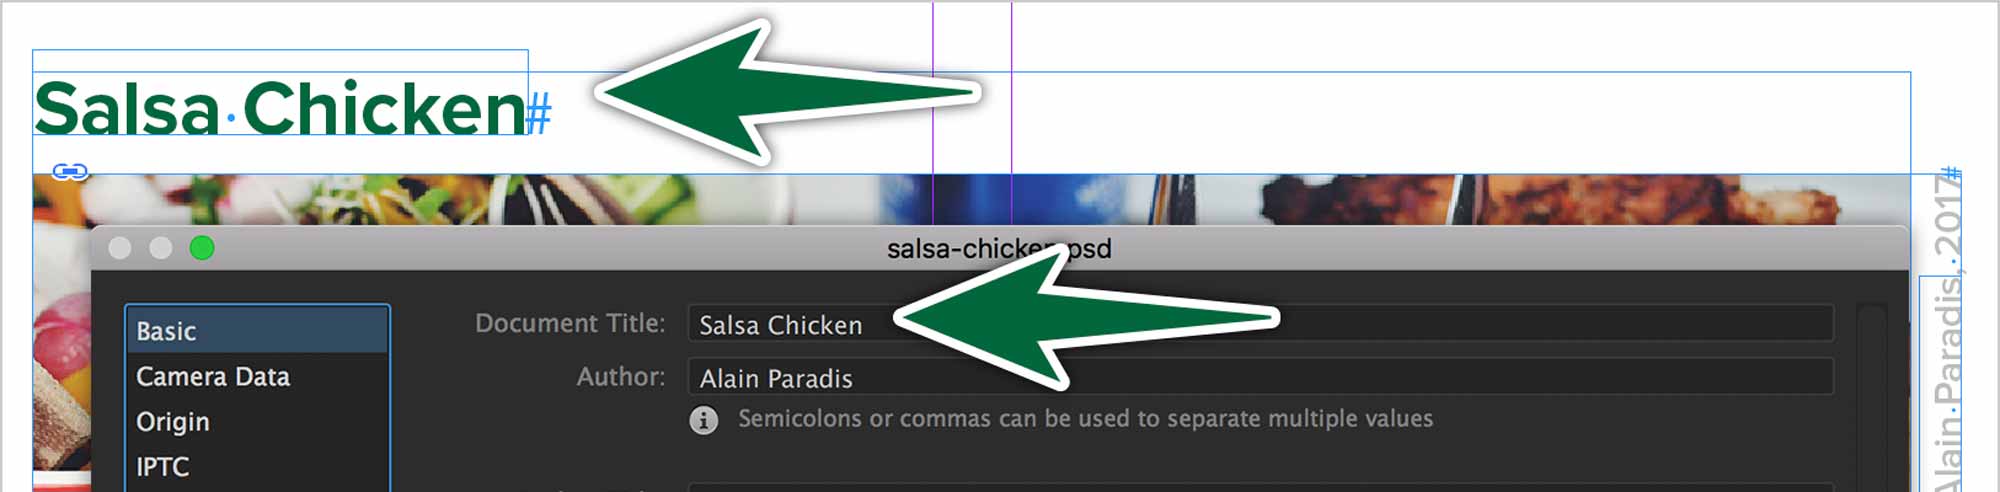
Second Image:
- Document Title: Salsa Chicken
- Description: A household favourite. Use mild, medium or hot salsa depending on your taste.
- © Your Full Name, 2017
In InDesign, we need to set up our captions in Object > Captions > Caption Setup…
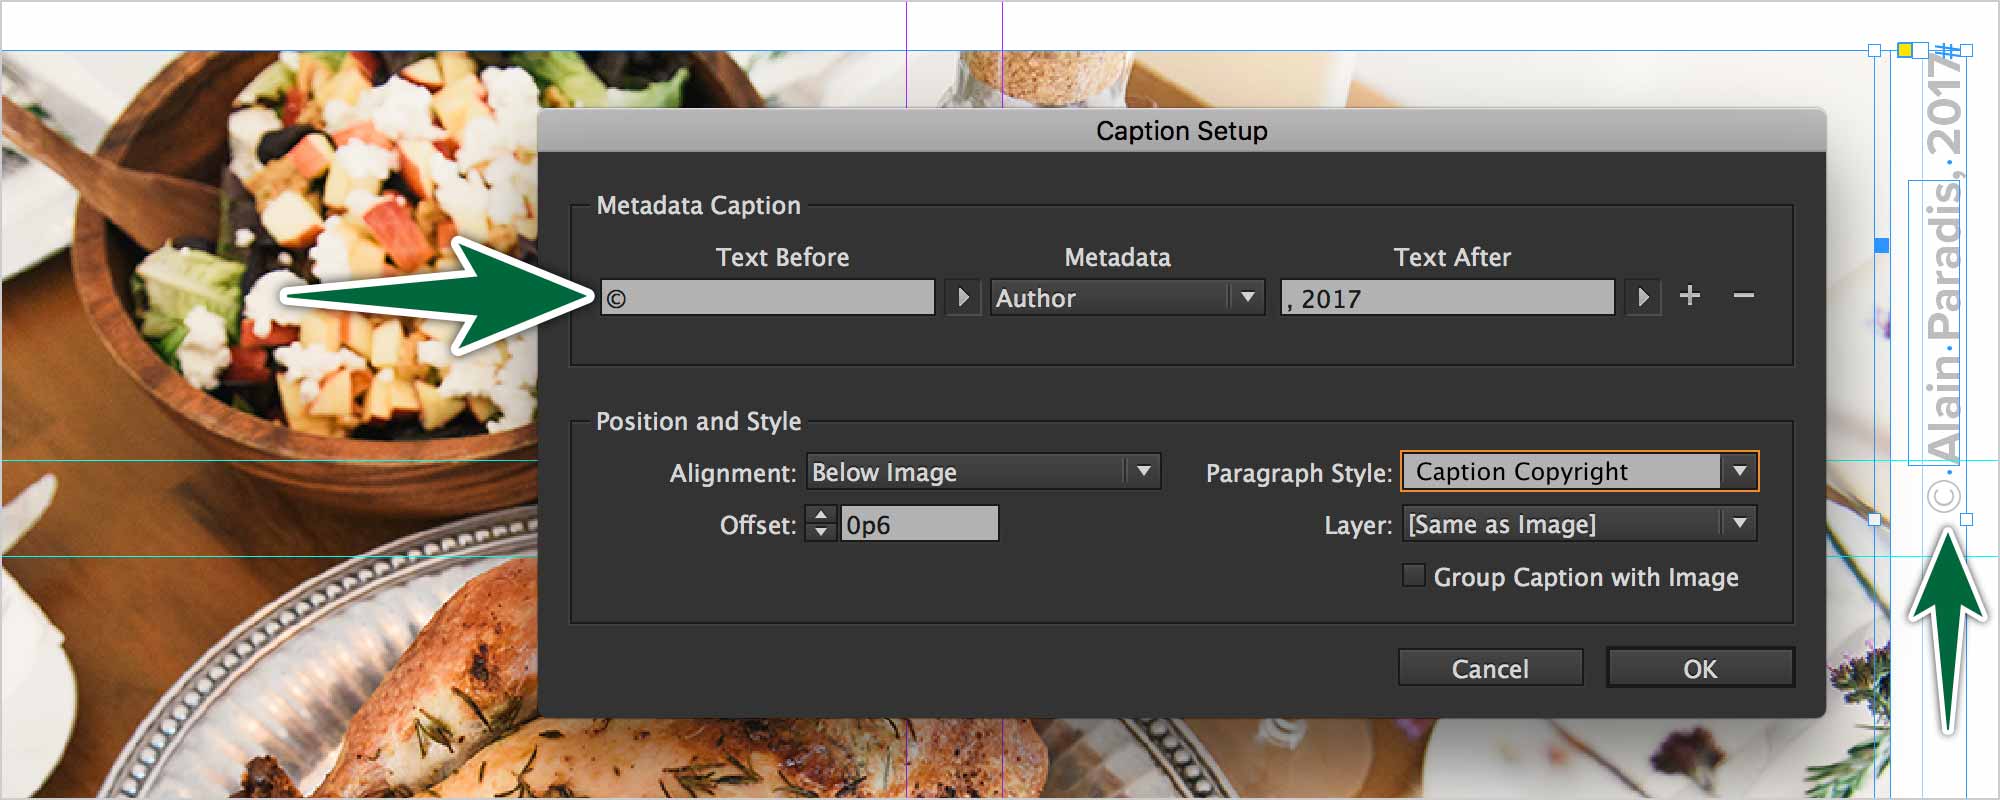
This is where we can choose the meta-data types that were entered back in Photoshop. We can even add text before or after the meta-data. There’s an option to style the captions there too.
To actually create the caption, we select the photo, then go Object > Captions > Generate Live Caption… This will make a new text frame with the meta-data in it, styled with the chosen paragraph style.
We can create a caption which will insert a title for the photo, too.
Tables of Contents
An InDesign Table of Contents is built based on the Paragraph Style used to style the chapter headings. That’s where it pulls the text from. It’s going to be imperative that your titles have paragraph styles applied.
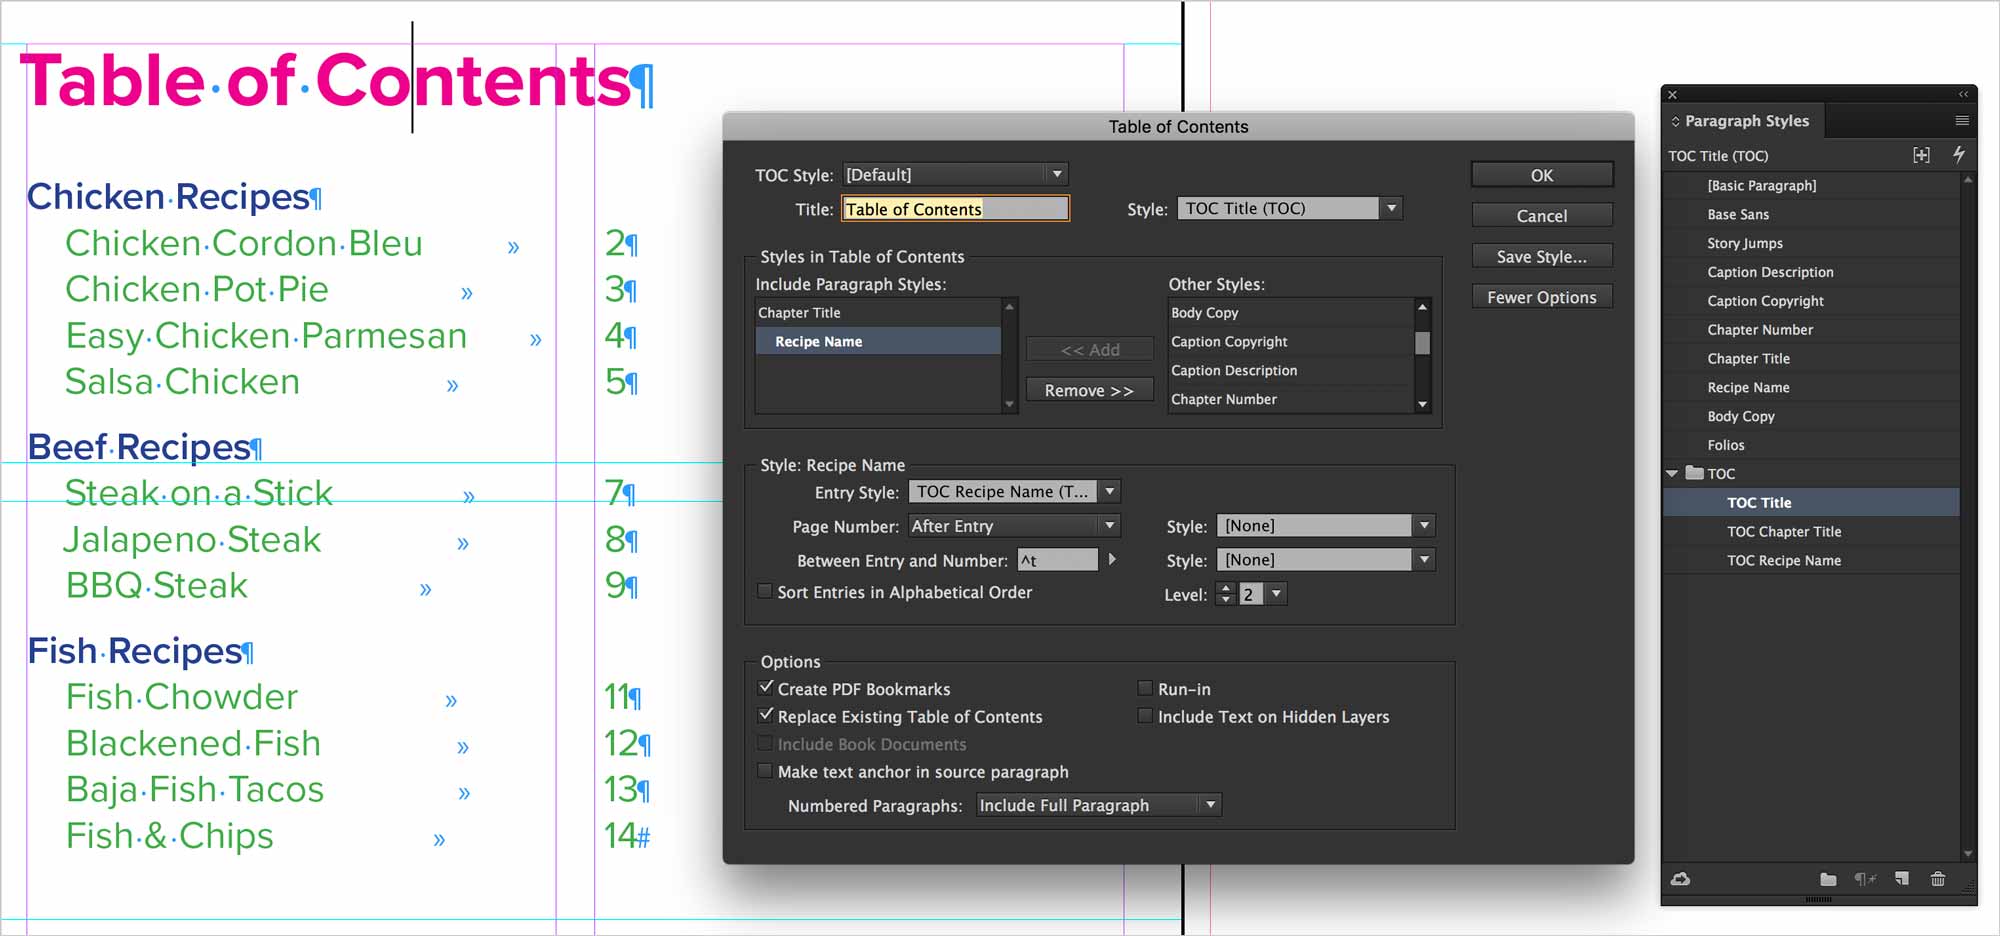
We need to also create paragraph styles to style the actual table of contents. Let’s create three levels of styles. One is for the title, the second is for the food types and the third is for the recipies. Remember that we can always edit them after the fact.
You’ll find the options under Layout > Table of Contents…. If you make a change in your text, you can go Layout > Update Table of Contents
Formative Activity
Document Setup
Create a new document as shown, with 16 facing pages. Note that 16 is divisible by 4.
Double-check that you’ve entered all the other values in the dialogue properly. Once our document is created, we want to edit our base paragraph styles.
Paragraph Styles
Edit your Basic Paragraph style so it’s in Caslon Pro Regular. Create a Base Sans paragraph style using Runda Bold font. This is the font you’ll base all other sans serif styles on.
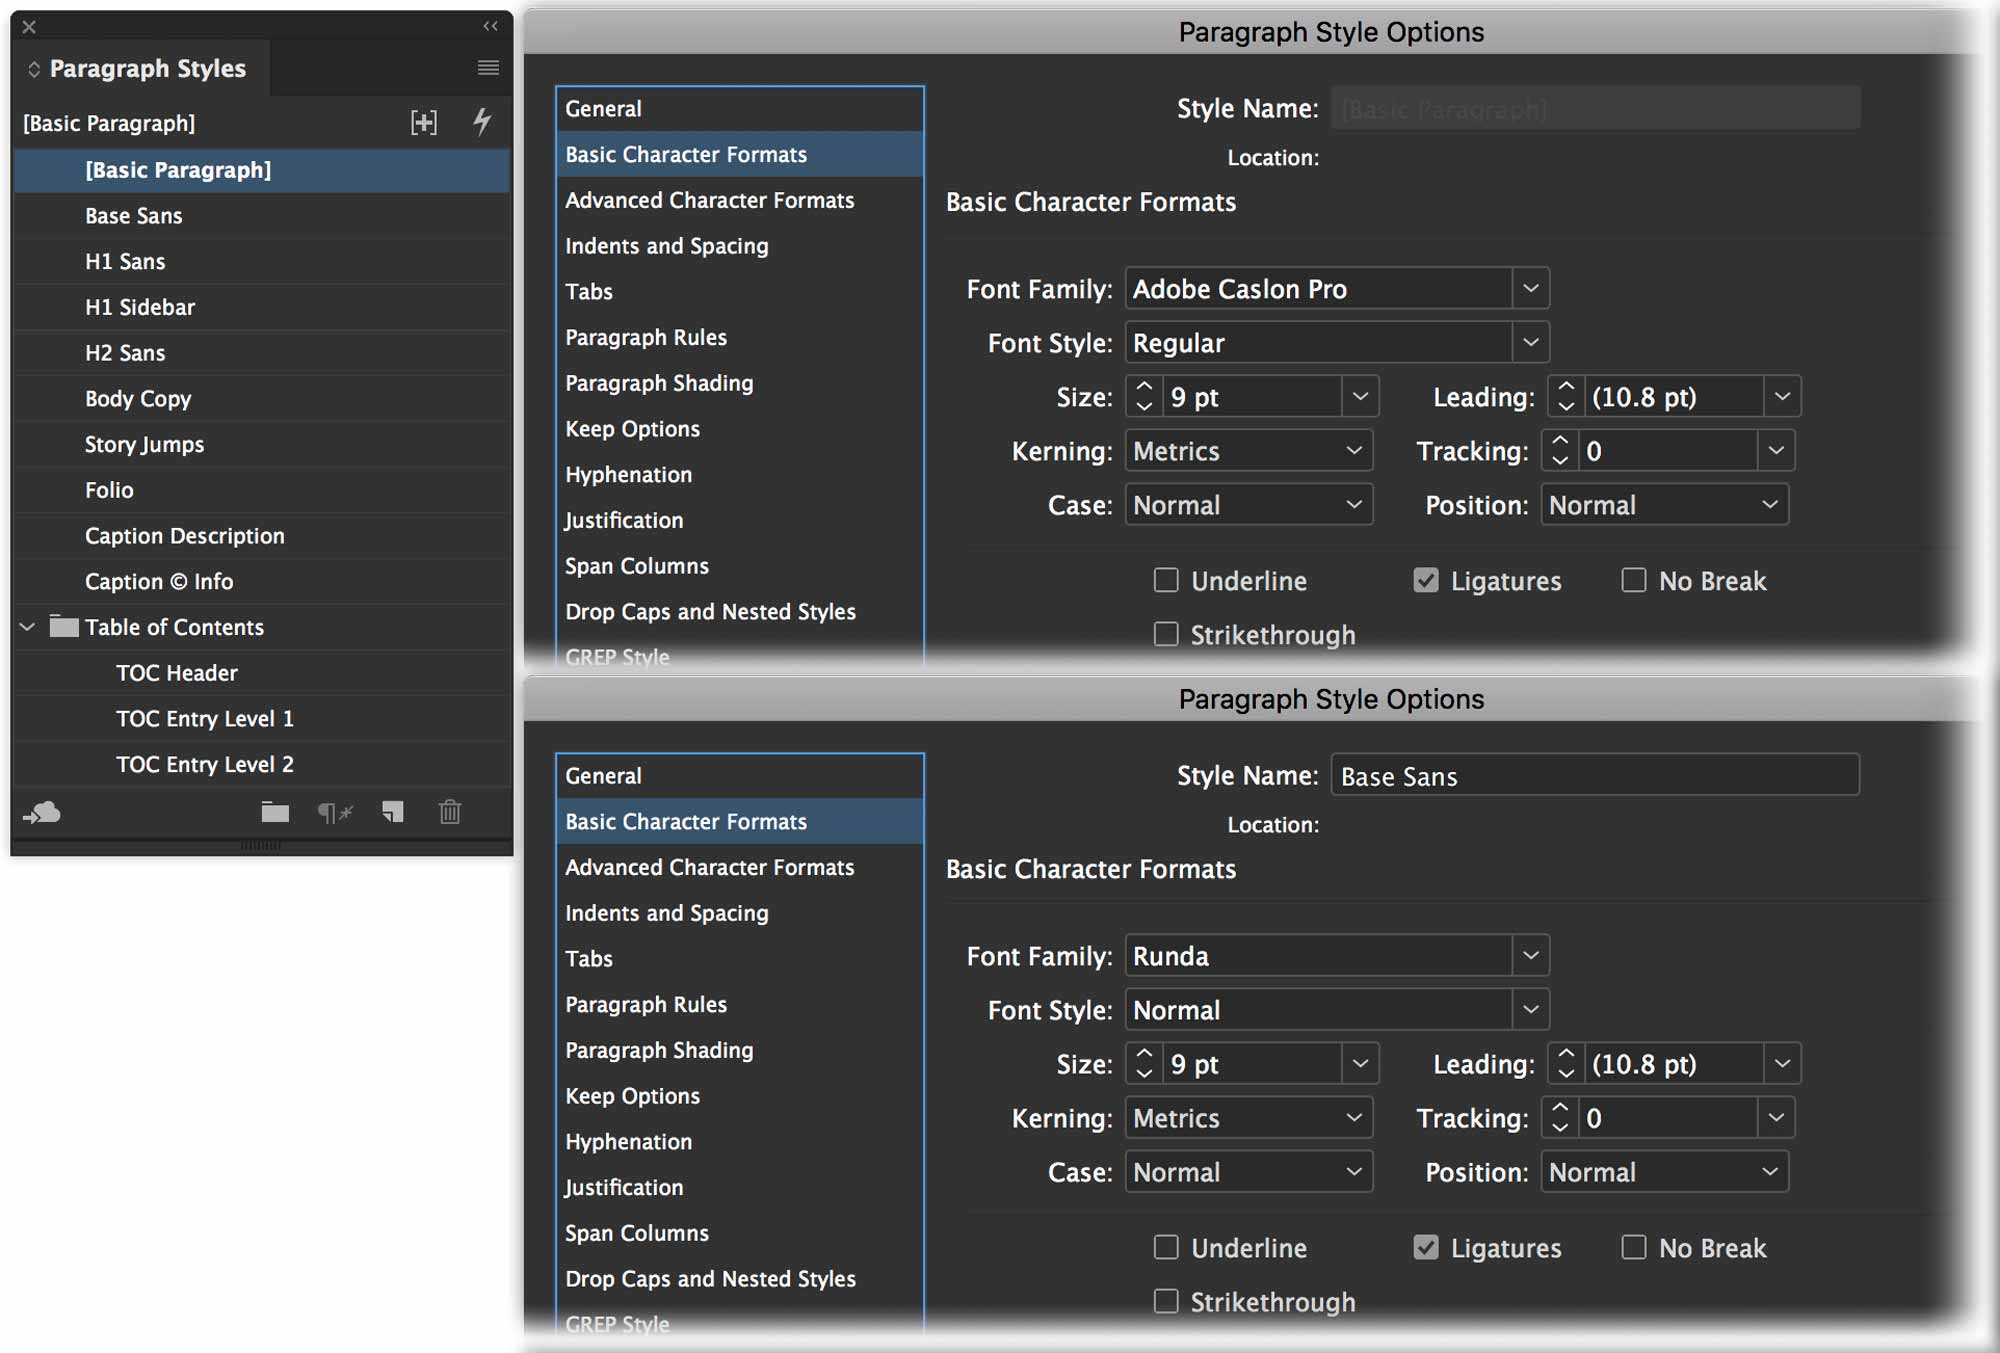
This is my Paragraph Styles panel. Make sure you base all serif styles on Basic Paragraph. Base all sans-serif styles on Base Sans.
Parent Pages
Rename A-Parent to A-Base. Create a new parent page based on A-Base called B-Content.
Create a Primary Text Frame on B-Content. Make sure it has two columns. Thread the frame on the left-hand parent page to the one on the right-hand parent page.
Numbering & Sections
Set up sections so that the first to the fourth pages have lower case roman numberals. Starting on the fifth page, your numbering should have regular (arabic) numbering.
Place Text
Place the provided text starting on the fifth page of the document, which should be numbered page 1.
Styling Text
Your body copy should be set in Caslon Pro Regular 9pt. The product lines need to be set in Runda Bold font, which is your sans-serif typeface at 18pt. The product names are also in Runda Bold font at 10pt in upper case. The upper case is styled in the paragraph style, never typed in the text.
Page Folios
Set up automatic page numbers on your A-Base Parent Page.
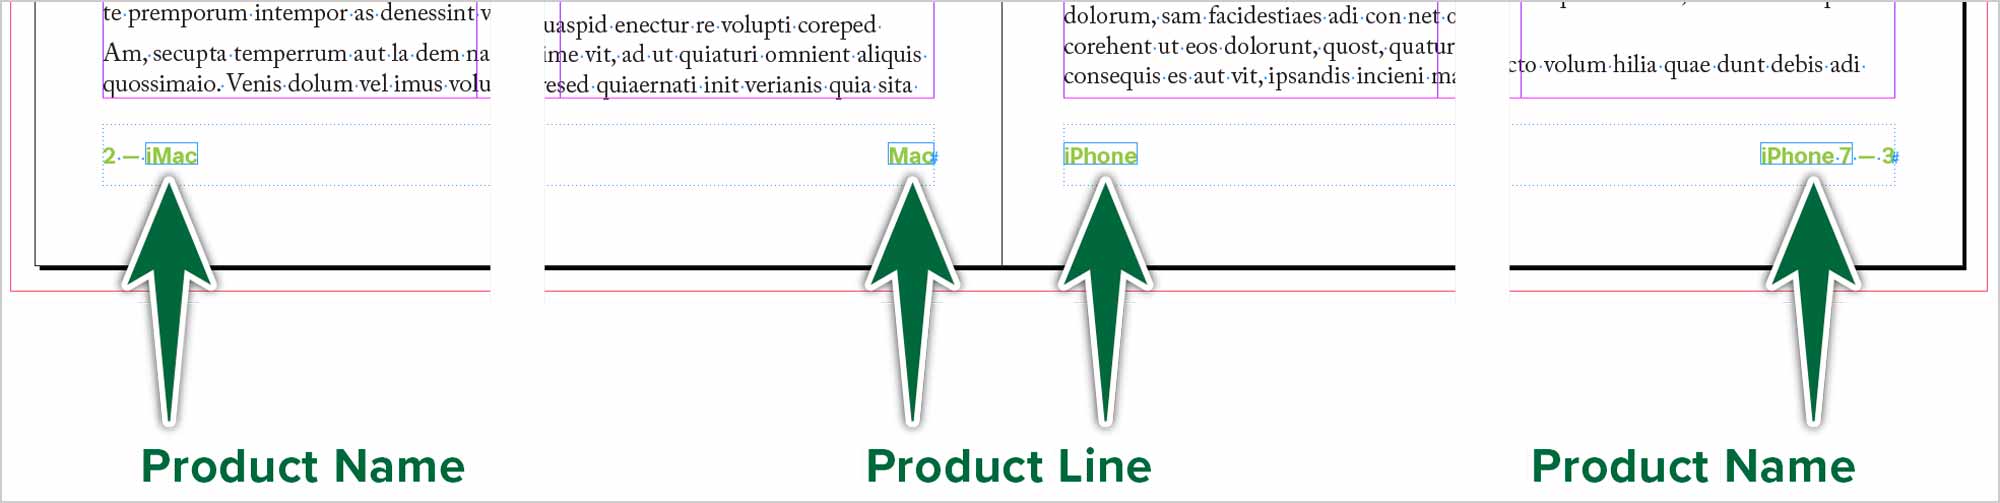
Create a text variable using the product name paragraph style. Insert it in the footer, after the page number. Create a right-aligned tab, then add a variable for the product lines.
Slug Info
Go to your A-Base Parent Page. We’ll increase the size of the slug to accomodate messages for the design team. Make the top slug 6p0 (1 inch)
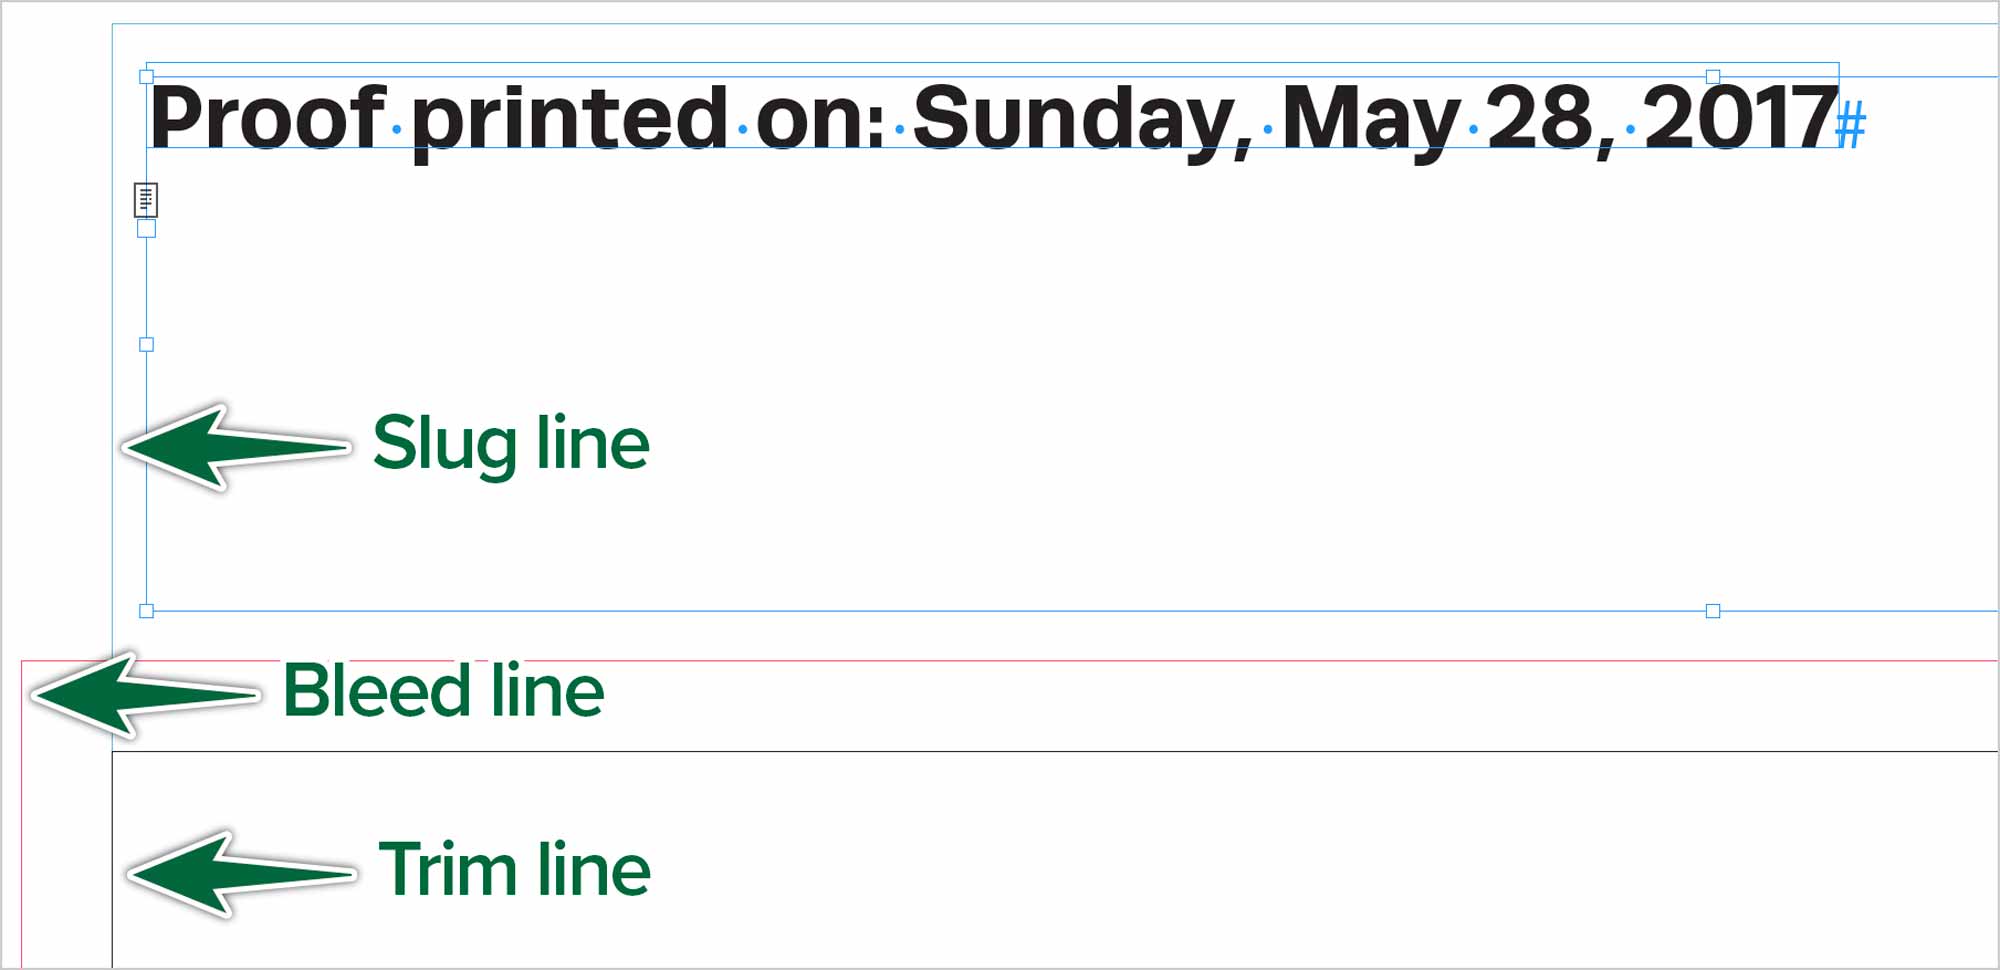
Slug content needs to be away from the bleed line.
Automatic Story Jumps
Use the provided to text on two separate pages, in threaded text frames. Create a story jump on each of the frames. One reads Continued on page… The other reads Continued from page…

Live Captions
Place the provided image near with the Apple Watch text. Create a text wrap around the image.
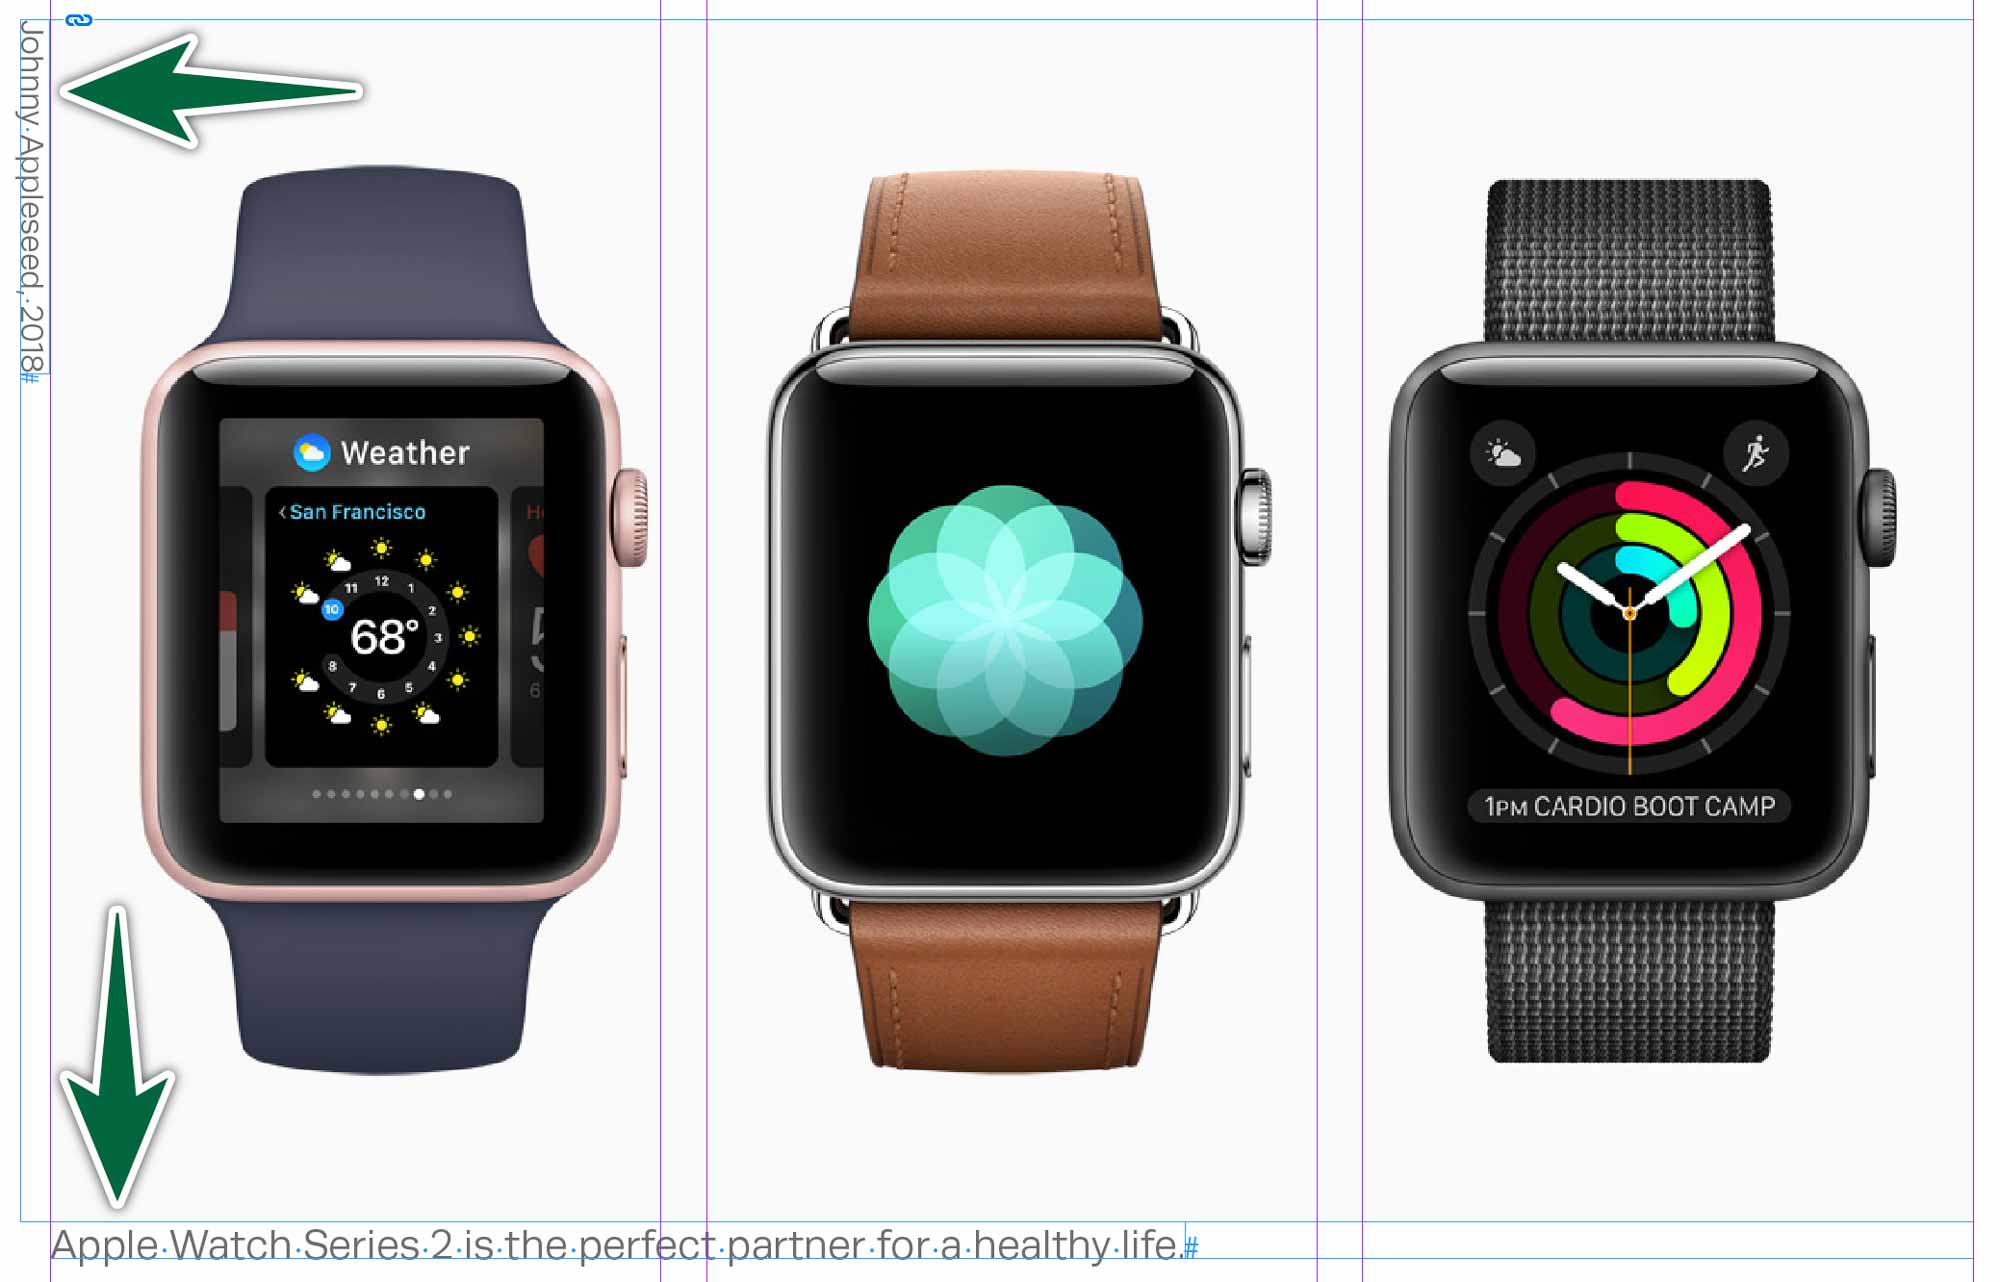
Configure two captions for the photo. One is a copyright message:
© Appleseed, Johnny, 2017
Make it subtle. Maybe light grey. This text shouldn’t distract from the content.
The second caption is a description of the photo. It should be place below the image. It should read:
Apple Watch Series 2 is the perfect partner for a healthy life.
Table of Contents
Create a table of contents on the third page of your document — page iii. It’ll be a two-level table of contents.
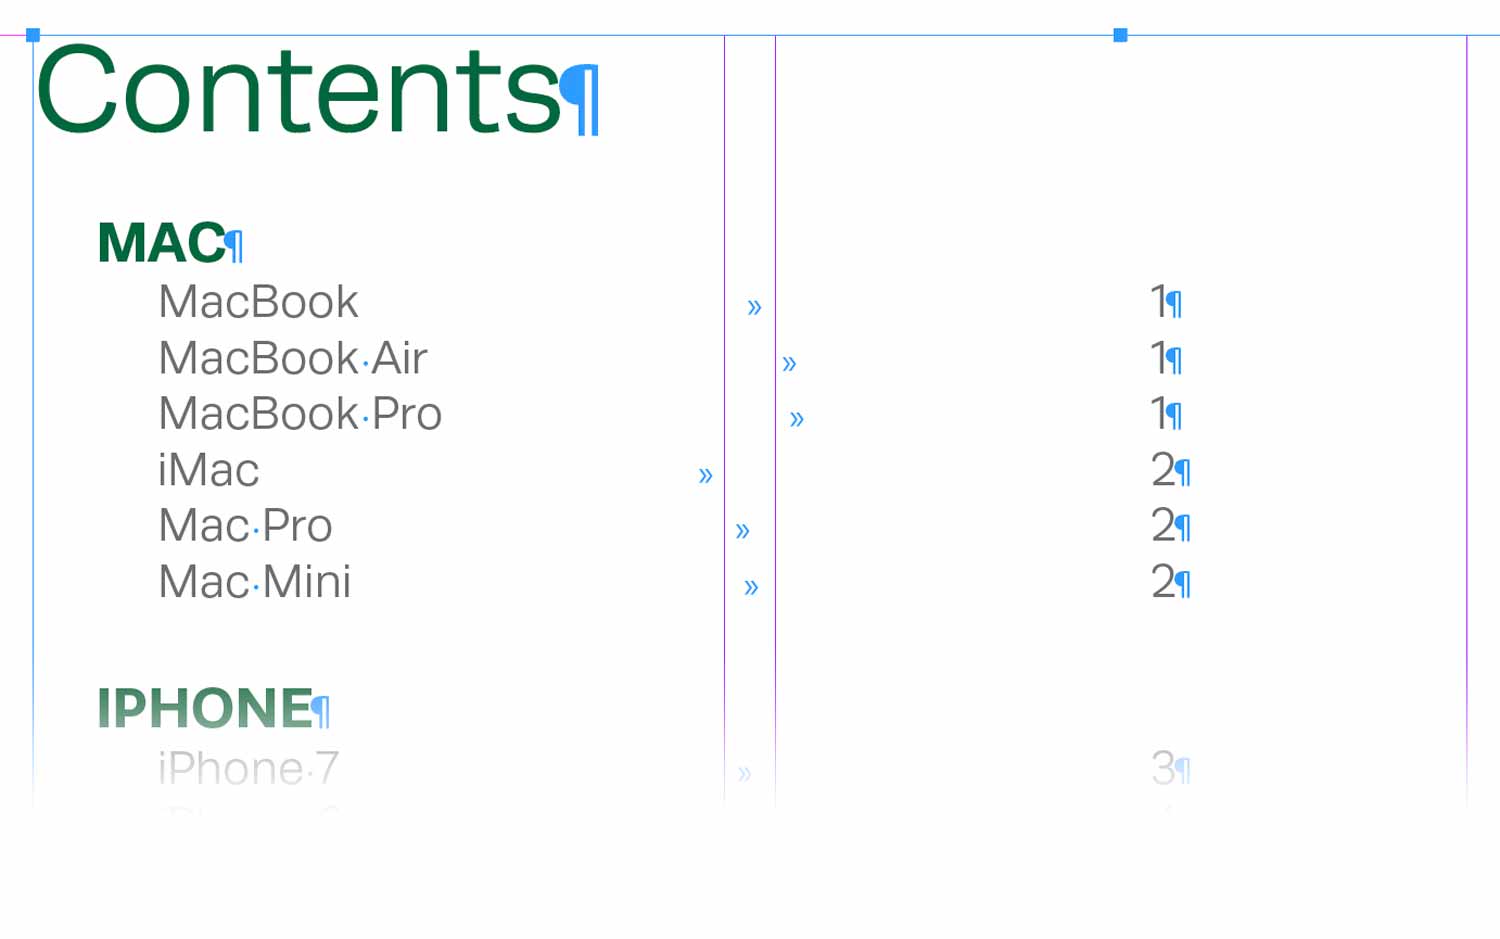
You’ll need to set up the approriate paragraph styles. Turn off page numbering for the first level entries which are the product lines.
