Topics
About Tables
Tables are always inside text frames. They may even have not strokes or fills, but they’re still there. They behave a lot like a paragraph of text.
You must use the Type Tool to edit a table. If you use the Selection Tool, it selects the frame that the table is in, not the table itself.
When working with tables, there are two levels for formatting. There’s table-level formatting and cell-level formatting. Table-level applies to the whole table. Cell-level formatting applies to specific cell options. All formatting is part of either of these modes.
Table Controls
There’s the Table menu, table-related panels, the Control Panel. Table-related panels include Table and Cell panels, then the Table Styles and Cell Styles panels. It’s also very convenient to right-click to access contextual content in the menu.
Navigating Tables
You first need to click in the table with the Type Tool. You can tab through the table. You can also Shift-Tab to move backwards through the table. If you type the Escape key, it will select the current cell.
You can hover your Type Tool cursor at the top of a column to select it. You can select rows by hovering at the start of the row. If you hove at the top-left of the table, it will select the whole table.
In the Table menu, there’s a Select item which also allows you to select.
- Command-3 selects a row.
- Option-Command-3 selects a column.
- Option-Command-a selects the whole table.
Creating a Table
You can create a table by putting your cursor in a text frame and using Table > Insert Table… If you use Create Table from the Table menu, you can create a table without an existing text frame. It’s like placing an image in InDesign. The table will fill the text frame you drag.
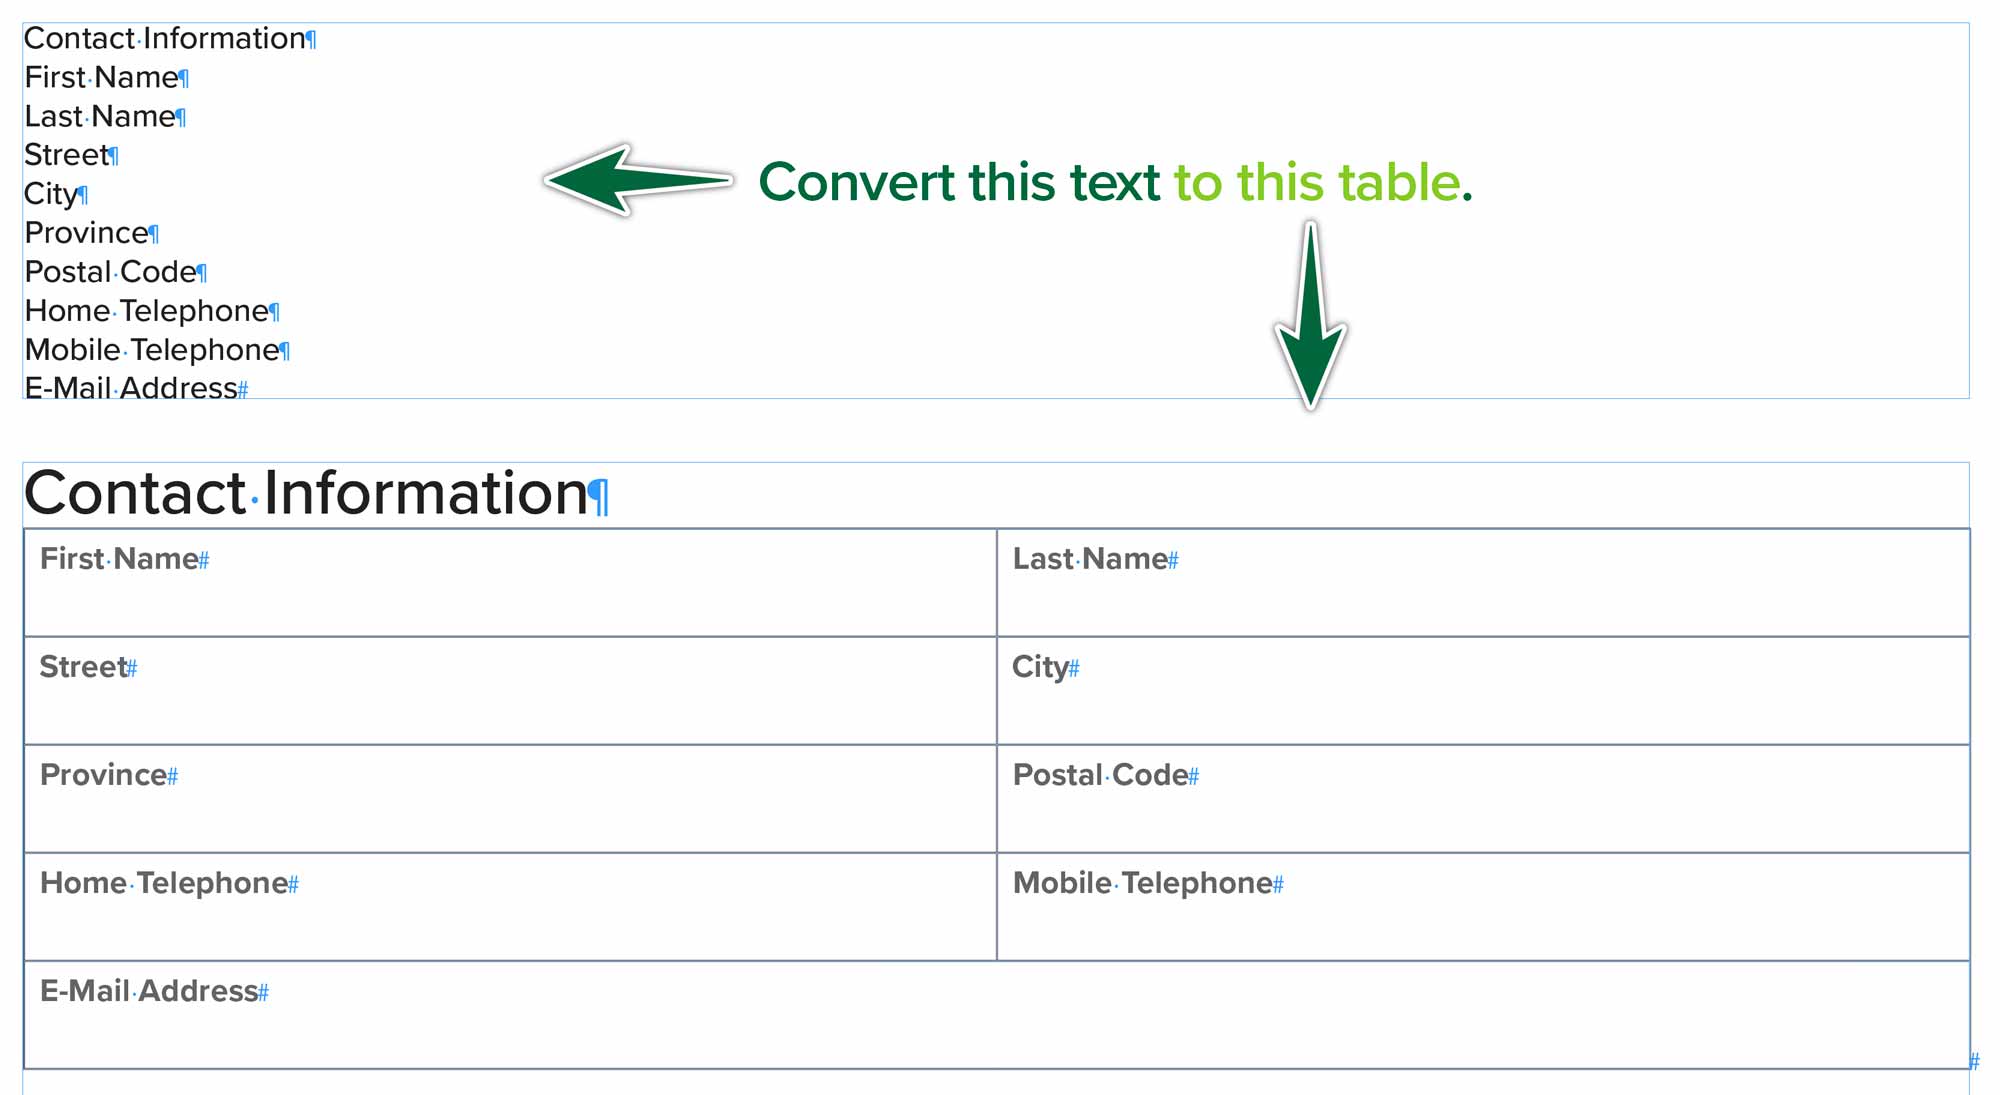
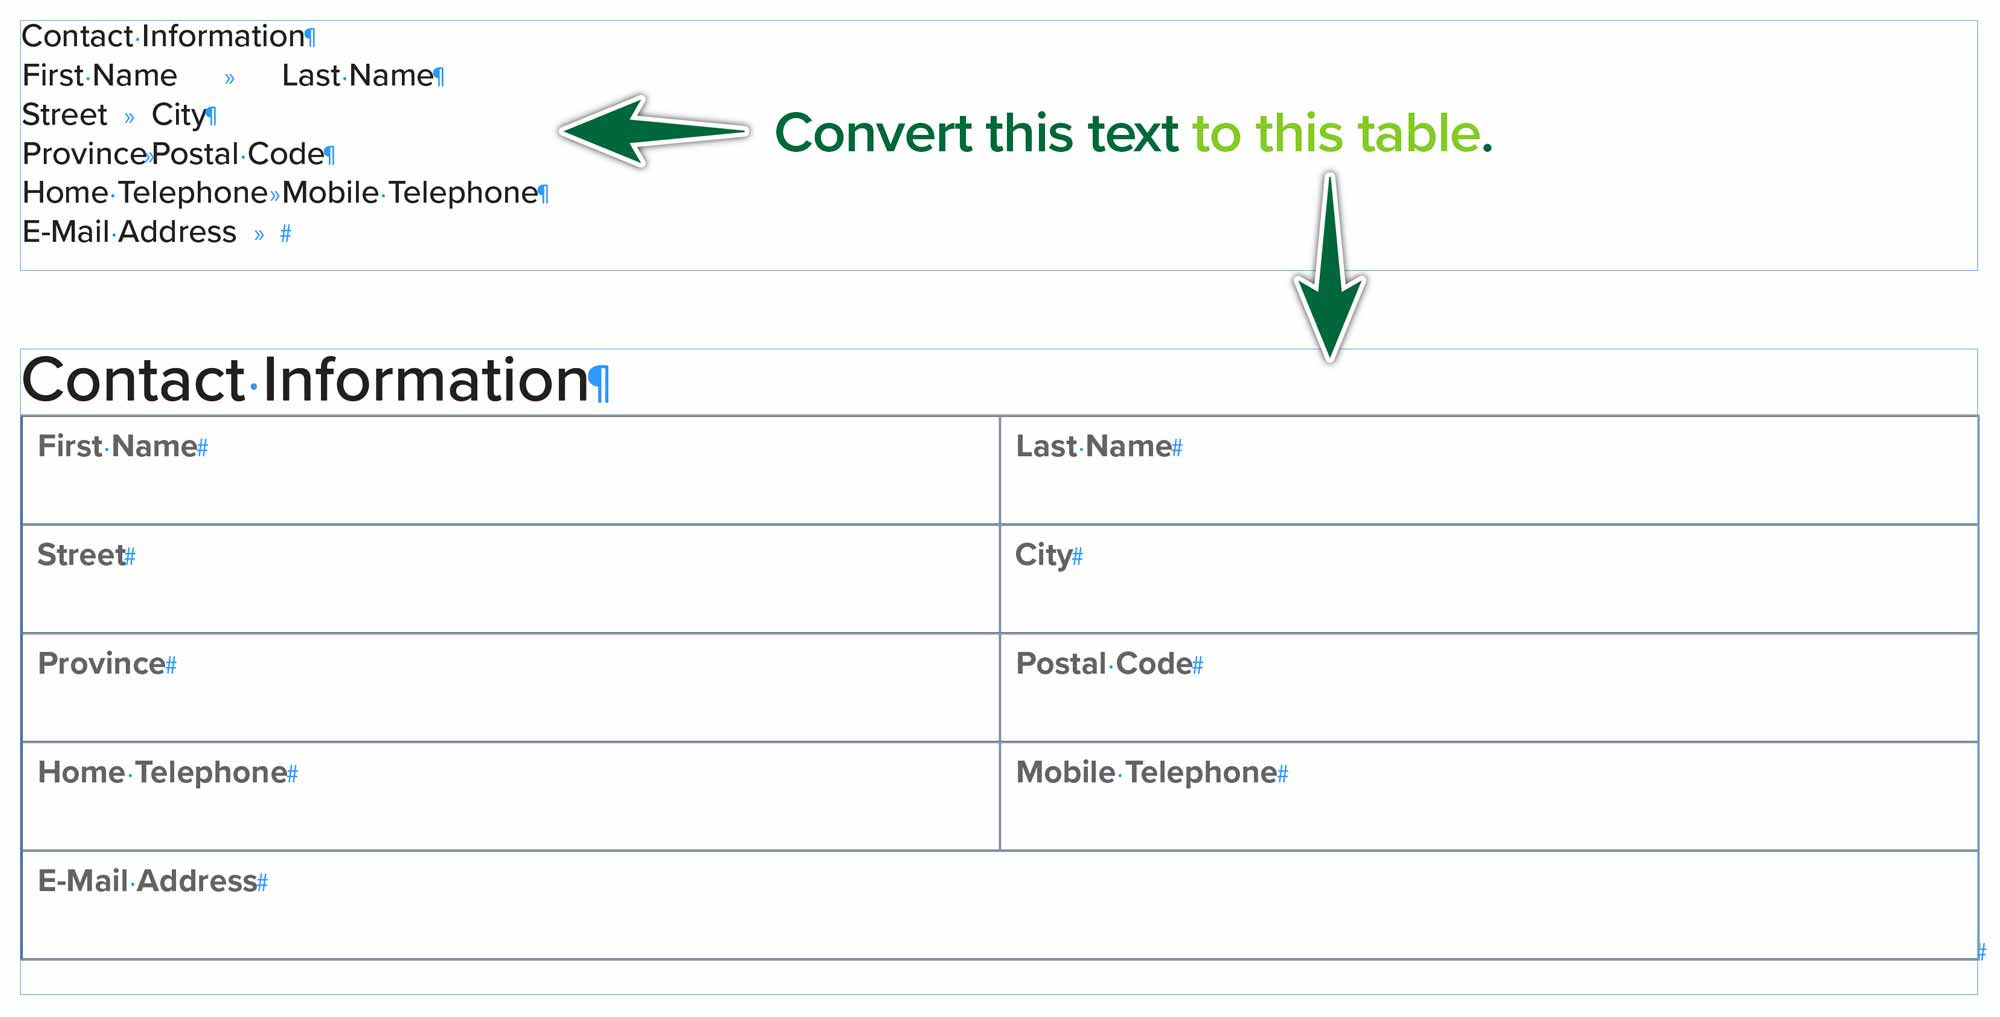
You can also convert existing tabbed text to a table. You choose Table > Convert Text to Table…
The final method is to place an Excel file. Hold the Shift key and click OK to show import options. You can choose options for building the table built on the Excel spreadsheet. If you have existing table styles, the whole table can be formatted automatically.
You can convert a straight list of text by using Convert Text to Table command. Just change the column delimiter to Paragraph, then tell it the number of columns you want. Voilà!
Tables in a Frame
To center a table, you can center it as you would a paragraph of text. You can apply a left indent also. You can add Space After and Space Before a table.
Table Formatting
Table controls are extensive. There’s a control in InDesign to do just about anything to a table’s appearance to make it look just right.

Table Borders
From the Table menu, go to Table Options. You can set options for borders there. By default, table borders are centred on the path. The proper way to turn off any border on a table is to set the border to zero. This way, it doesn’t occupy space in the text frame. This is different that only filling with no colour.
If you make manual or local changes to borders, you can check Preserve Local Formatting, so what you do in the Table Options dialogue doesn’t undo your work.
Header & Footer Rows
Select a top row in the table, right-click and choose Convert to Header Row. This doesn’t affect its appearance. Table headers repeat themselves if the table is in two text frames. If you place a long Excel spreadsheet into InDesign and flow it across multiple pages, the header rows will repeat at the start of each next text frame.
Alternating Row Fills
Alternating fills aid readability. Control-click in the table. Go Table Options > Fill Options. Choose Every Other Row. There are various patterns for filling either rows or columns. You can’t fill rows and columns. It’s either/or.
Alternating Strokes
There are altenating row or column strokes. You can set up all kinds of patterns in the Table Options dialogue. As opposed to fills, you can draw row strokes and column strokes in one table. You can also choose which strokes are on top – row strokes or column strokes. Go to Table Options > Stroke Drawing Order to set this.
Cell Height & Width
You can simply drag with the Type Tool to drag cell sizes. If you hold Shift, it will resize rows or columns proportionally. A better way to resize columns is to select them and enter measurements in the Control Panel. Row height is a bit different. It has At Least or Exactly a number. If you set an At Least value, this allows the row to grow. If you set it to an Exactly number, the text in the row becomes overset instead.
Formatting Text in a Cell
You can format text normally in cells. Use paragraph styles normally. You can also position text within a cell. You can do vertical and horizontal centering. Option-Command-B will bring up your Cell Options dialogue to set the position of the text within the cell. This is very similar to the regular Command-B for text frame options. You can also add cell insets in the Cell Options dialogue.
You can rotate text in 90º increments with the Text Rotation setting in the Cell Options > Text dialogue. You can also do this from the Control Panel.
Modifying Row & Column Stokes
You control your stoke appearance from the Stoke Proxy. It’s the box in the Control Panel or the Cell Options dialogue. The blue lines represent the strokes which will be affected. If you select certain cells, then edit them in the Stroke Proxy, it represents only the selected cells. If you select the whole table, the Stroke Proxy represents the whole table.
Cell Fills
Select cell(s) and go to Cell Options with a right-click. You can change the fill colour there. You can change it in the Control Panel too.
You can add diagonal lines to table cells. This can x things out or shade a cell. This puts a diagonal line or an x across the cell(s). They can cover up the typed content, but you need to set it that way. By default the x is behind the text. The control is in the Diagonal Lines panel in the Cell Options dialogue.
Add or Subtract Rows or Columns
You can add or remove rows or columns for the Table Options dialogue. When you make changes in the dialogue, it adds or removes from the end of the table. To add rows or columns at a location in a table, place your mouse where you want to add and right-click. Select ‘Insert…’. You can also Command-9 to do the same thing. You can use Command-Delete to delete selected rows or columns.
Moving Rows & Columns
You can select whole rows & columns, then hover to see the drag cursor. Drag rows and columns.
If you merge some cells, this cancels drag and drop editing. You also cannot drag a single or a few selected cells. If you have a local stroke on a row or a column, it will not drag when you move the row or column. Table strokes are actually shared between all the cells they touch.
Merging & Splitting Cells
Select the cells you wish to merge. Right-click and select merge cells. You can split them the same way. You can even unmerge cells, which returns them to their original configuration. When you merge multiple cells which contain text, a return character is inserted at the removed cell boundary.
Overset Text
To resolve overset text in a table cell, simply open the Story Editor window to see the overset text, then edit it shorter to resolve the overset.
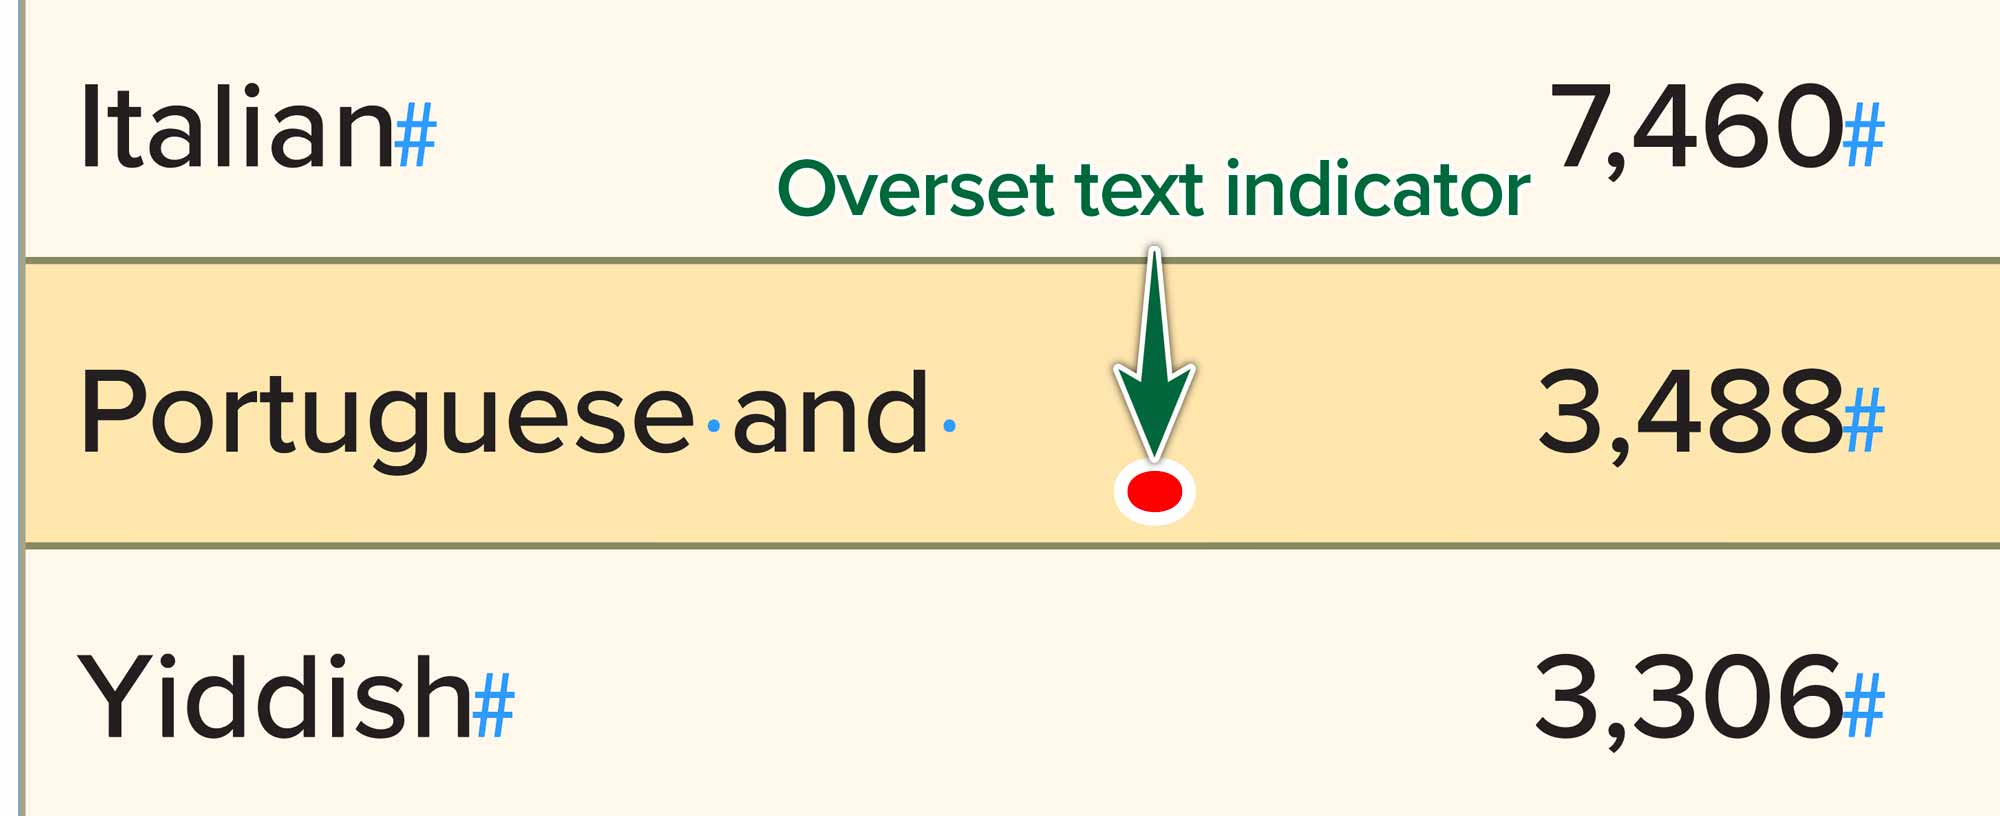
Table & Cell Styles
Styling can add stroke & fill colours and style text, but it will not create a header row or set the dimensions.
You create styles like you do text styles. You can either create style, then apply it. You can also style the cells, then re-define the style. You can even nest a paragraph style inside a cell style.
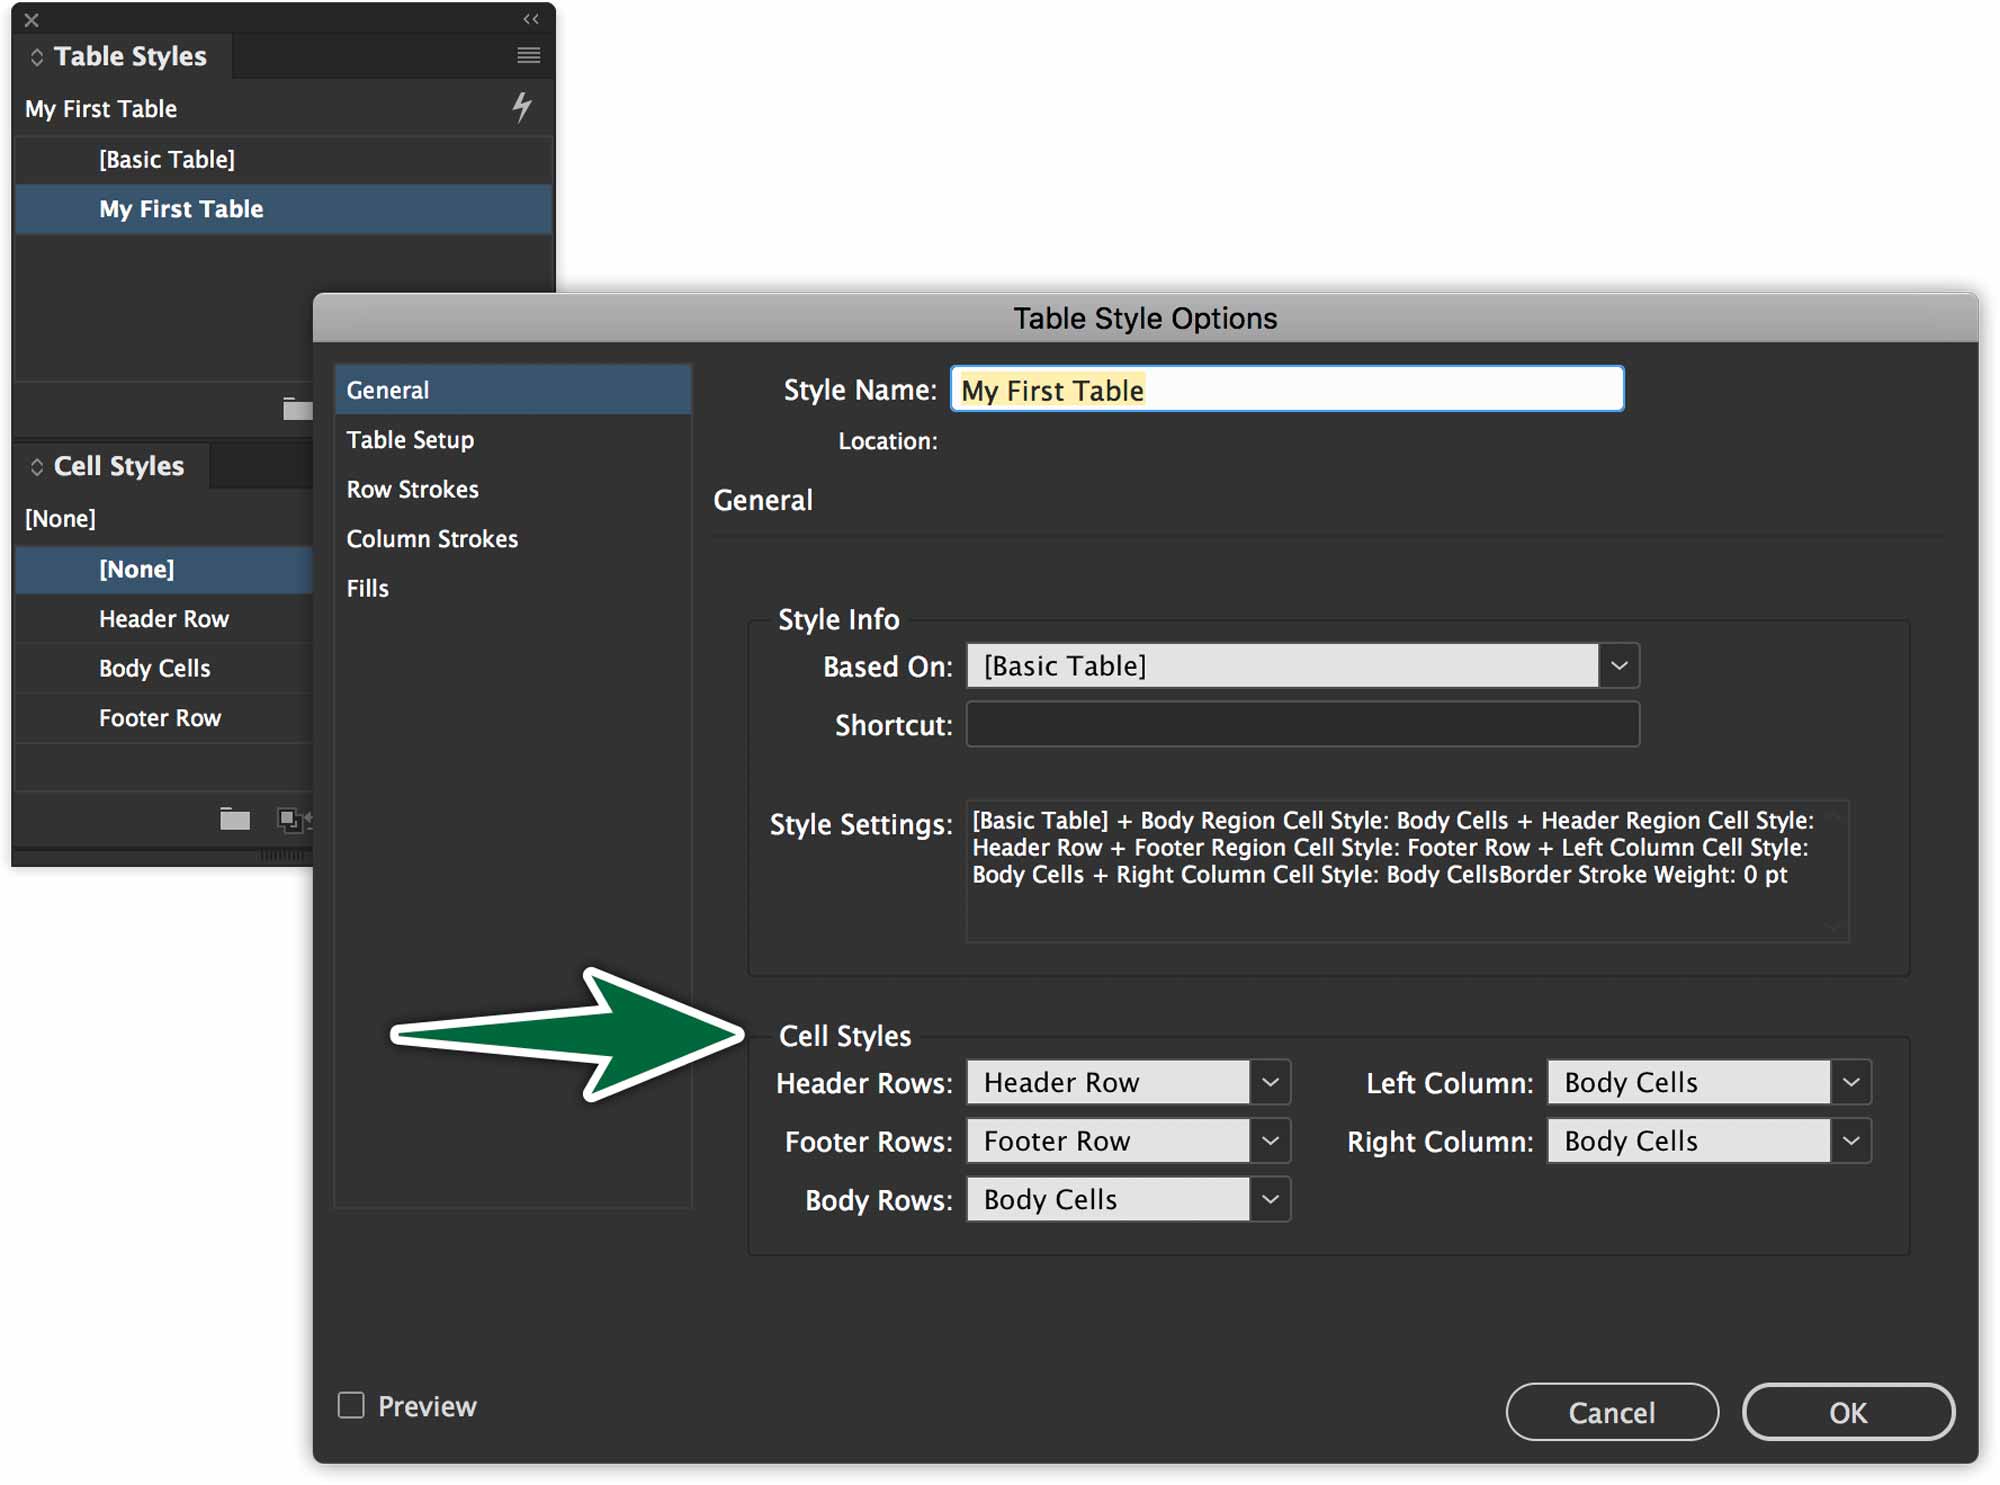
Table styles don’t actually format that much. But they can contain cell styles inside them. This is really how you style tables. Set up all the cell styles you need, then activate them inside the table style’s options.
You can share Table Styles & Cell Styles. If you drag a table into the CC Libraries panel, the styles will come with it. You do need to drag it out of the panel, for the styles to appear in a new document. You can also use the flyout menu from the Table Styles panel and choose ‘Load Styles…’.
Graphics Cells
Tables can hold more than just text. You can place graphics in a cell, with granular controls to make them look just right.
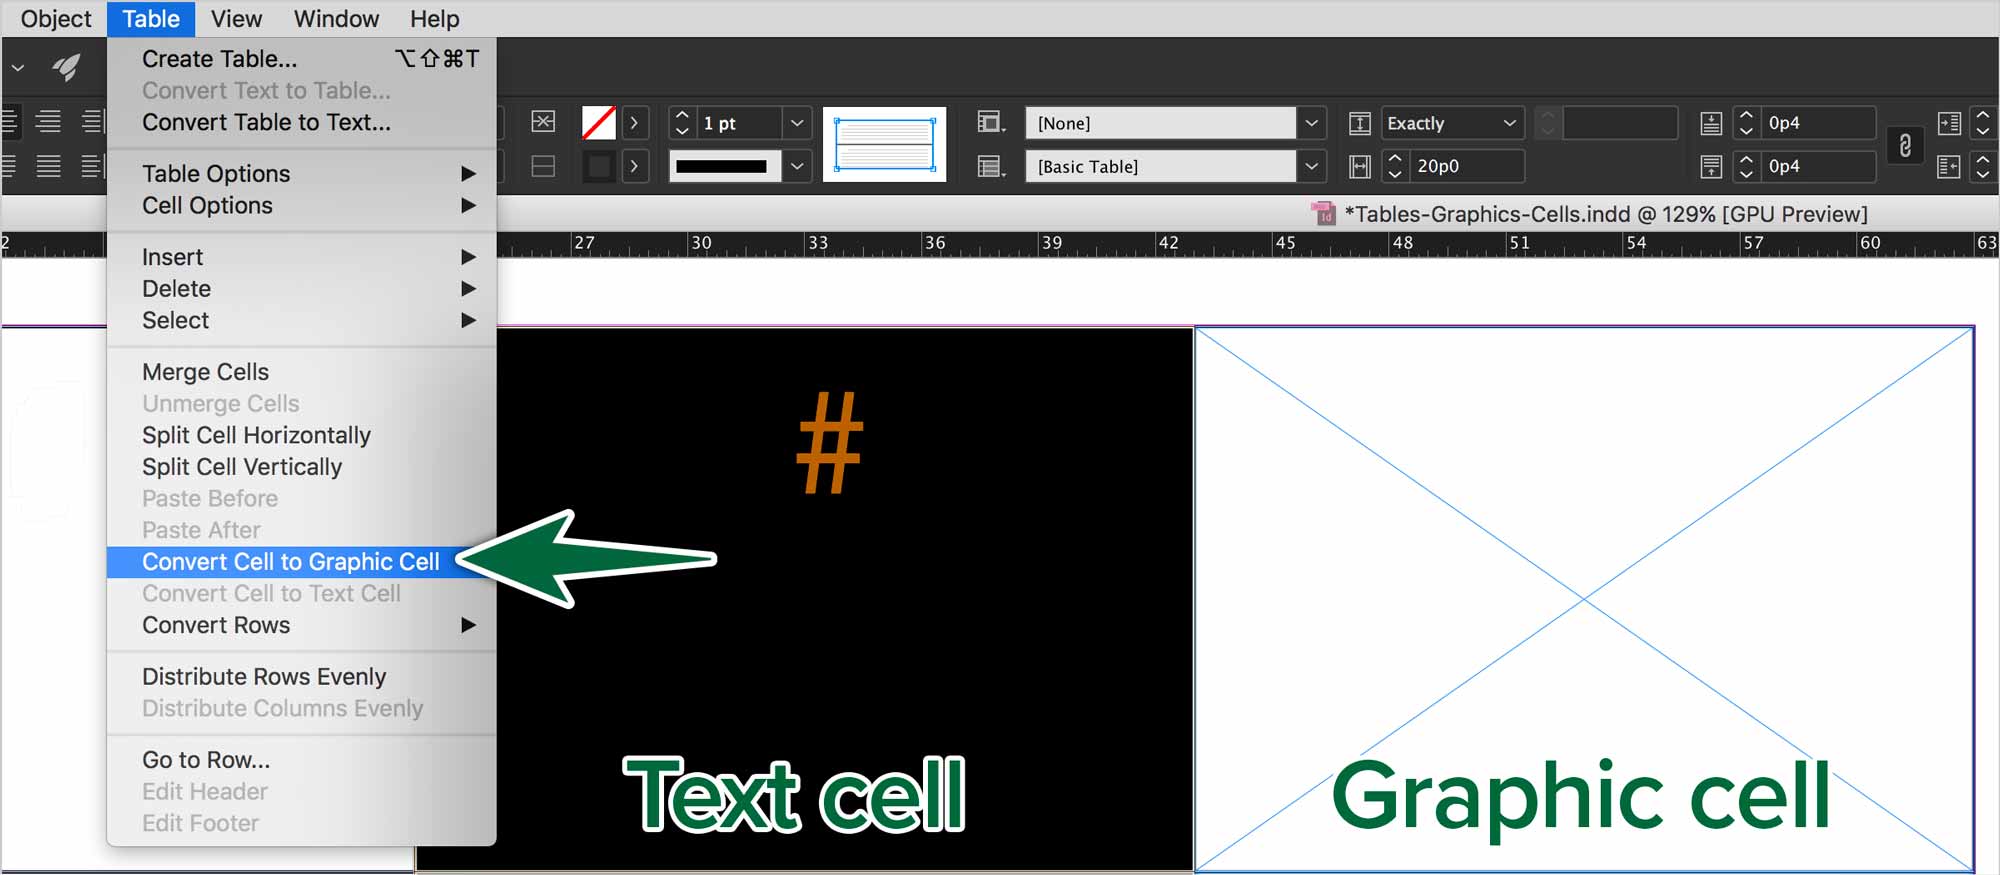
Graphic frames get inserted into the cells. The cells are glued to the edges of the cell edges. By default, the graphics frame has a Fill Frame Proportionally setting. You can change this anywhere you can change the frame-fitting options, including the Control Panel icons.
If you turn on Auto-Fit for cells, you can add cell insets and it will shrink the graphics in the table cell.
You can edit the graphics frame inside the cell, like adding a stroke to the frame inside the cell. You can use all the tools available to any graphics frame, like Object > Convert Shape… to make it another shape inside its cell. You can affect it with the pen tool too.
Updating Table Content
If you do some setup work up front, you can really save time with client edits. Using table, cell & text styles can make updates seamless.
In order to be able to update the content of a table, you need to turn on a preference. Go InDesign > Preferences > File Handling… Turn on Create Links When Placing Text & Spreadsheet Files. If you have a placed Excel spreadsheet, then you make changes in the original file, it can update in InDesign. If you have styles applied to the table, it’s best to have table, cell and paragraph styles inside each other. If you have paragraph or character styles in your cell styles, everything will update.
You can use copy/paste to modify text content in a table. The new text needs to be tab-delimited. To do so, paste the text into a frame off the page. Copy the new text. Select the first cell and paste. If the new text matches the structure of the existing table, it will fit. When you paste, choose Edit > Paste Without Formatting. This will keep the formatting that was in your table to start with.
Formative Activity
Let’s Build Some Tables
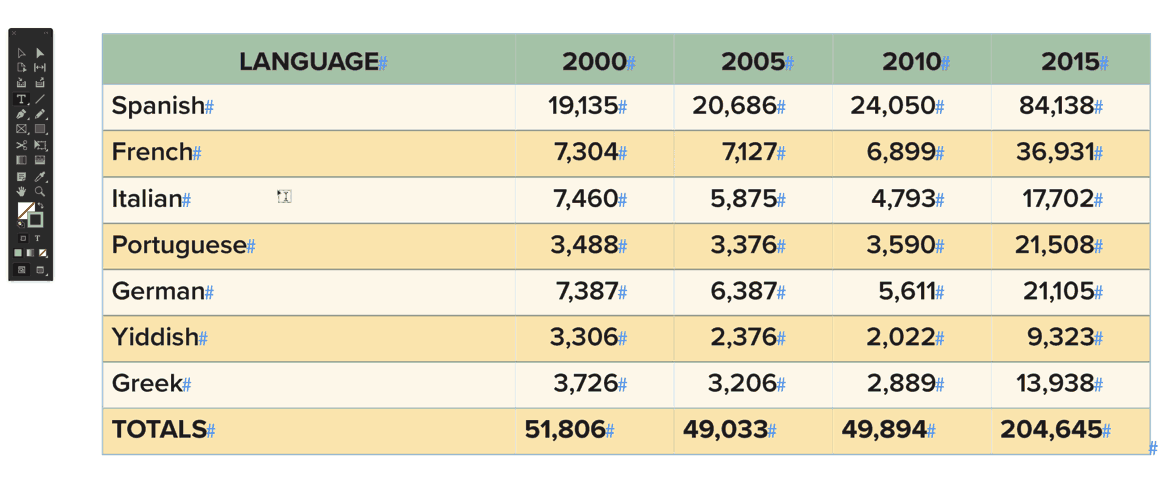
Your assignment is to use the provided content to build and style tables as shown.
Convert a list to a table.
Convert tabbed text to a table.
Style a table with Table, Cell, Paragraph & Character Styles.

Supplemental Links
- Adobe: Tables
