Topics
In this lesson, we’ll learn how to use the perspective drawing tools in Illustrator.
Types of Perspective
Illustrator allows for the three types of perspective illustration. See the image below for a visual of one-point, two-point and three-point perspectives.
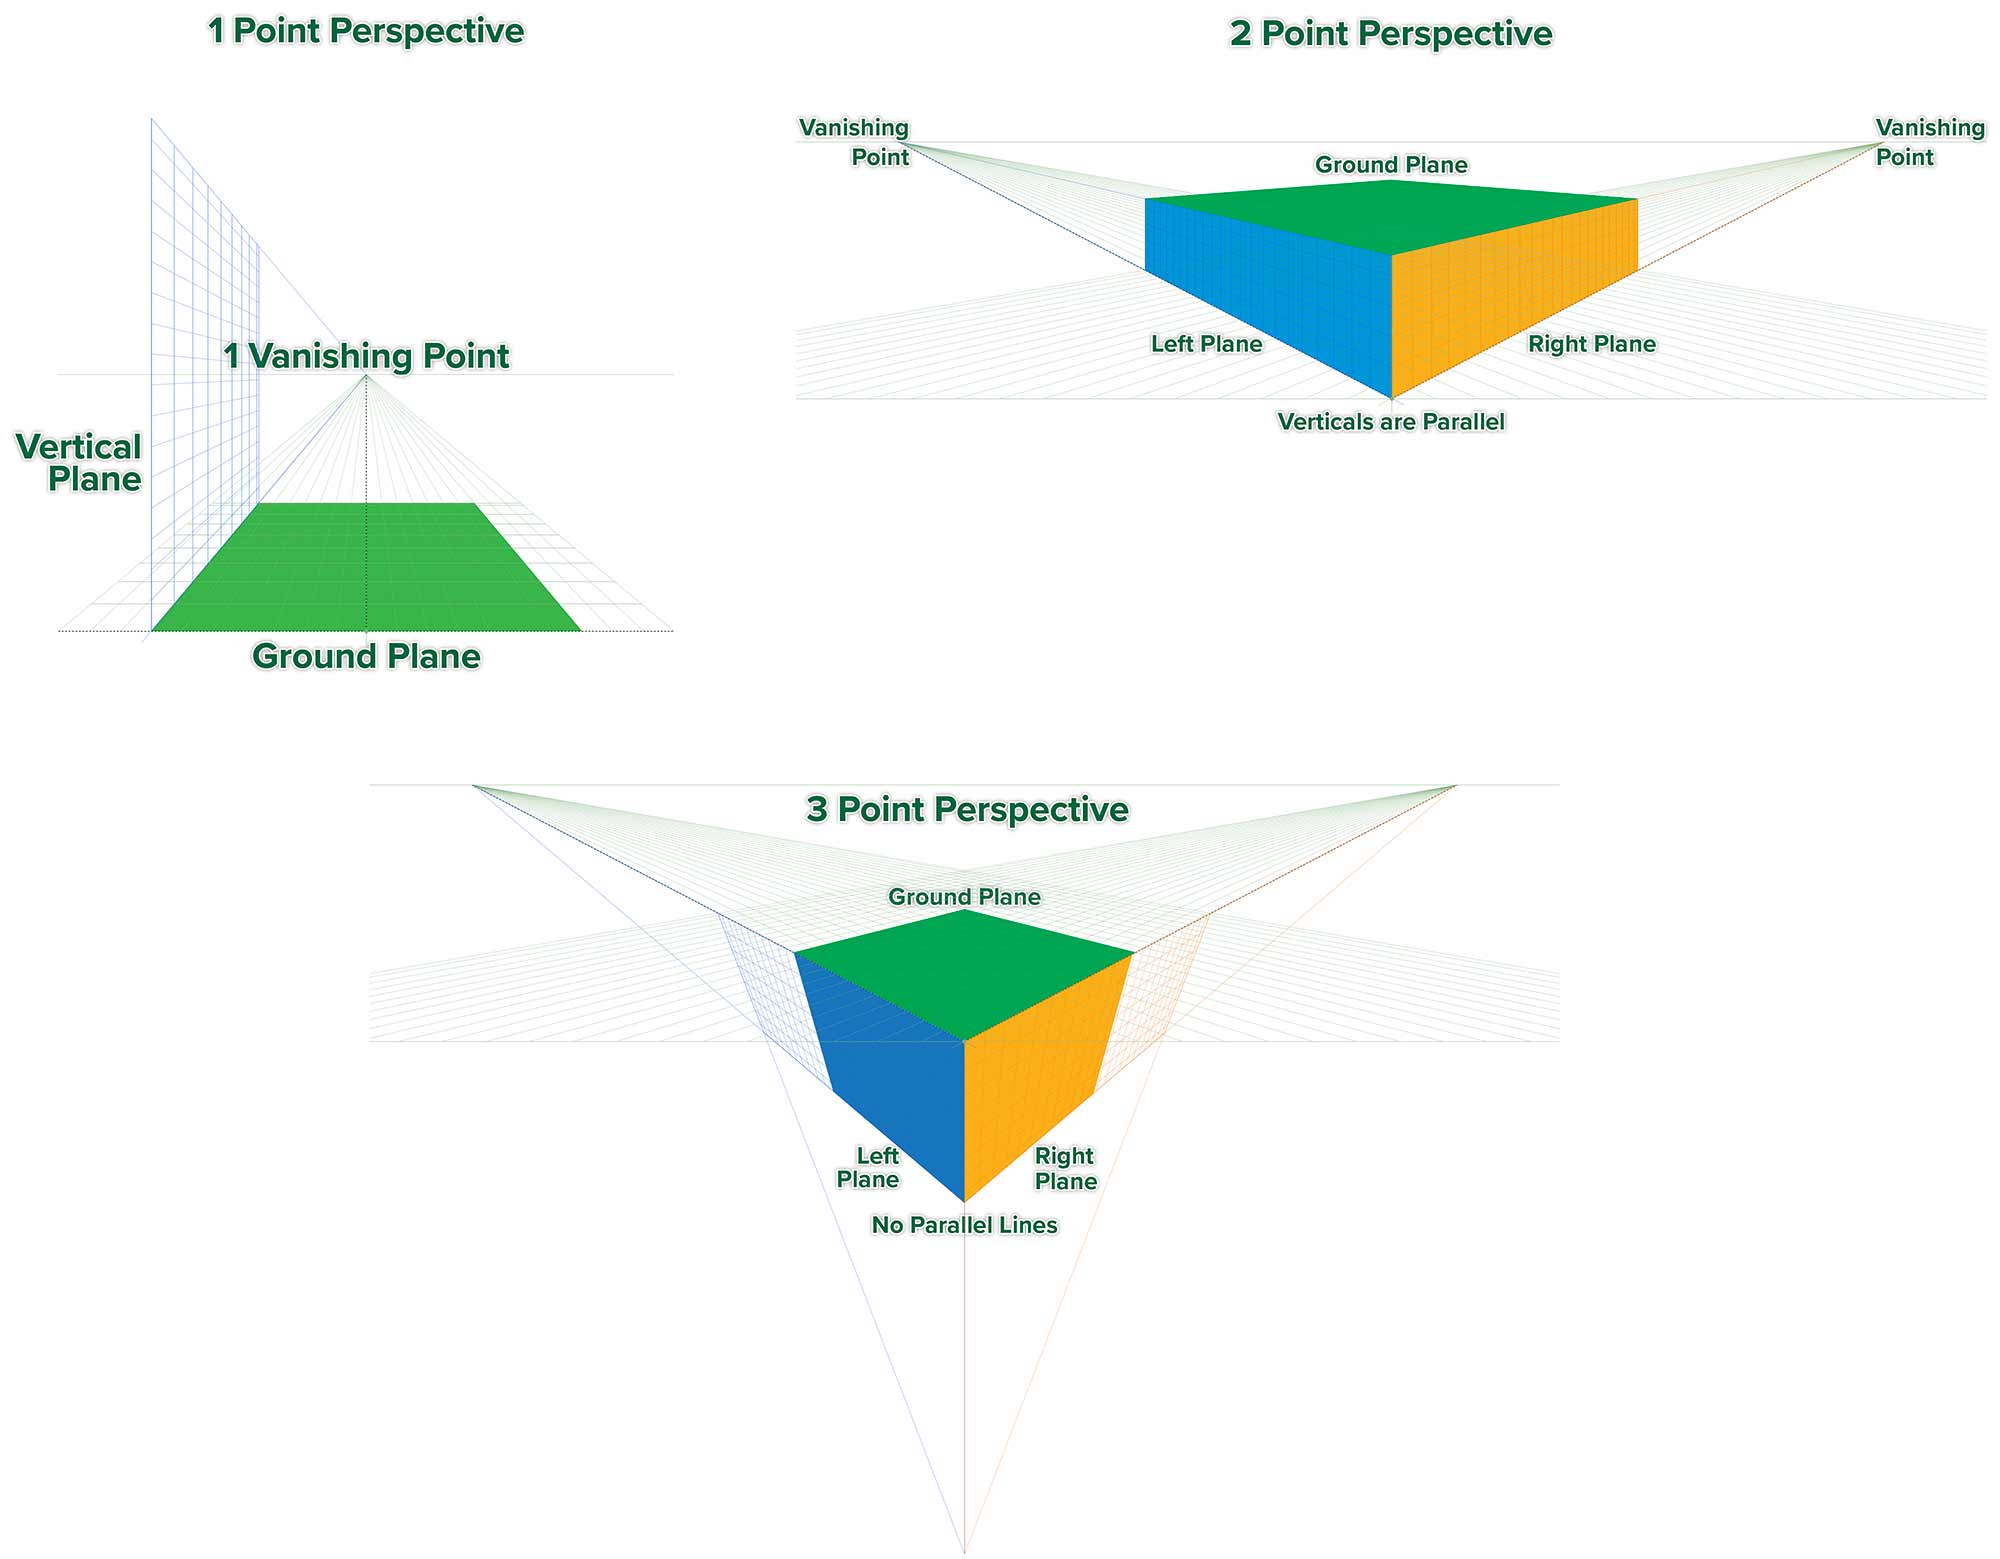
One Point Perspective
- 1 ground plane
- 1 vertical plane
One-point perspective is used when you’re point of view is straight-on the subject. Horizontal and Vertical guides are parallel. Depth lines go towards one vanishing point.
Two-point perspective
- 1 ground plane
- 2 vertical planes
- Vertical planes are parallel.
Two-point perspective is used most commonly. It’s point of view is off at an angle. Vertical guides are parallel. Left and right plane guides each lead to a vanishing point on the horizon line.
Three-point Perspective
- 1 ground plane
- 2 vertical planes
- Vertical planes are not parallel.
This is the same as a two-point perspective, except that the vertical planes are not parallel. This gives your constructions an added sense of strength.
If you want to change type of perspective, go View > Perspective Grid. If you’ve already drawn art in one type of perspective, if you change perspective, the art won’t change.
Parts of the grid.
This is Adobe’s explanation of the Perspective Grid.
Adjusting the Grid
The grid is central to drawing in perspective. We’ll deconstruct the grid and adjust it to suit our needs. Adjust the grid with the Perspective Grid Tool.
- The first action to take is to center the grid origin to the bottom center of the shape.
- The ground plane can be adjusted with three different widgets. The centre, left & right.
- Step two is to adjust the height of the grid from the top-center.
- Adjust the height of horizon.
- The Horizon Line is adjustable with the widgets all the way at the ends of the Horizon Line.
- Lastly, widen the vanishing points so the left and right planes fit what you want.
Once it’s adjusted, those parameters can be saved under View > Perspective Grid > Save Preset.
The Perspective Grid can be moved from one Artboard to another. Hover the Perspective Grid Tool over the Ground Plane widget, then drag.
Actually Drawing
Drawing in perspective isn’t much different than normal drawing. As long as the one of the planes are targeted on the .
Plane Switching widget.
![]()
The Perspective Grid Tool allows you to manipulate the grid itself. The Perspective Selection Tool allows you to select and edit artwork in perspective.

Click on one side of its cube to draw on that plane on the page. Click just outside of the cube in the widget to deactivate perspective drawing. When drawing on the various planes, Illustrator’s regular stacking order is respected.
You can attach existing artwork to the perspective grid. Select the artwork, then go to Object > Perspective > Attach to Active Plane. This can yield unexpected results. The better way to do it is to use the Perspective Selection Tool to simply drag artwork onto the active plane.
Artwork can be released from the Perspective Grid. Use the regular Move Tool to move artwork in 2 dimensions. You can also go to Object > Perspective > Release with Perspective.
First Practice Drawing
Let’s practice drawing simple artwork in each type of perspective. 1, 2 and 3 point perspectives. Keep in mind that you can only display one grid system at a time. Create one Artboard, then draw your artwork. Create a second artboard. Choose a different perspective system, then draw on it. Do this a third time. When you return to the original artboard and turn on the Perspective Grid, it will be in the right configuration for that artwork.
Symbols in Perspective
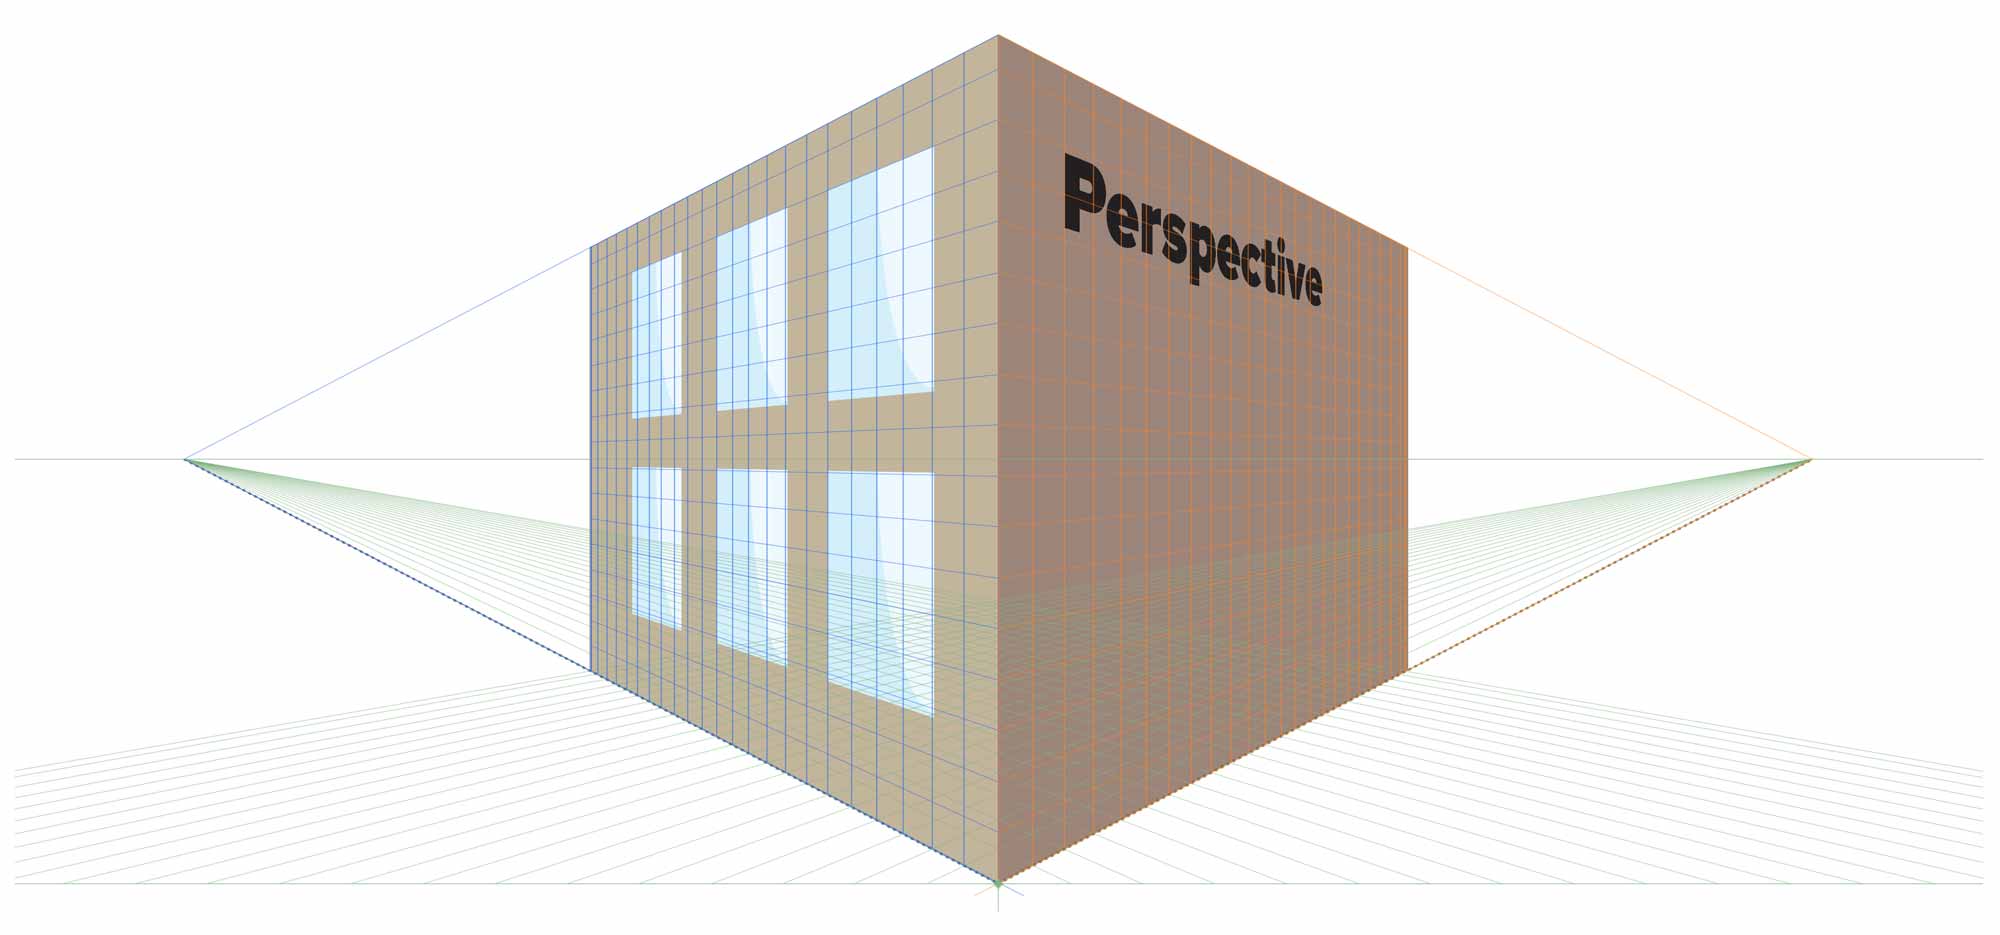
Create an Artboard with a two-point perspective. Draw what looks like a simple building. We’ll create a Symbol to draw the windows on the building. We’ll only need to draw one initial shape, then we’ll be able to edit them all at once.
Adding Type in Perspective
To add type in perspective, you need to first create it in 2D. Use Point Type – so just click with the Type tool and type. Don’t drag a box. Once you have some type, drag it onto the grid with the Perspective Selection Tool. To edit text which is in perspective, select it with the Perspective Selection Tool. Go to the Options Bar and click on Edit Text. To move type in perspective, use the Perspective Selection Tool and drag.
- To move perpendicular to the grid, hold the number 5 key while dragging.
- To move artwork by a specific amount, select it, then double-click on the Perspective Plane Widget.
- A temporary new plane grid can be displayed by Shift-clicking on an Anchor Point with the Perspective Grid Tool.
Symbols can be used in perspective. As usual, double-click on the Symbol instance, edit, then hit Escape to get out of Isolation Mode. All Symbol instances will update.
To move artwork along with the Perspective Grid, go View > Perspective Grid > Lock Station point. Drag a Vanishing Point. The artwork will move with it, though some more complex details may not respect the move.
Formative Activity
Draw in perspective to match the provided building photo. Your goal is to match the perspective of the building. Draw windows as Illustrator symbols. It doesn’t matter if you don’t match everything exactly. The goal is to get the pespective right.
Supplemental Links
- Adobe: Perspective Drawing
- Adobe: Define Perspective Grids
