Topics
Why Mockups?
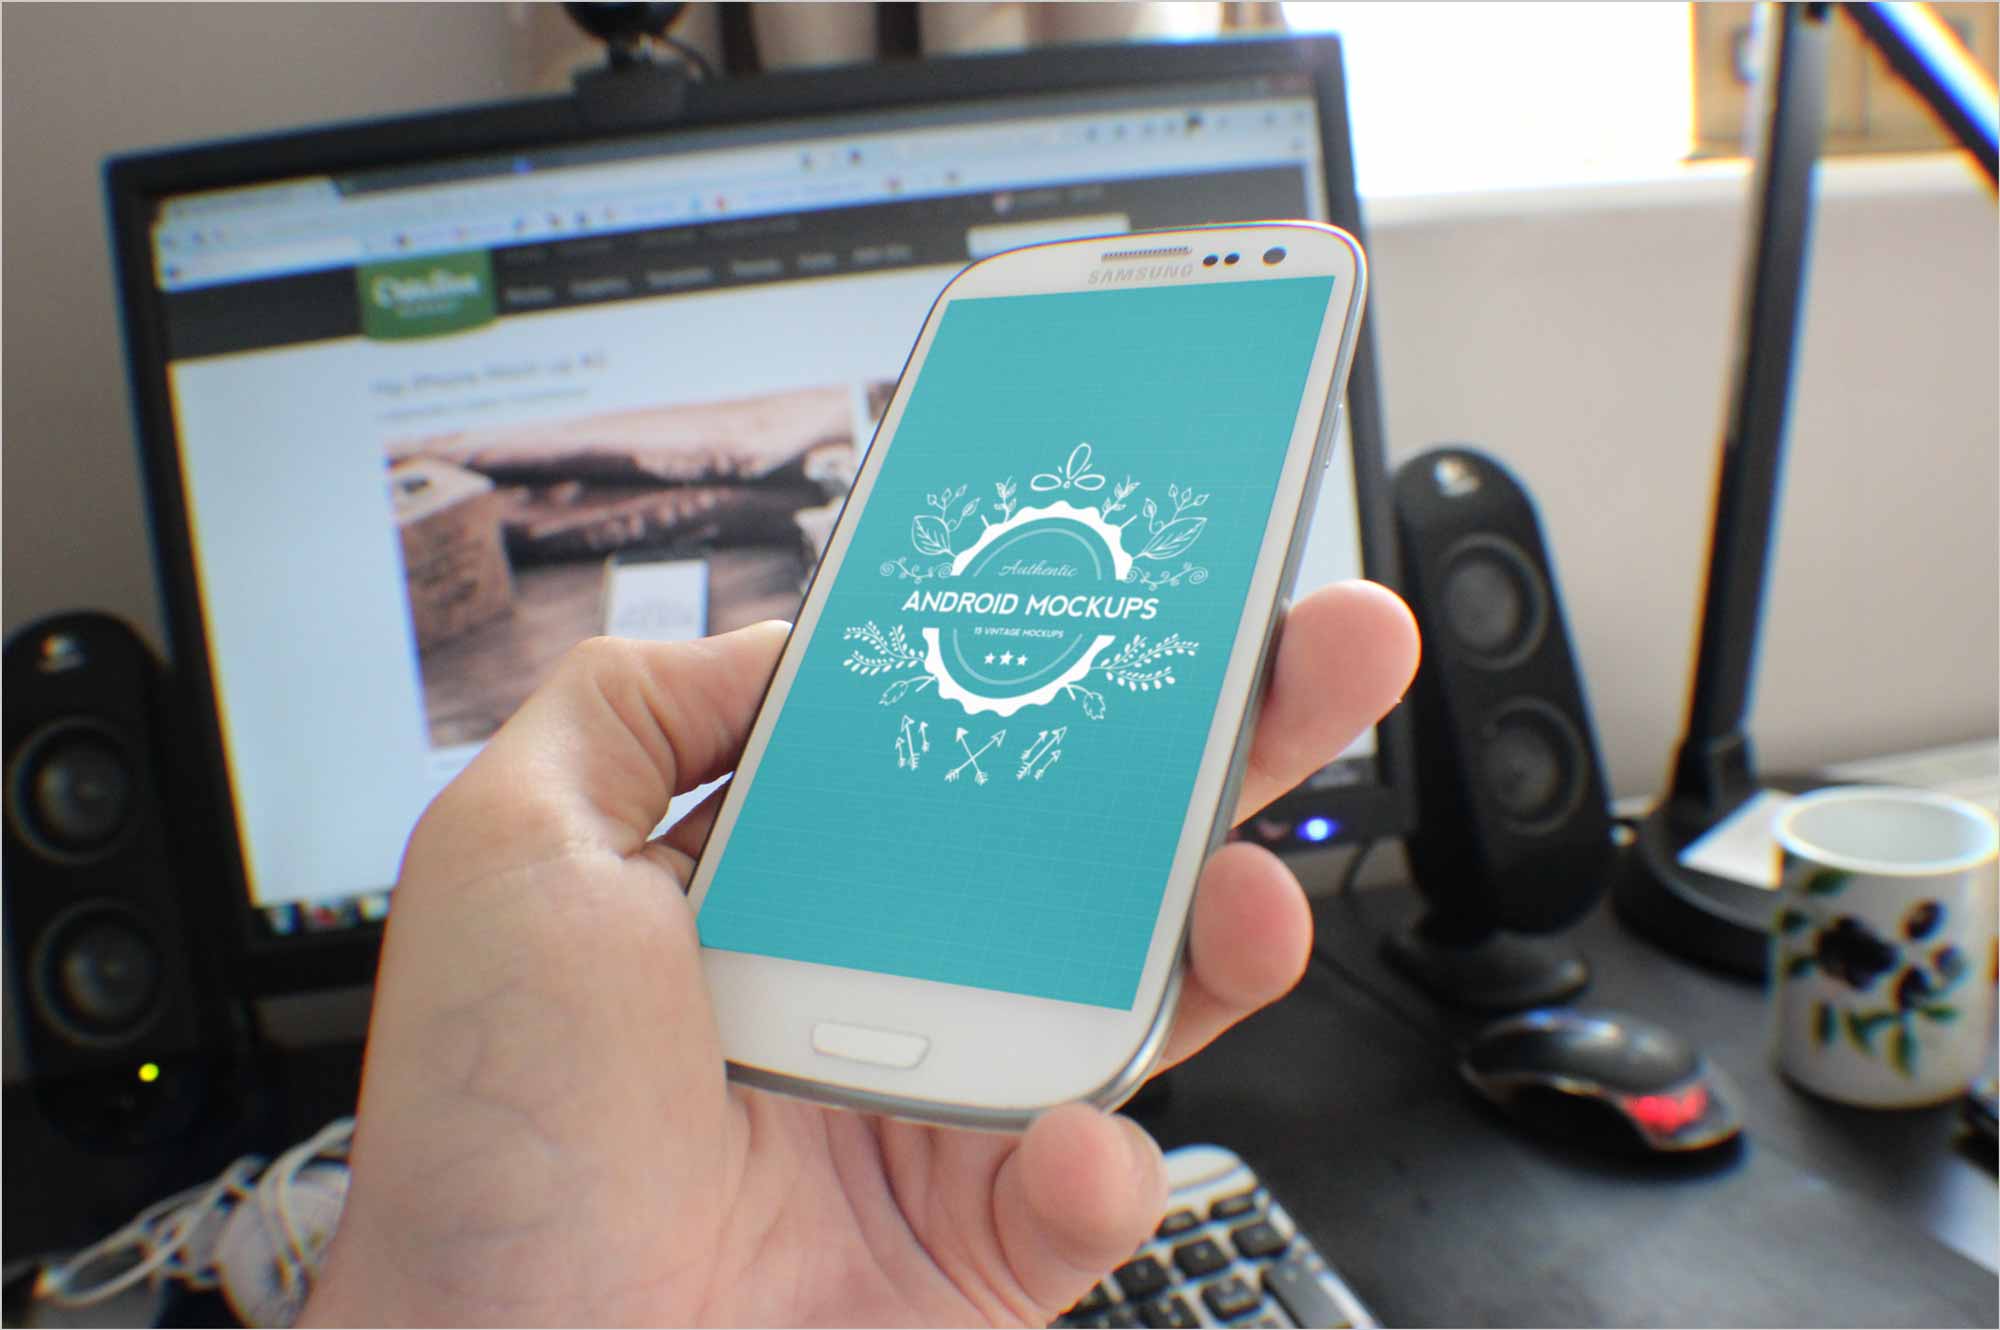
The mockups we are referring to here are Photoshop files in which a designer can place their portfolio pieces so they become part of a photograph. They feature your portfolio piece in its natural environment as if it were in daily use.
There are a plethora of web sites where members of the public can buy templated design solutions, be they brochure or web site templates. You should treat these sites as a source of competition for designers everywhere. What they shouldn’t be is a source of graphics for us, designers. We need to be the ones making (and maybe selling) the mockups, not buying them.
Why Smart Objects?
A Photoshop Smart Object is the tool used to create the mockup. It allows for the seamless swapping of artwork, while all the transformations, masks and effects are maintained.
Smart Objects are a special type of layer in Photoshop. They’re a container for the original image (or images!). The image can be a photo, vector content or even text. The goals of Smart Objects are to ensure non-destructive editing, to assist team work and to edit duplicate layers simultaneously.
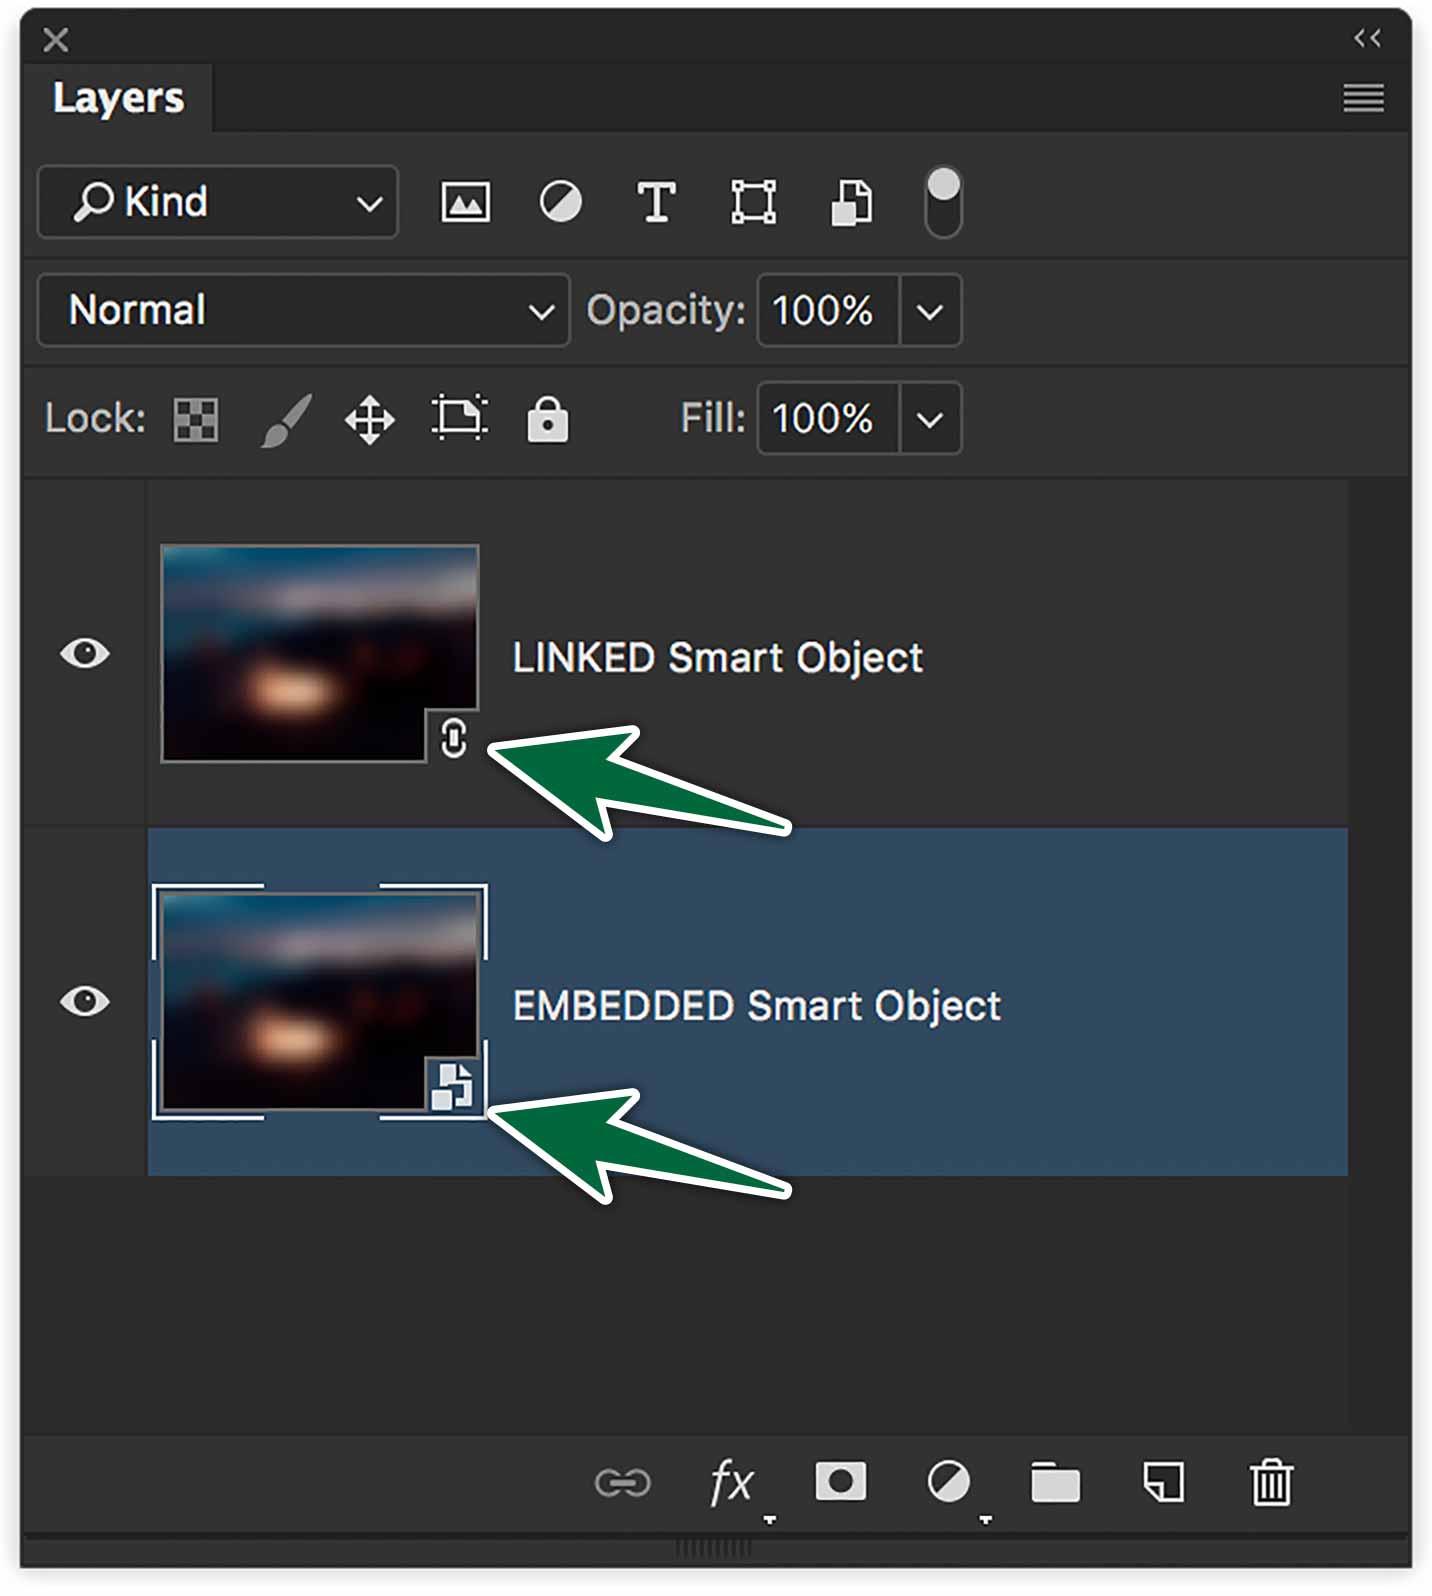
You know you have a Smart Object by the small icon in the corner of the layer’s main icon. There’s a chain-link icon for Linked Smart Objects and a page icon for Embedded Smart Objects.
The reason Smart Objects aid non-destructive editing is that you’re not really affecting the pixel data. See, if you scale a Smart Object, you’re not really scaling the image. You’re scaling an image of the original art. This means that you could scale it up and down repeatedly without damaging the original image’s pixels.
One thing you cannot do to a Smart Object is affect its pixel data by painting in any way.
Some Settings…
There are a few settings related to Smart Objects you should know about. Go Photoshop > Preferences > General to find these settings.
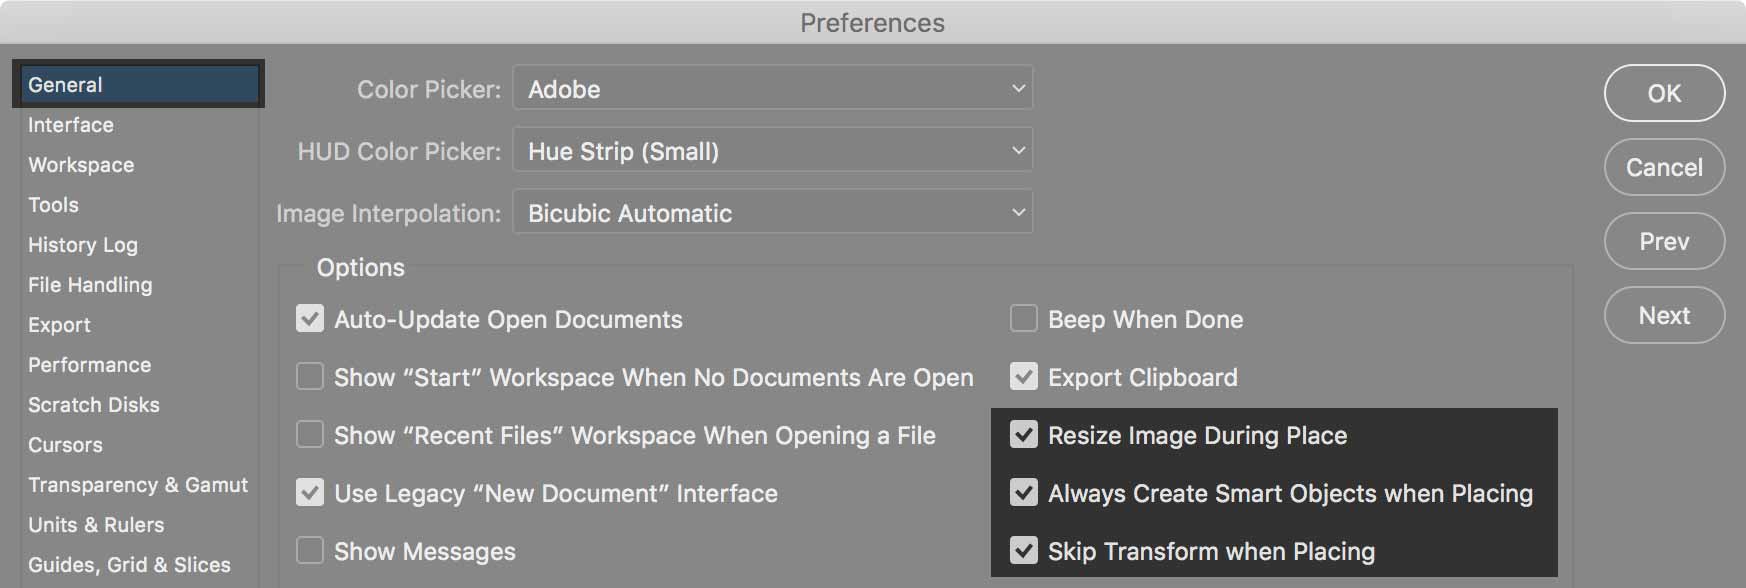
Resize Image During Place does just that. If you place an image that’s larger than your current canvas, it will resize it to fit the canvas. This prevents a gigantic image’s tranform box from being way off screen.
Always Create Smart Object when Placing is pretty obvious. When you use the File > Place command, the resulting layer is a Smart Object.
Skip Transform when Placing eliminates the transform box alltogether. You can always envoke the Tranform box with ⌘-T if you want to scale your placed Smart Object.
Creating Smart Objects
From Menus
There are many ways to create a Smart Object. You can right-click on any layer’s name and choose Convert to Smart Object. You can also go Layers > Smart Objects > Convert to Smart Object. These commands are both the same. You can also get to the command from the Layers panel menu.

The Filters > Convert for Smart Filters command makes a Smart Object too. So really, they’re not Smart Filters. They’re normal filters being applied to the Smart Object. Either way, this makes it that any filters you apply to a Smart Object are non-distructive. They are applied to an image of the photo; not the original photo.
Placing an Image
When you use the File > Place command, the placed image is a Smart Object. It’s usually best to place .PSD files beccause they have layers. If you place a JPEG, then you do edits that have layers, you need to flatten them every time.
Replacing Their Contents
As stated above, a Smart Object is a container for a photo or vector art. Well, if it’s a container, it stands to reason that we can replace the contents of that container.
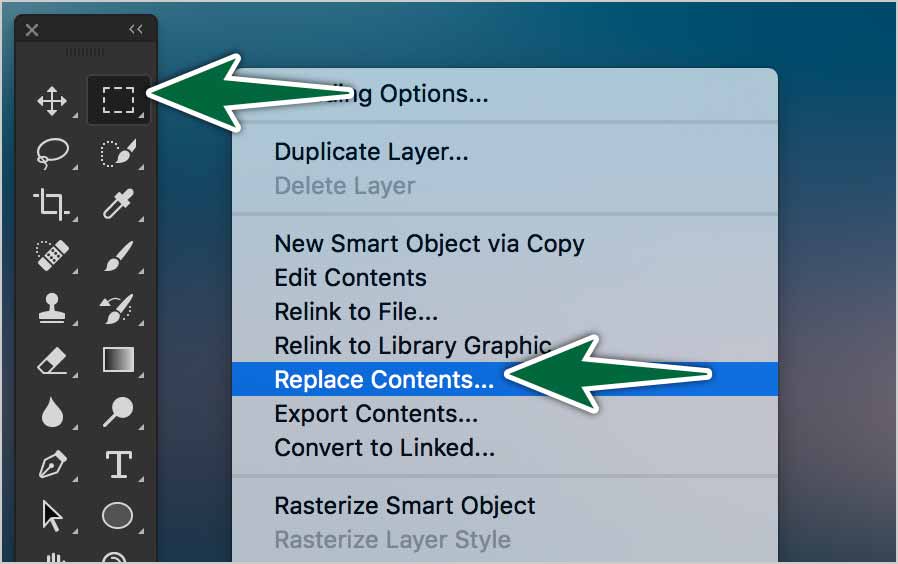
With the Marquee tool, right-click on your canvas. You’ll see an option for Replace Contents…. You can also access this command by right-clicking on the layer and from the Layers > Smart Objects menu.
When you replace the contents of a Smart Object, it inherits all the transformations and effects you had previously applied. This is really one of the big benefits of Smart Objects.
Duplicating a Smart Object
There are two ways to duplicate a Smart Object. One method makes it that all instances of the Smart Object have one source image. The second method creates a whole new Smart Object, with no relationship to the first.
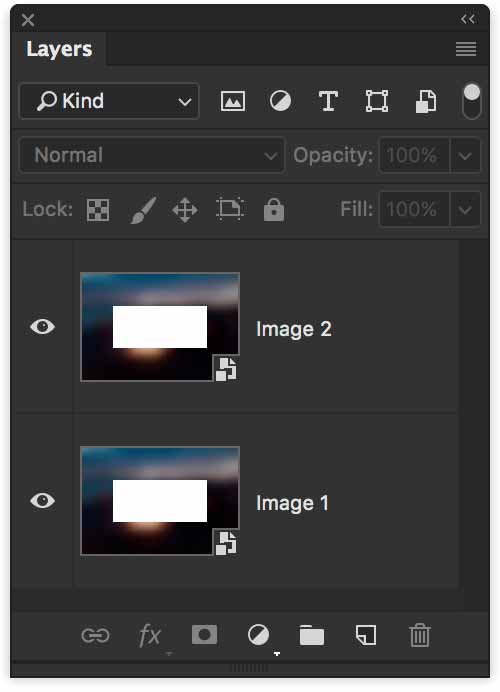
By default, all duplicates of a Smart Object have the same source image inside them. When you edit one, all copies reflect the edit. In the image above, I added a mask to one of the layers. The other layer got the mask automatically.
New Smart Object via Copy

When you use the New Smart Object via Copy command, Photoshop creates a separate instance of the Smart Object, which doesn’t affect any others.
Linked vs. Embedded Smart Objects
When you use the File > Place command, you have two choices. You can choose Linked or Embedded. When you choose to embed, the image becomes part of your Photoshop file.
When you choose to link it, the image behaves as a linked image would in InDesign. There’s a link relationship between the main file and the linked file on your computer. The contents of a linked Smart Object are referenced from external image files.
With linked Smart Objects, you can use a shared source file across multiple Photoshop documents. This is great for working in teams. Imagine three designers each working on files A, B and C, wich each have file D linked to them. When D is edited, it updates in A, B and C like magic. Really. Magic. Adobe Magic.
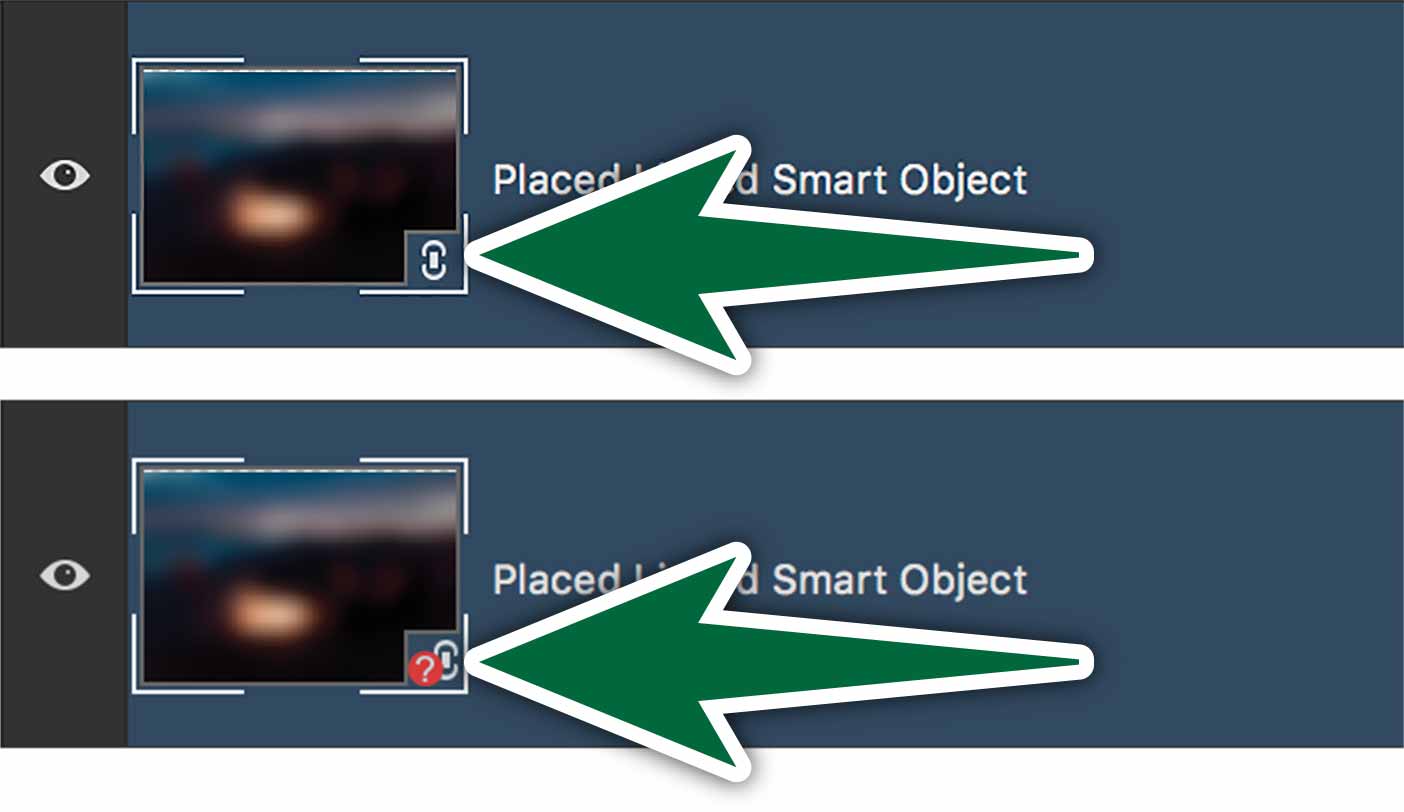
Linked Smart Objects really work like linked images in InDesign. If you edit the linked image, it updates in the parent file. Beware! If you move, rename or delete the linked file in Finder, the host file can lose track of it.
You may have noticed that there’s a File > Package command in Photoshop. The function is used to package linked Smart Objects, just like the Package function works in InDesign. And that’s all it’s good for. It doesn’t package fonts or anything else.
Rasterize a Smart Object
You can convert a Smart Object to a regular layer by simply right-clicking on it in the layers panel, then choosing Rasterize Layer. As usual, this command is also available from the Layer menu, or with a right-click while using the Marquee tool. Once you’ve done so, the layer’s tranformations become destructive.
Formative Activity
Our First Device Mockup
In our first mockup, we want to place artwork on the screen of an iPad. We have the photo of the iPad, then we have a separate .psd of a poster we’ve designed. To place artwork on a device screen, follow the steps below.
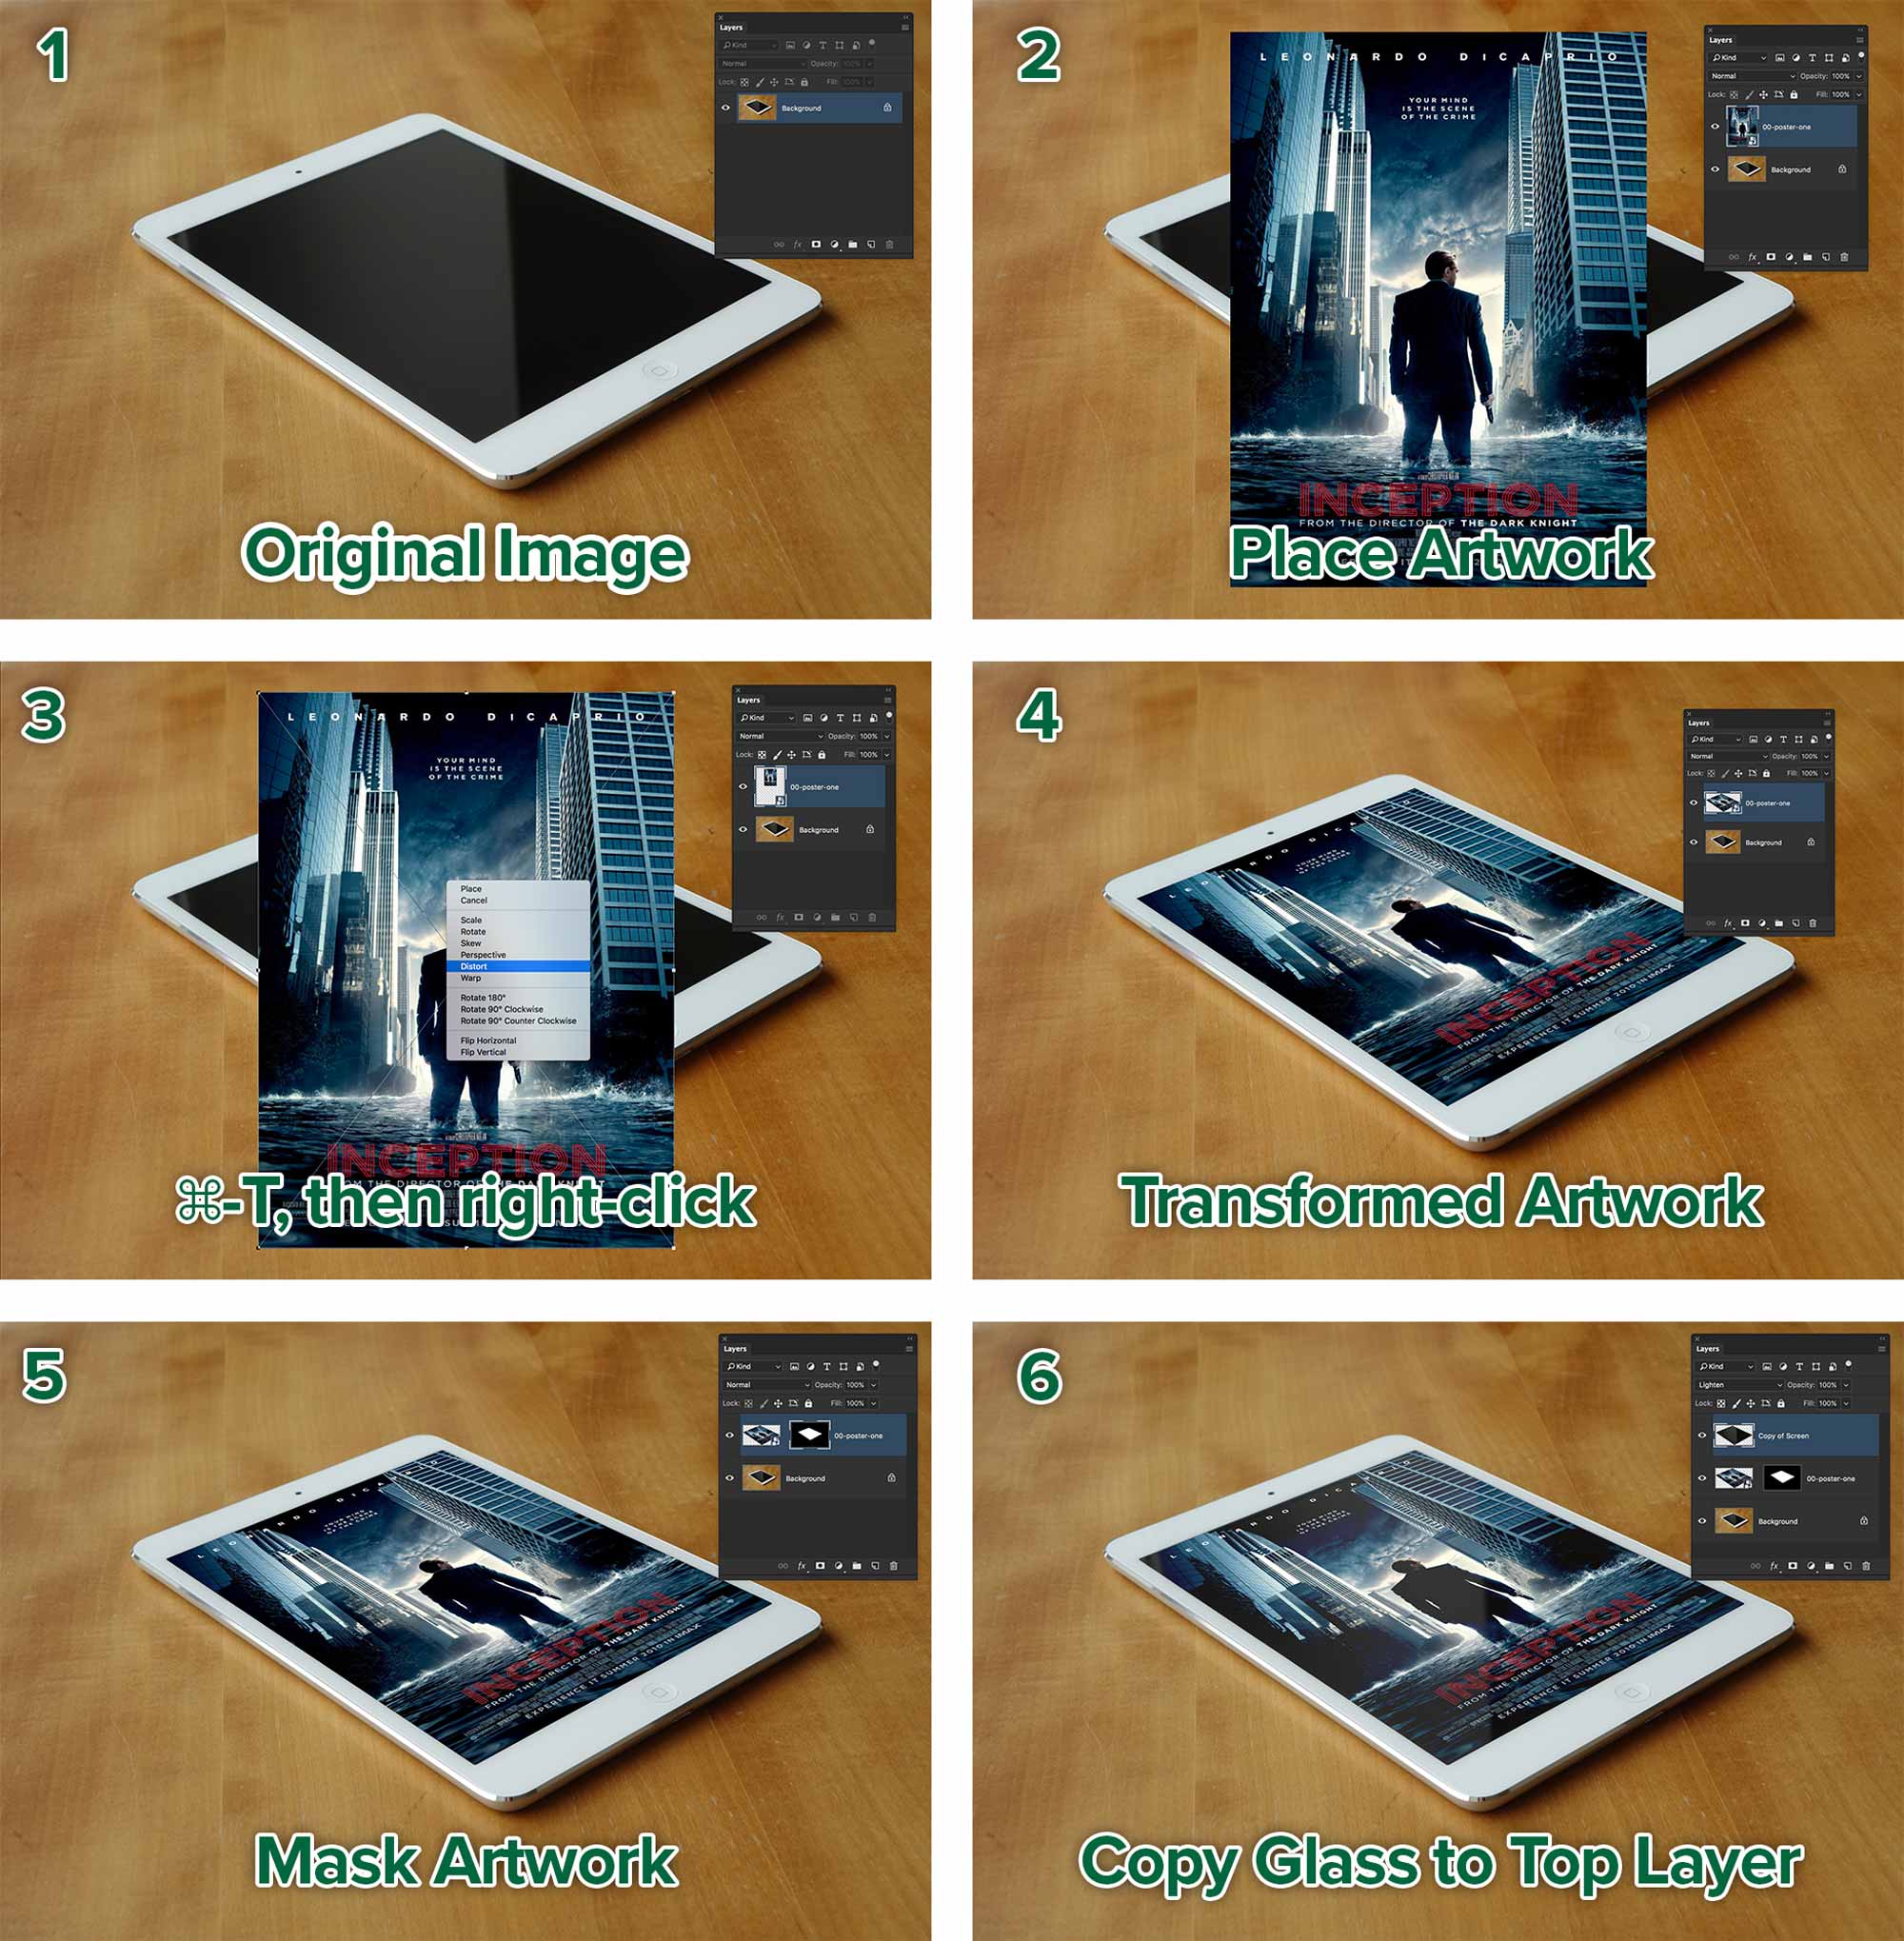
You can use any of the transform types shown in step 3. Whatever works for your circumstances. In step #5, you should detach the mask from the image by deactivating the chain-link icon in the Layers panel. This allows us to move the artwork separately inside the mask for proper positioning.
Our First Fabric Mockup
In order to make artwork conform to the wavy shape and texture of of a fabric, we need to use Photoshop’s Displace filter.
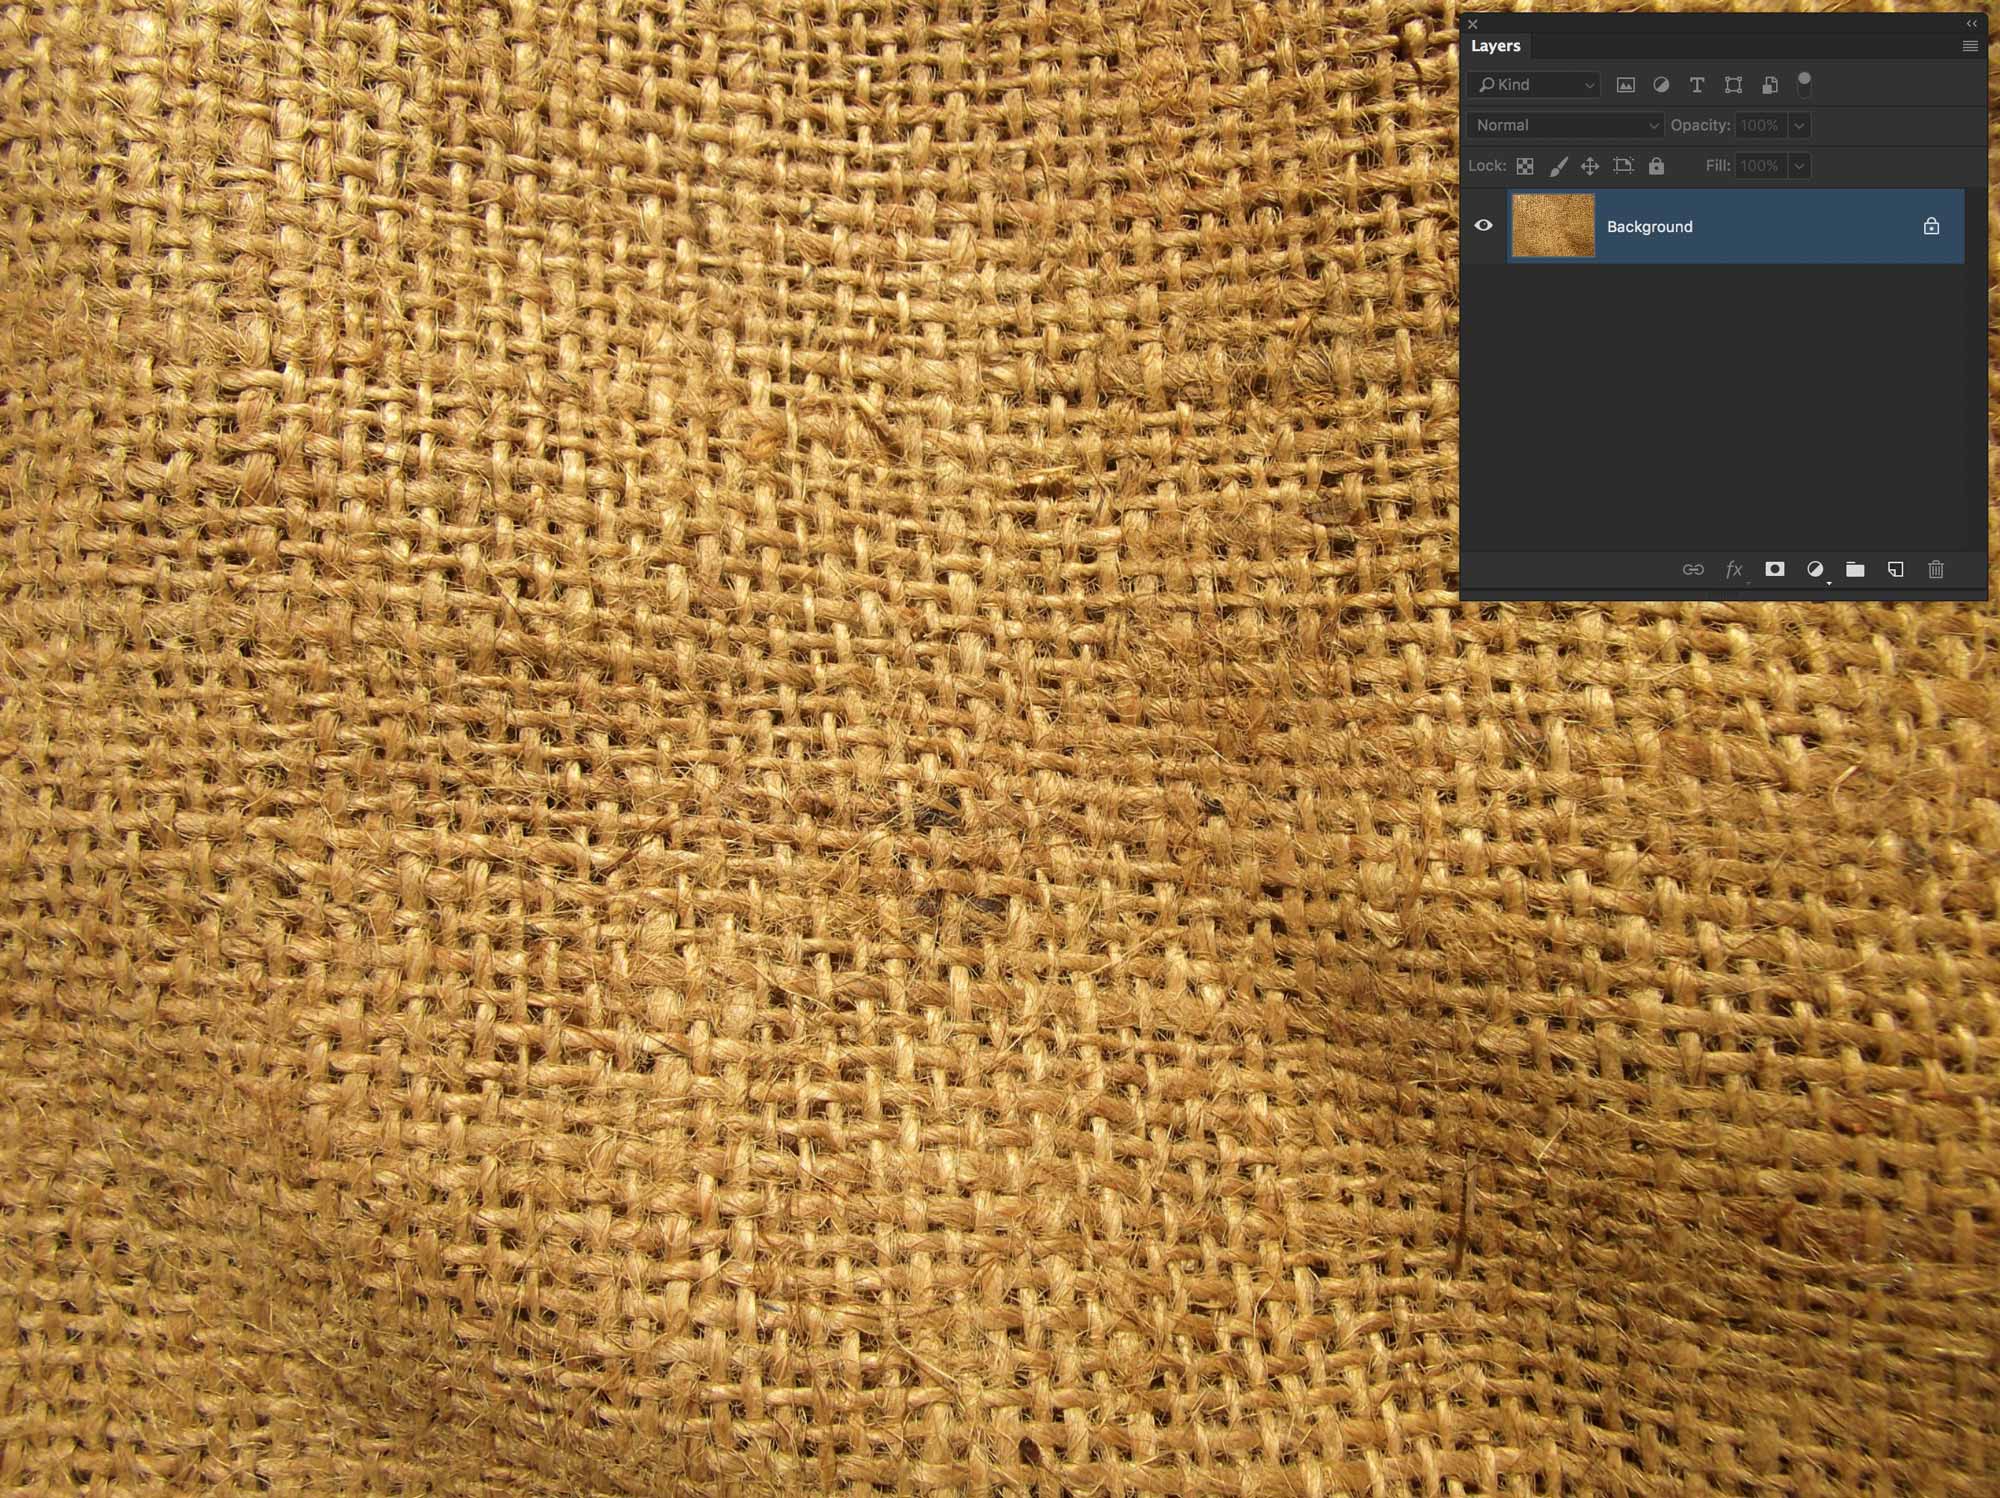
This is our original untouched image that we’ll map the logo to.
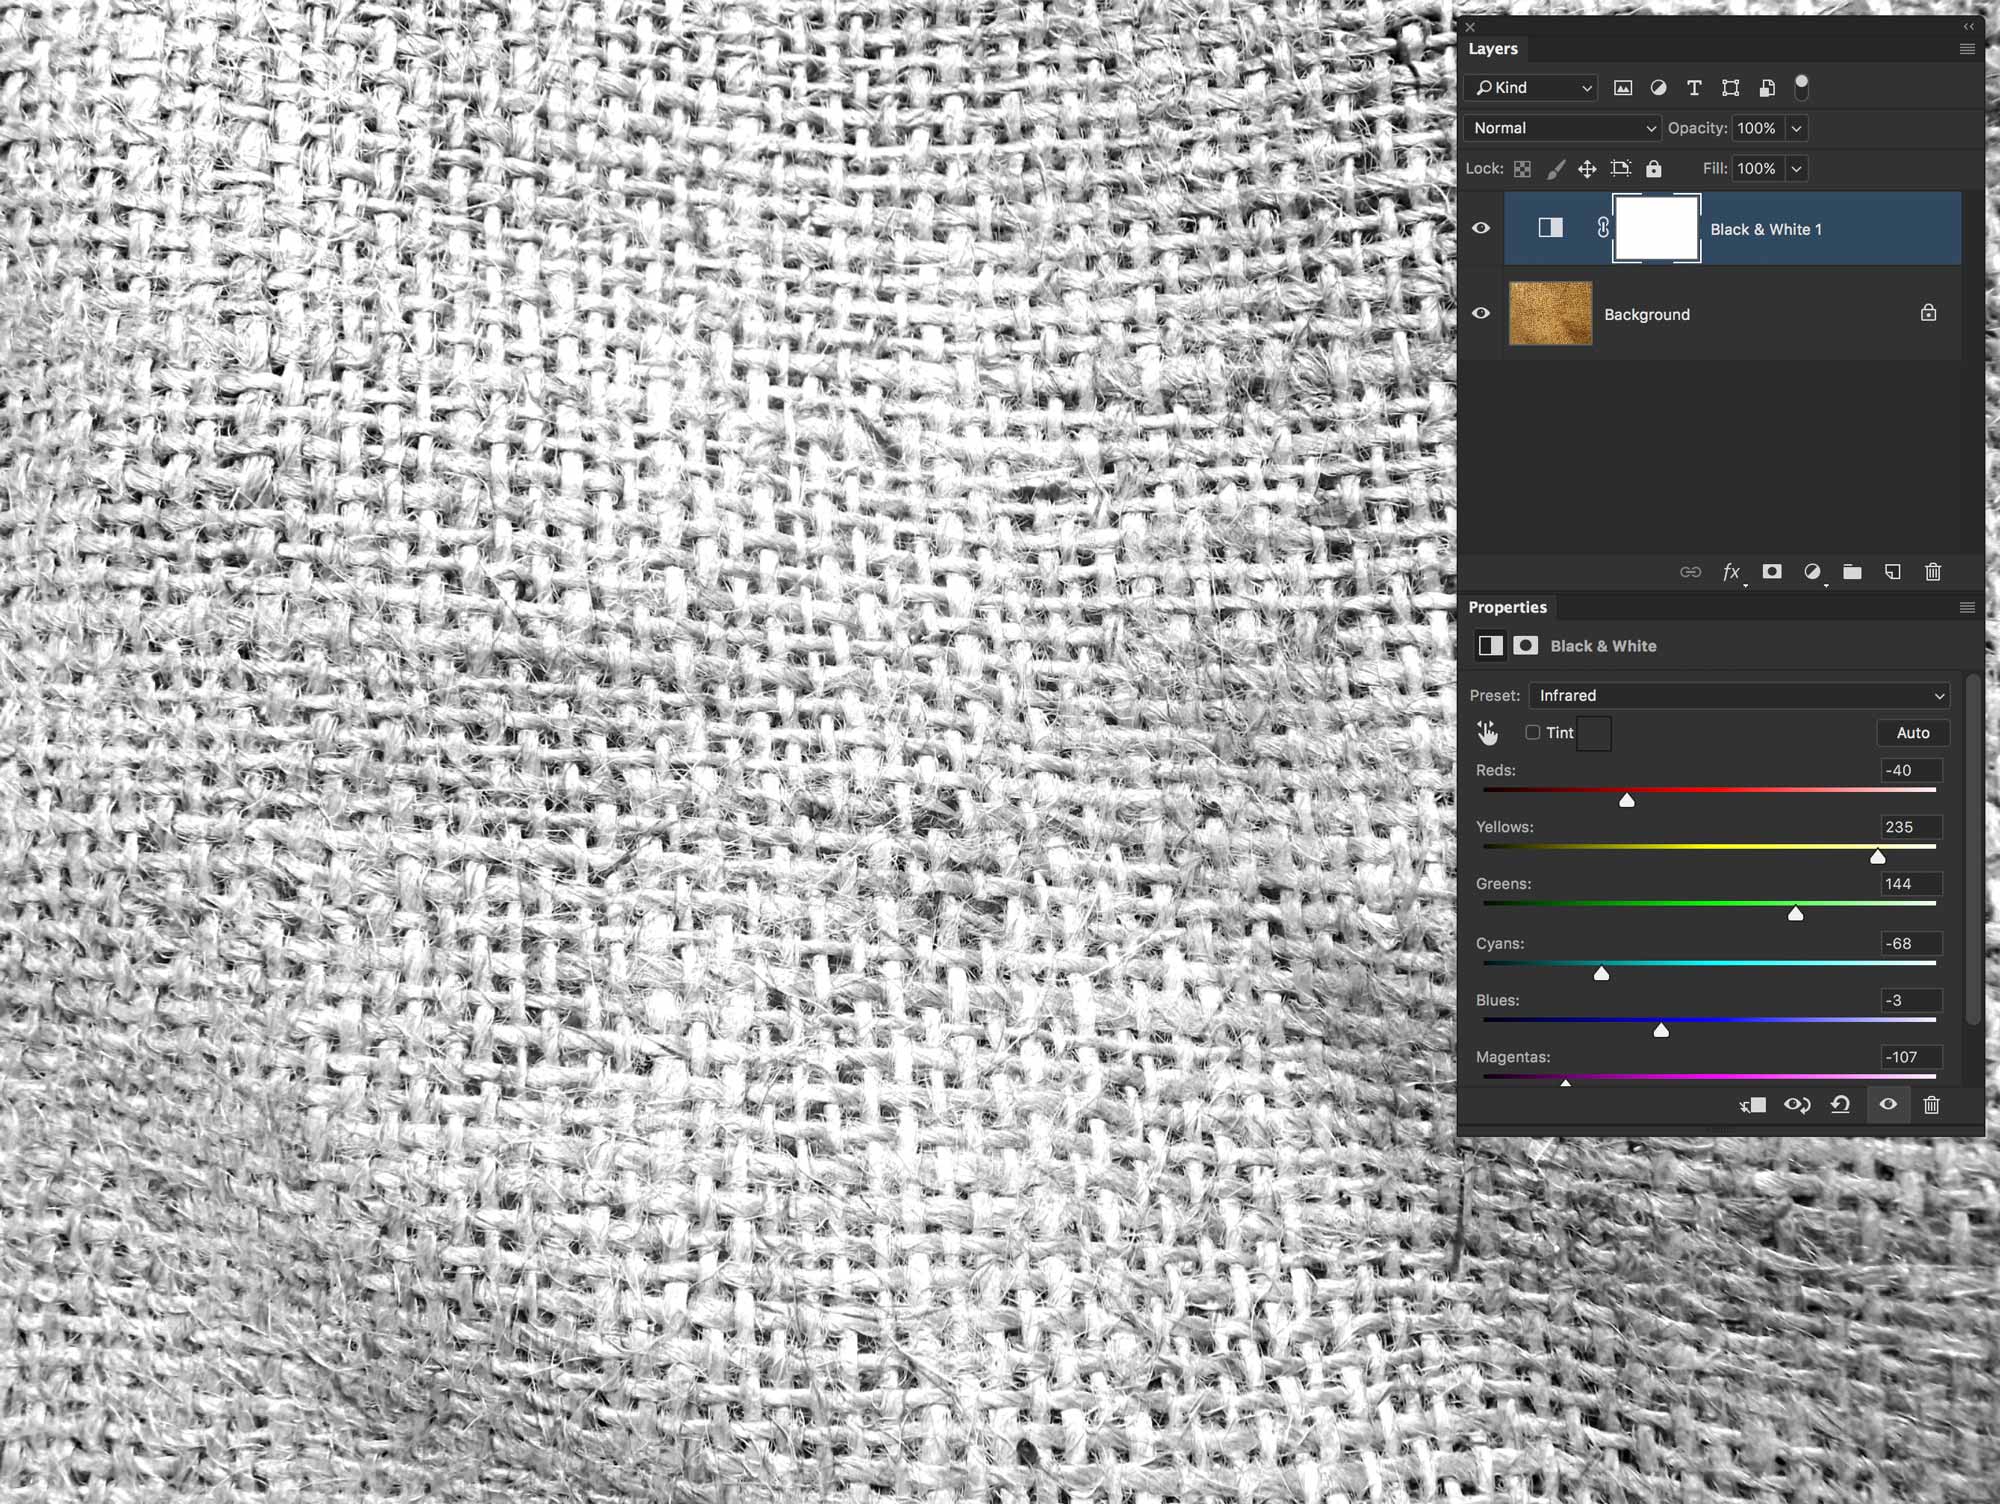
We need to create a greyscale version of the burlap to use as a bump map. The best way to do this is to create a Black and White Adjustment Layer. Usually the Infrared setting gives you the highest contrast. If it doesn’t work for you, choose another preset. We’re looking for the whitest whites and the darkest blacks possible.
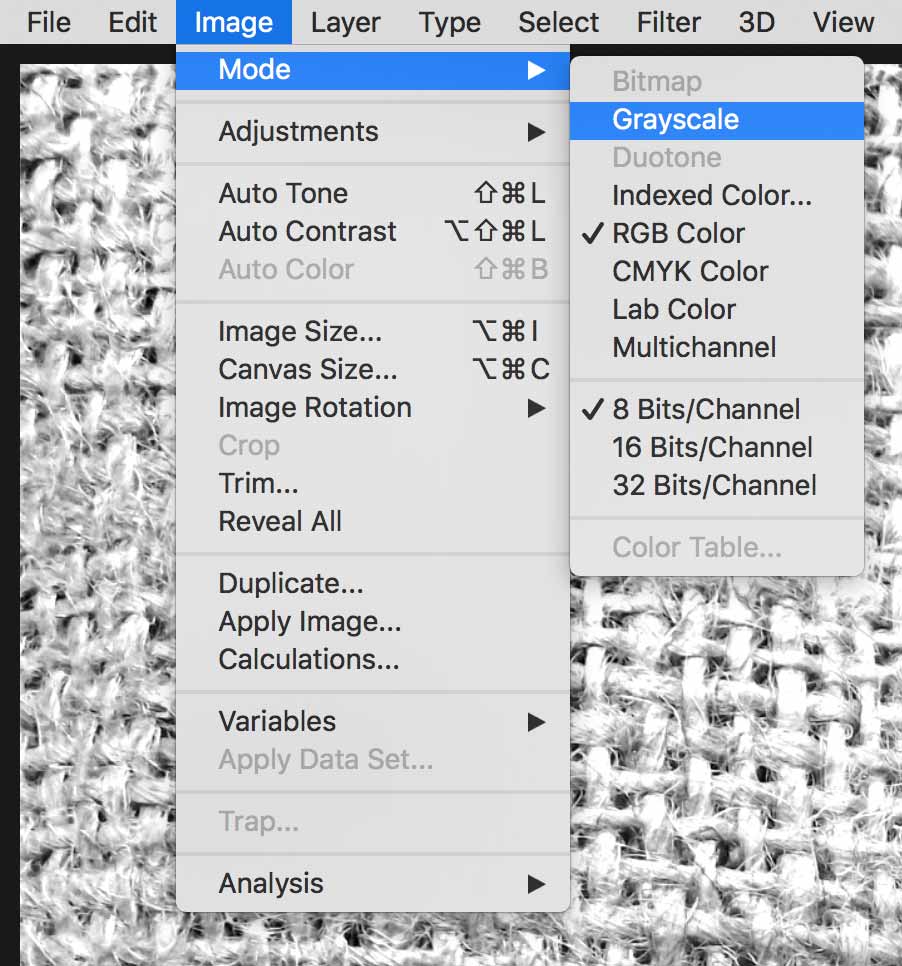
Convert your file to greyscale mode. Photoshop will ask you to flatten layers and discard colours. It’s all good. We’re going to discard these changes anyways.

Use Save As…, then make sure that As a Copy is checked so that it spawns a second copy of the file. This will leave the original file untouched. We wouldn’t want to convert our original file. Once you’ve done this, undo back to the colour version of the file.
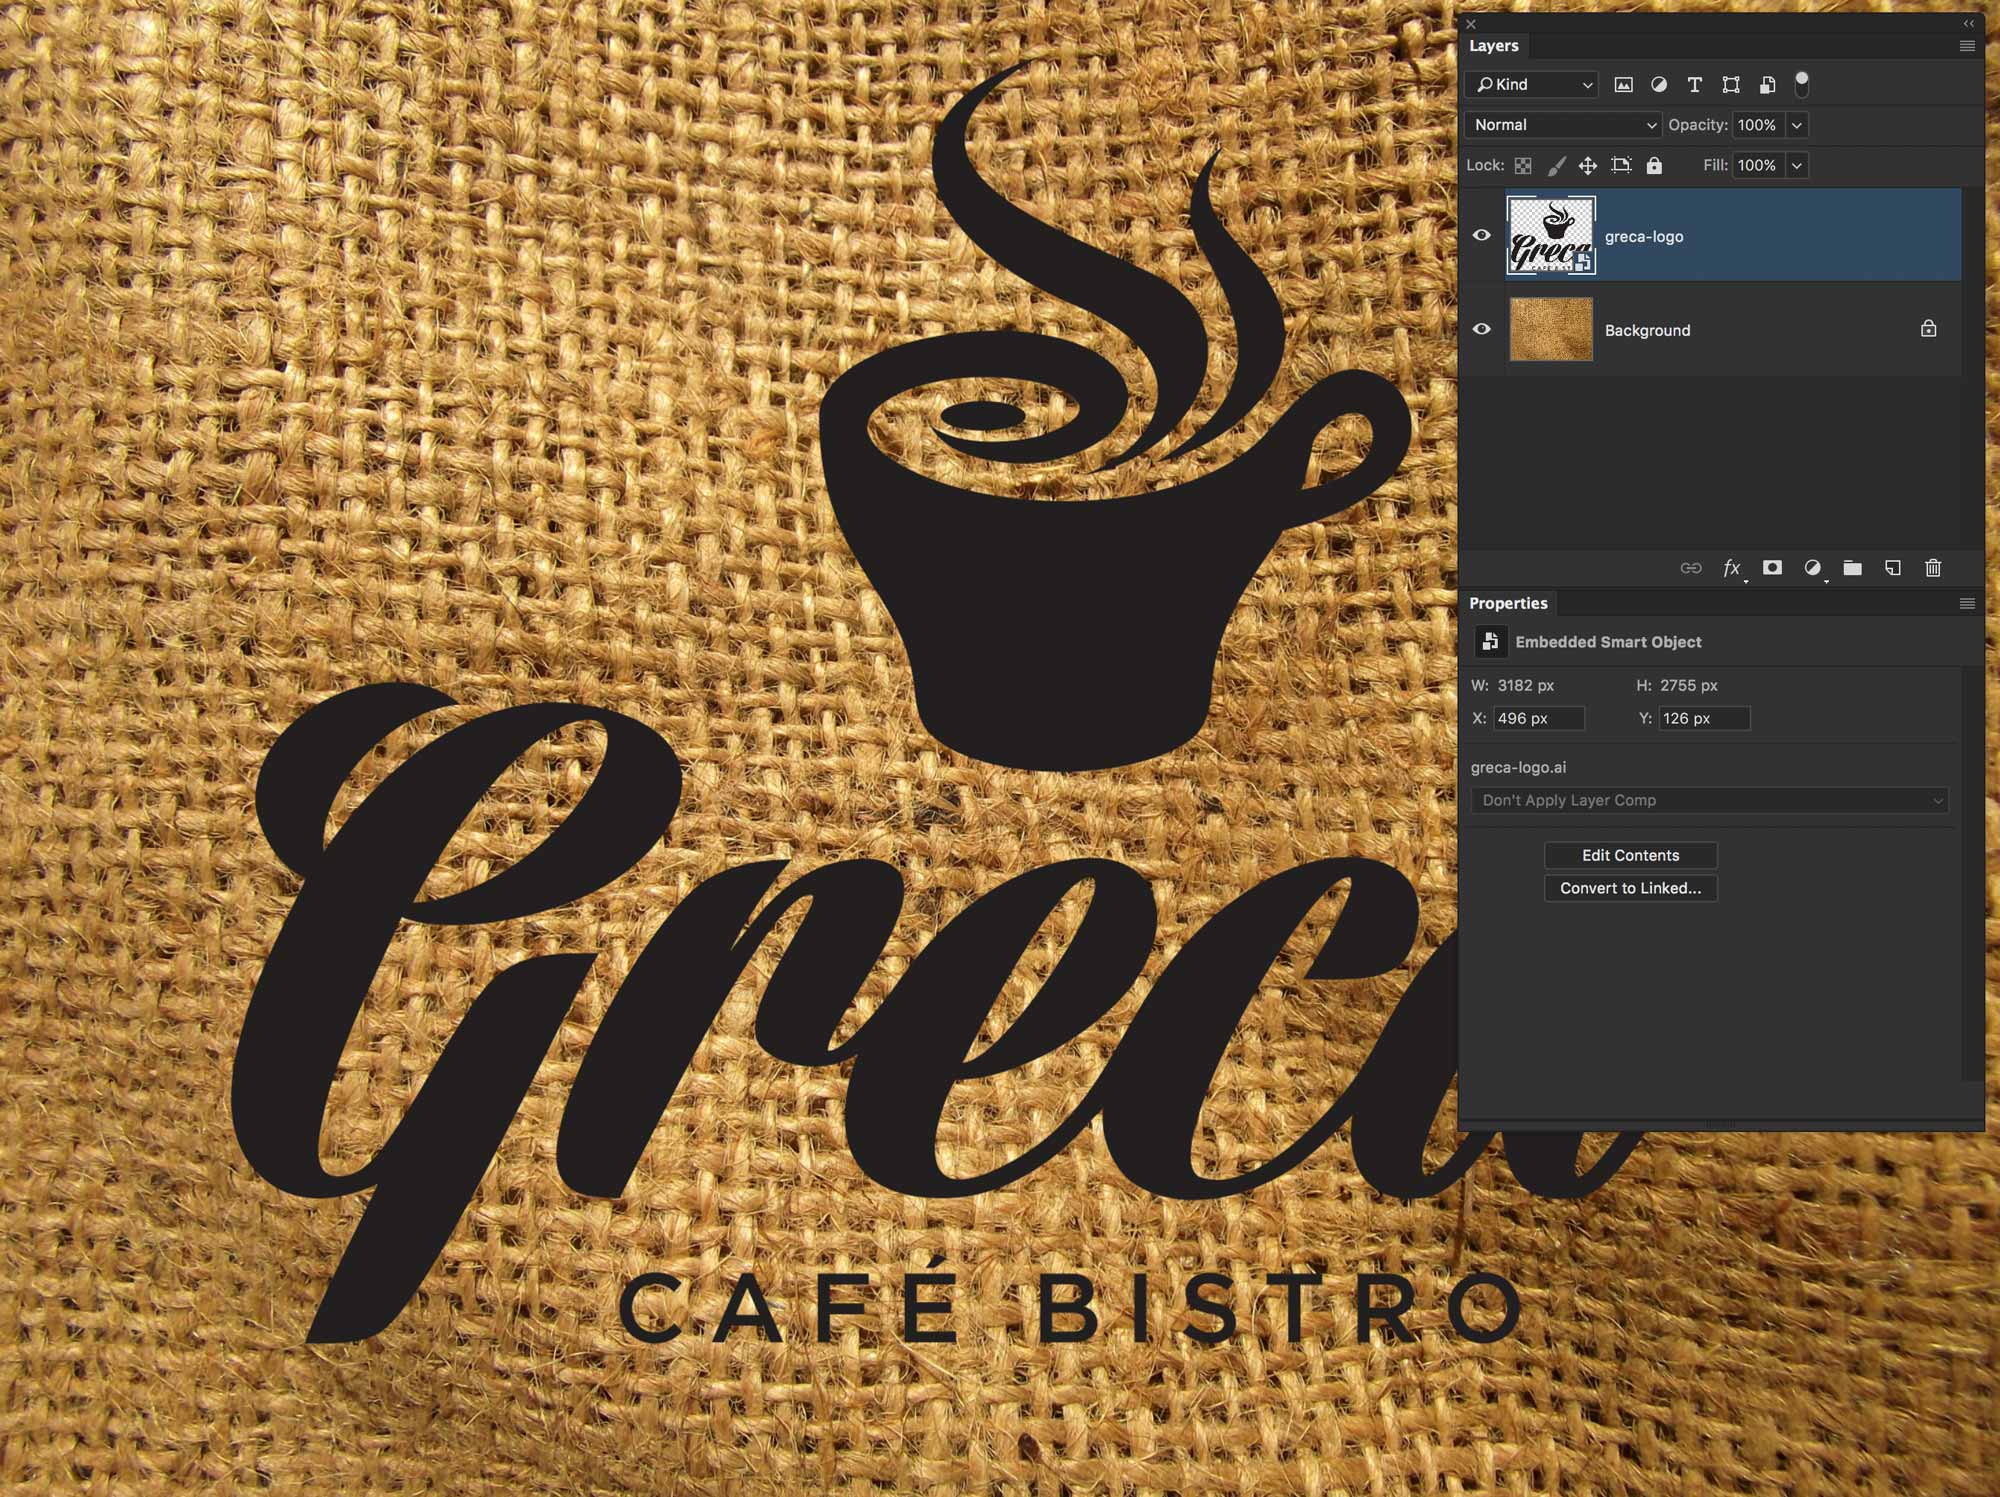
Drag any file from Finder into your Photoshop canvas. You can also use File > Place Embedded… to import artwork to map to the background texture. Either way, these methods create a Smart Object.
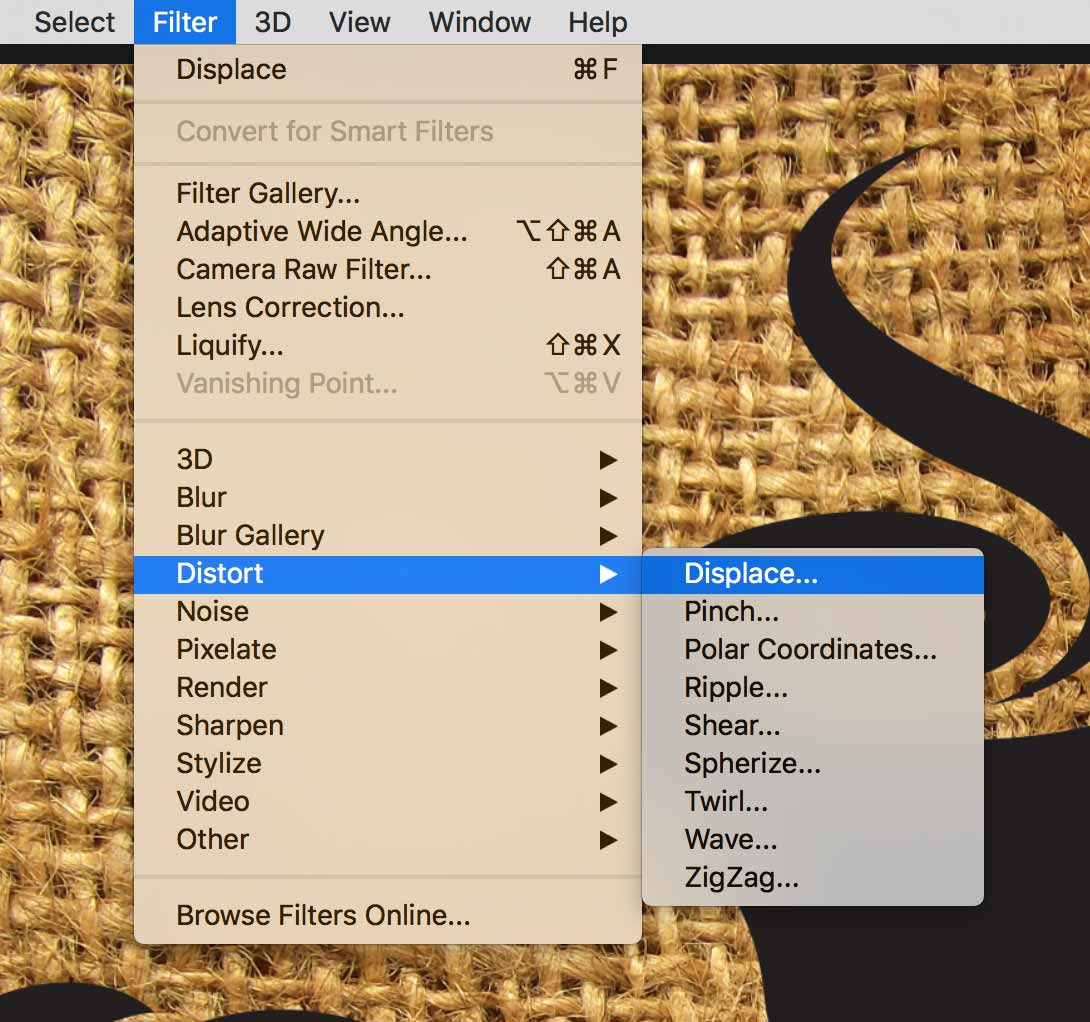
The Displace filter makes our logo inherit the texture of the bump map we give it.
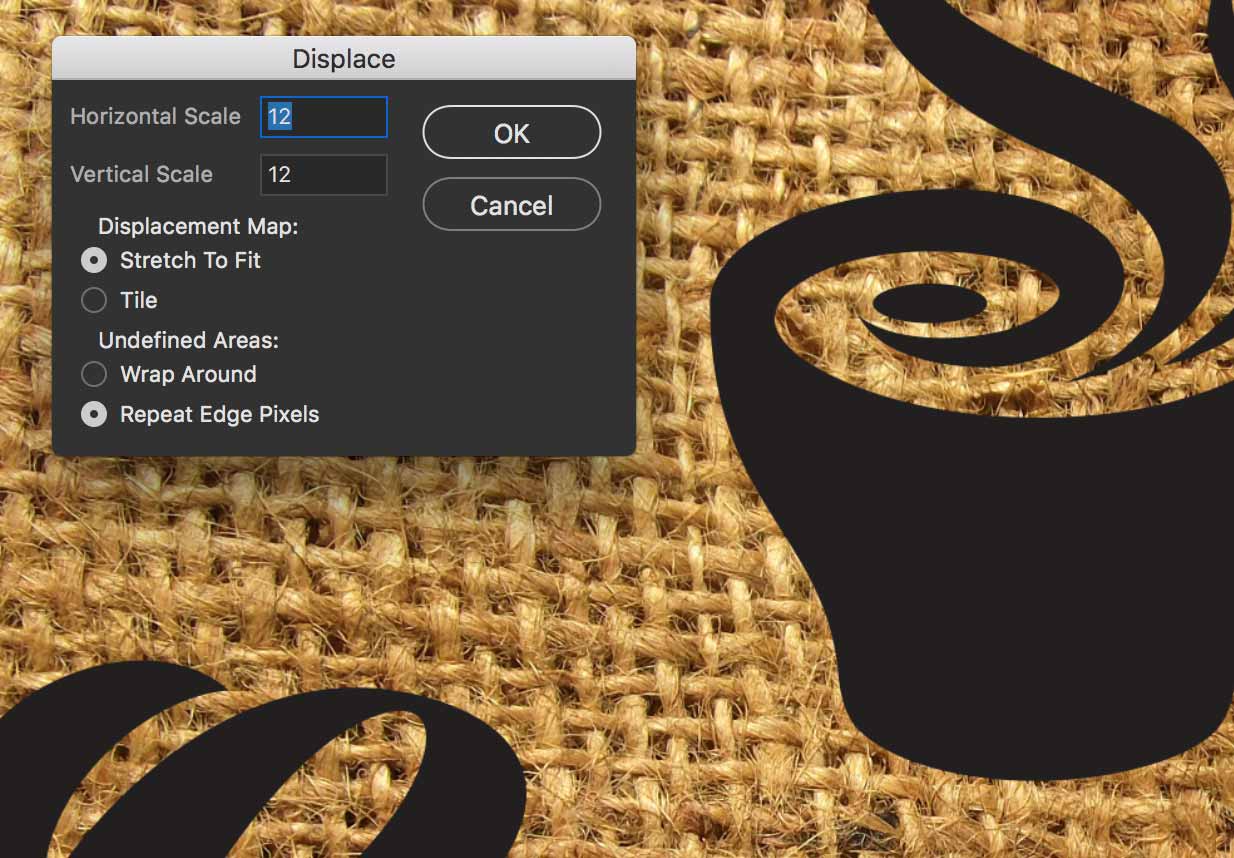
The settings you enter in the Displace filter really depend on the resoution of your file. Notice that the number doesn’t even have a unit of measure. It’s not pixels or percent. We’re going ol’ school here. Giv’er a number. Take a guess. This is exactly why we’re using a Smart Object. It allows us to go back into the settings to make the effect look just right.
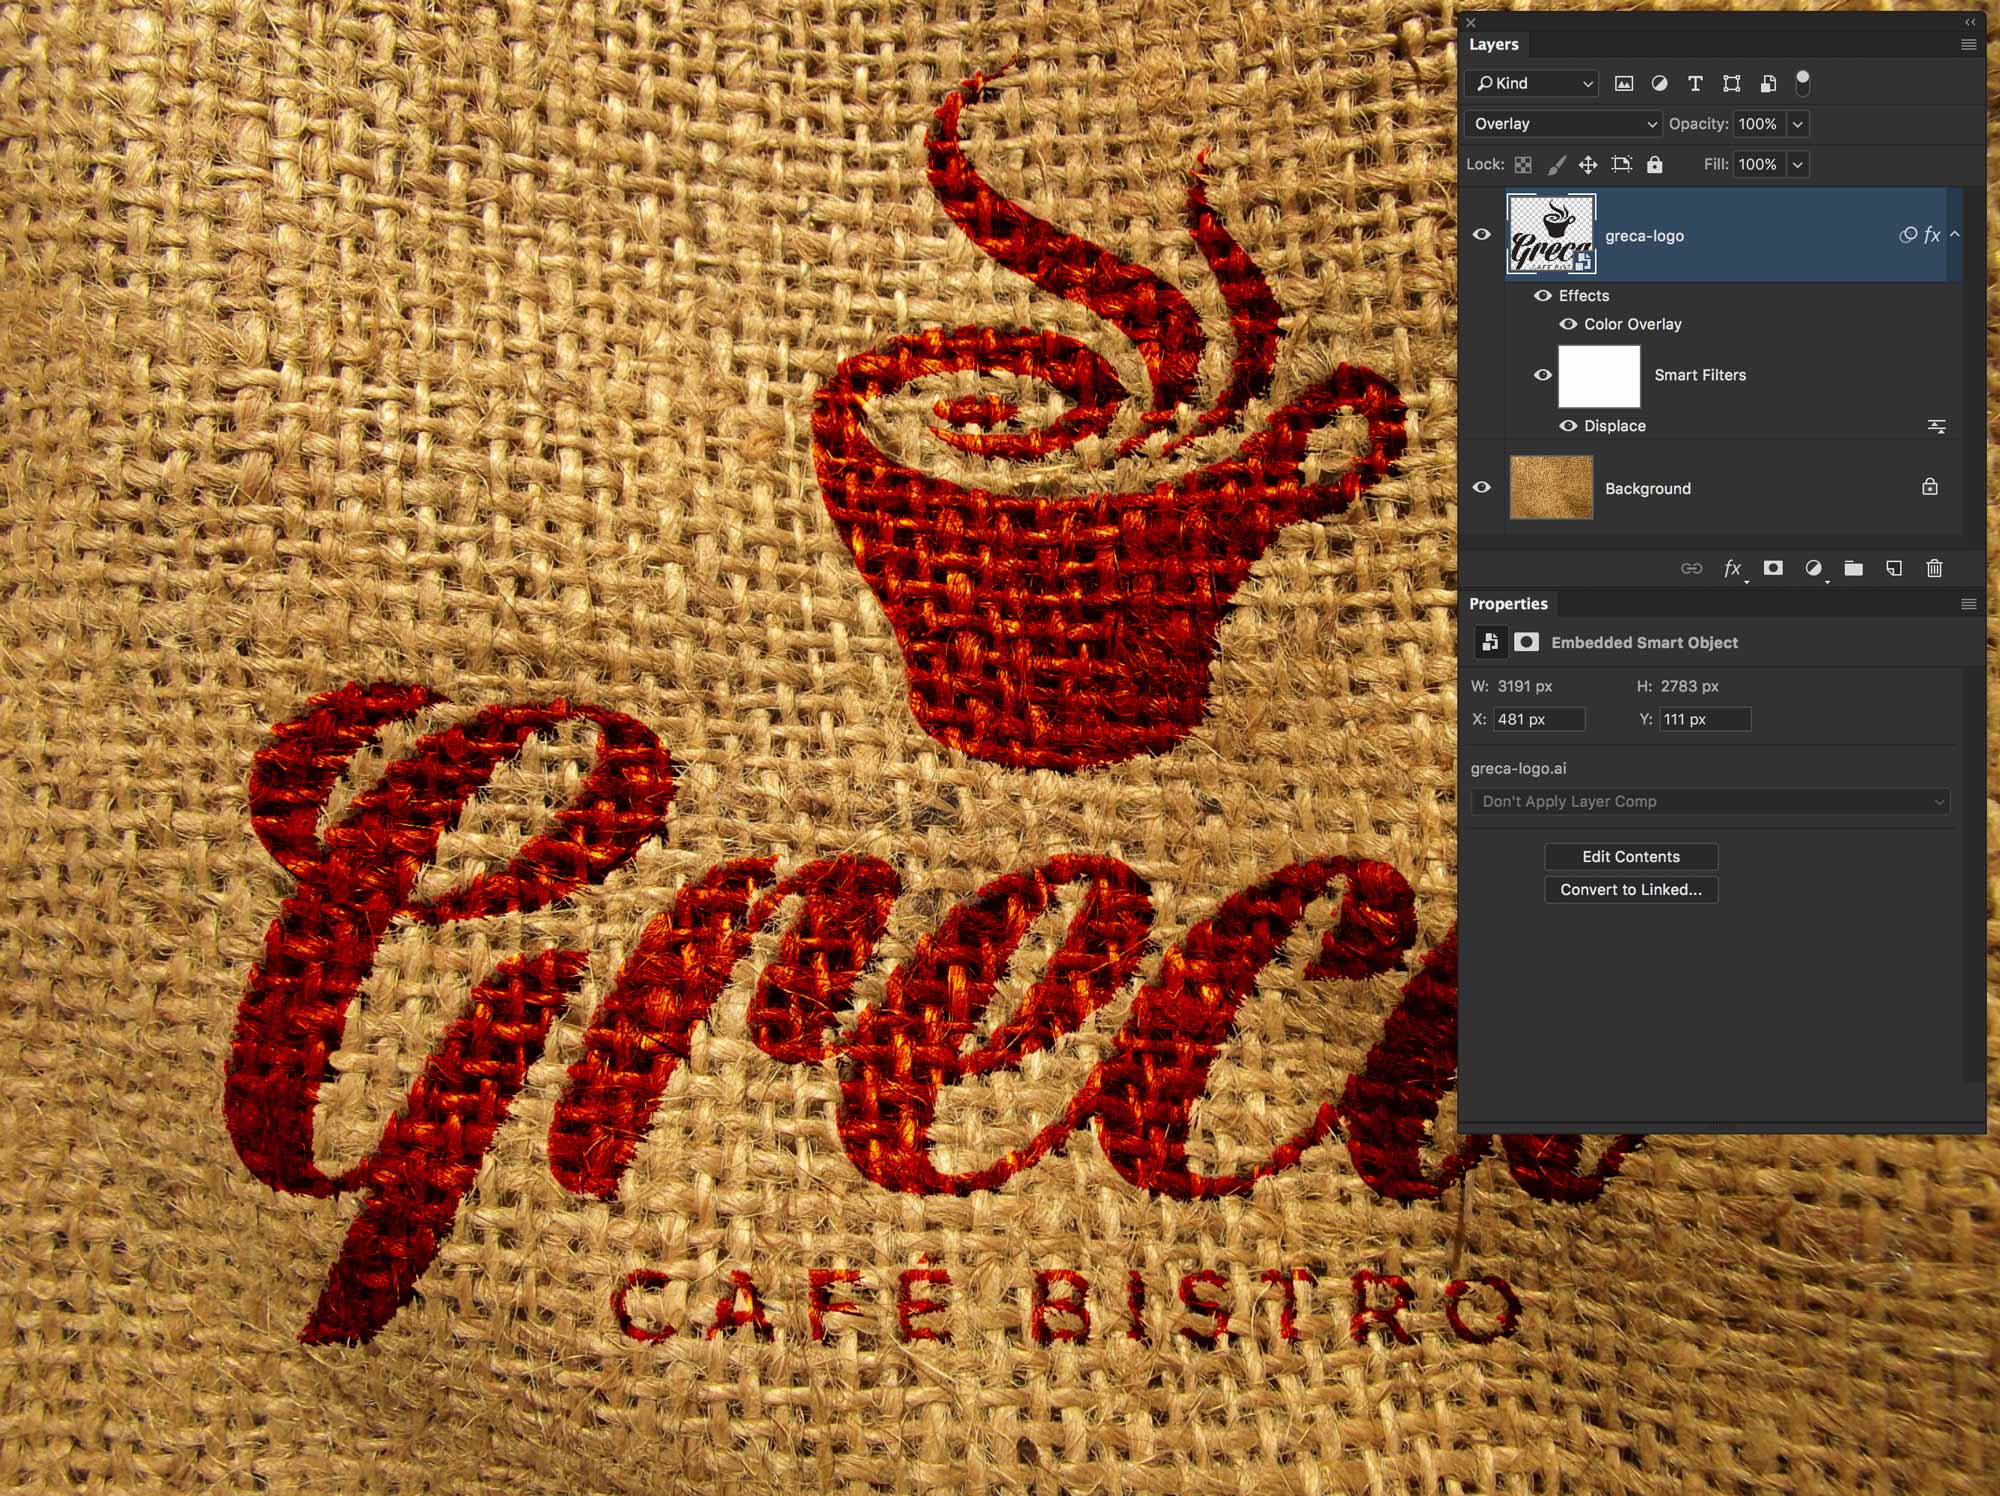
We can finish this off by changing the blend mode for the logo’s layer. In this case, the logo’s black on a lighter backgroud, so the Overlay blend mode works pretty well.
If you want to add a colour to the logo, use a Colour Overlay Layer Effect.
