Topics
Before We Start…
Let’s change a few settings in InDesign before we start building our document. You need to do this with no document open.
Once you’re done these changes, quit and re-launch InDesign.
Planning Your Layout
Before starting to build the file for your publication, you need to plan the layout. I create my layout sketches on thumbnails printed from InDesign. Use tabloid-sized pages to sketch them out.
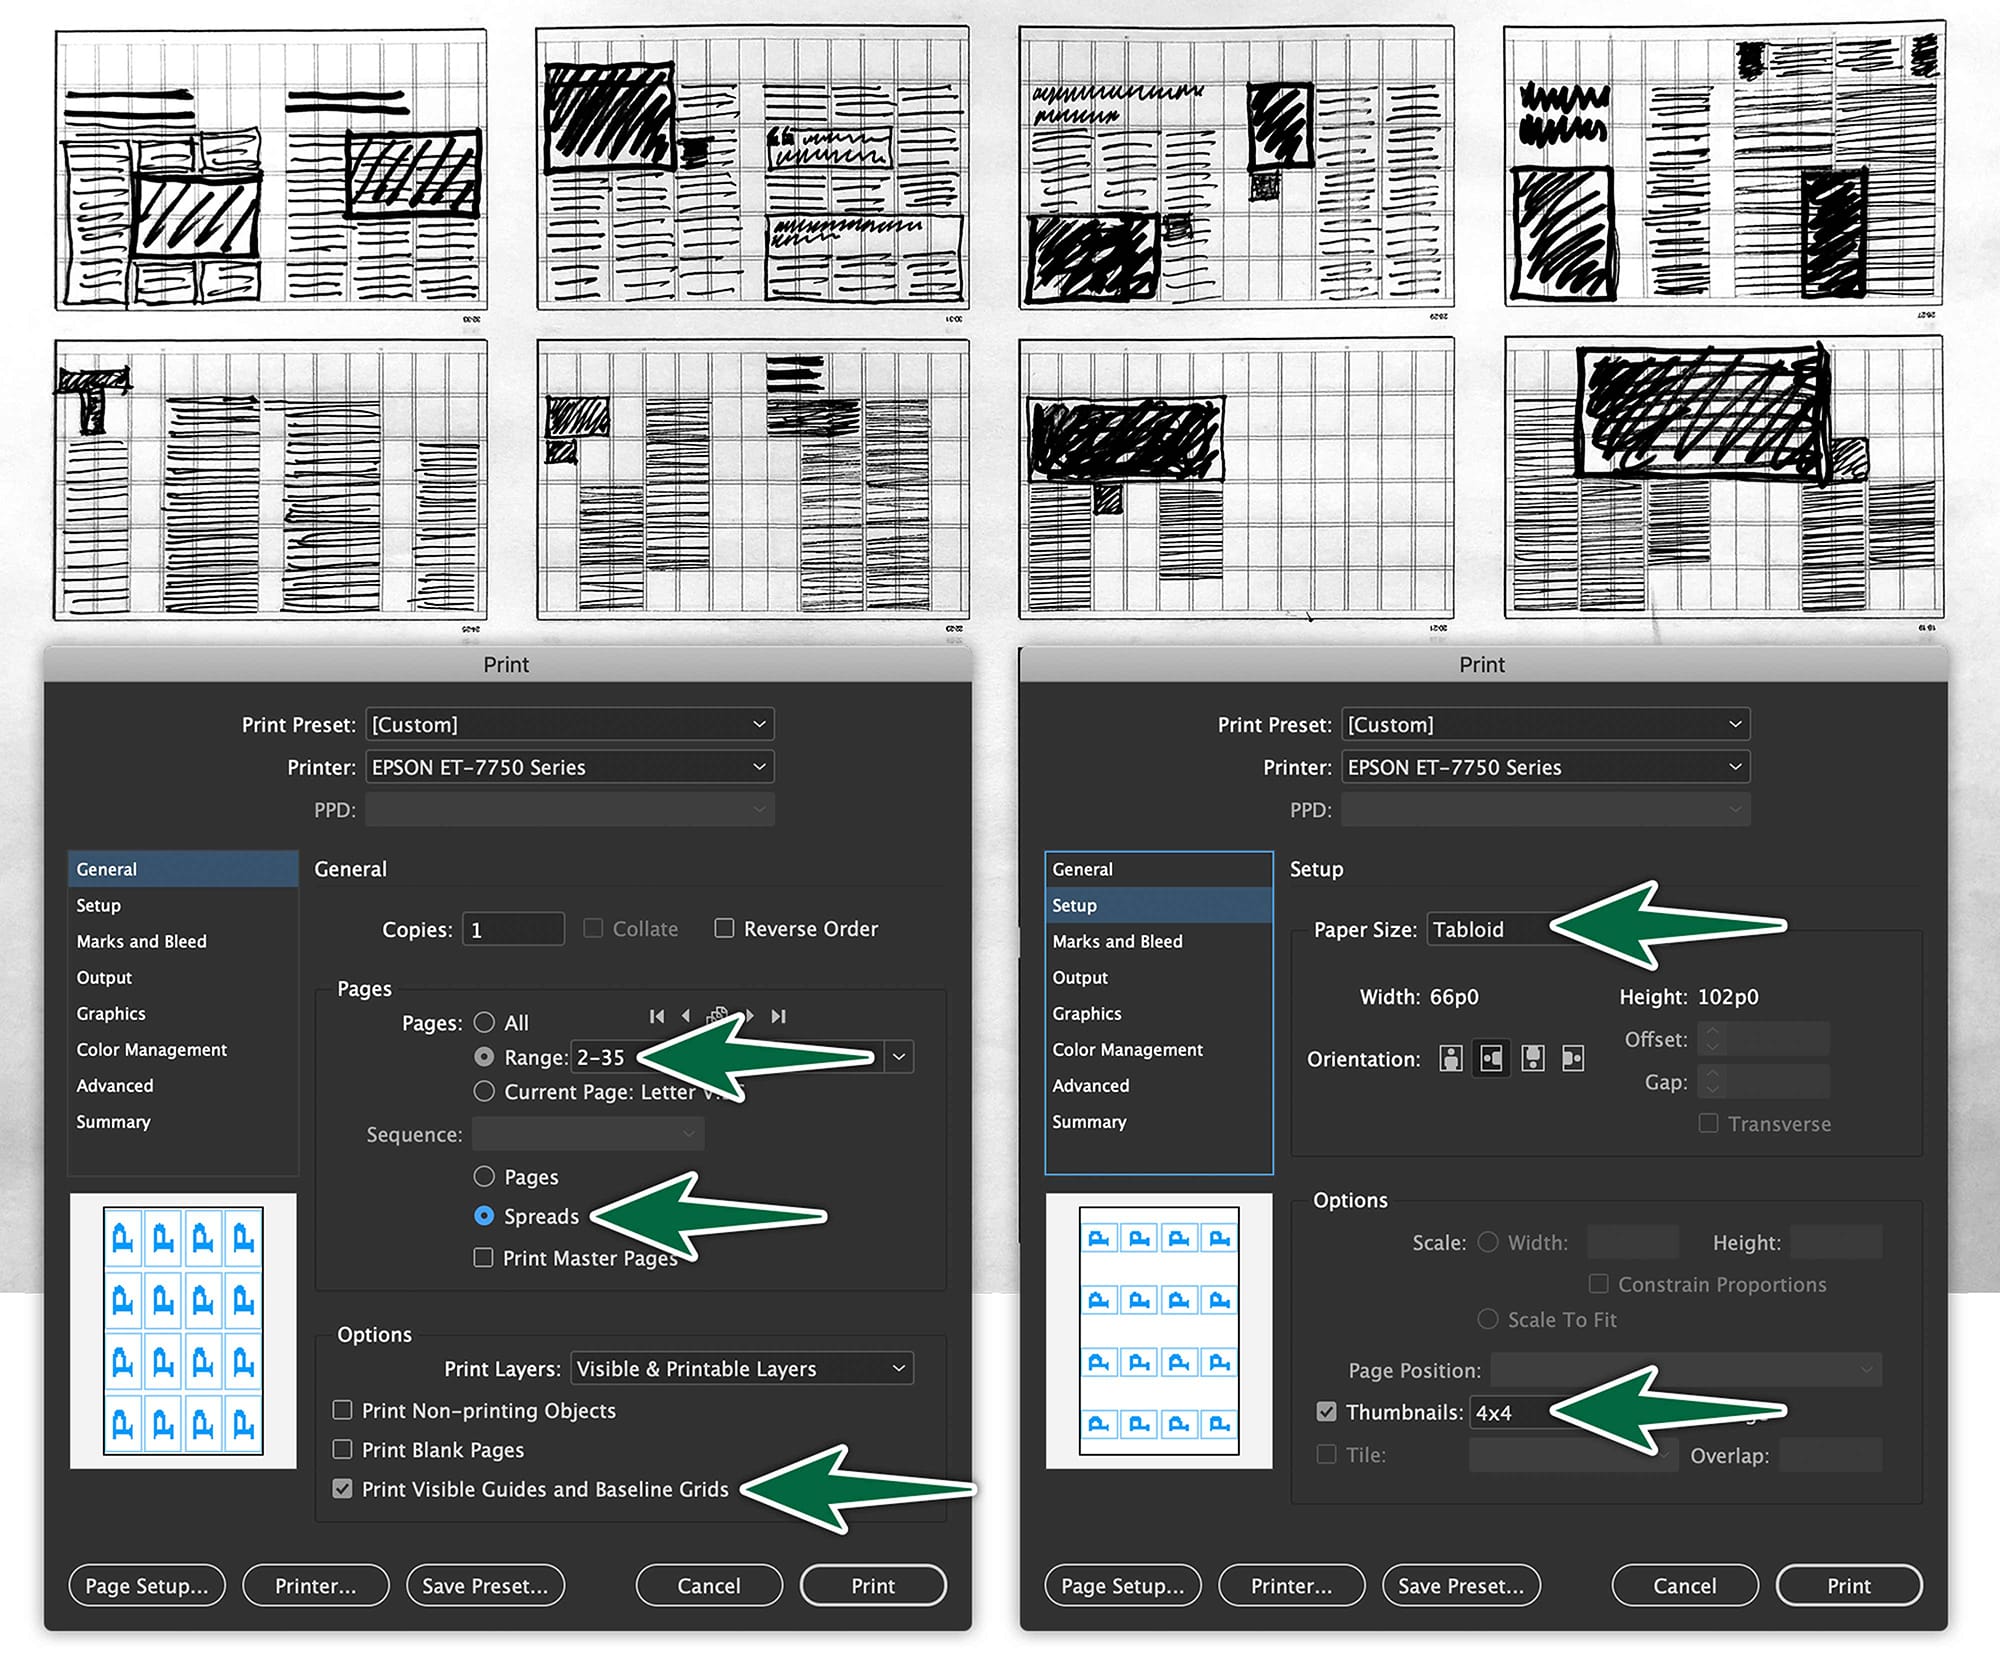
There’s a tutorial in the playlist above on how to print your page layout grid on tabloid sheets. Draw out your sketches on these pages. The better the planning, the less time it will take you to build your plublication.
New Document Settings
We want to pay attention when setting up our document in the New Document dialogue. But don’t be too nervous about it. If you need to, you can change settings after the fact.
Anatomy Of The Page Grid
The page grid is the framework that holds your layout together. It’s unseen when printed, but essential to consistent pages.
To start, keep your grids as simple as possible. The first goal is to keep line length and margins reasonable.
For most part, you can ignore the eights. Use this as a four-column grid. The same goes for a six-column grid. Use it as a three-column page.
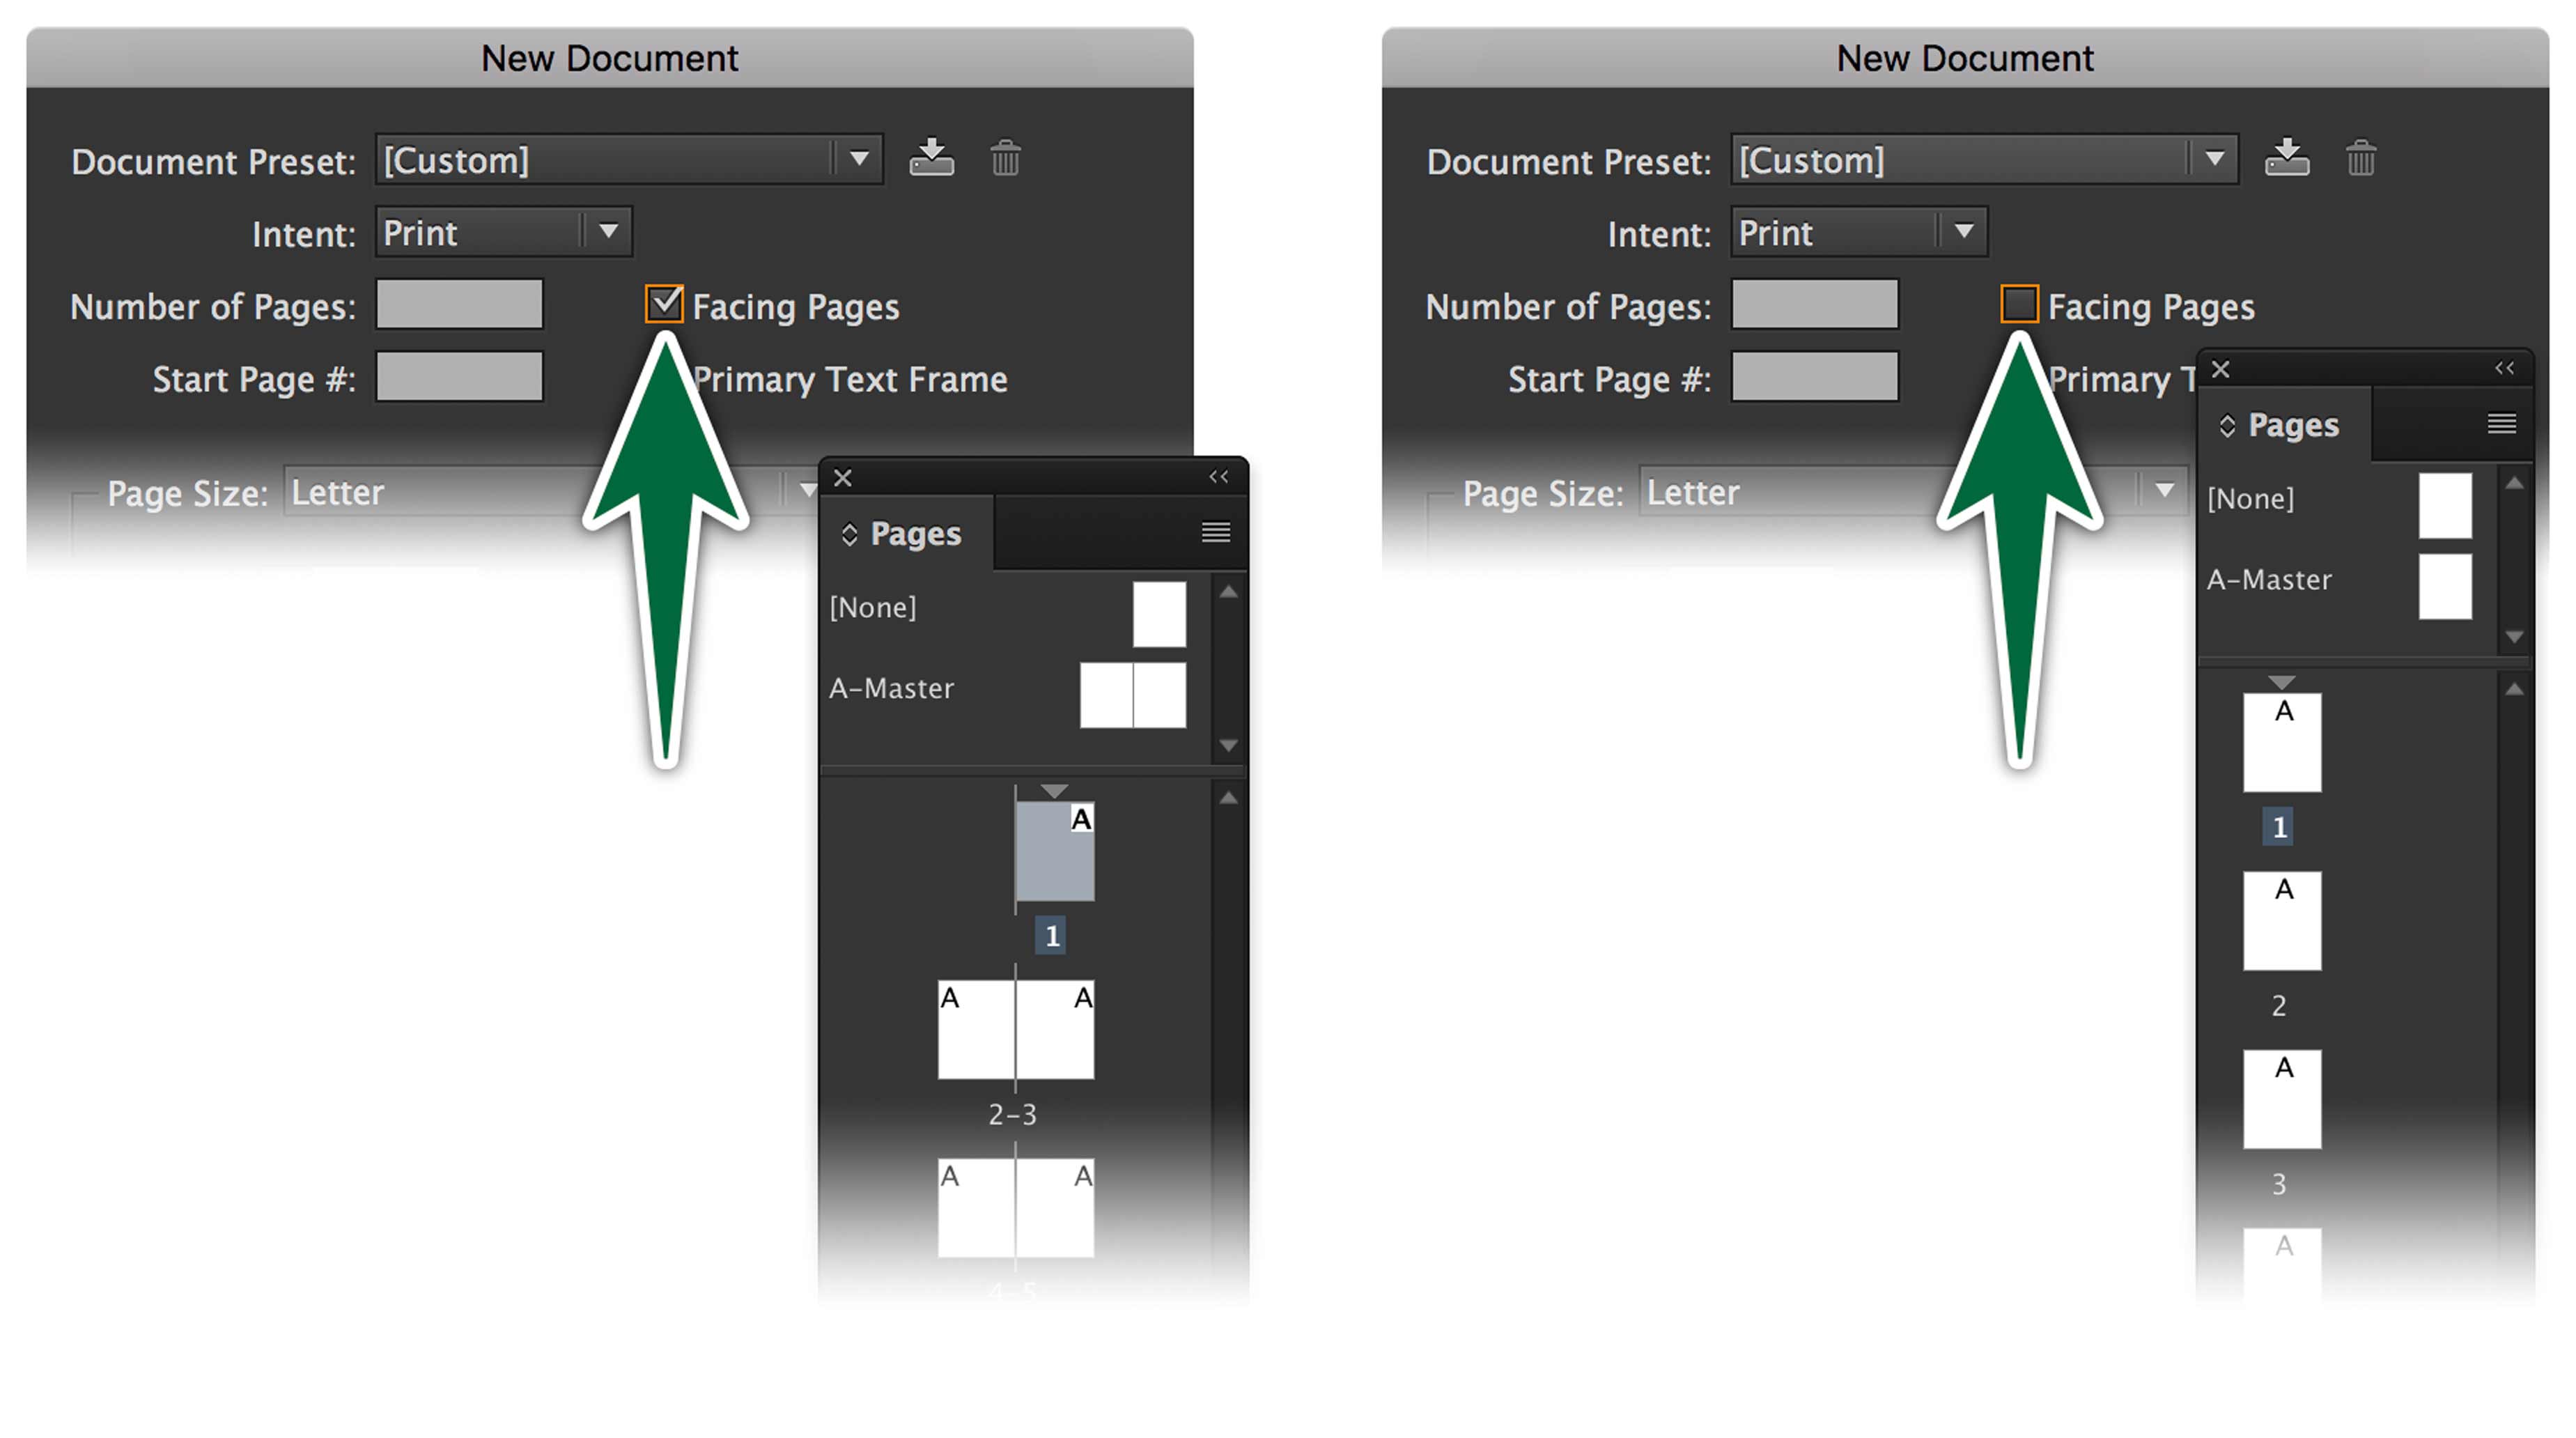
Facing pages?
Use facing pages if your document is a saddle-stitched publication. If it’s going to be printed as loose sheets, then you don’t need to use Facing Pages.
Primary Text Frame
When you’re reading a mainstream magazine, there’s usually a lot going on in the pages. There are ads, side bars, titles, photos and more. There’s also the guts of the main story you’re reading. Well, those text frames are the Primary Text Frames. They make up the flow of the main story. They’re like a stream going through your document.
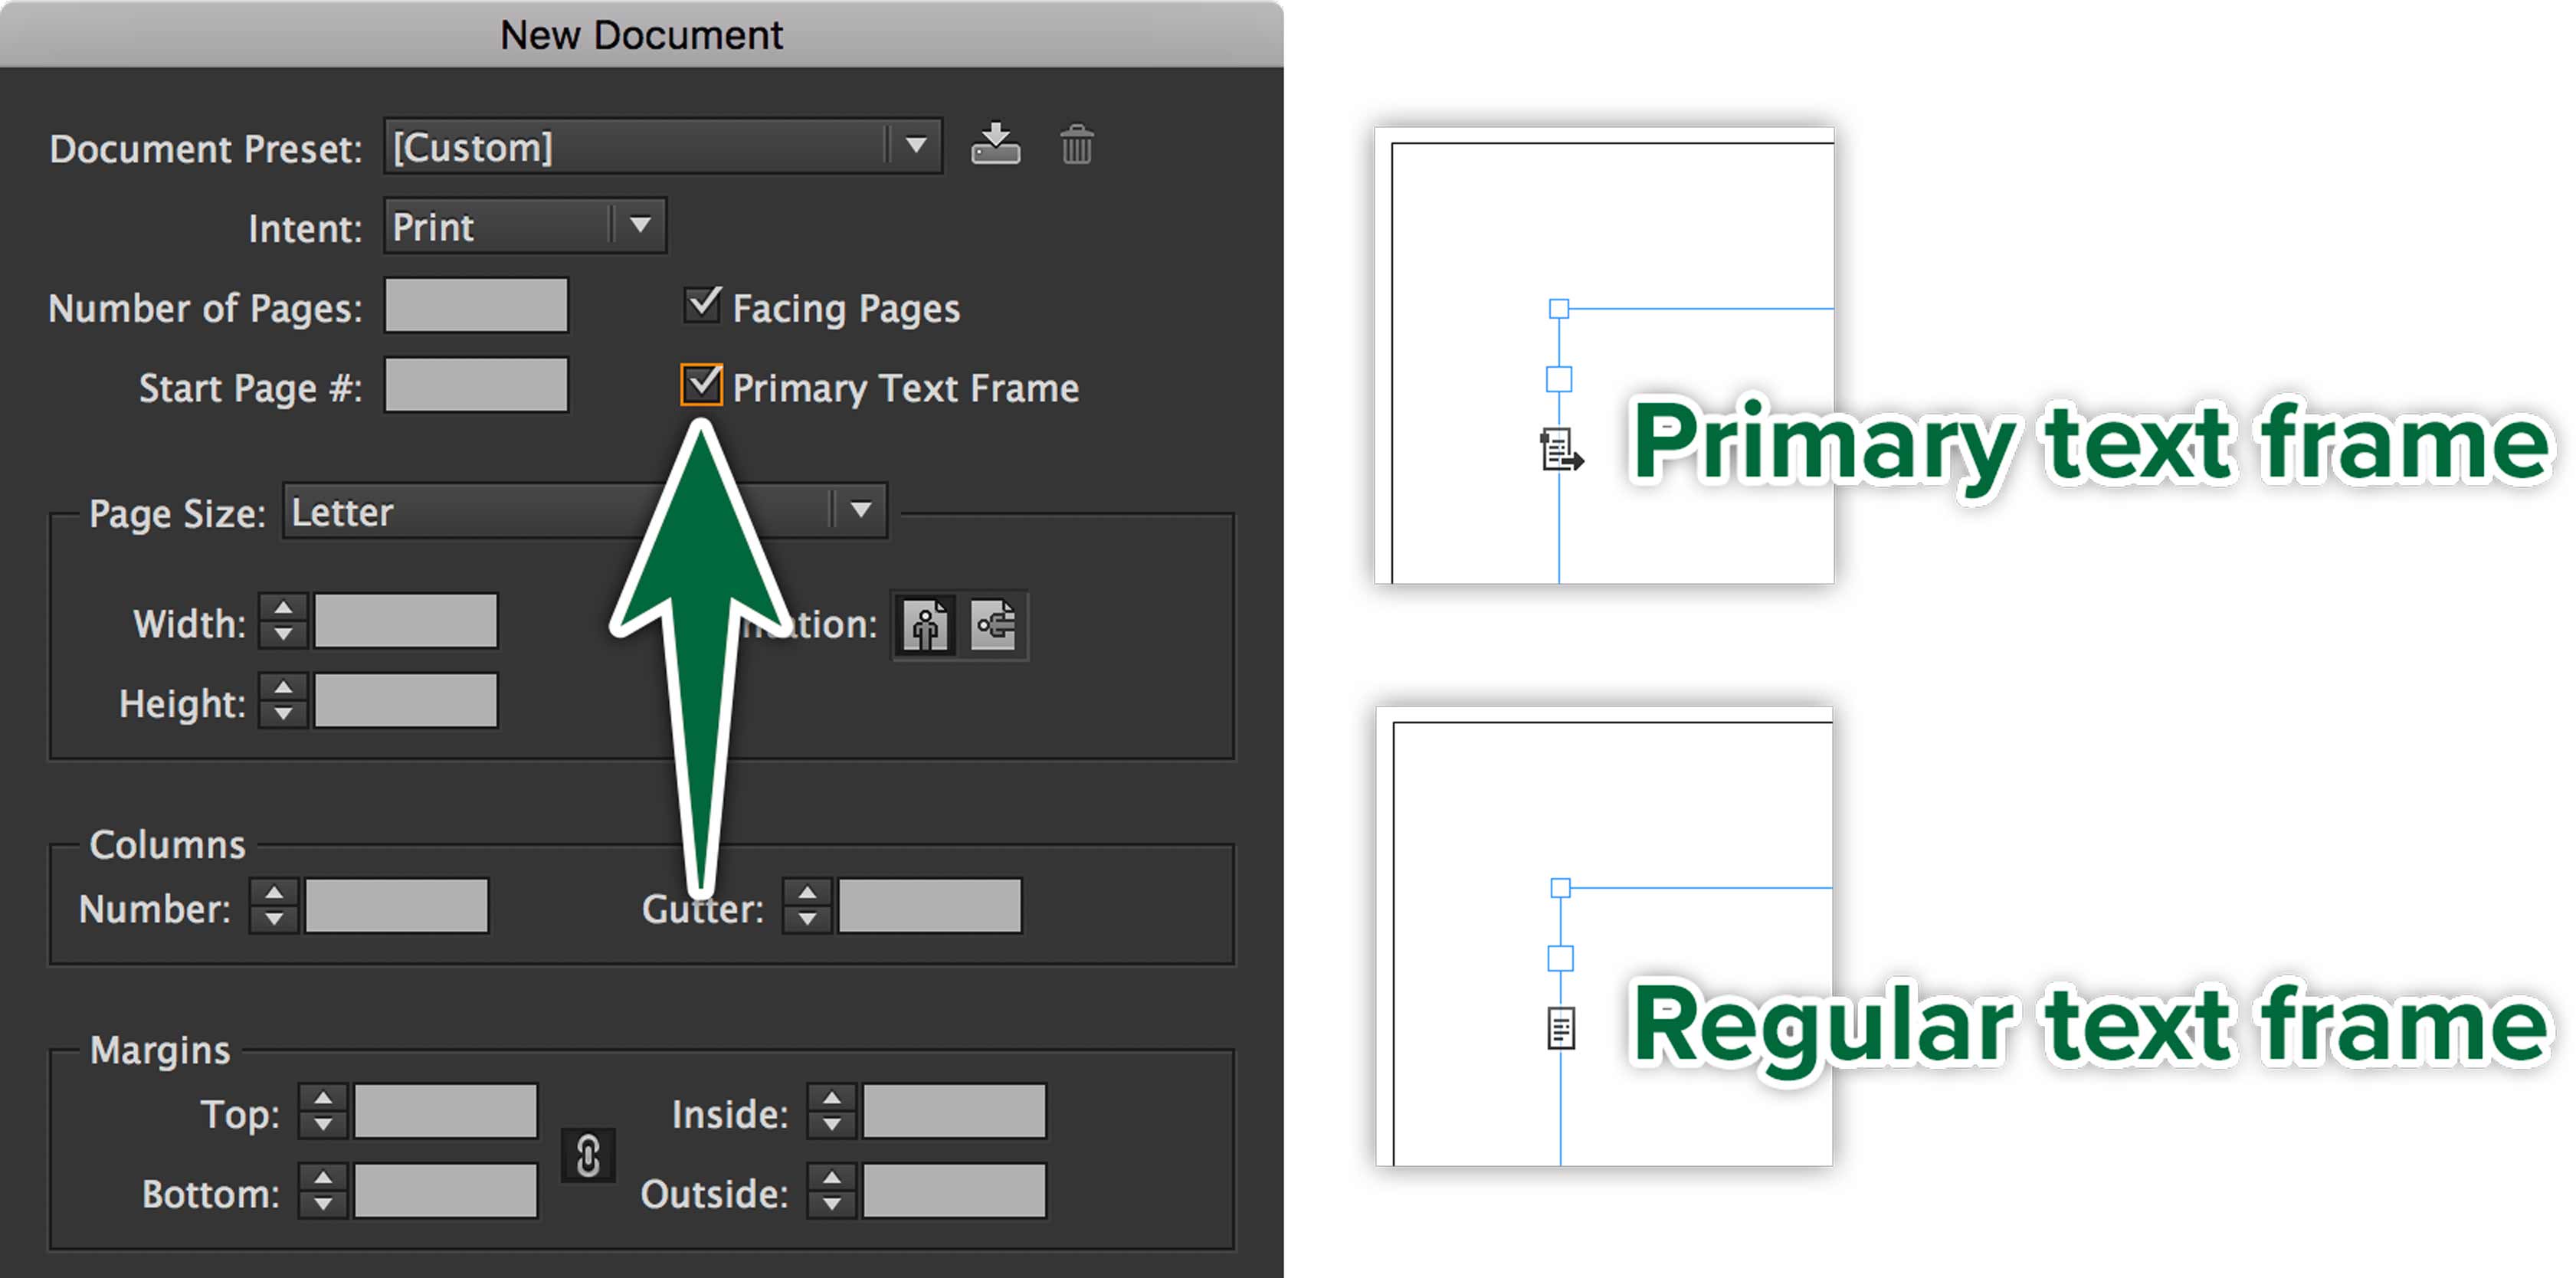
There can only be one primary text stream through a document. The beauty of Primary Text Frames is that when you apply a new Parent with a Primary Frame, it adapts to the new layout with the text simply re-flowing through it.
If you didn’t check the Primary Text Frame checkbox when you created the document, you can always go to your Parent Pages to activate them there. All you need to do is click on the icon shown above to make the little arrow appear.
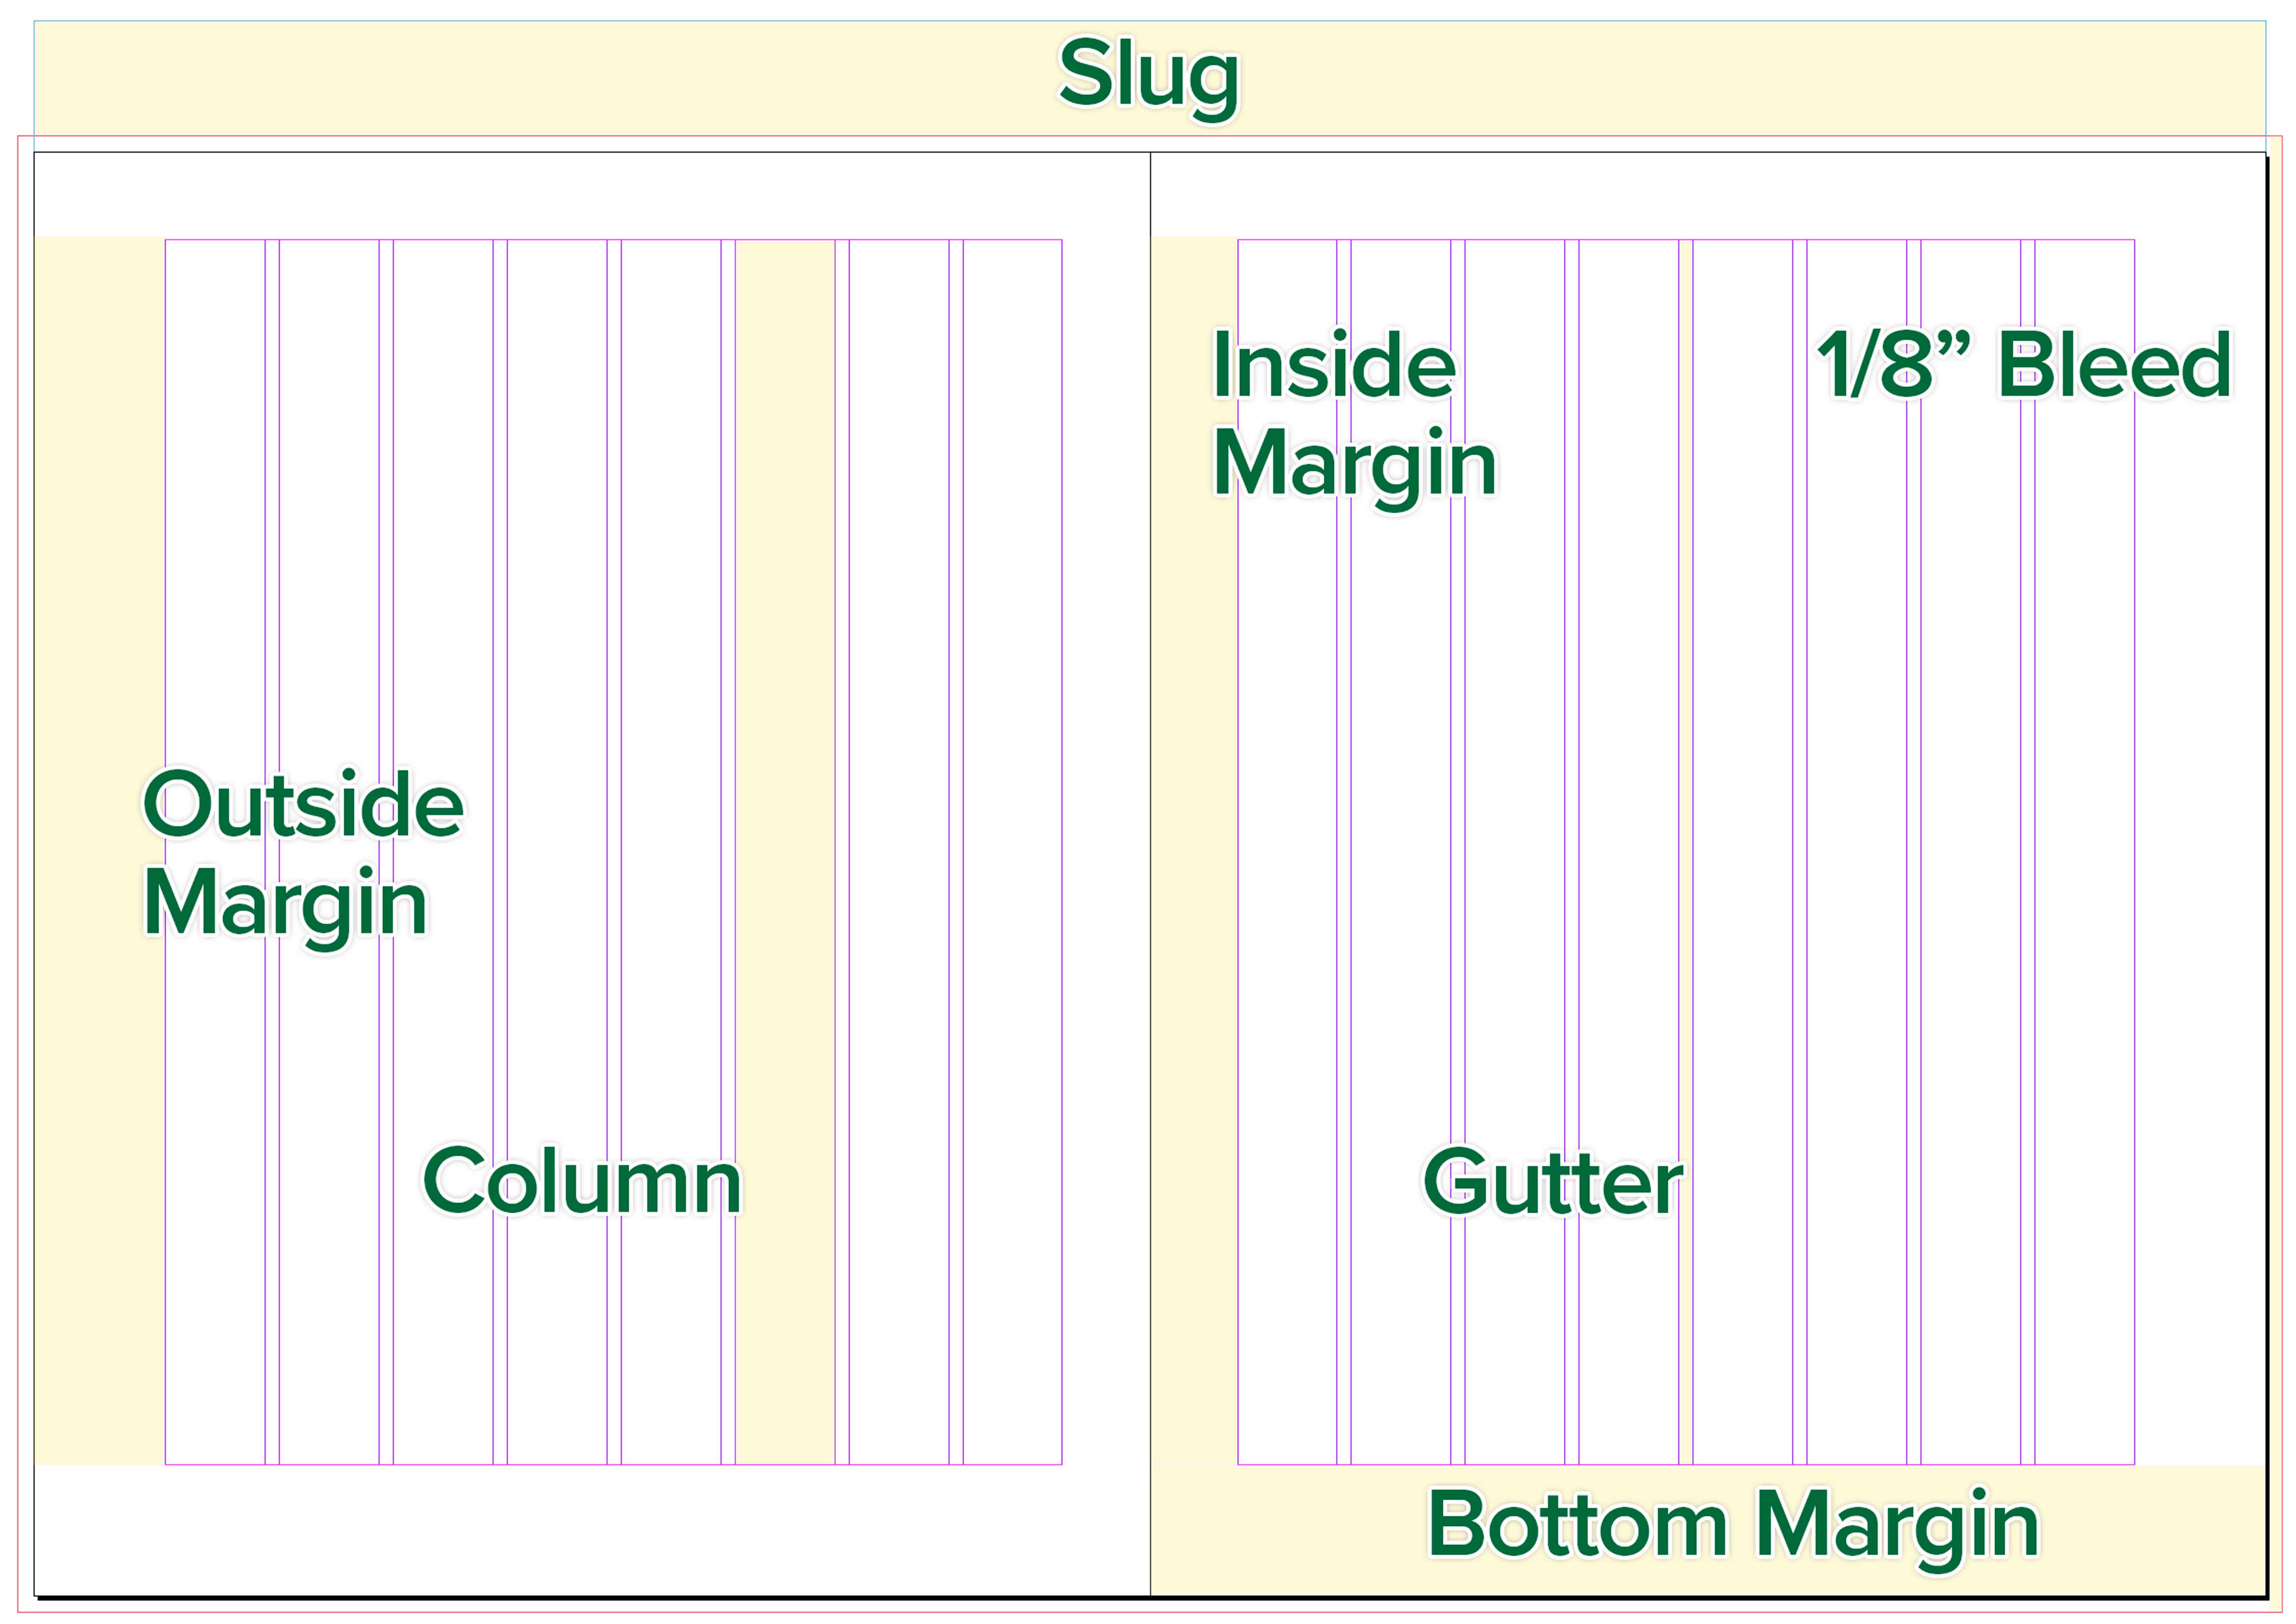
Bleeds
The page bleed is the excess space you set to allow for inaccuracy when your commercial printer trims your pages. It’s usually ⅛″. In InDesign, it appears as a red line around the perimeter of your pages.
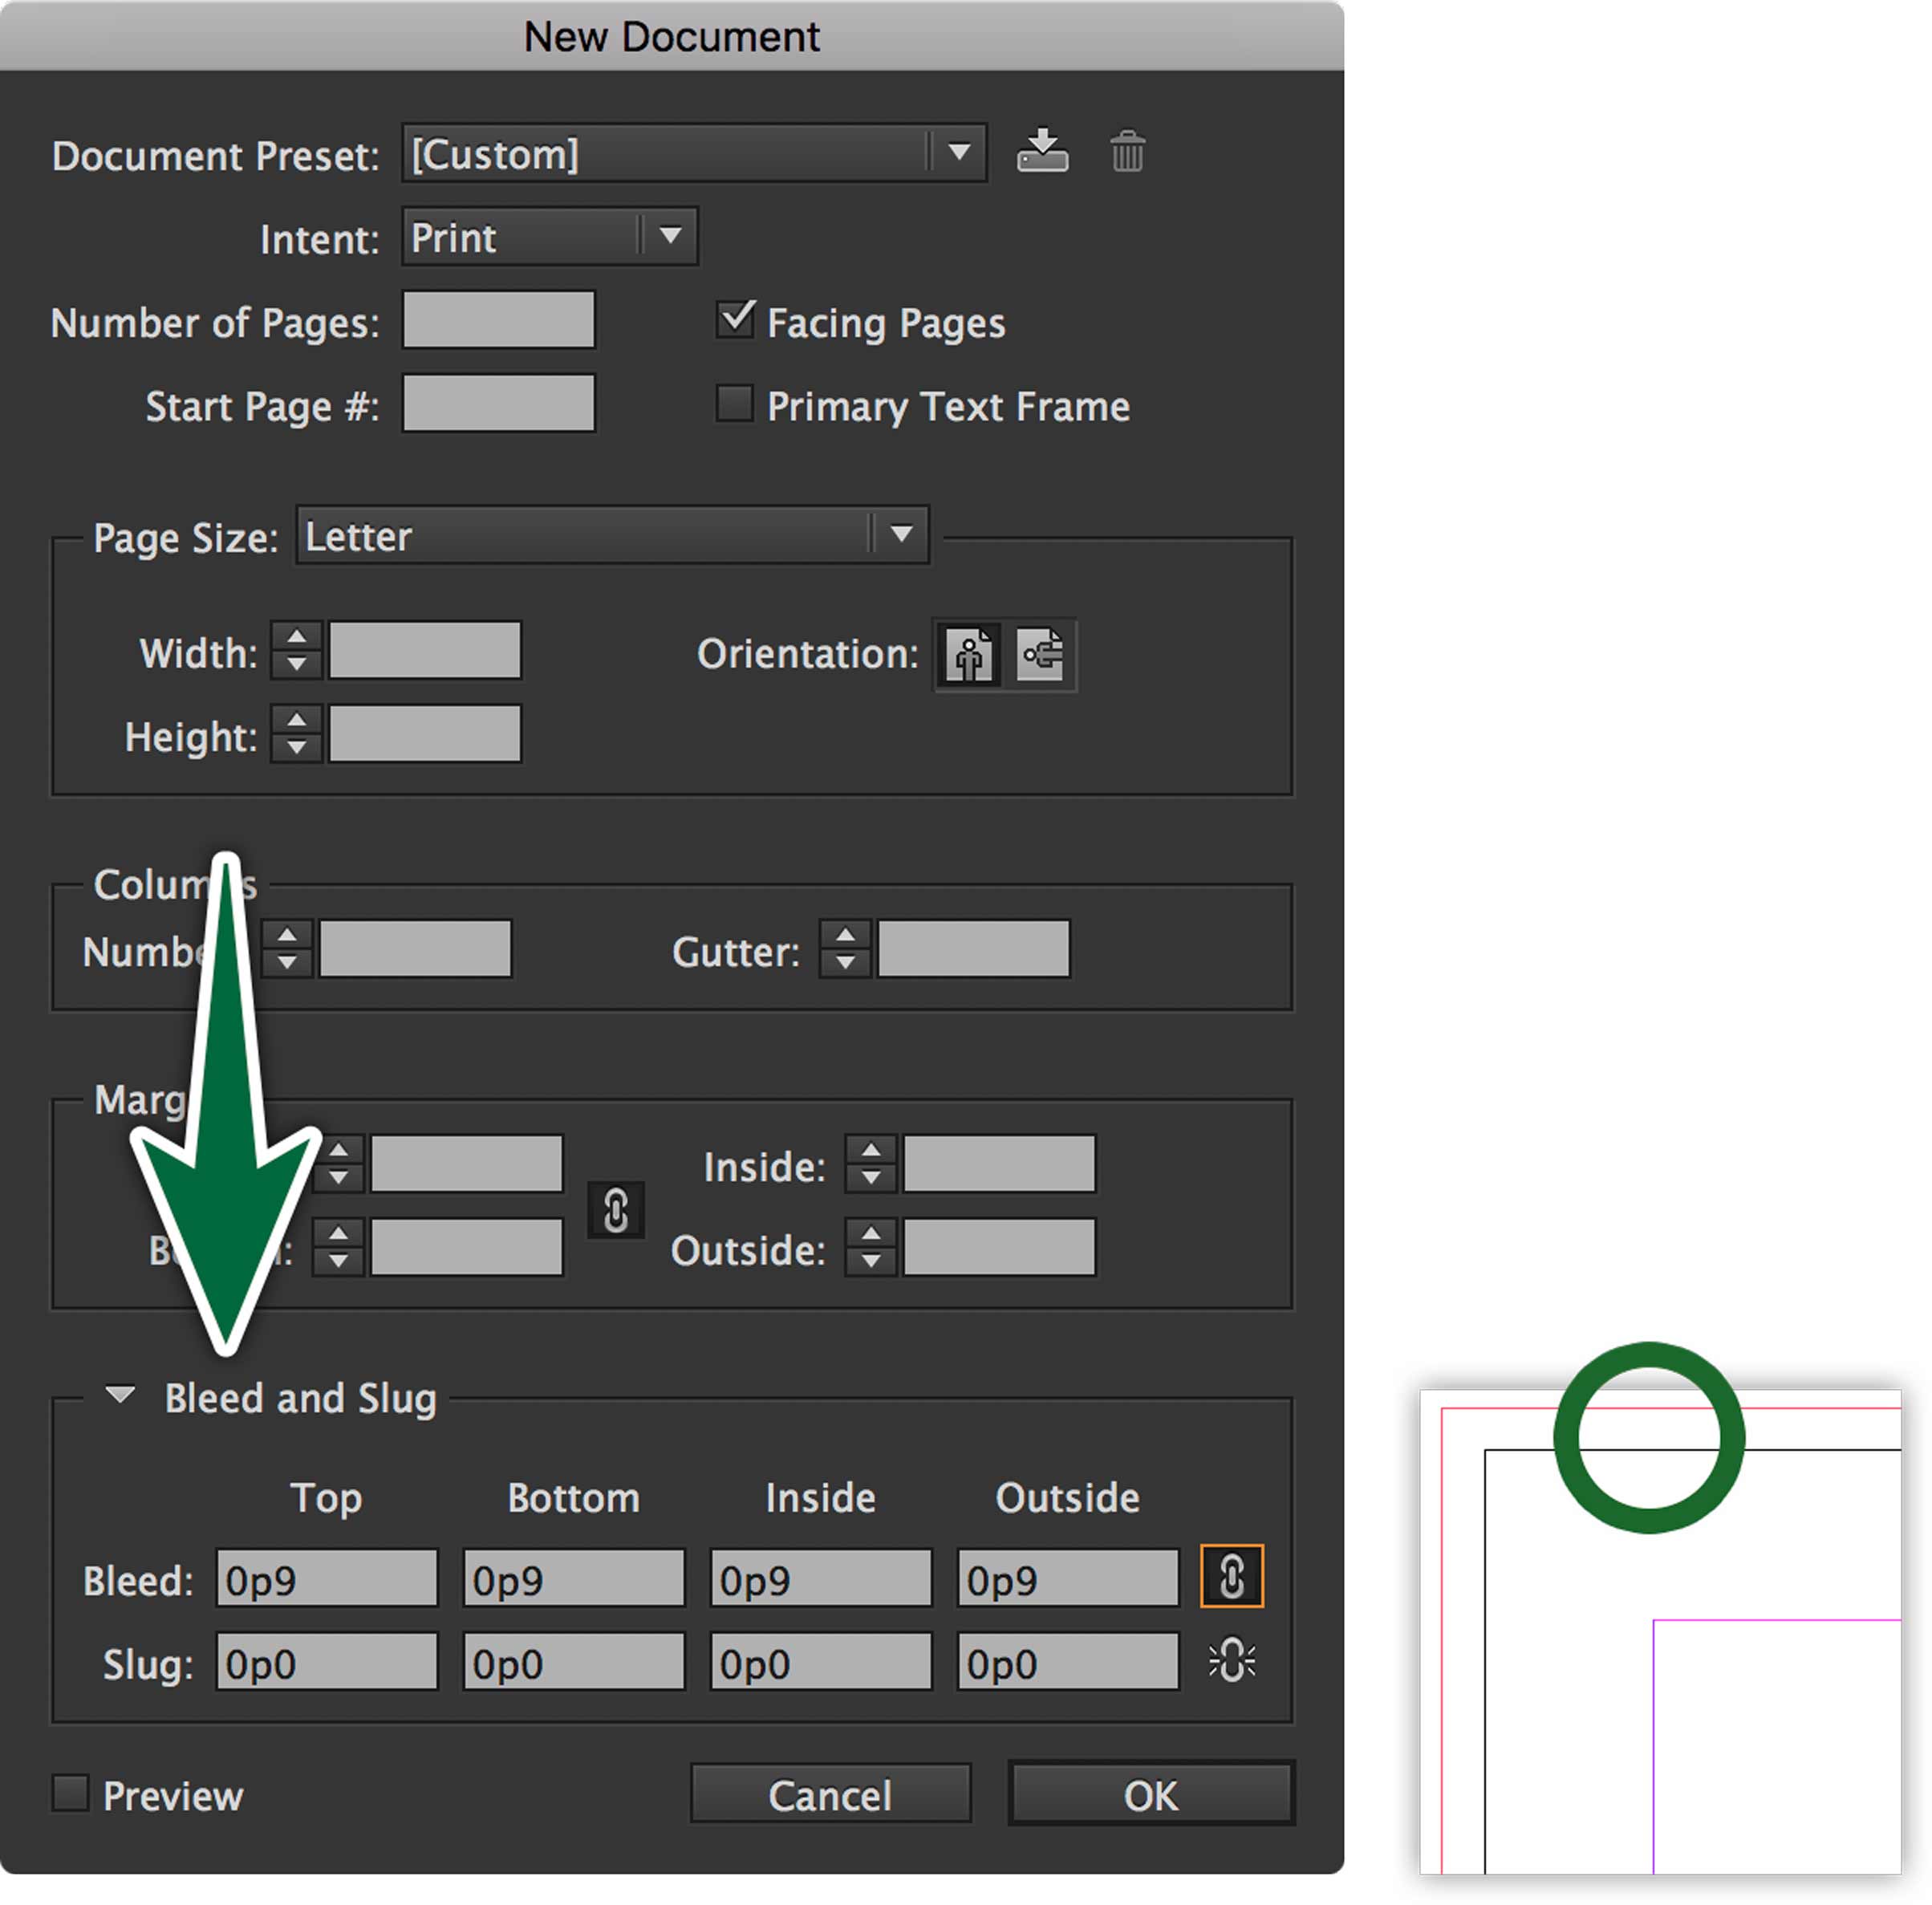
When you’re setting up your new document in InDesign, it’s a good idea to add a bleed. Even if you’re not sure that the document will bleed, there’s no harm in having it there. At least you won’t need to add it after the fact if you discover you need it.

Parent Pages
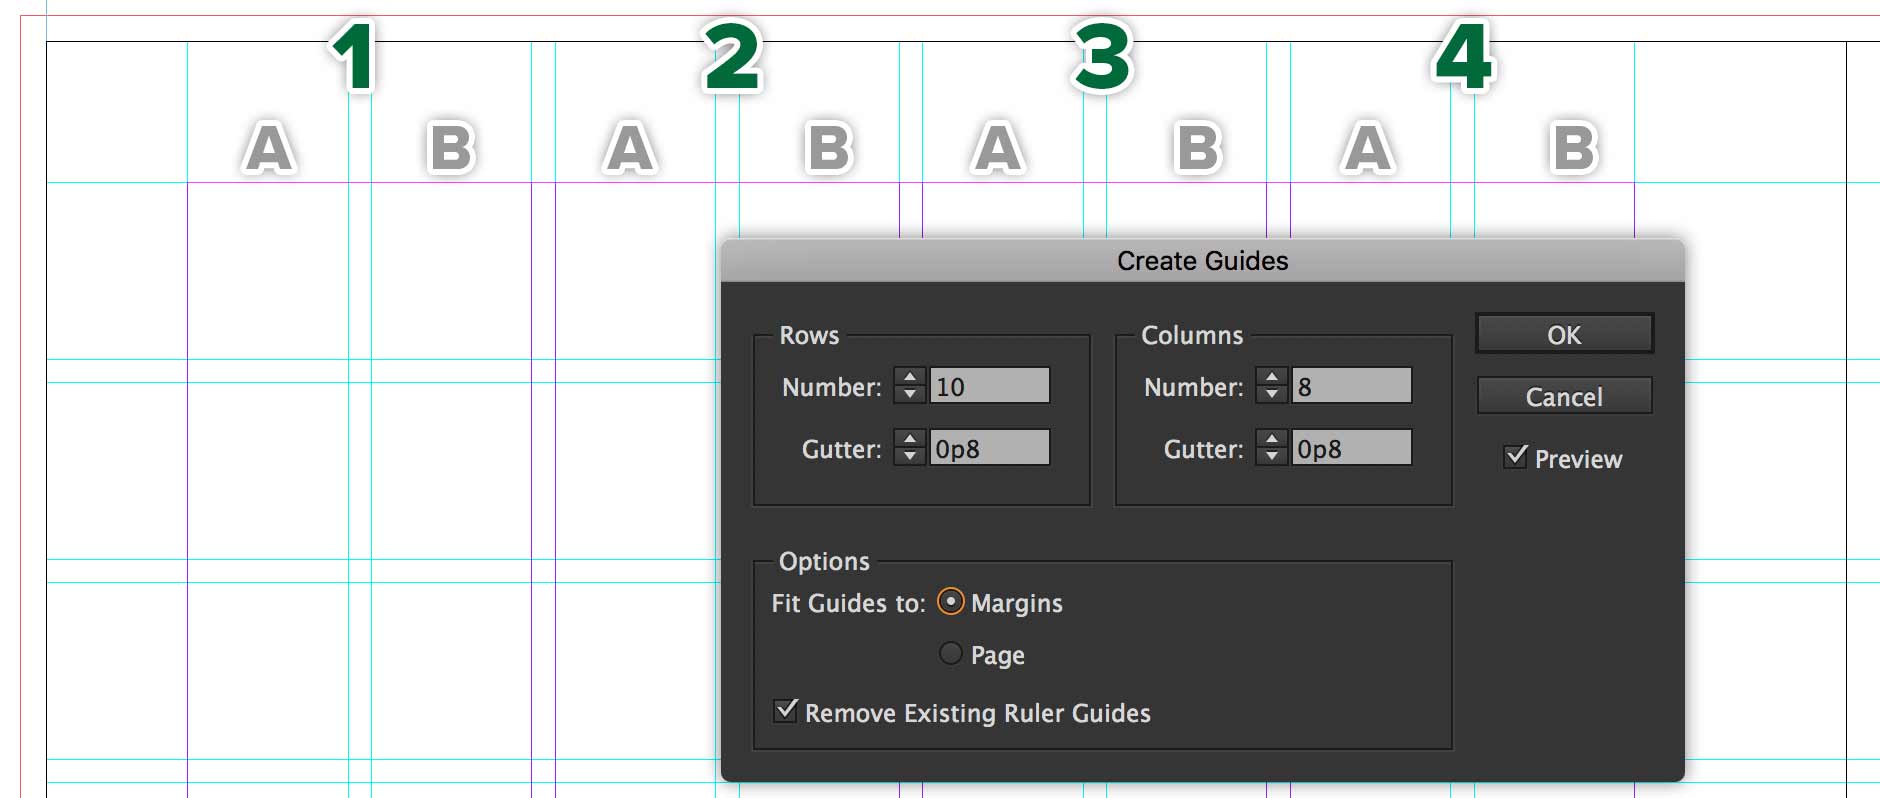
Set Up a Horizontal Grid
Go to your A-Parent, then use Layout > Create Guides… To create horizontal guides on your pages.
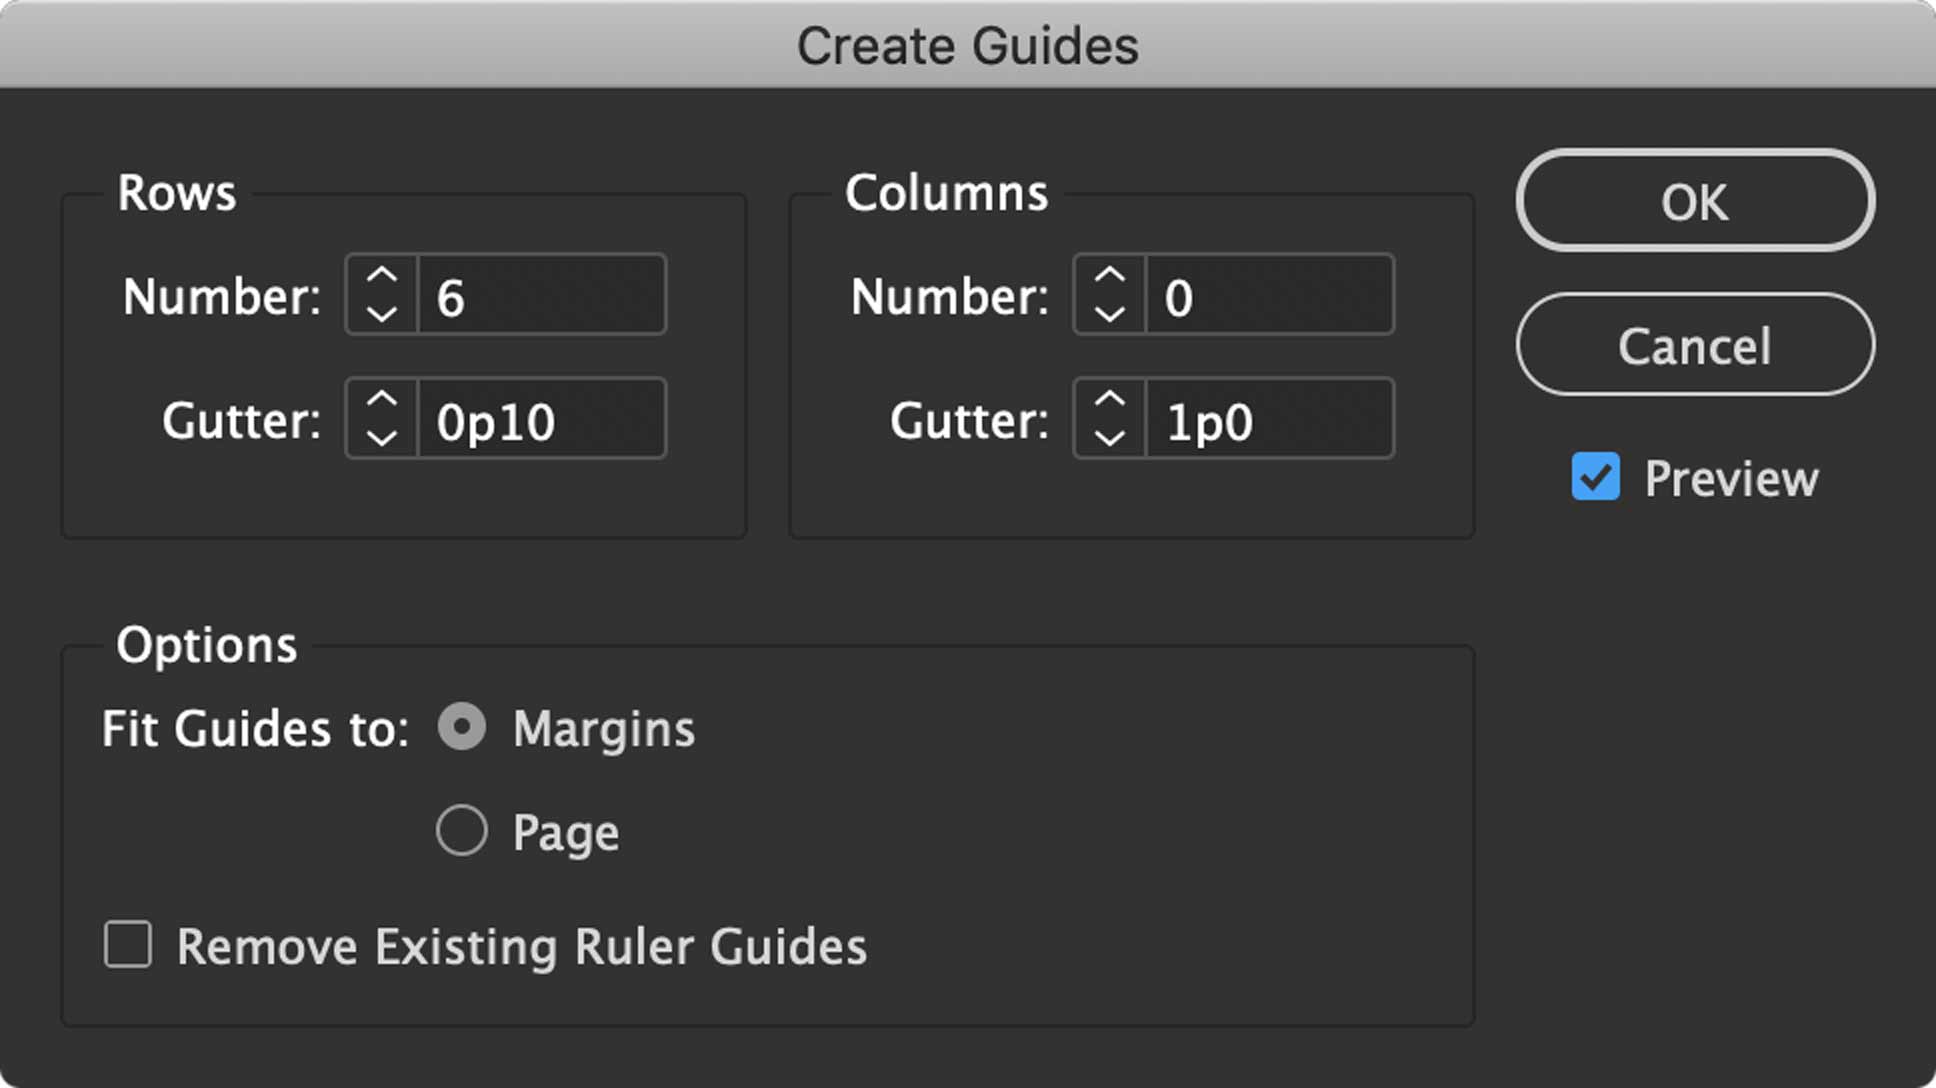
These guides will give you a structure for aligning objects.
Parent Text Frames
Text frames which are on Parent Pages appear on all pages that have that Parent applied to them. Parent pages act like templates for your pages. If you modify a Parent Page’s layout, all the pages with that Parent applied will change.
If you modify a Parent item on a document page, that item will no longer change with the Parent.
Parent Page items are locked on document pages. That means that you cannot select them on the document page without unlocking them. You can Shift-⌘-click on a locked frame on a document page to unlock it. Alternatively, you can type Shift-⌘-⌥-L to unlock all Parent Page elements on a document page.
Automatic Page Numbering
InDesign can assign page numbers automatically. All you need to do is type Shift-⌥-⌘-N in a text frame on a Parent Page.
It’s a good idea to set the alignment of the page folios to Away from Spine.
Managing Text Frames
Your document can have a series of threaded frames. That means that the text from one story will flow from one frame to the next across pages. You can also have a single text frame that doesn’t connect to another.
In InDesign, a Story is one or a series of threaded text frames. You’ll know you’ve come to the end of the story when you see the # symbol at the end of the text.
If you ever see the ⊞ symbol shown above, it means that you have overset text. This means that there’s too much text to fit in the box. The excess text just doesn’t appear on screen.
To resolve this, you can either make your frame larger, or make the text flow to another frame by threading it.
Text Threads
Go View > Extras > Show Text Threads. We want to turn on text threads. Do this with no document open so that the setting sticks for all future documents. That’s what we call an InDesign default.
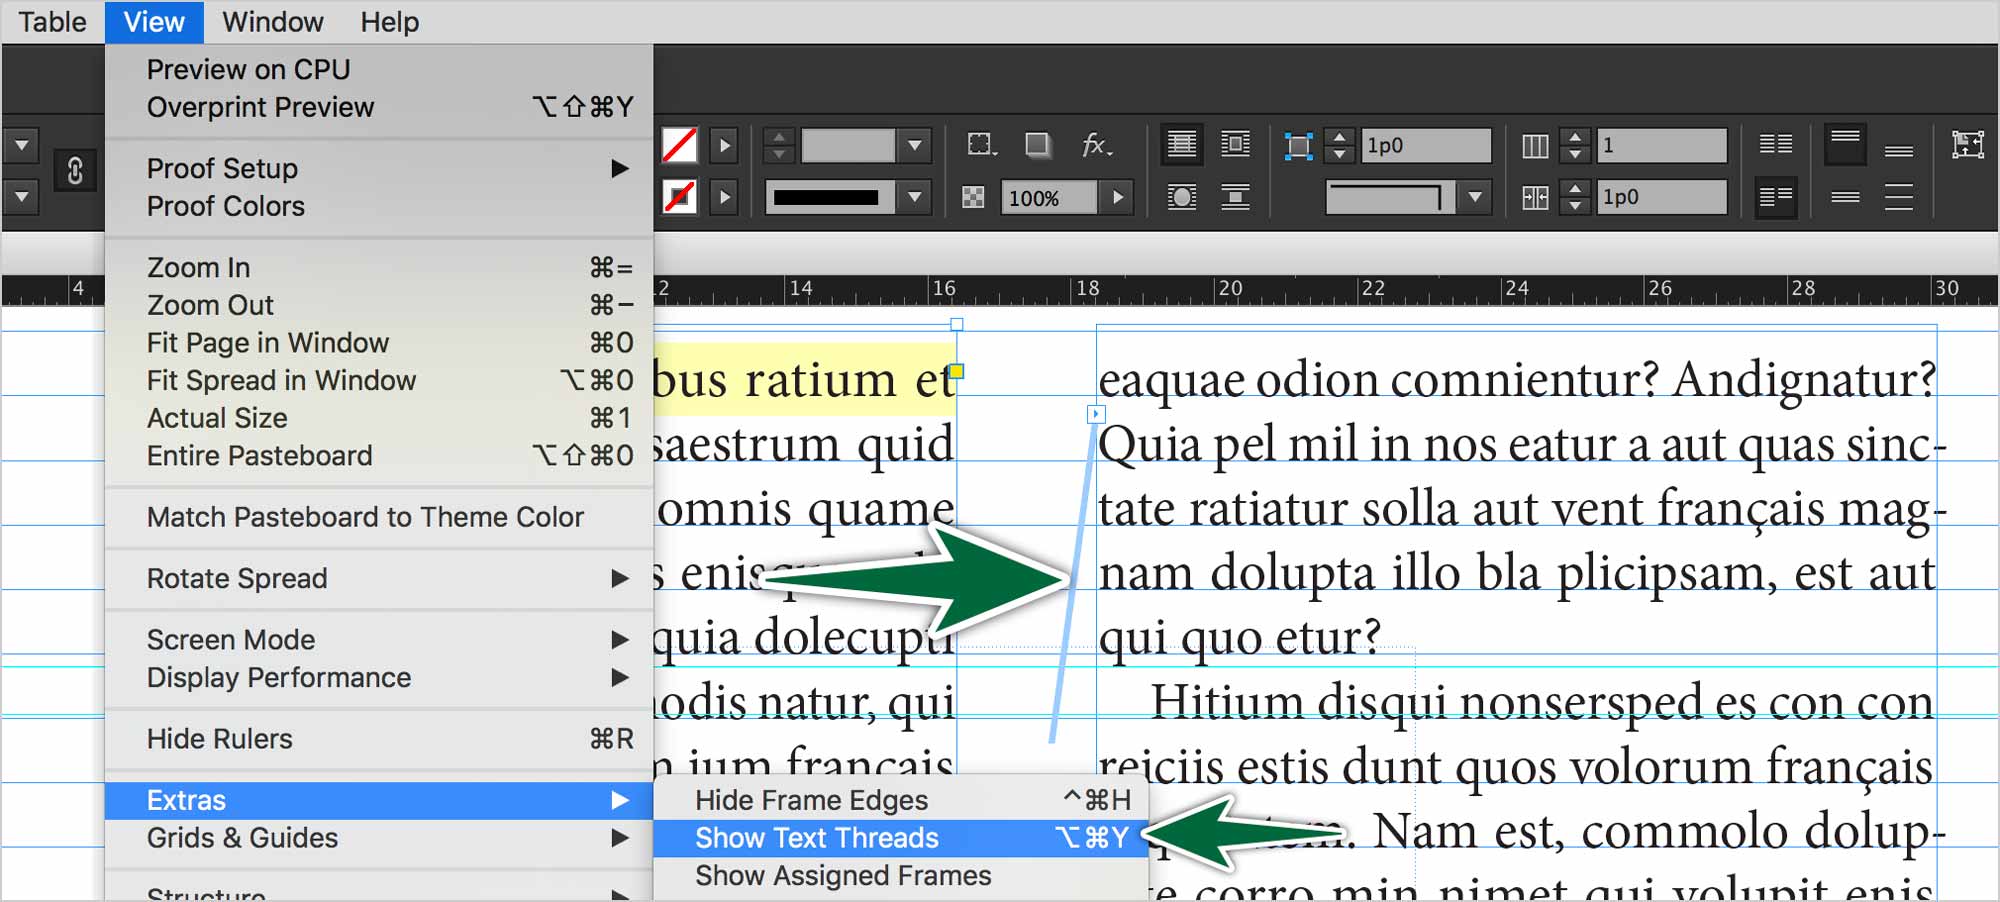
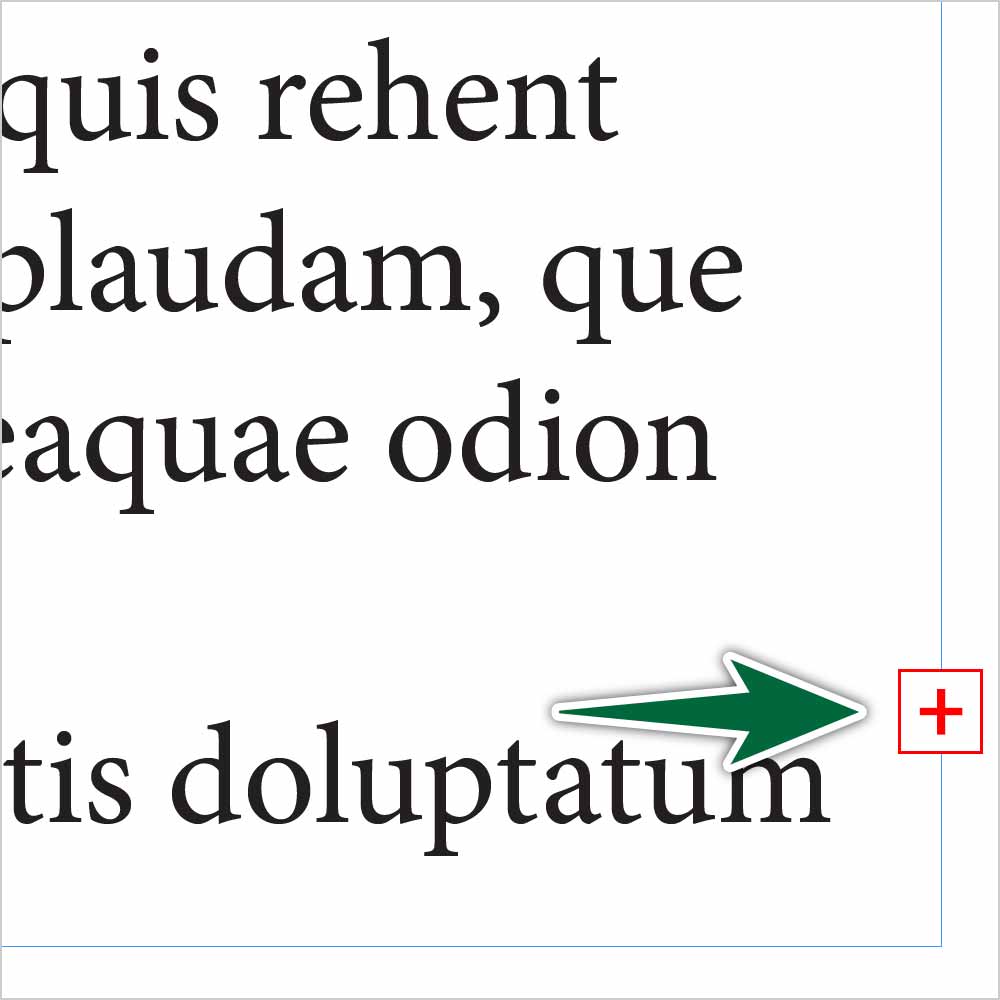
Text frames can be linked so the text flows from one to another. This is called threading. The little square at the bottom right of a text frame is called the out port.
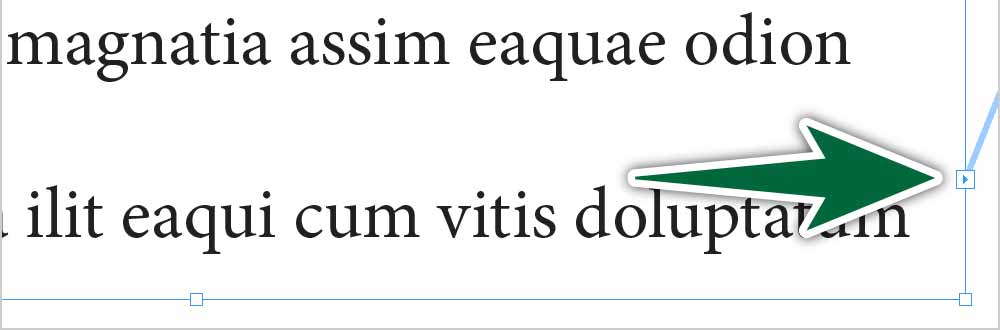
It indicates if text in the current frame threads to another frame, as it does in the image above. You don’t need to select the frame. If there’s an arrow in the out-port, it means that it’s threaded.
To thread text, click on the out port. You’ll get a cursor loaded with text. Just click anywhere on another frame to create a thread.
If you wish to insert a new frame between two threaded ones, simply click on the out port. You’ll get a cursor loaded with text. Click and drag to create a new frame in the story.
To break a thread, double-click on the out port. It will become overset text. You can then re-thread it to a new frame.
Story Jumps
A story jump is a bit of text that reads something like Continues on page 23. Let’s create story jumps. We’ll store them in our CC Libraries, so we can re-use them at will.

Styling Text
Base Styles
We create base styles with the goal of easing revisions. We want to set a base serif and a base sans-serif paragraph style. If we need to change the underlying fonts in our document, all we’ll need to do is change one style and all the inheriting styles will change.
Create a Base Sans paragraph style. The only item you set in this style is the font family. We want to have a Base Serif too. If you want, you can use Basic Paragraph for this. Again, just set the font family.
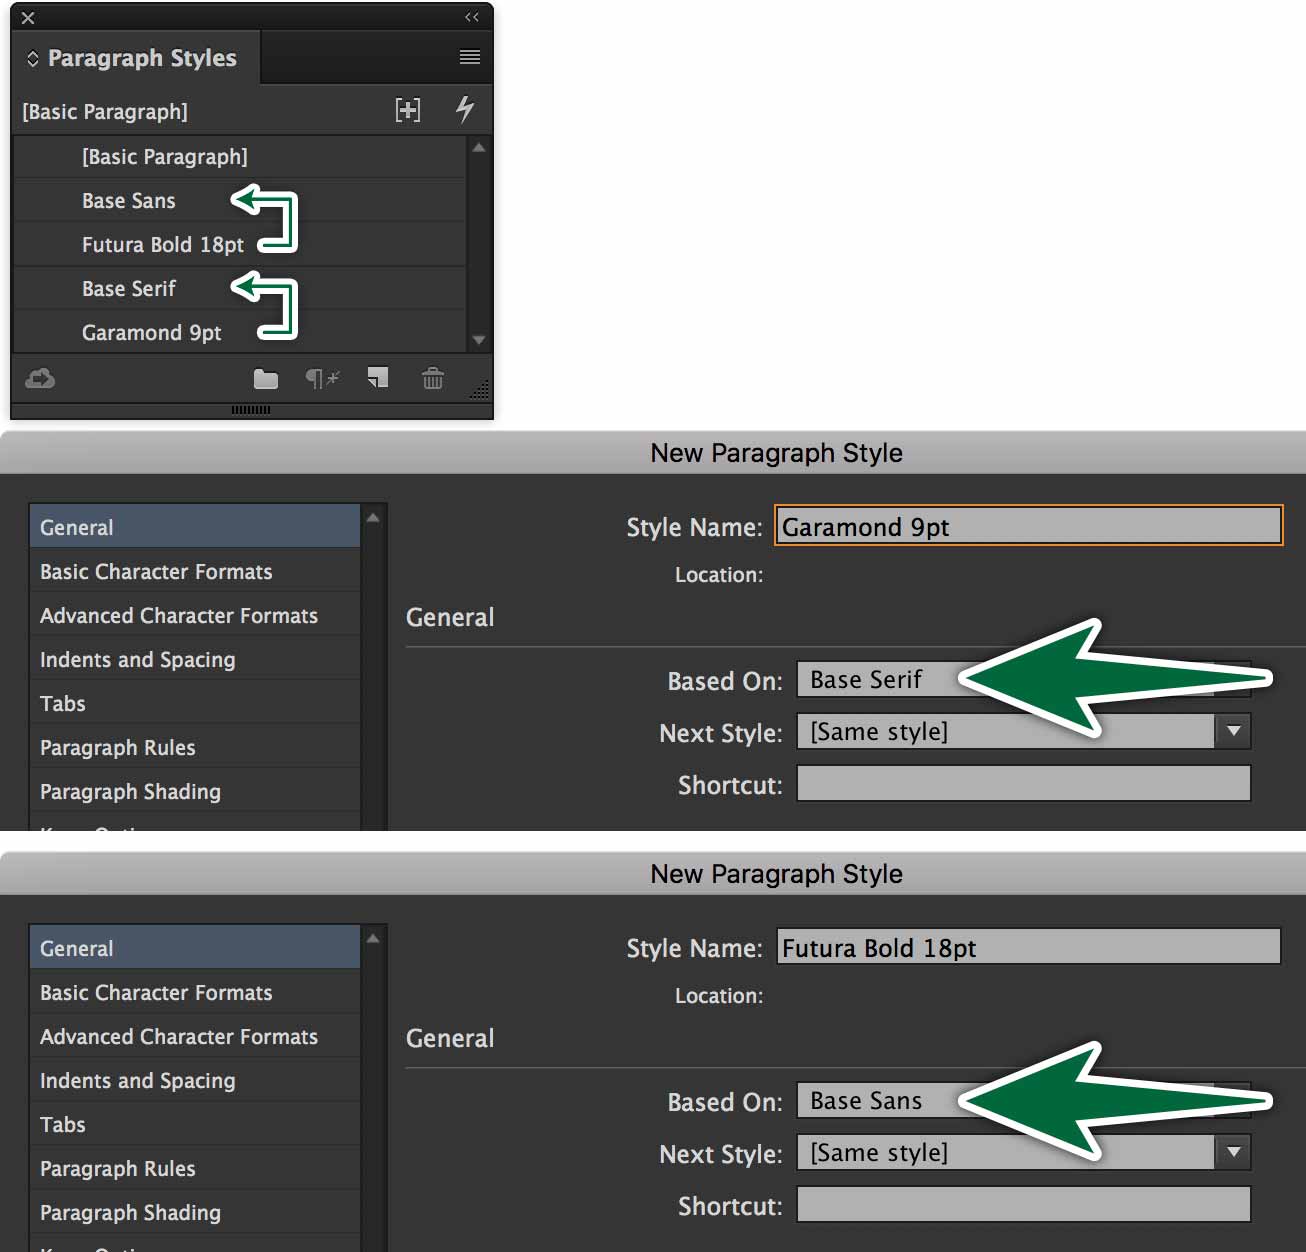
When you create all other styles, make them all Based on the base style. The base styles should be the parent of all the styles you create. When we change the font family in the base style, all other styles will inherit the change automatically. This is a real time-saver and headache avoider.
All text in all of your documents need to have a Paragraph Style applied to make revisions easier. It also prevents omissions in editing.
Body text us usually somewhere between 9 and 11 points in size, depending on the characteristics of your chosen font. The default leading in InDesign is 120%. This means that if your body text is set at 10 points, your leading will be 12 points. Don’t change this unless you really have a good reason.
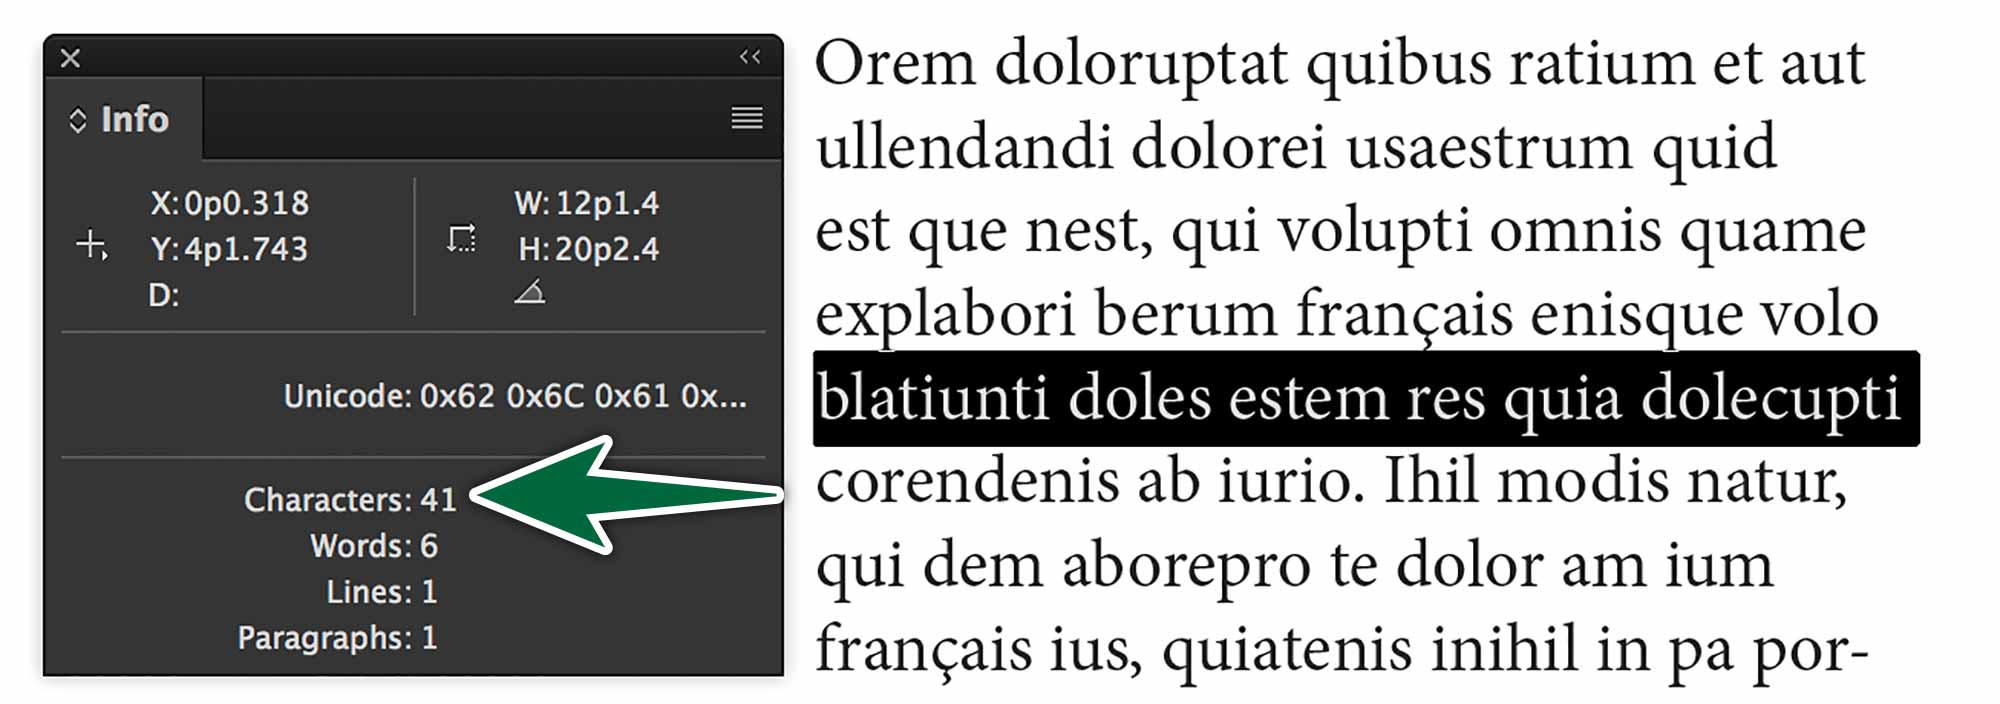
We should be aiming for line lengths of 35 to 45 characters per line. You can check the number of characters per line using the Info panel. Highlight a line of text and refer to the panel for the character count.
Styling Headlines
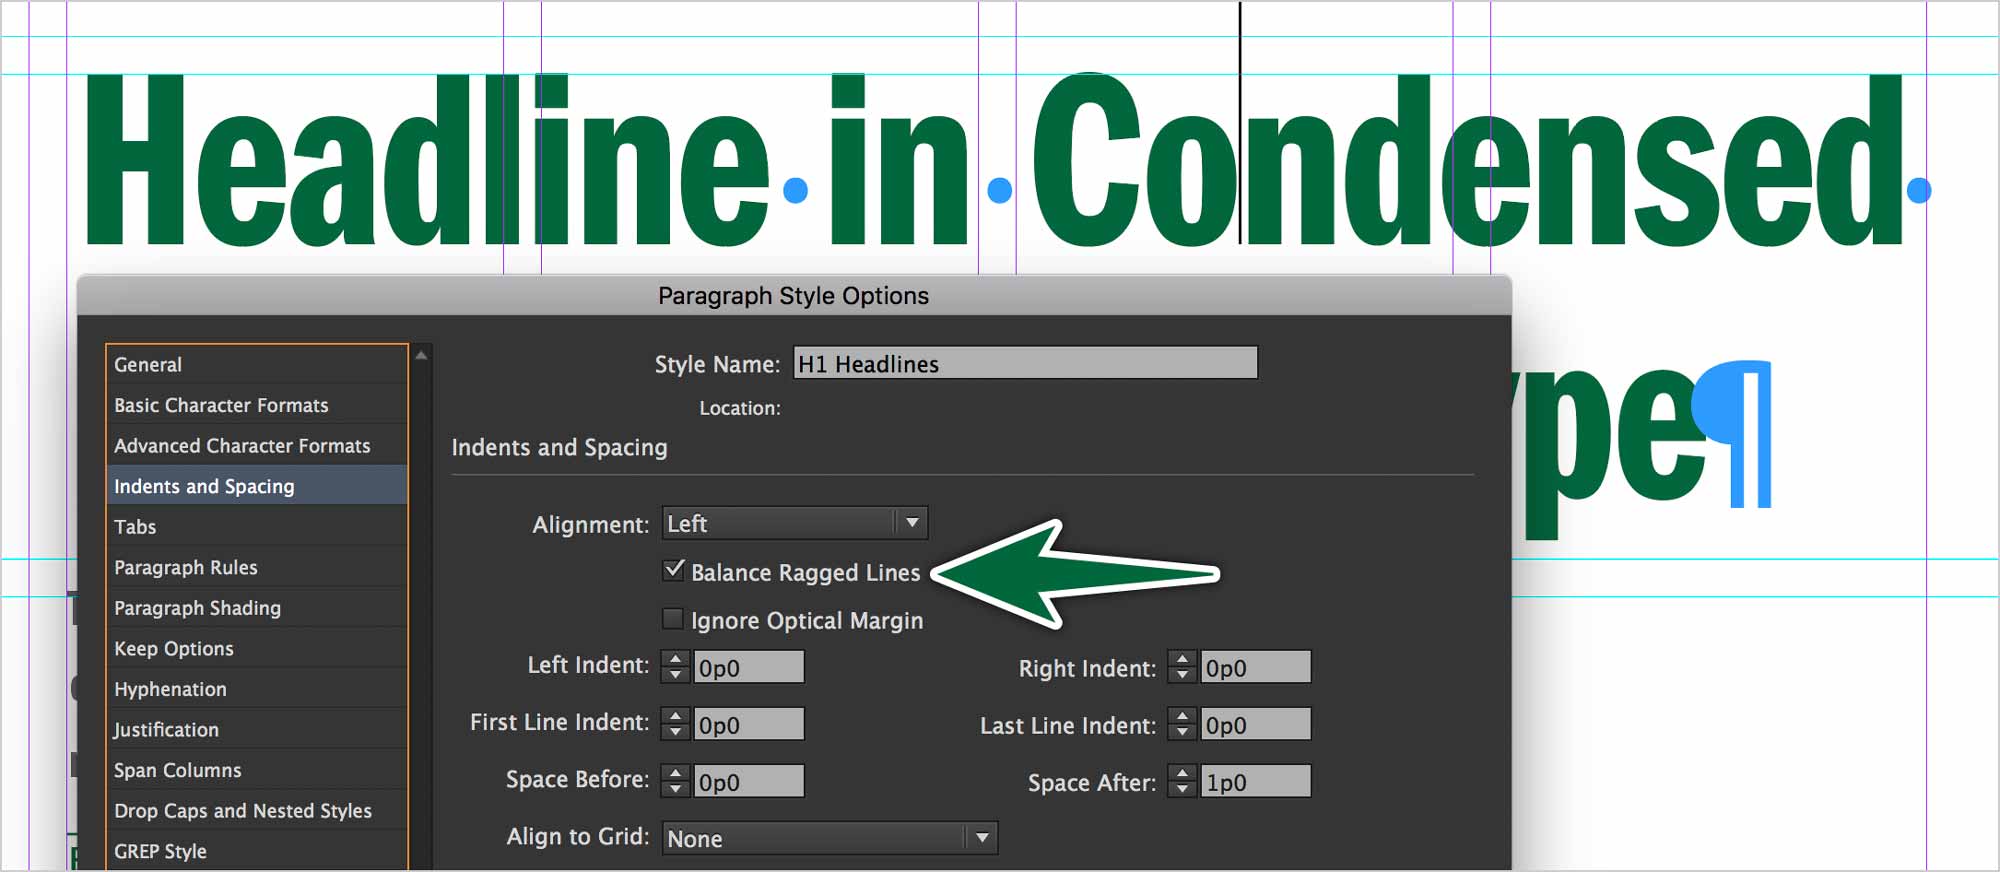
When styling a large title, a deck or another short paragraph with large text, we want to turn on Balance Ragged Lines in the paragraph style. Never turn on this feature for long lengths of text like body copy. The line length will become uneven.
Spacing Paragraphs
We need a subtle but clear indication when one paragraph ends and another begins. The choices are a first line indent at the start of the paragraph, or a space after the paragraph.
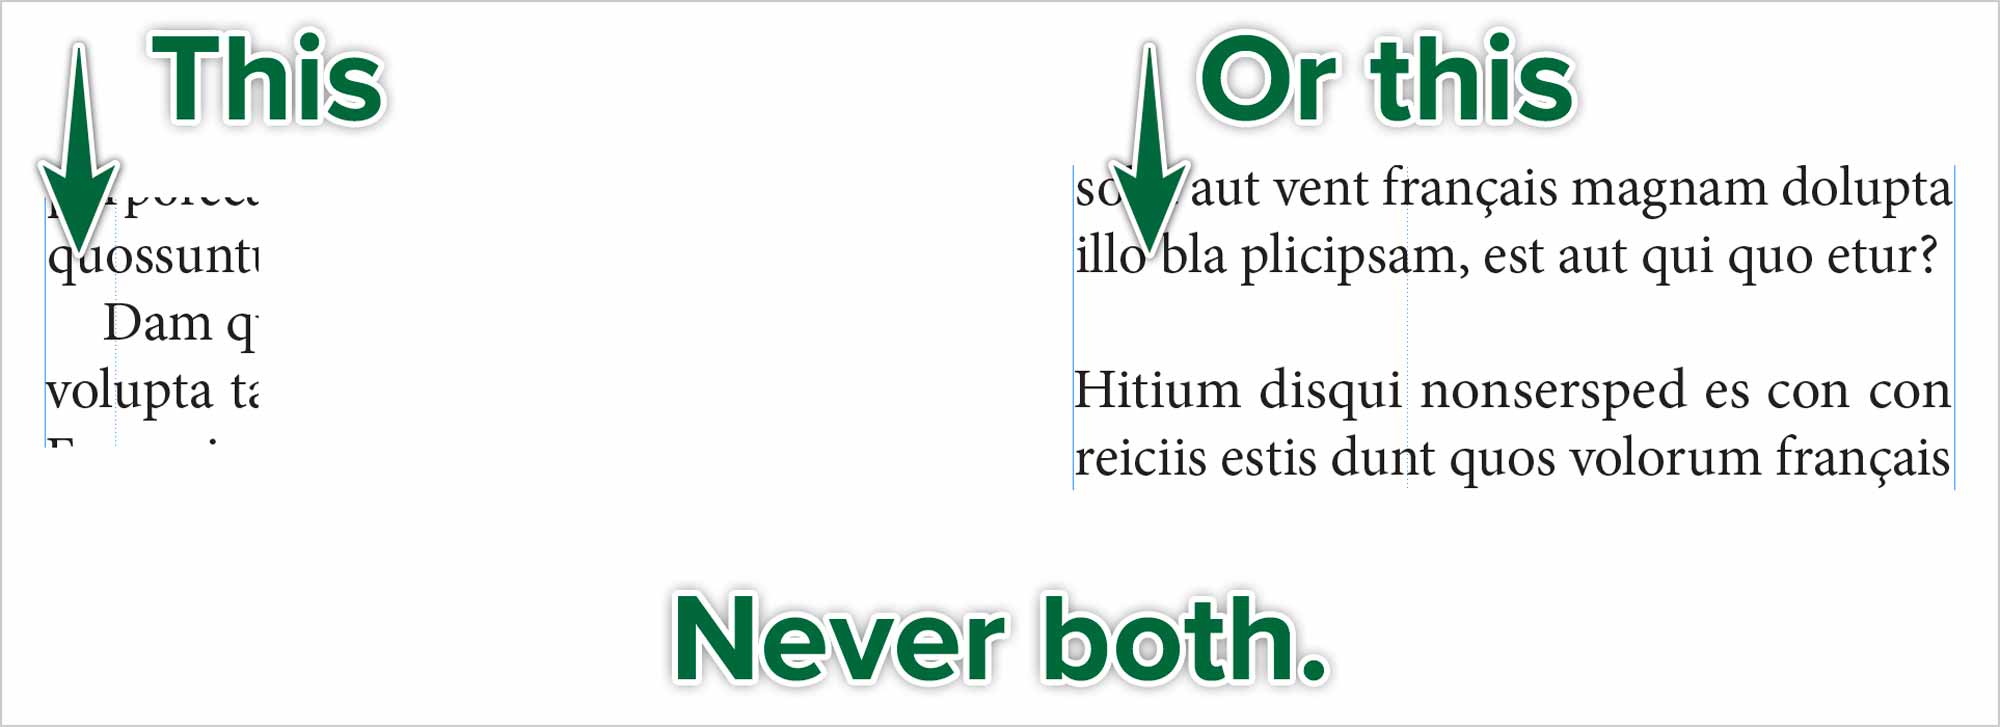
When you use a space after the paragraph, these spaces cumulatively burn up a lot of room in your doucument. If space is precious, it may be better to use a first line indent. Size your first line indent at 1em. That means make it the same size as your type size. 9pt type, 9pt first line indent.
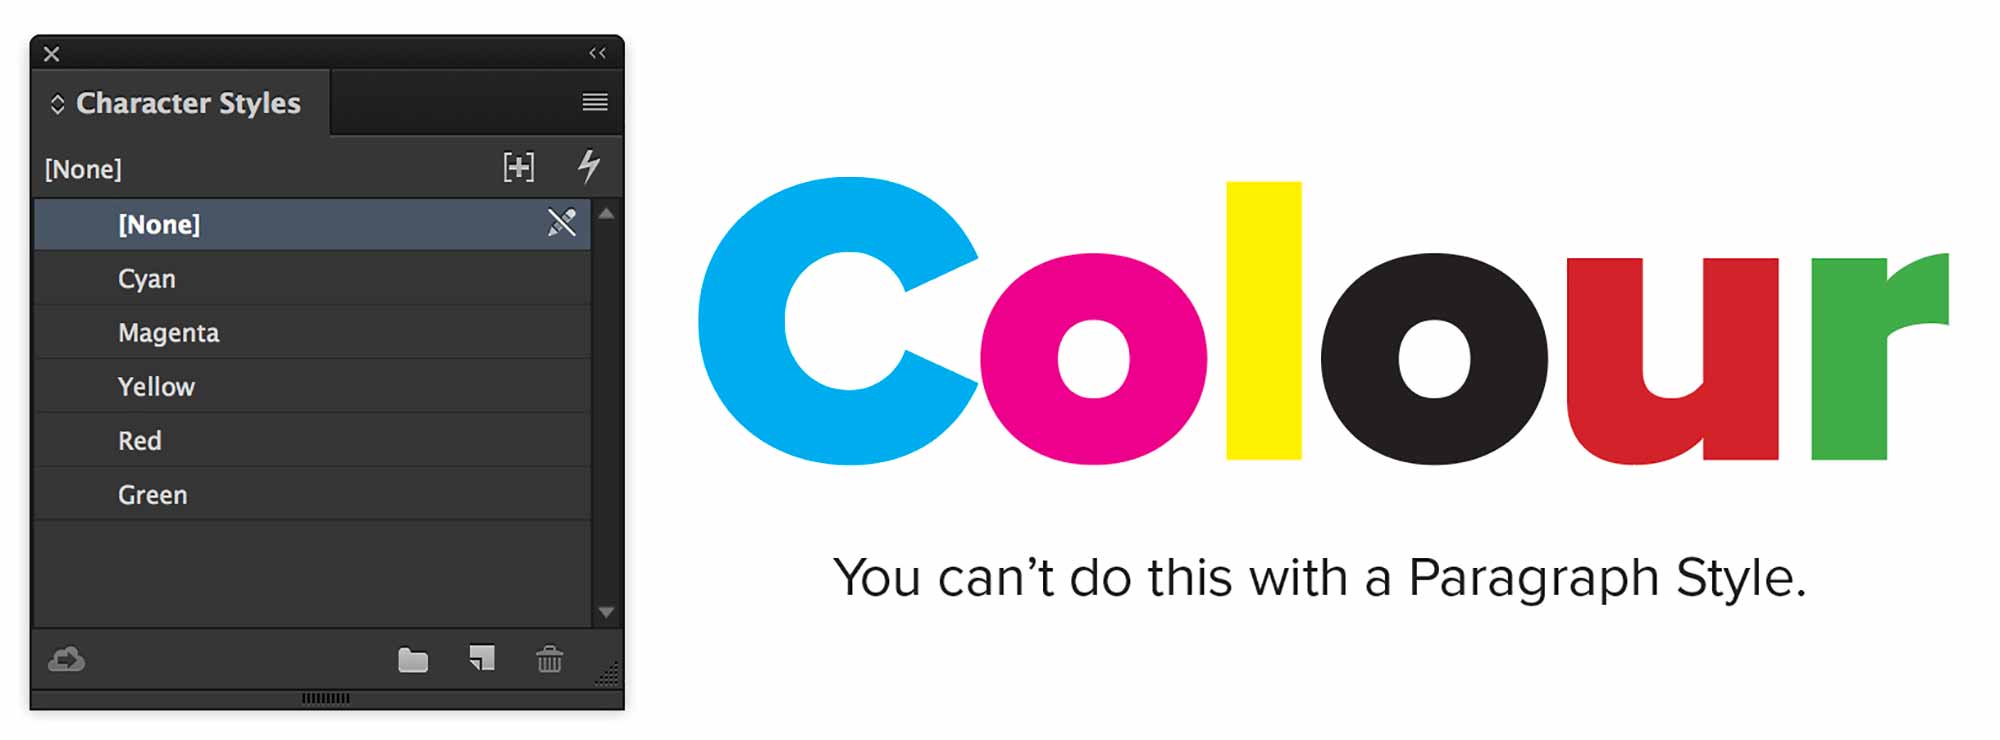
Character Styles
Use Character Styles sparingly and only where necessary. They’re used for styling at a character level and not at a paragraph level. They’re good for italicising words and the like.
GREP Styles
GREP Styles apply Character Styles when a certain condition is met. You could autotmatically make every instance of the word ‘français’ appear as français across your whole document.

All you need to do is tell it which Character Style to apply to the text. You also need to tell it which text to apply it to. InDesign will dynamically apply the style as it encounters the criteria. GREP Styles can do much more. We haven’t even touched on the actual GREP patterns here. We’ll come back to them in the future.
Drop Caps
We’ll style a drop cap with the help of this information.
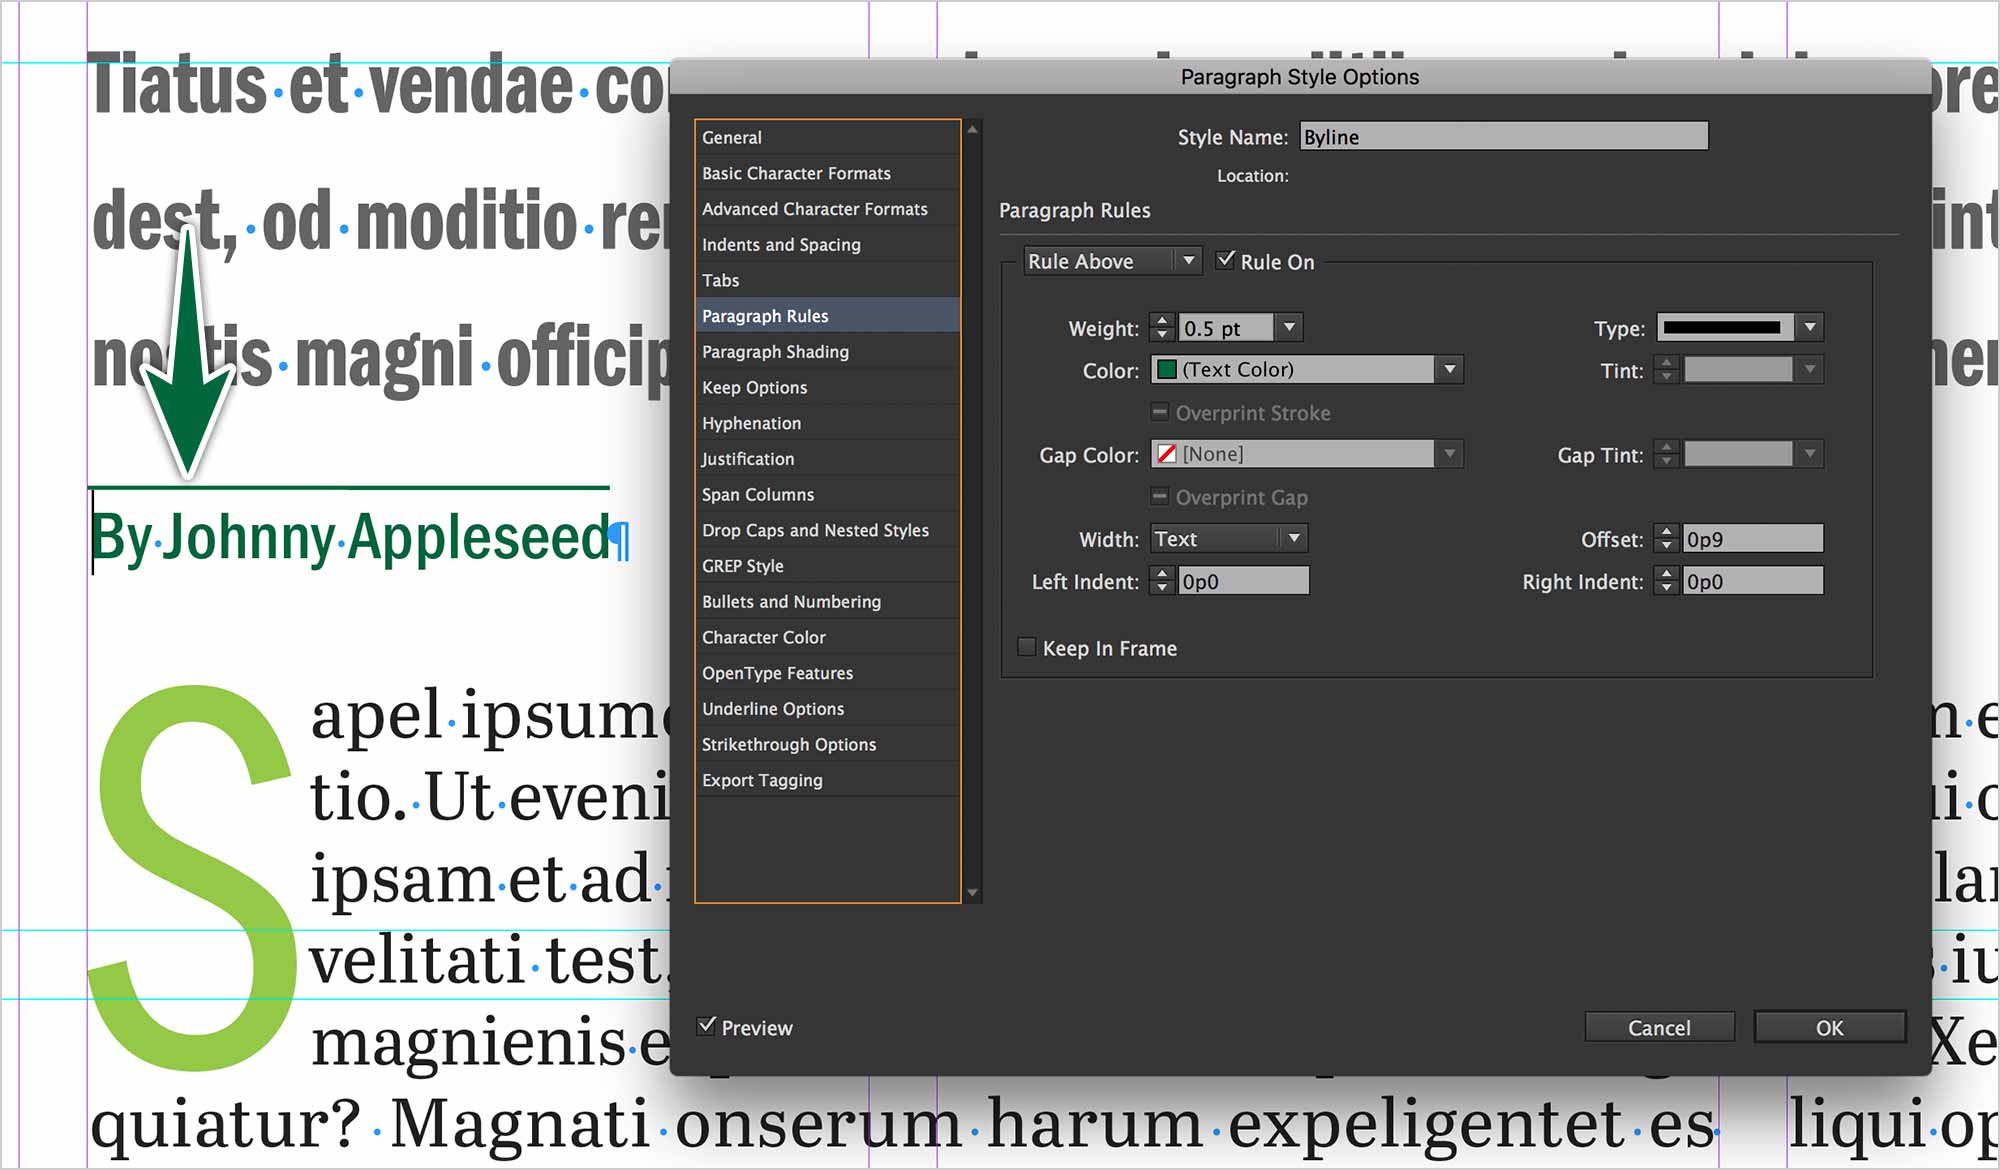
Paragraph Rules
Paragraph Rules are horizontal lines which can be activated in a Paragraph Style. They appear either above or below a paragraph. Remember, in InDesign, a paragraph can be as short as one glyph!
Styling Pull Quotes
Second to a headline, a pull-quote can really be an attention-getter. Pulling a quote from the text with provocative text will draw the reader to your story.
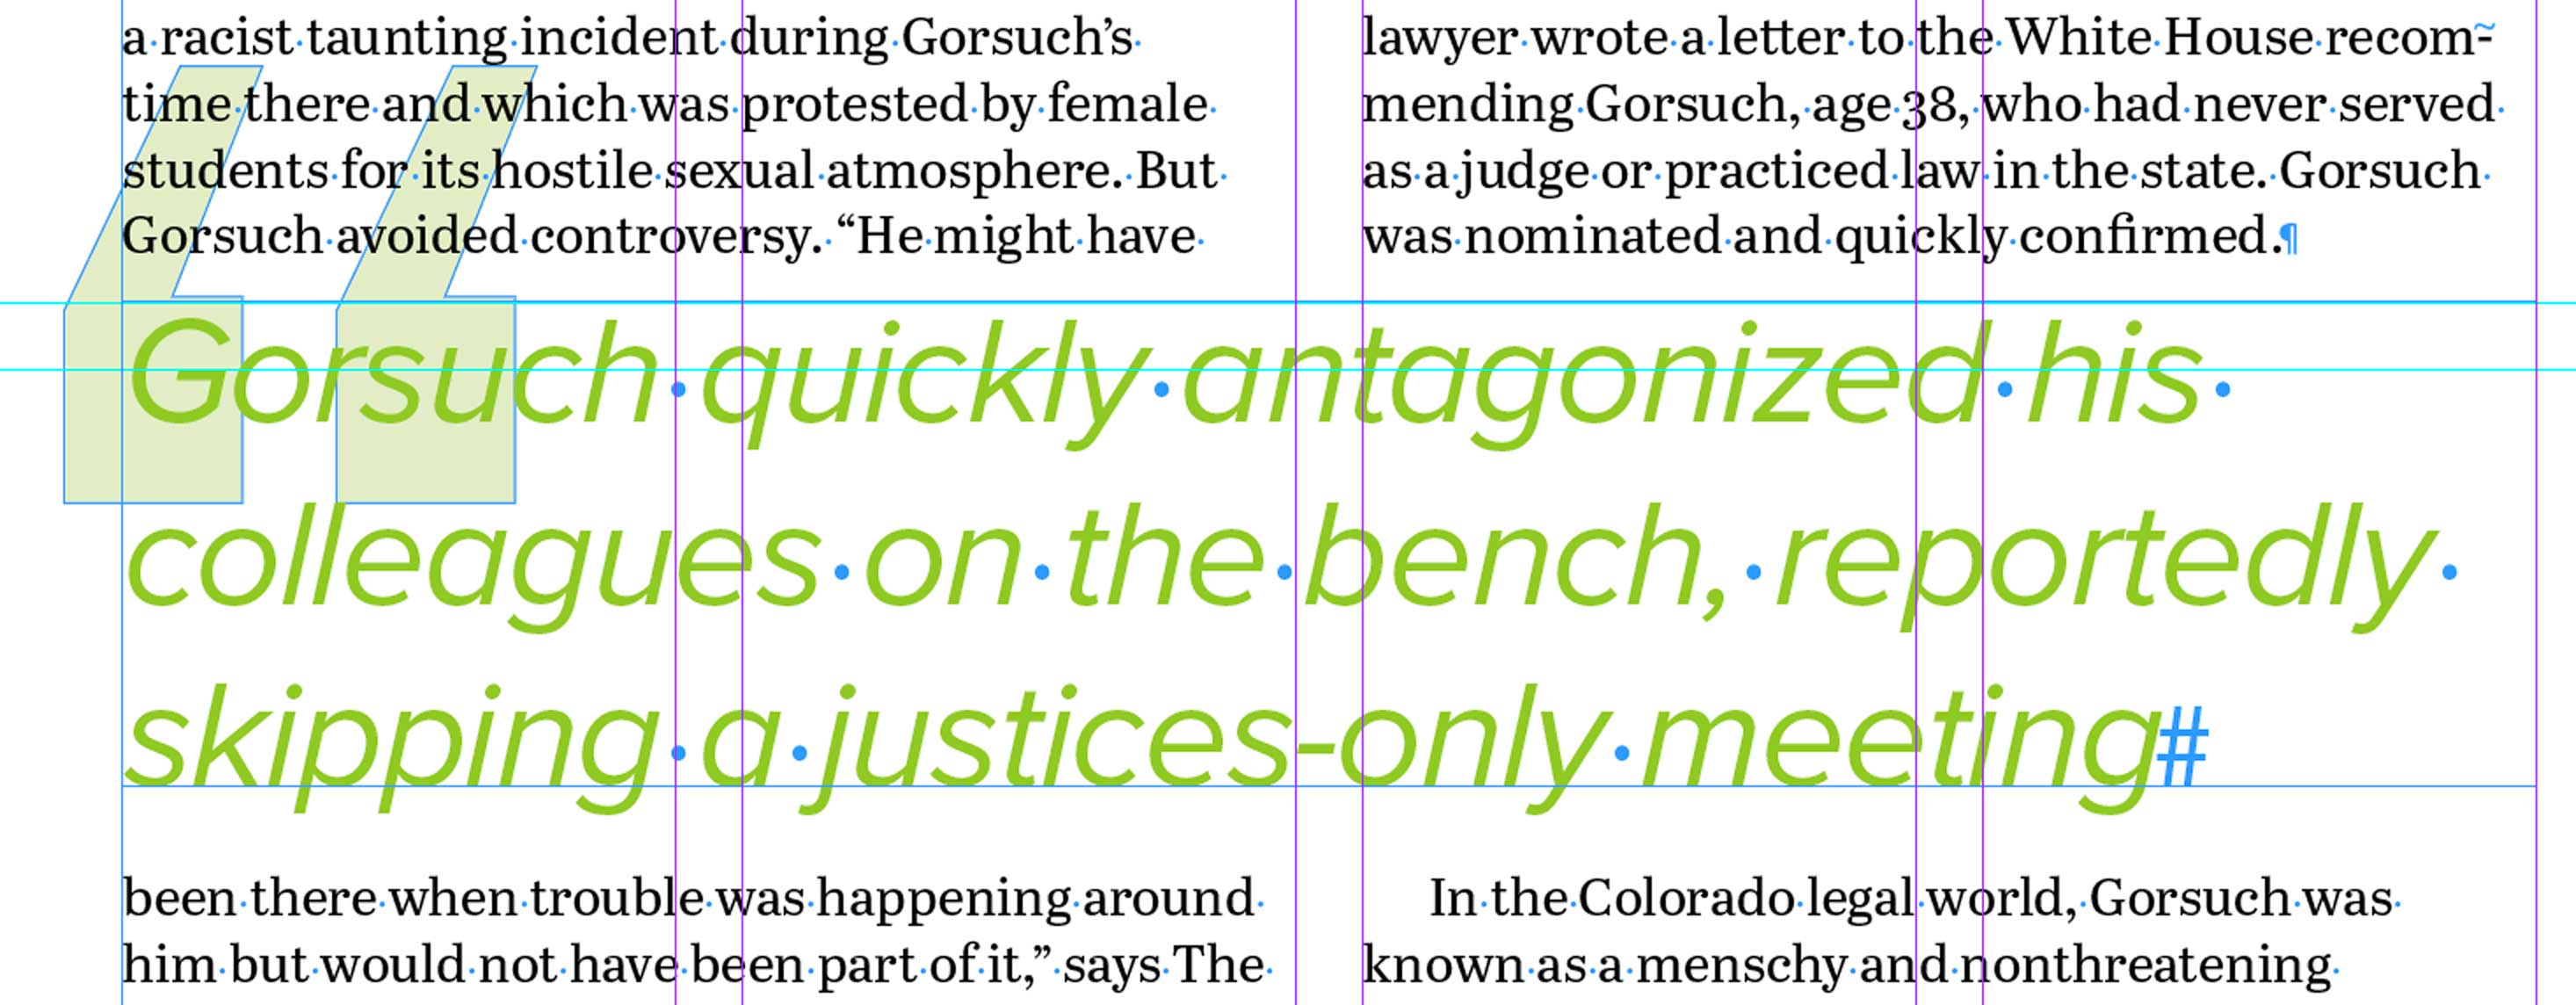
Pull quotes are set in a separate text frame in InDesign. We take a quote from the text (leaving it in the text) and copy it into its own frame, then style it with distinctive type and decorative quotation marks. The sans-serif font should be based on our Base Sans. Style a large quotation mark by typing a large quote mark in its own text frame. We want it light behind the text. Go to Swatches panel and create a New Tint Swatch. This takes the current colour and saves the tint as a swatch. Once it’s styled, select the frame and go Type > Create Outlines. Group the quote mark frame and the quote frame itself. Add a text wrap on the frame with the second button in the panel. Add 9pt padding around it.
Let’s add the pull quote to the CC Libraries panel so we can insert one at any time.
Styling Sidebar Stories
Sidebar stories are separate but related stories. They’ll be of interest to the reader of the main story. A separate text frame is created and styled to stand out, sometimes with a background colour.
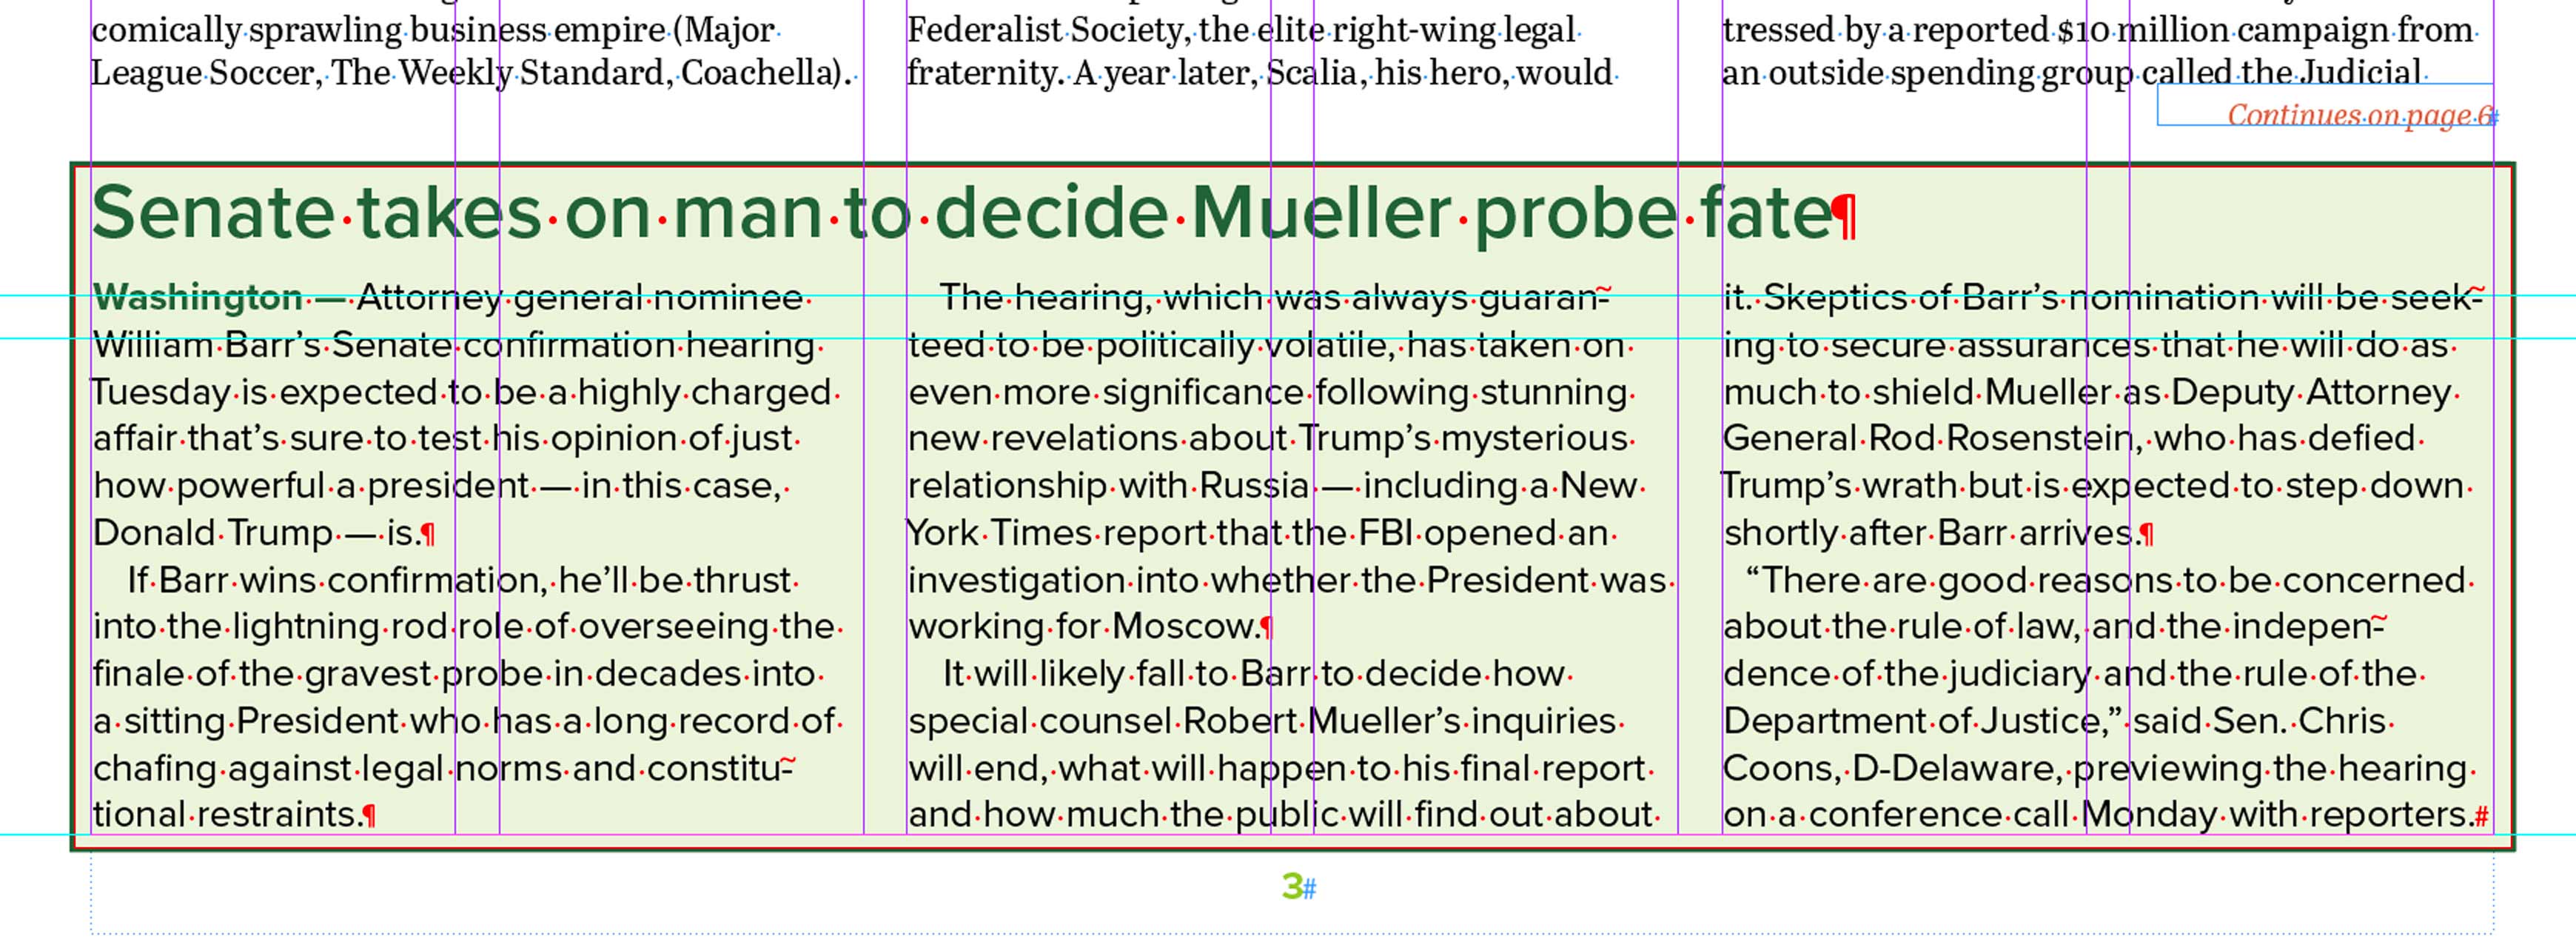
Sidebar stories can be another entry point for the reader. It’s easier to digest than the longer feature story. A reader may read the sidebar, then decide to dive into the feature.
We’ll create a separate text frame which will contain the headline and the sidebar story. It will have a wrap on it to push away the main text frame.
Story Enders
A story-ender is a small graphic that indicates you’ve read to the end of the story. All you need to do is create a small graphic. Place the insertion point at the end of the story. Paste the graphic inline.
It’s a good idea to save the story-ender in your CC Libraries.
Your Assignment
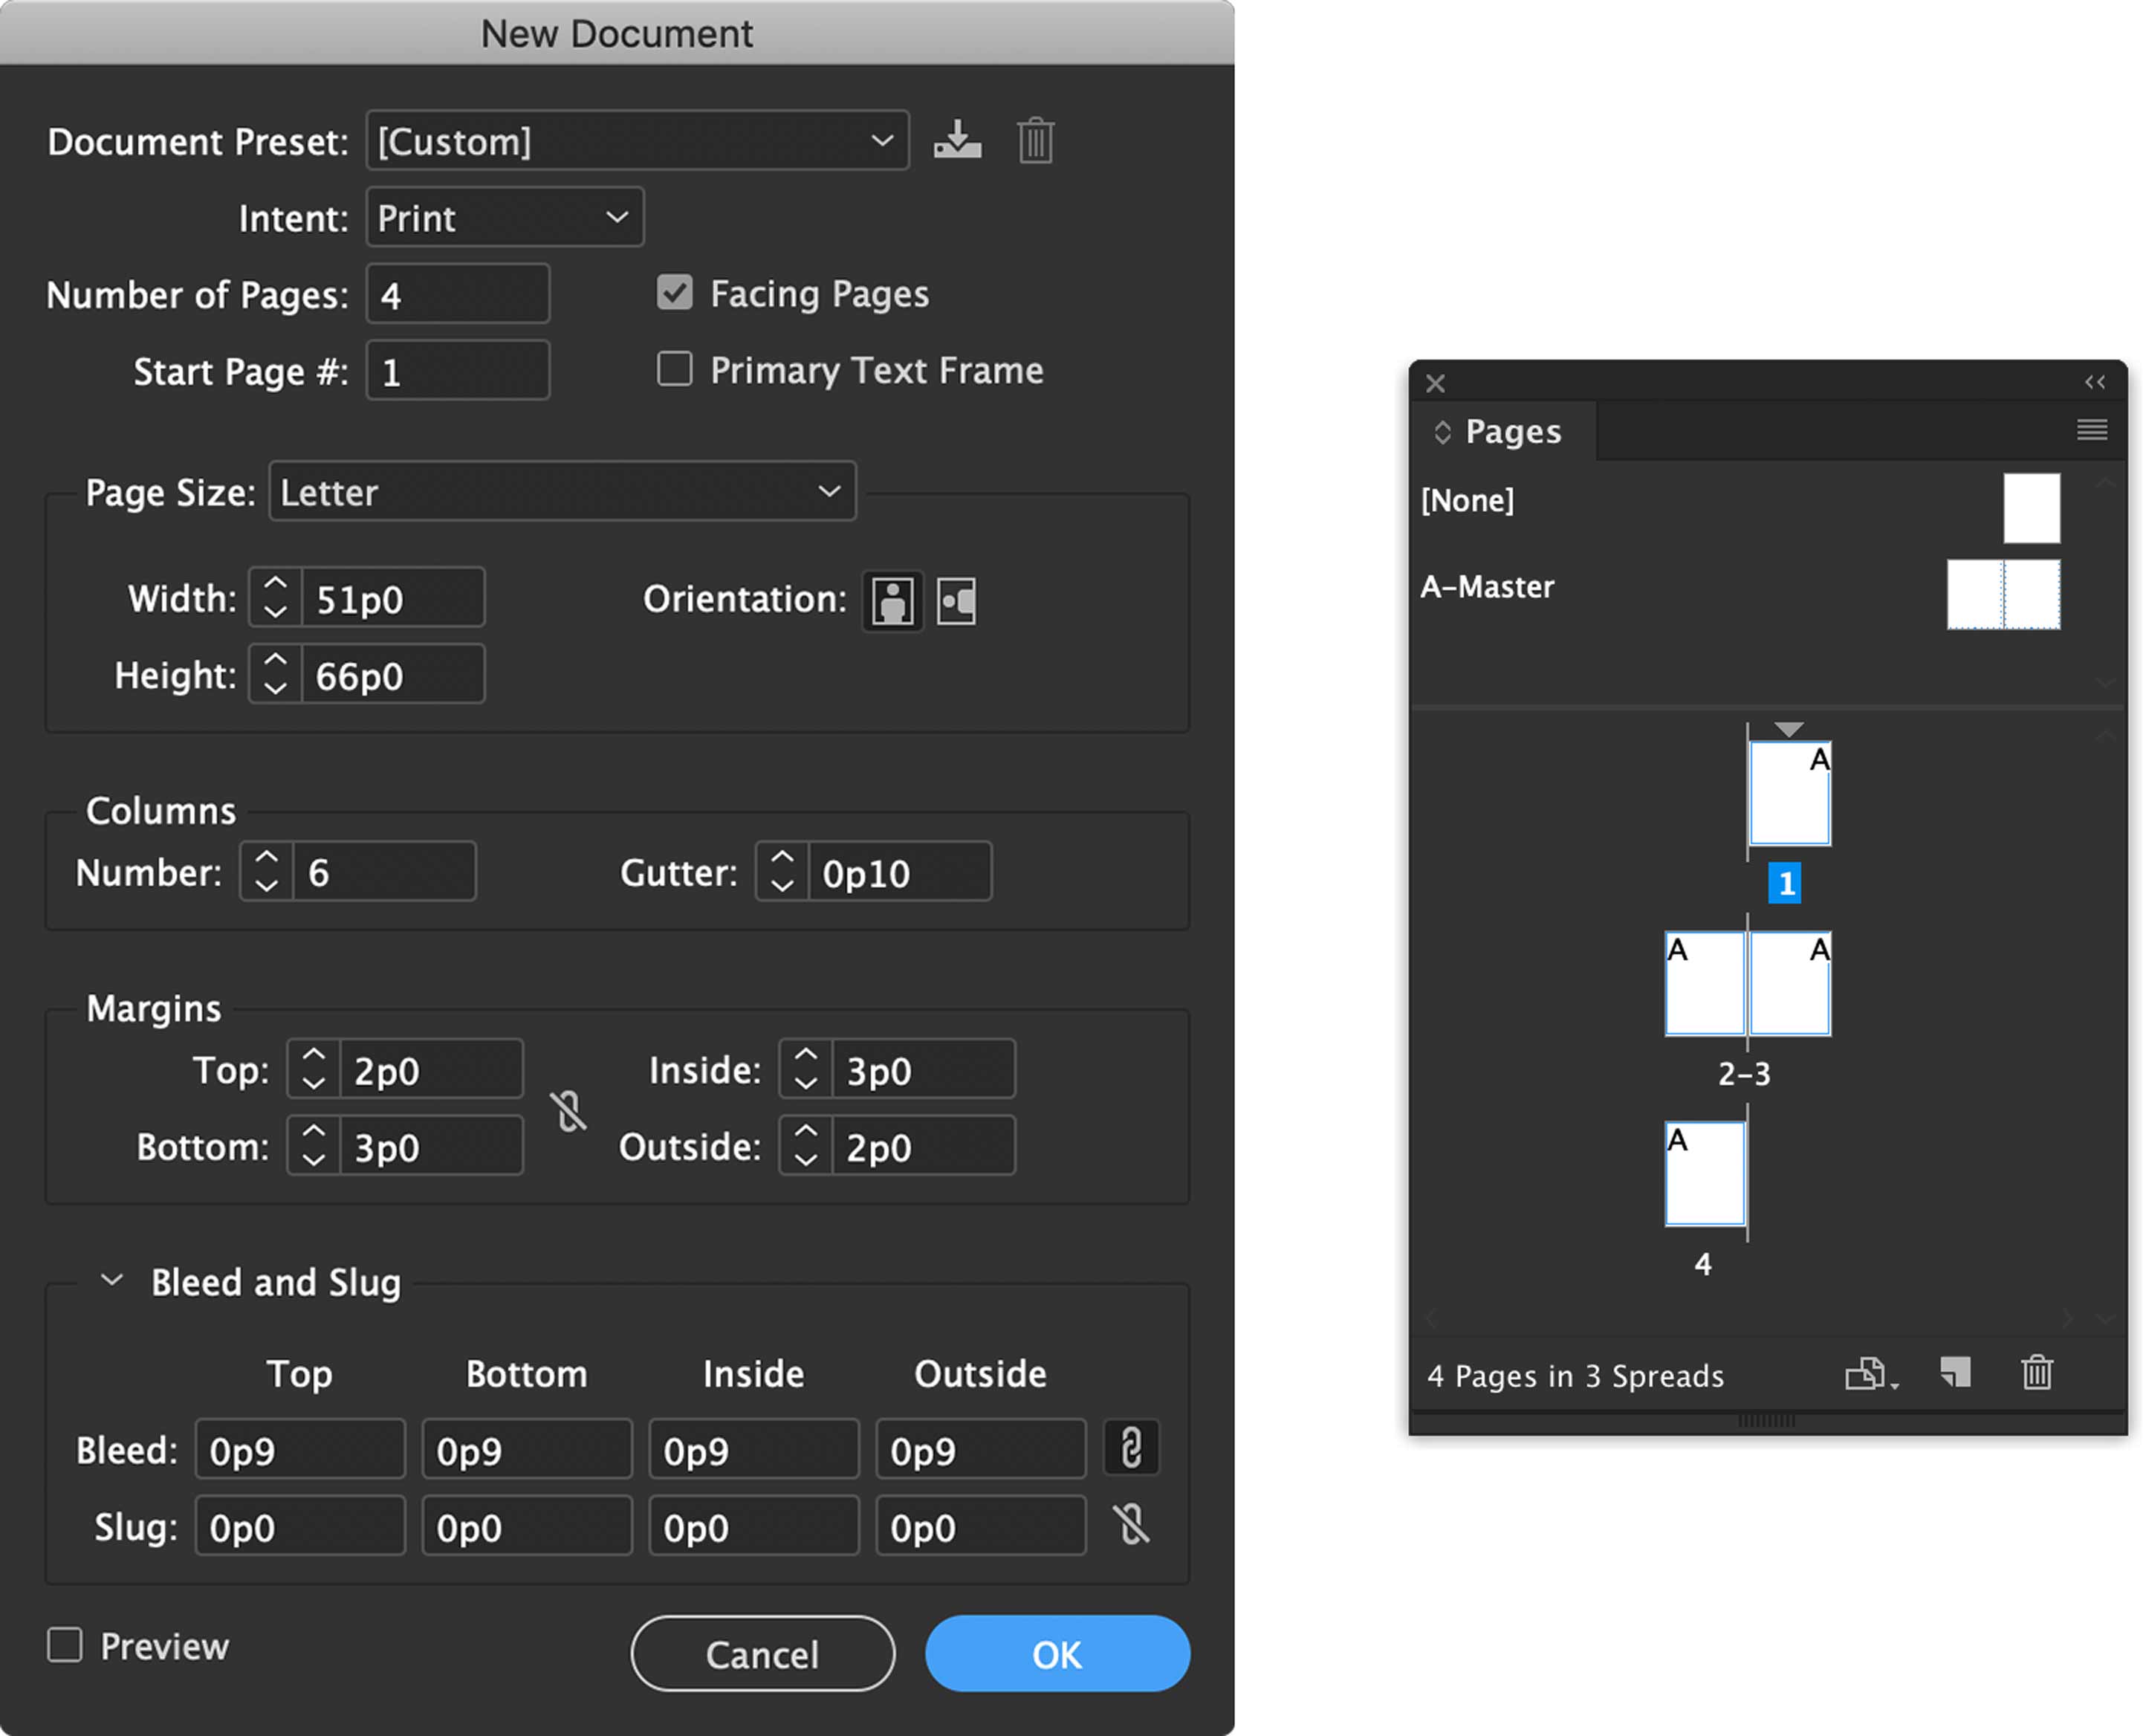
Download the provided text. Create a new InDesign document with these settings. Pay attention to each field in this dialogue.
Layers
Rename Layer 1 to Text. Create a new layer. Call it Images.
Parent Pages
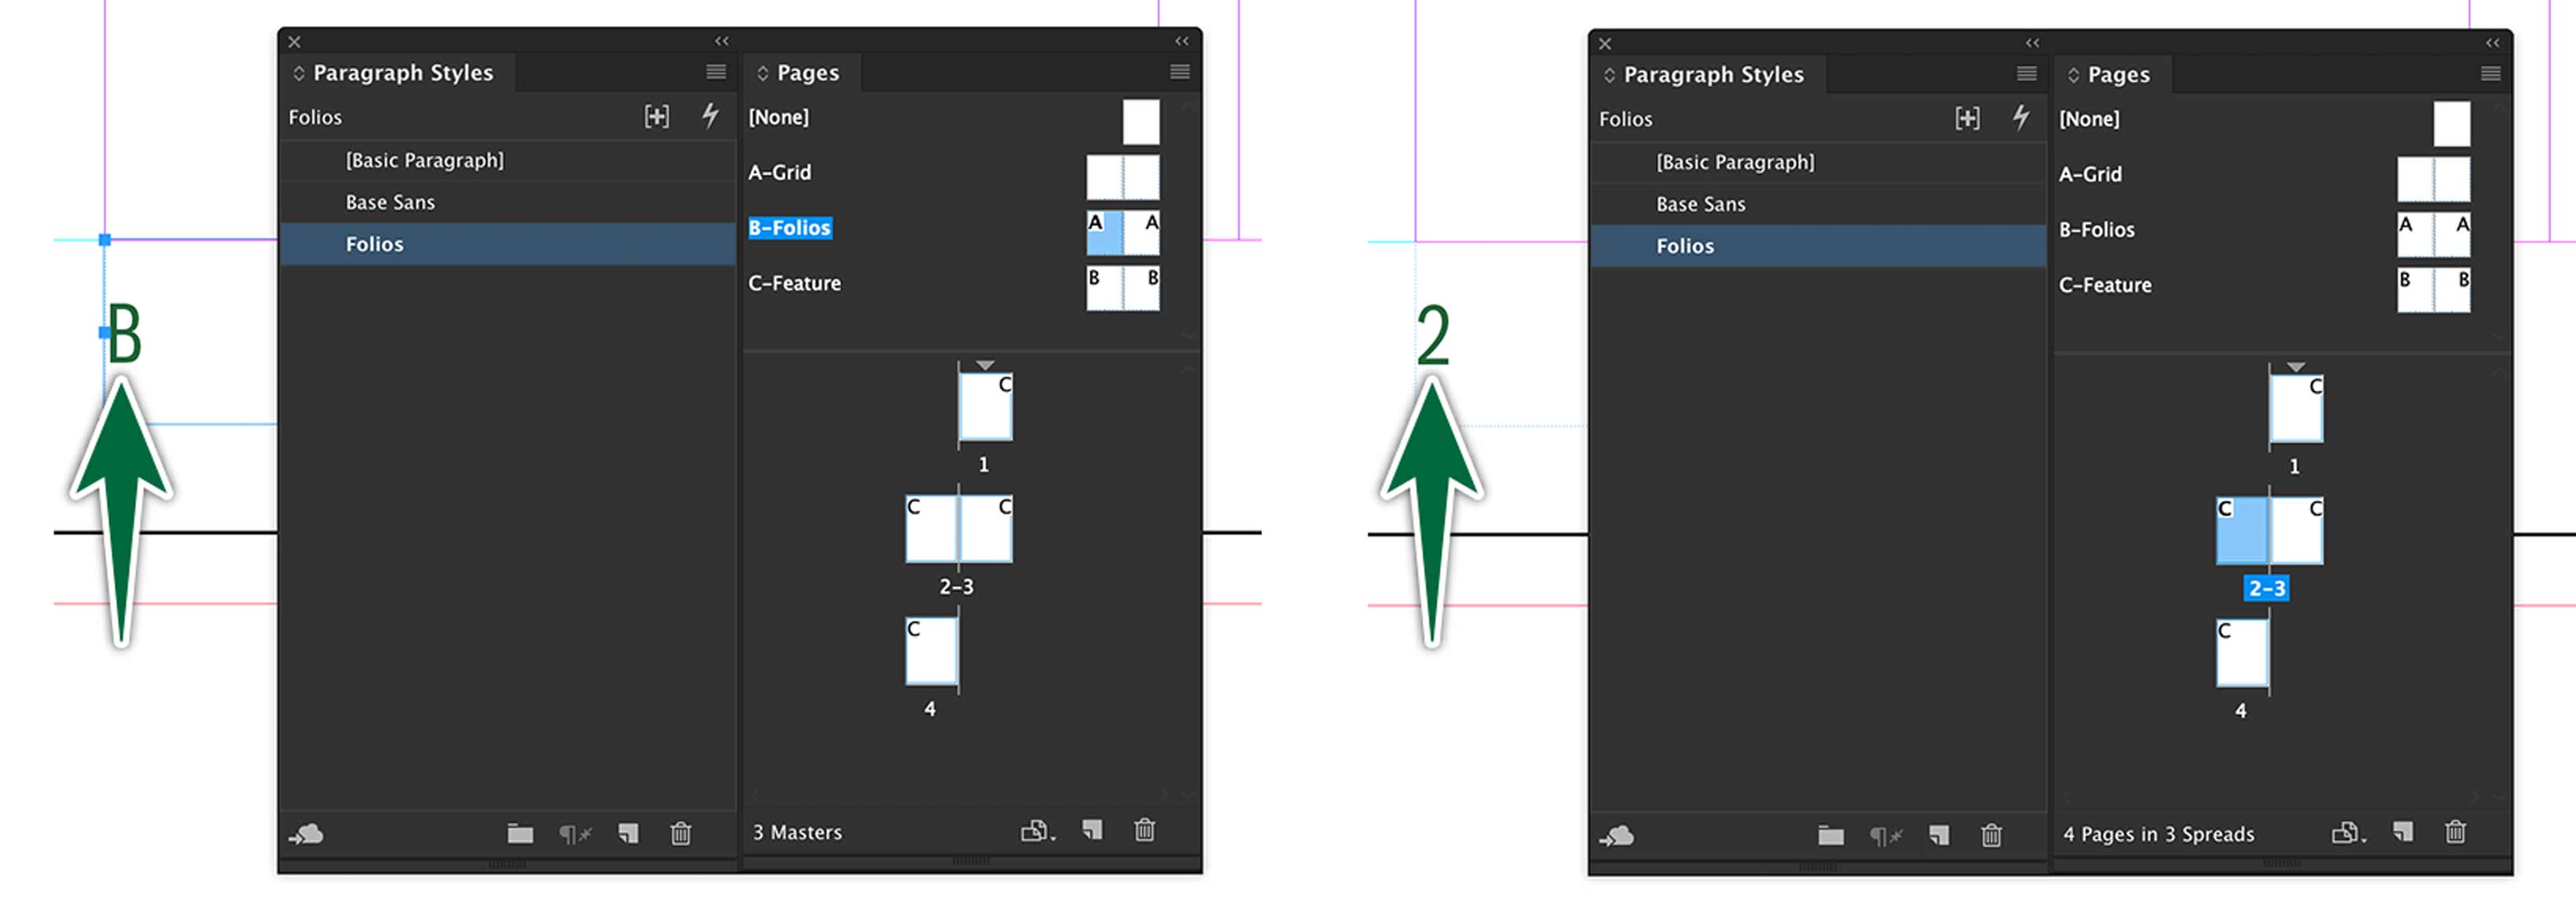
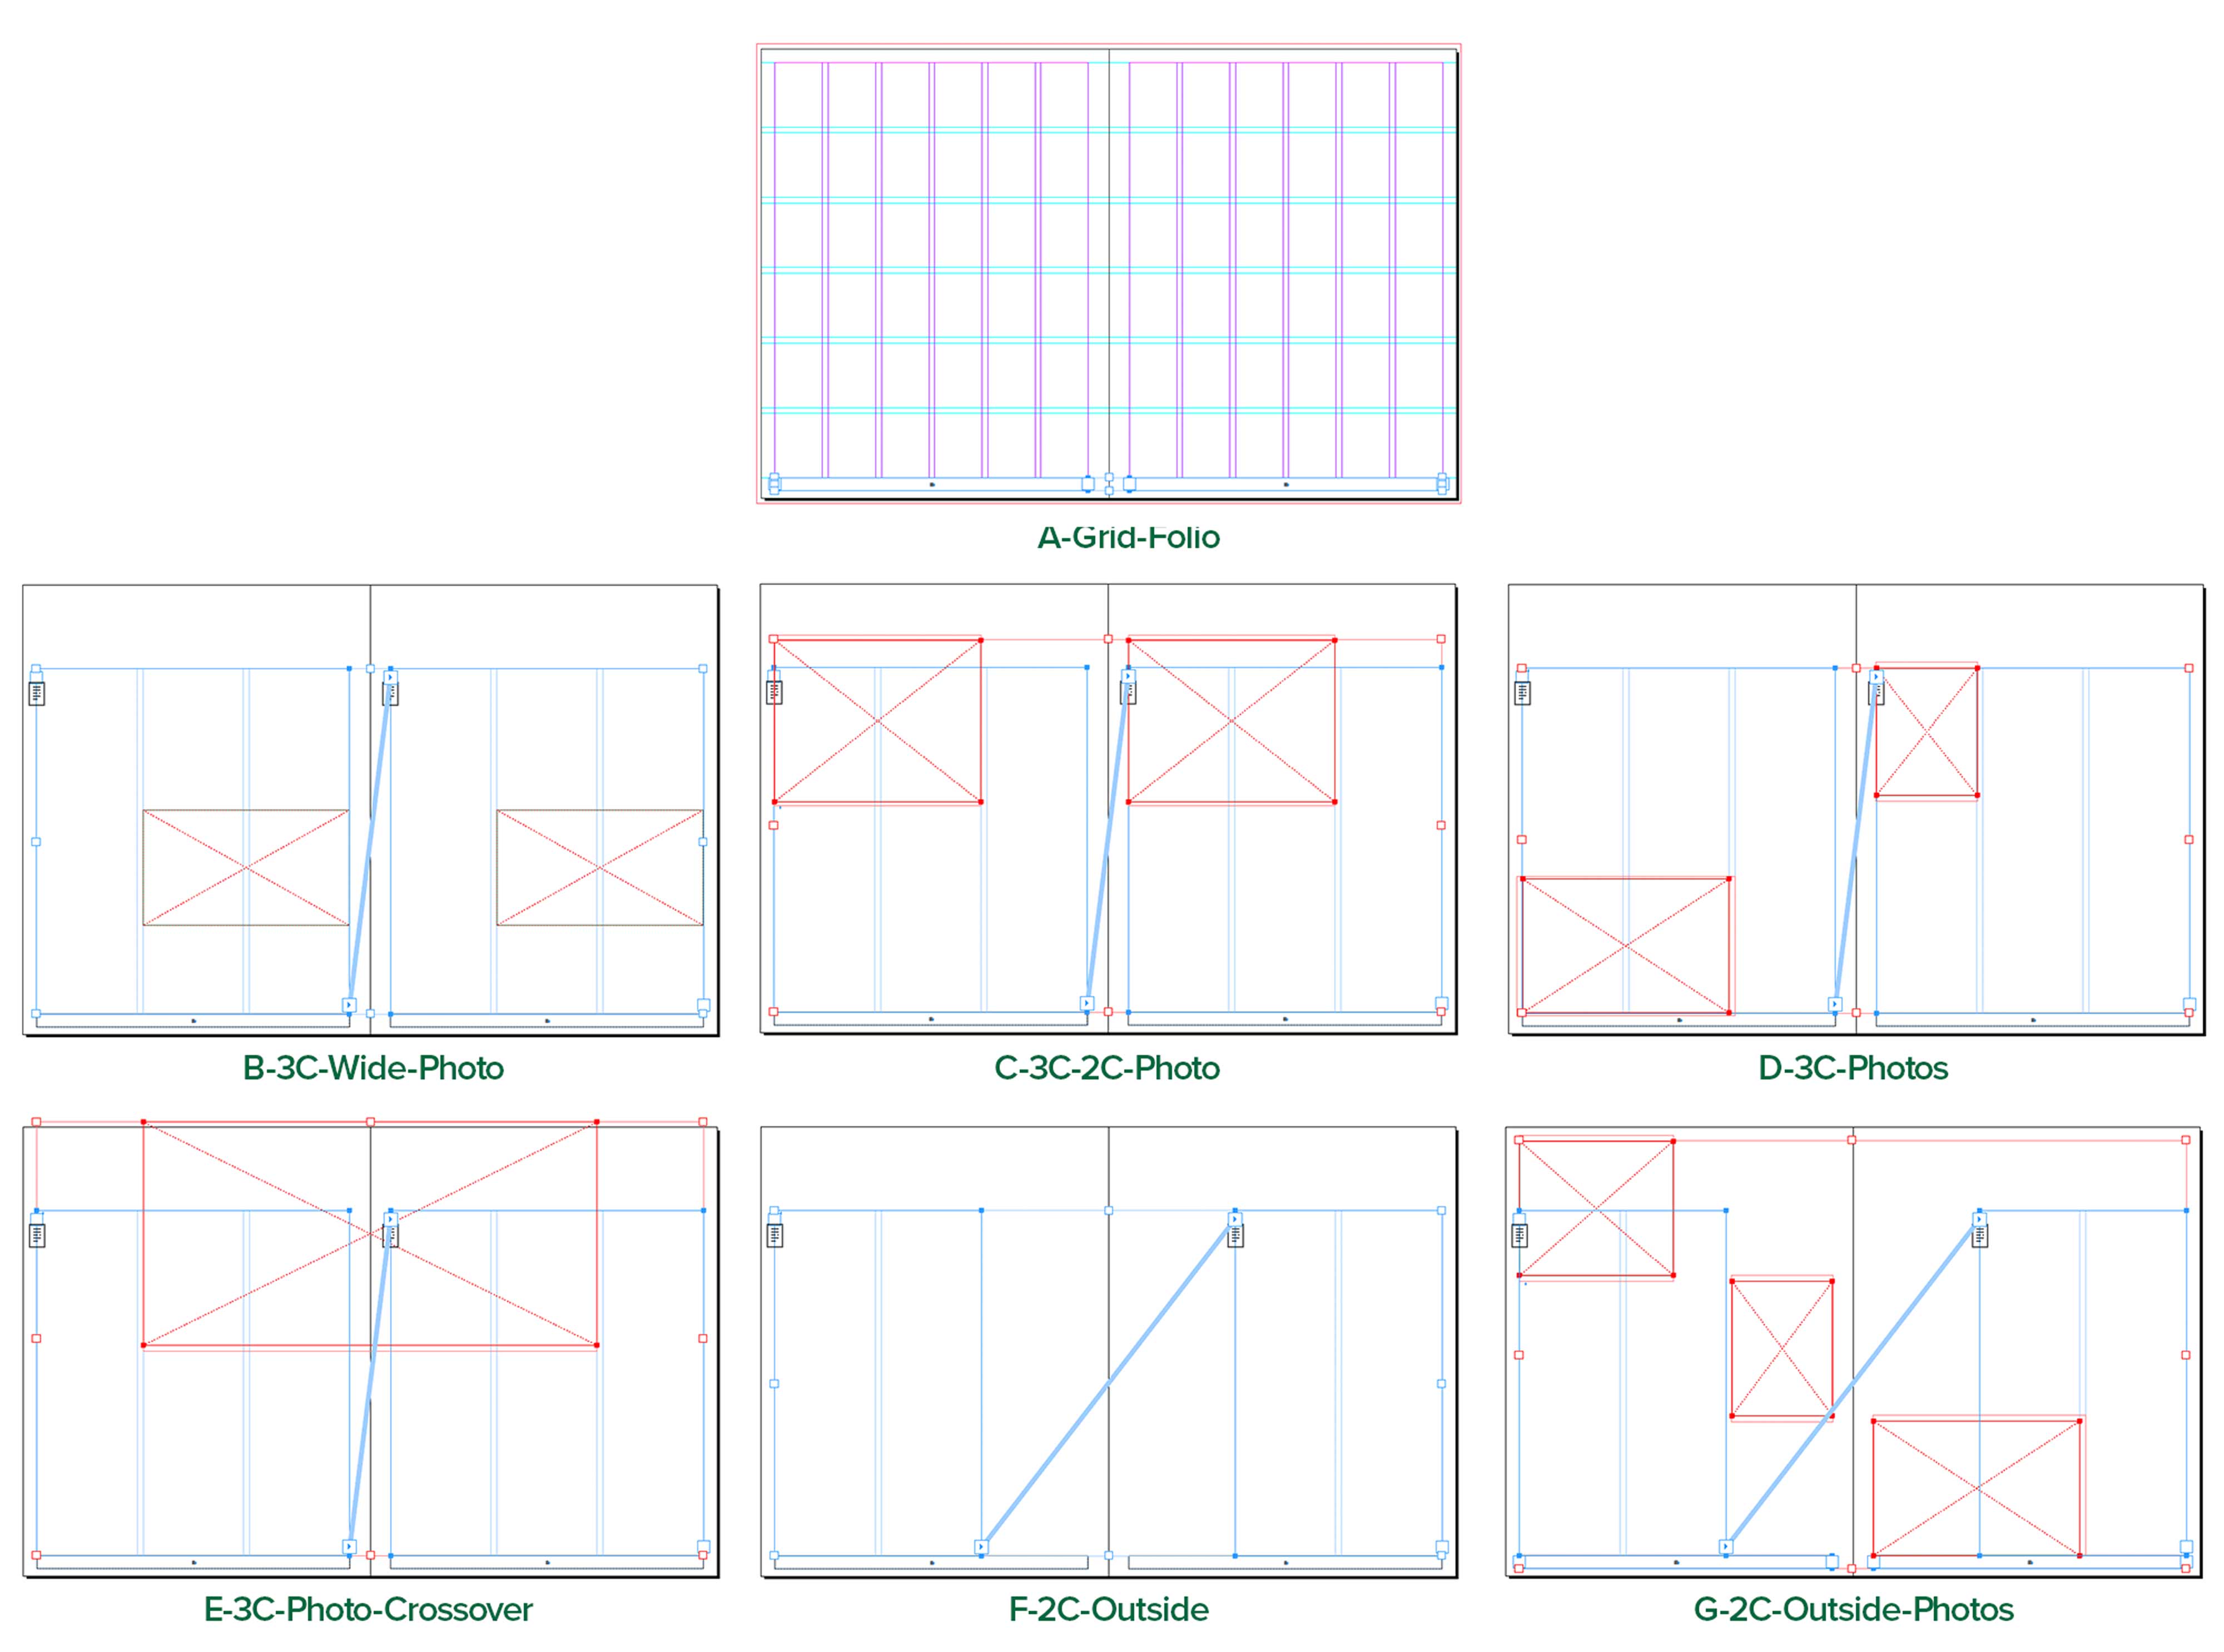
Let’s create our Parent Pages based on our sketches. In the panel below, 2C & 3C refer to how many columns wide our text frames are.
Rename A-Parent to A-Grid-Folio. Place guides on the page using Layout > Create Guides…, like this:

Continue to create Parent Pages named as they are above. They’ll all be blank as you create them.
Remember to place all image frames on the Images layer. Place the text frames on the Text layer.
Styling Text
Start by activating the fonts we’re going to need for our layout.
- AbrilText-Italic
- AbrilText-Regular
- ProximaNova-Bold
- ProximaNova-Extrabld
- ProximaNova-Regular
- ProximaNova-RegularIt
- ProximaNova-Medium
- ProximaNova-Semibold
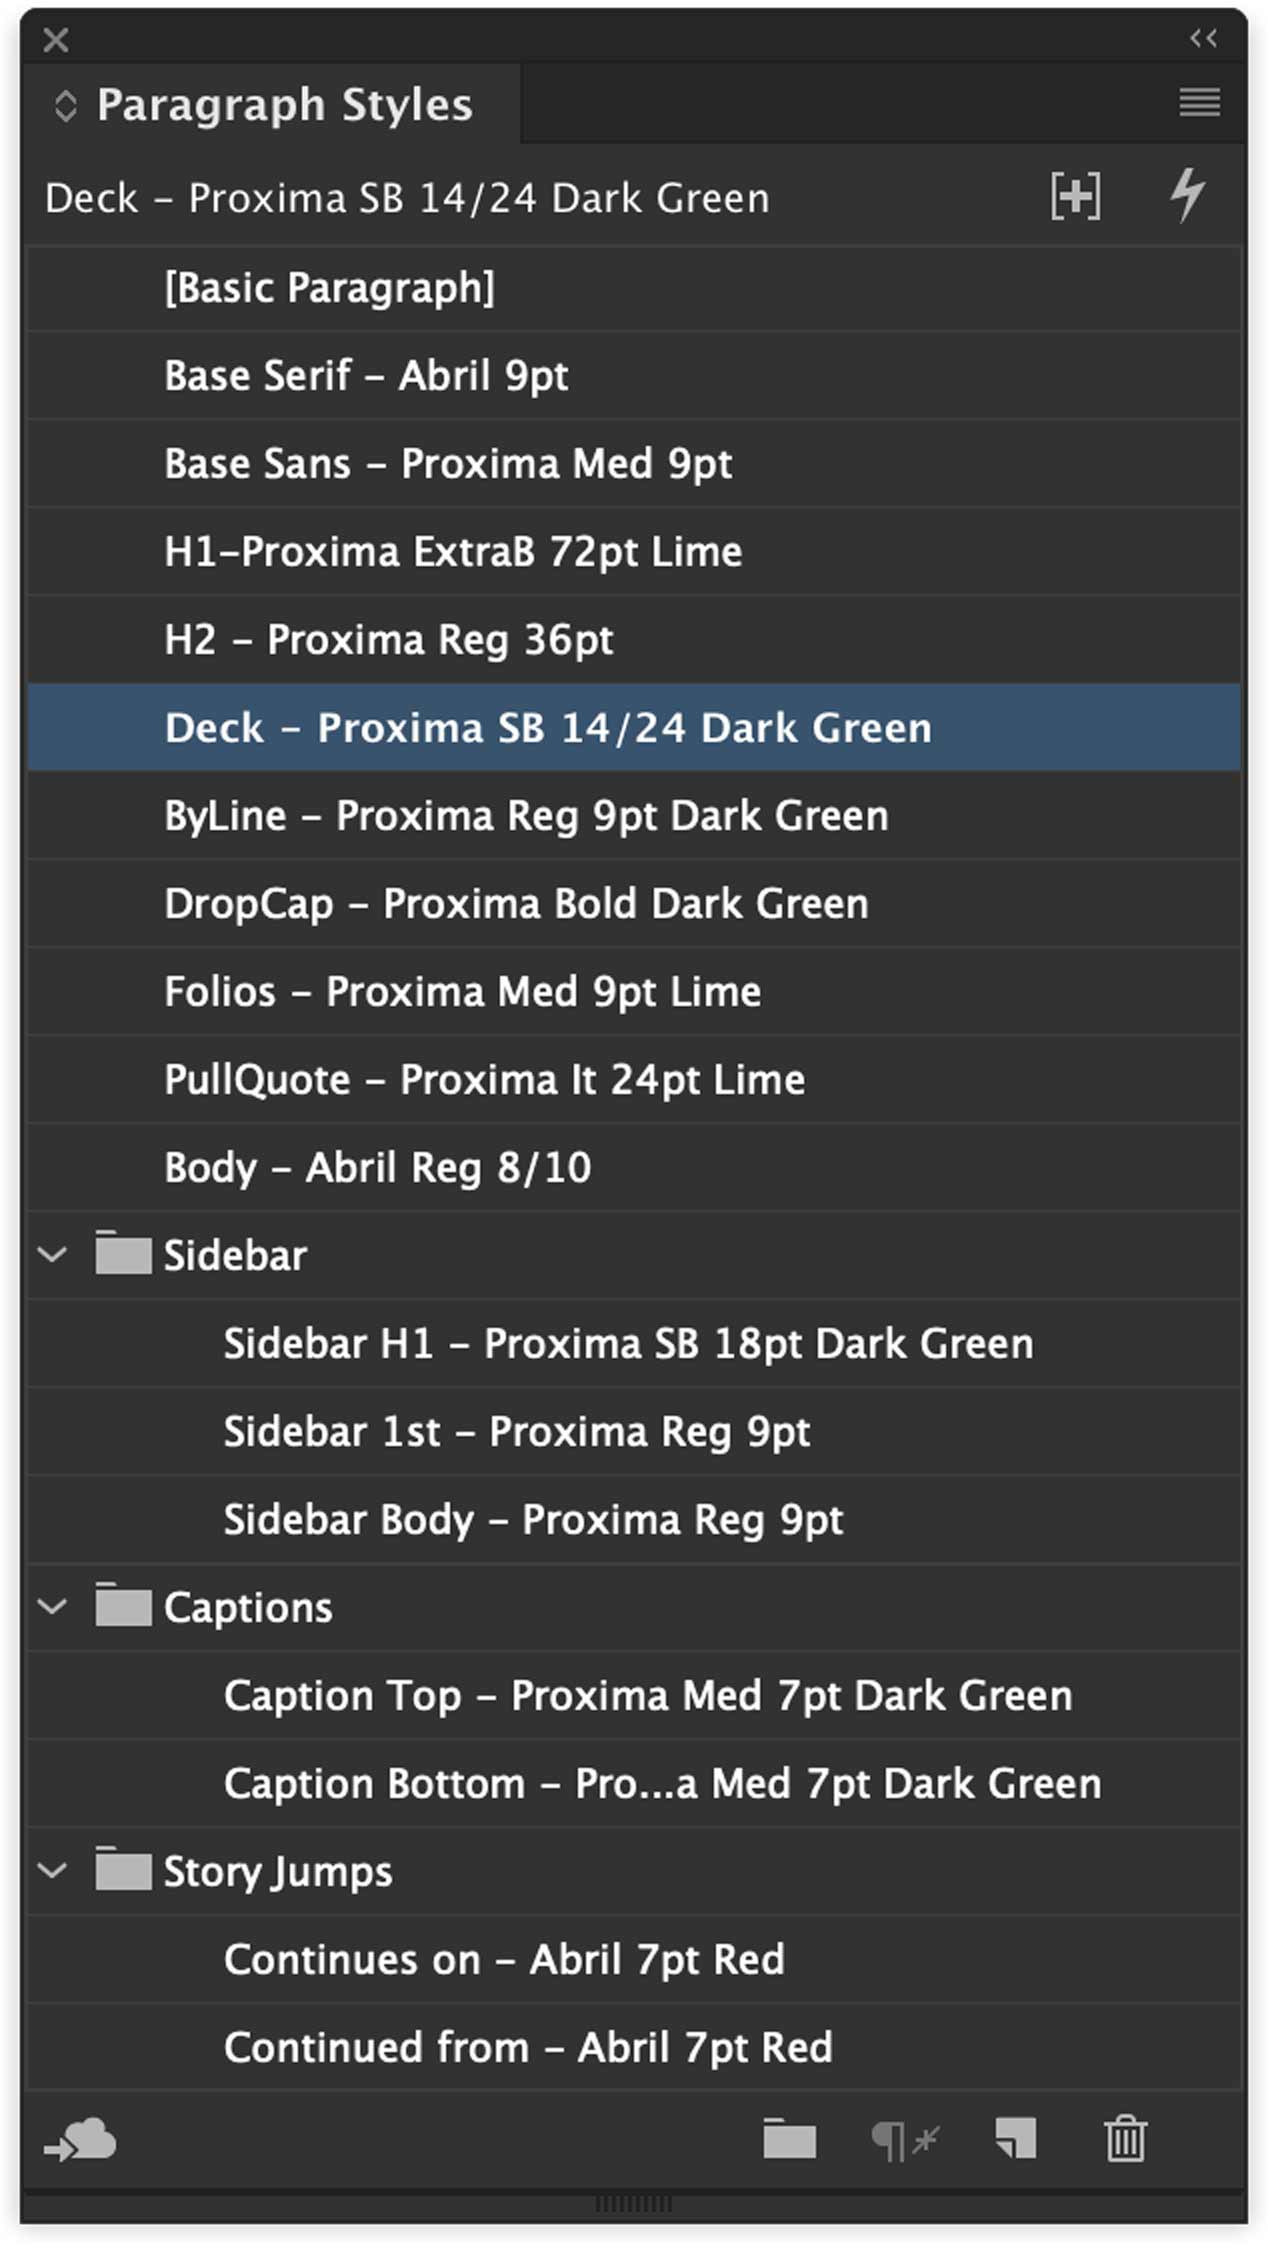
Now, create these paragraph styles.
Apply Parents
Let’s apply Parent Pages to our document pages. Use the provided PDF as a guide. There may be some minor differences. It’s fine. Sometimes we riff off a Parent Page.
Automatic Page Numbers
Add page numbers on A-Grid-Folios using Shift-⌥-⌘-N. Give the numbers their own paragraph style named Folios. It’s a good idea to set the alignment of the page folios to Away from Spine or Center.
GREP Style
In your body copy paragraph style, go to GREP Styles. Make it that each instance of the words Supreme Court is coloured red.
Drop Cap
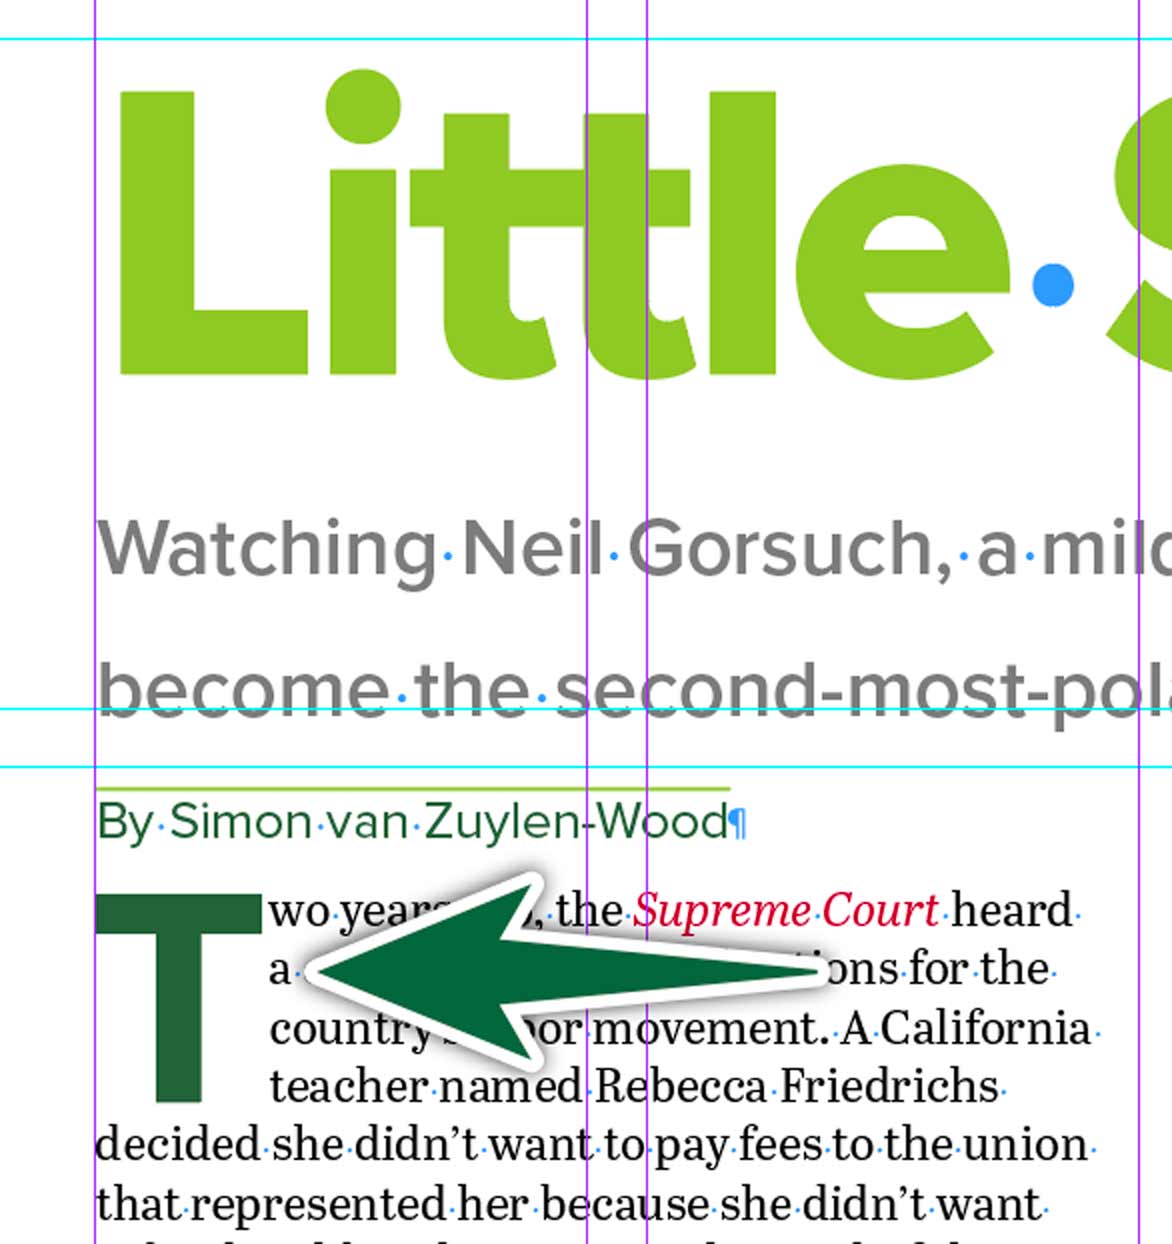
Create a Drop Cap Paragraph Style. Use the font Proxima Nova Bold for your drop cap. If you need a reminder of the process, read this…
Pull Quote
Use the provided text to create a pull quote as shown on the design guide.
Sidebar Story
Use the provided text to create a sidebar story as shown on the design guide.
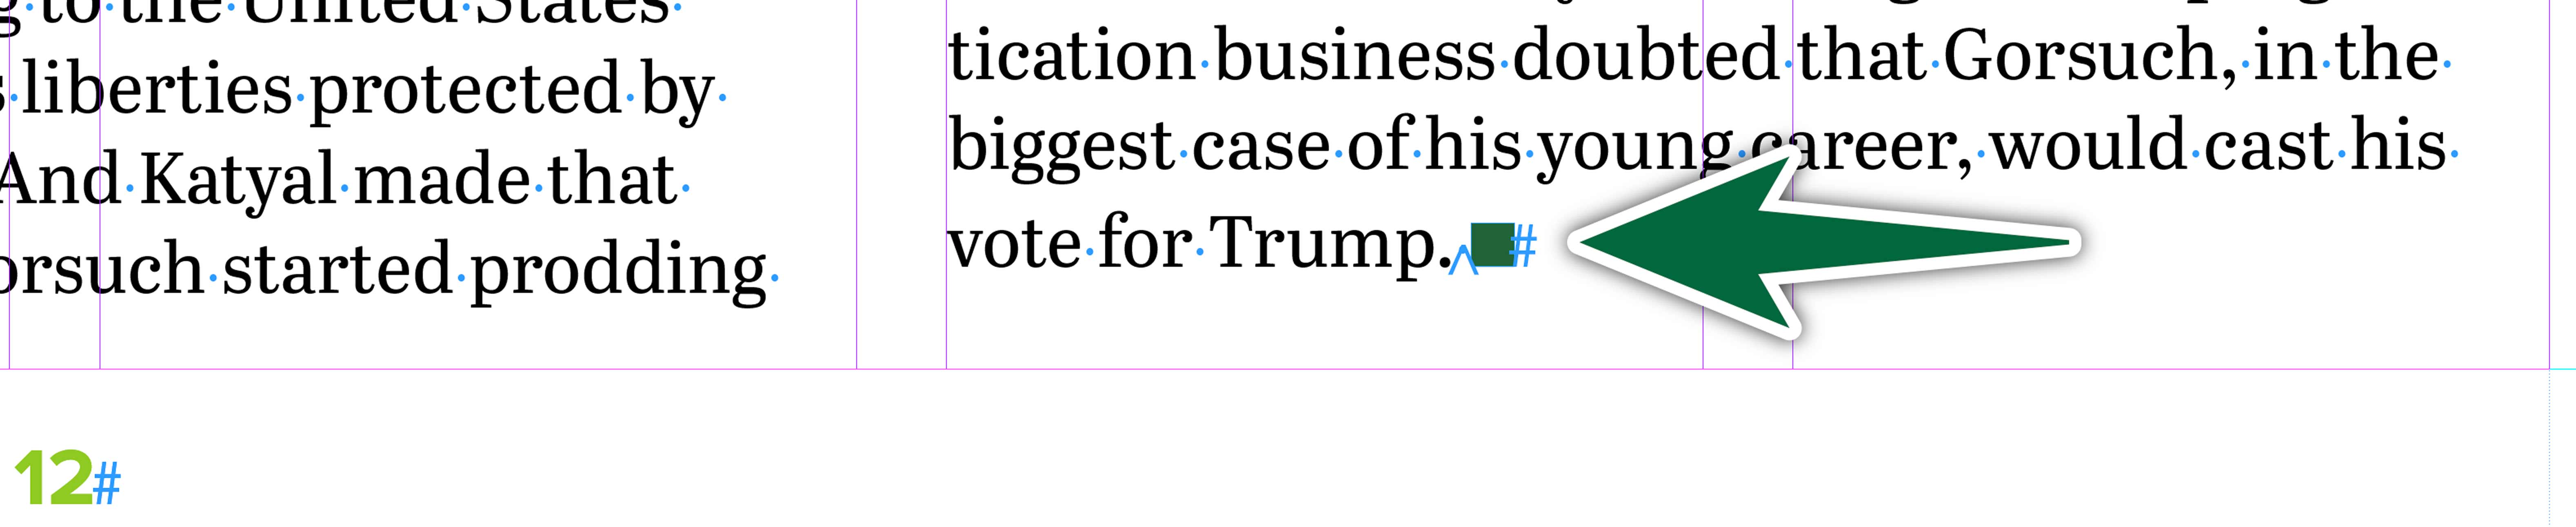
Story-Ender
Create a small green square. Paste it into a text frame. Insert a Non-Breaking Space character before it. Make sure the leading matches that of the Body Copy text.
More Pages…
Now that we have all our design elements set up, it’s simple to add pages to our InDesign document. Let’s increase it to 12 pages.
Let’s create the rest of the document based on the provided PDF design guide.
