Topics
As a graphic designer, you’ll be manipulating raster images for many different intents: high-end printing, app & web design, large format signage, etc… Being aware of the mechanics of what’s happening to the pixels in your images is crucial to successful reproduction.
Defining Terms
Terminology relating to raster images is rather flexible. Let’s assign terms to concepts
- Resolution
- This term is used in many different ways. In print, resolution refers to how many pixels there are in a linear inch of the image. In other words, the 'dpi' value. With images for the screen, resolution is the total number of pixels in the image. So a 1920 x 1080 pixel image has 2 million pixels, which can also be expressed as two megapixels. One megapixel equals 1,000,000 pixels.
- Pixel Dimensions
- People often use 'resolution' where I use 'pixel dimensions'. Pixel dimensions refers to the number of pixels for the height of the image and the width of the image.
About Bit Depth
The term bitmap has multiple definitions. Sometimes, it refers to a raster image. Sometimes it refers to a black & white image. The phrase black & white is also often misused, interchangeably with greyscale. This all just causes confusion.
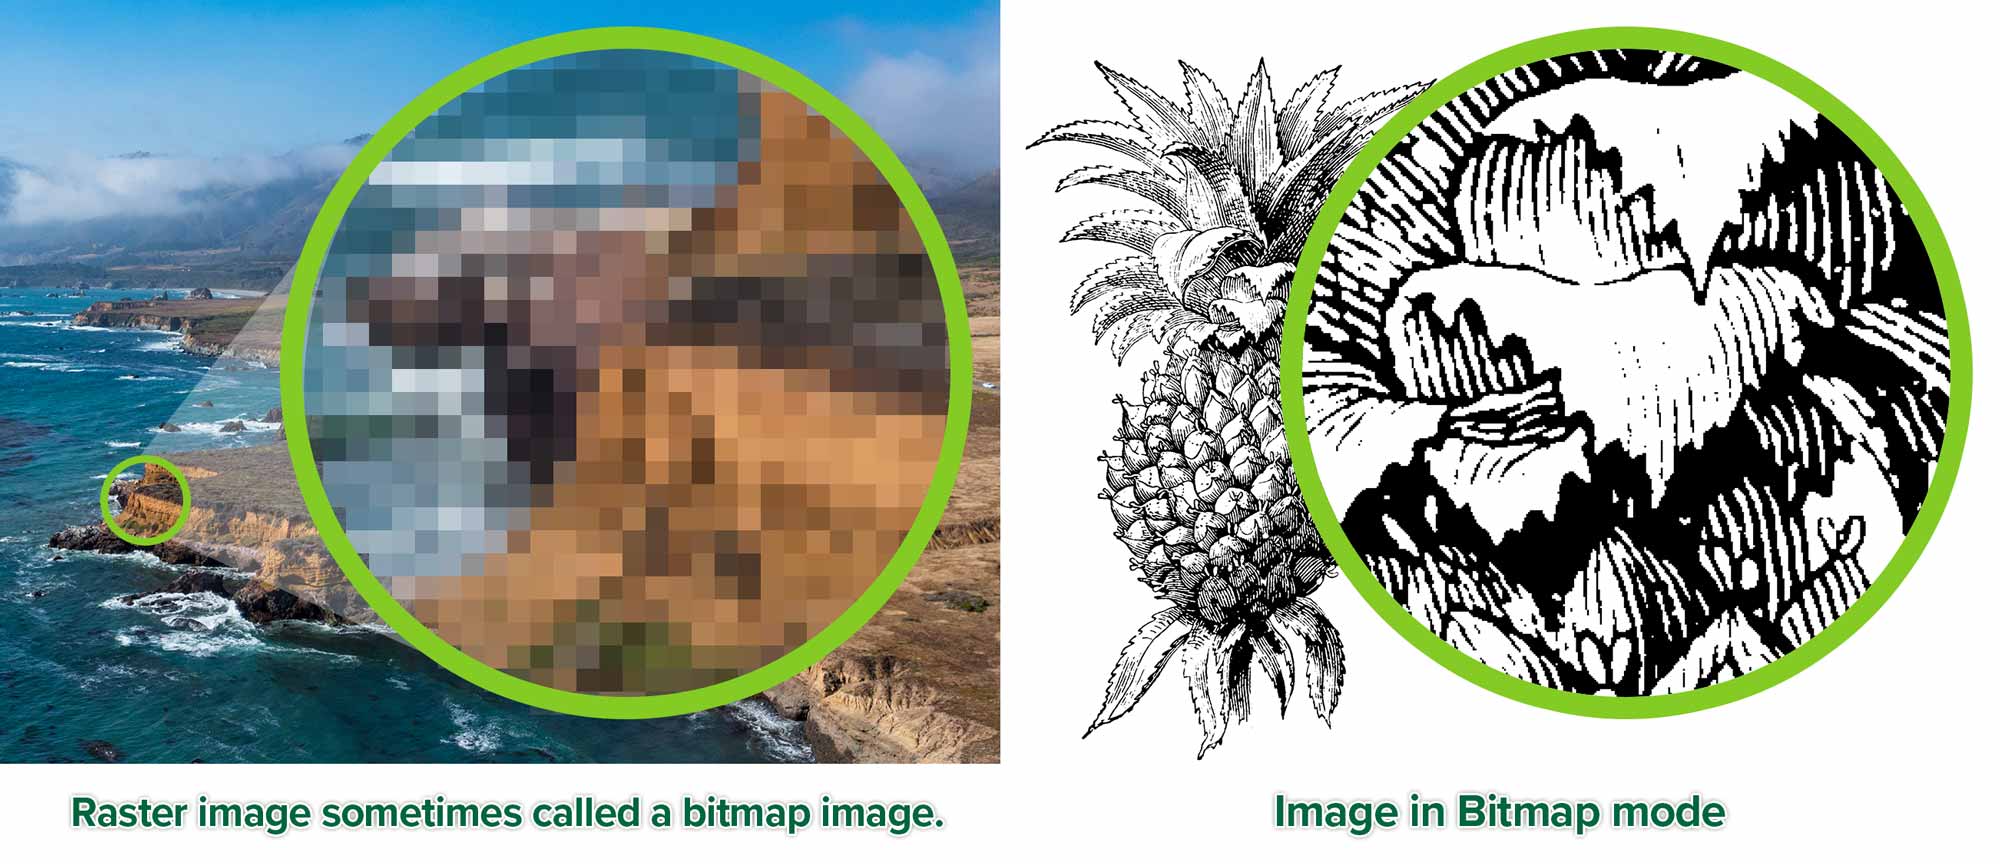
It’s best to use raster when refering to a pixel-based image. Use greyscale for grey images. Use Bitmap or Bitmap mode for pure black and white images.
Bit Depth
A raster image can go from a single bit image, in bitmap mode to an 8 bit image, in colour. Bit depth can go way higher, but such images are rarely used in graphic design.

Bitmap Mode: Each pixel can only either be black or white. It’s like a light switch that’s on or off. There are no other choices. It has only one channel. Bitmap mode is also called 1 bit colour because there’s only one bit of information. A bit is the smallest increment of digital information. This means it has 21 colours. 2 x 1 colours, which are black and white. It’s either ON or OFF.

Greyscale: A greyscale image’s pixels can be one of 256 levels of grey. It has only one channel. That channel is itself a greyscale image. A regular greyscale image is called an 8 bit grey image. This means it has 28 greys. This is 2 x 2 x 2 x 2 x 2 x 2 x 2 x 2 = 256 levels of grey. That’s 8 twos.

RGB: In an RGB image, there are three channels: red, green and blue. Each one of those channels is a greyscale image that determines the intensity of its individual colour. The lighter the greys are on the channel, the more intense the red, green or blue will be. This is additive colour.

CMYK: A CMYK image has four channels: cyan, magenta, yellow and black. Black is the key colour, hence the K. Each channel has 256 levels of grey in an 8-bit image. The come together to make the full-colour image. The darker the grey on one channel, the more ink is put down on the page when printed. This is subtractive colour.
Images for the Screen Vs Print
When creating graphics for use on screen, the Resolution setting in Photoshop’s Image Size dialogue doesn’t matter. All we care about are the pixel dimensions when designing for the screen.
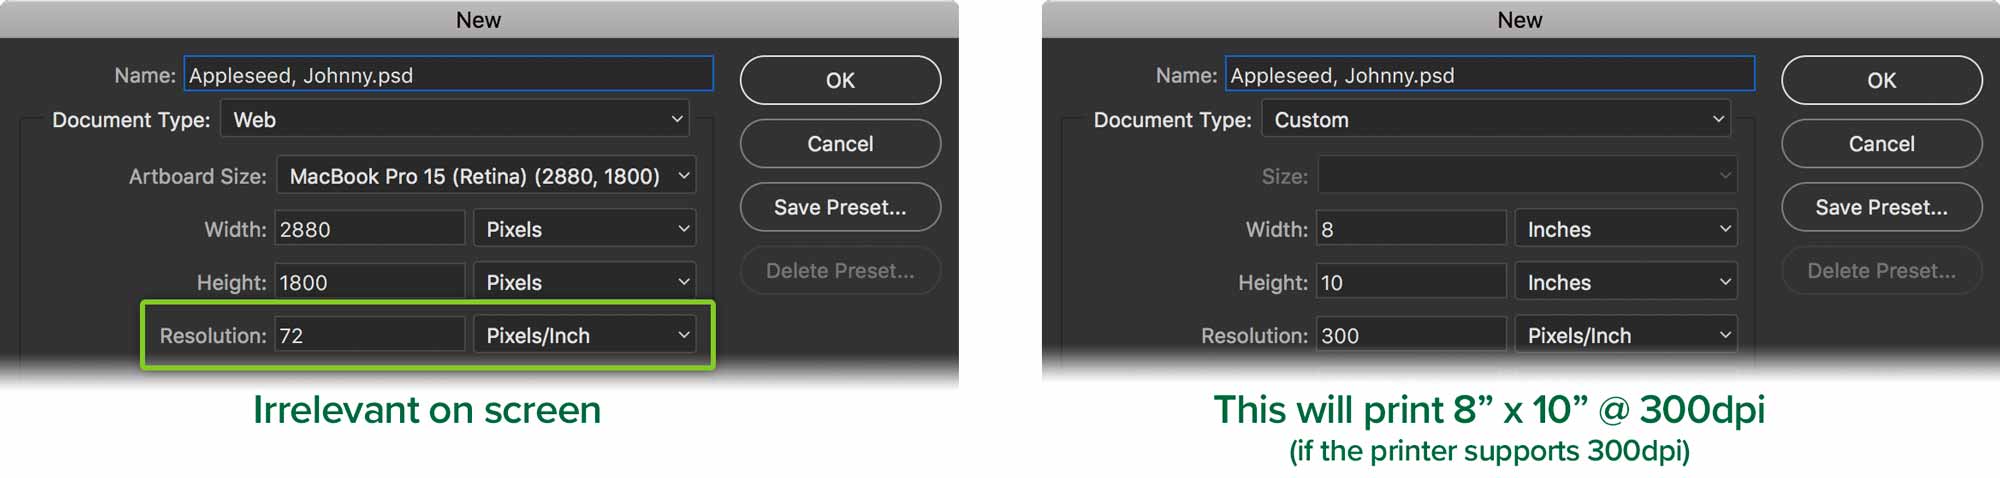
On the other hand, if the resolution is too low when printing, the image will look blurry or pixelated.
Pixel Dimensions
If you open the two provided images in Photoshop then view them at 100% by typing ⌘-1, you’ll see they zoom to the same size on screen. That’s because they’re both 1000 pixels wide.

Now go Image > Image Size. Notice how one of them has a resolution of 72dpi and the other has a resolution of 240dpi. Why do they both look the same on screen? If you were to print them, the 240dpi image would look much better. This tells you that pixel dimensions are relevant on screen and resolution is important in print.
If we open the Print dialogue in each image, you’ll see that the previews are much different.
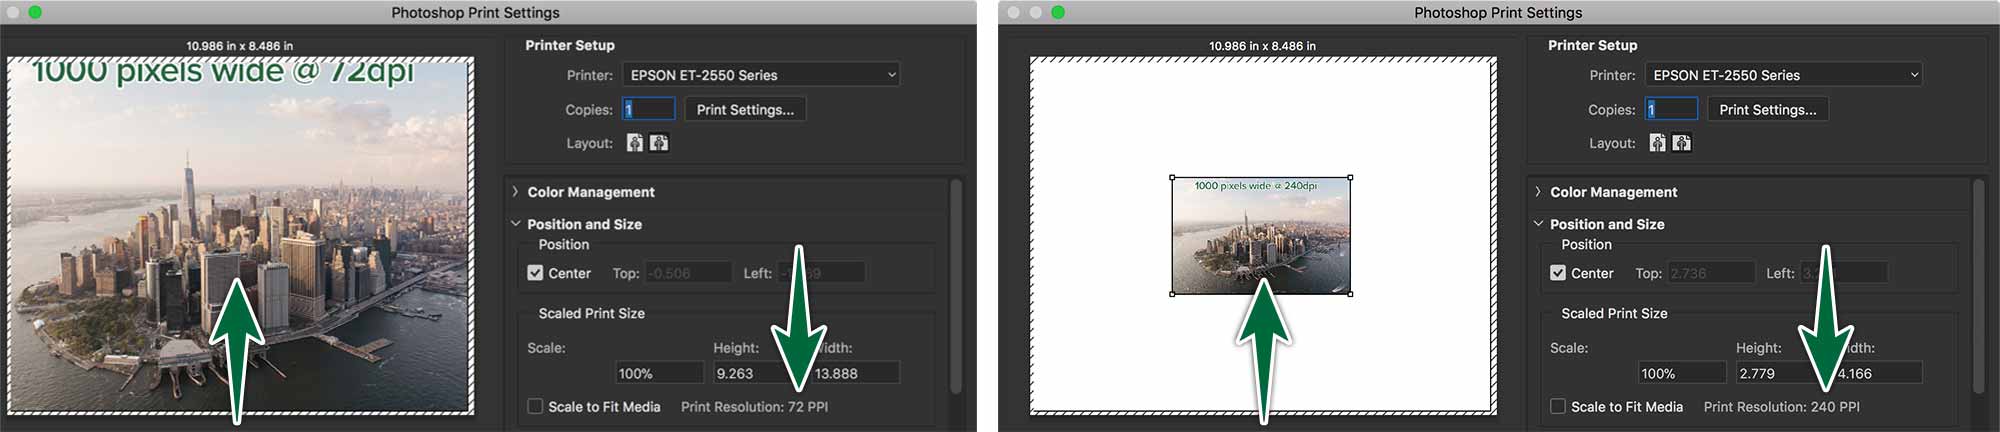
The pixels for the image on the left are much larger, since there are only 72 of them in one inch. There are 240 pixels in one inch for the image on the right. That makes them much smaller.
Resampling
Resampling is changing the amount of image data as you change either the pixel dimensions or the resolution of an image. When you downsample (decrease the number of pixels), information is deleted from the image. When you resample up (increase the number of pixels, or upsample), new pixels are added. Adobe
Open this image. It’s named 02-resample-9”x6”.psd. Let’s also launch InDesign to place the image on an 18” x 12” page. As you can see, the image takes up the hole page at first.
In Photoshop, go Image > Image Size… or ⌘-Option-i.
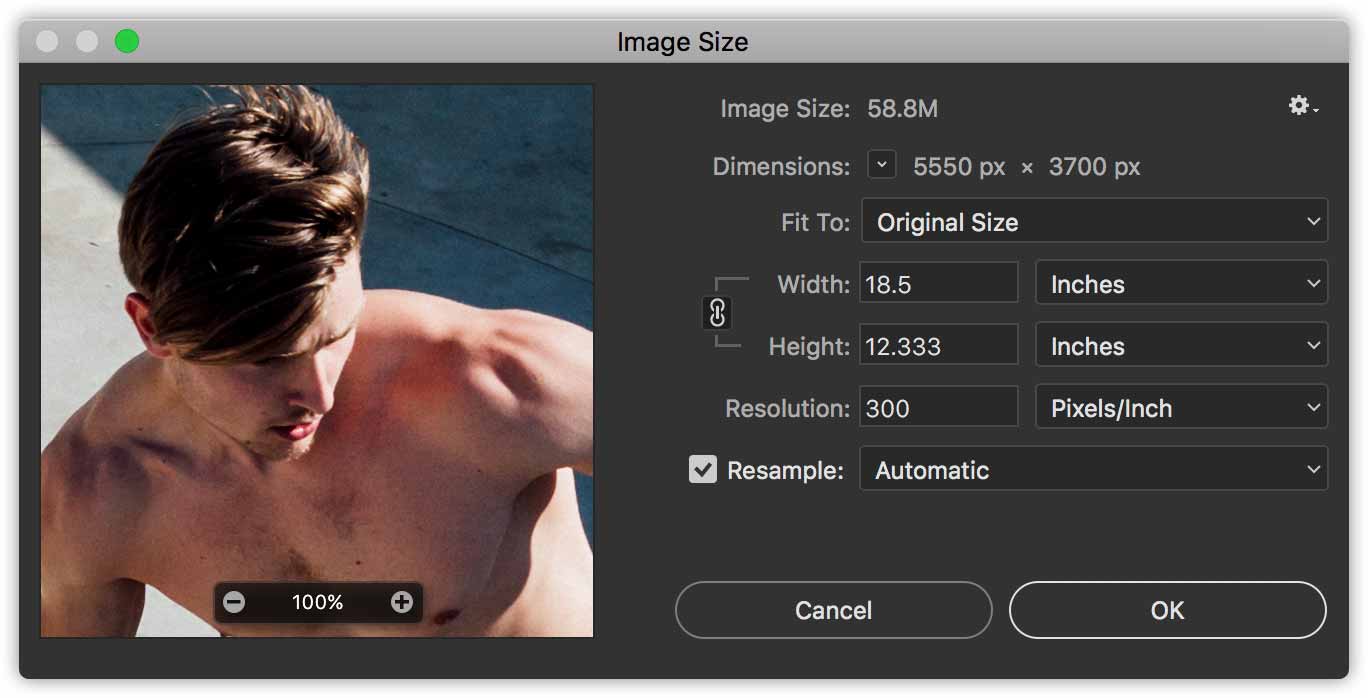
This is a very large image. It measures about 18” wide by 12” tall at 300dpi in print. That makes it weigh in at about 58 megabytes on your hard drive.
Let’s say we want to use it in a page layout in InDesign at 9” wide by 6” tall. All we need to do is enter 9” for the width while Resample is checked.
When we go back to InDesign, you’ll notice an exclamation mark on the photo. That means that it’s been edited outside of InDesign and needs to be updated. Click on the exclamation mark. The image updates to its new size of 9” wide by 6” tall.
Notice the following:
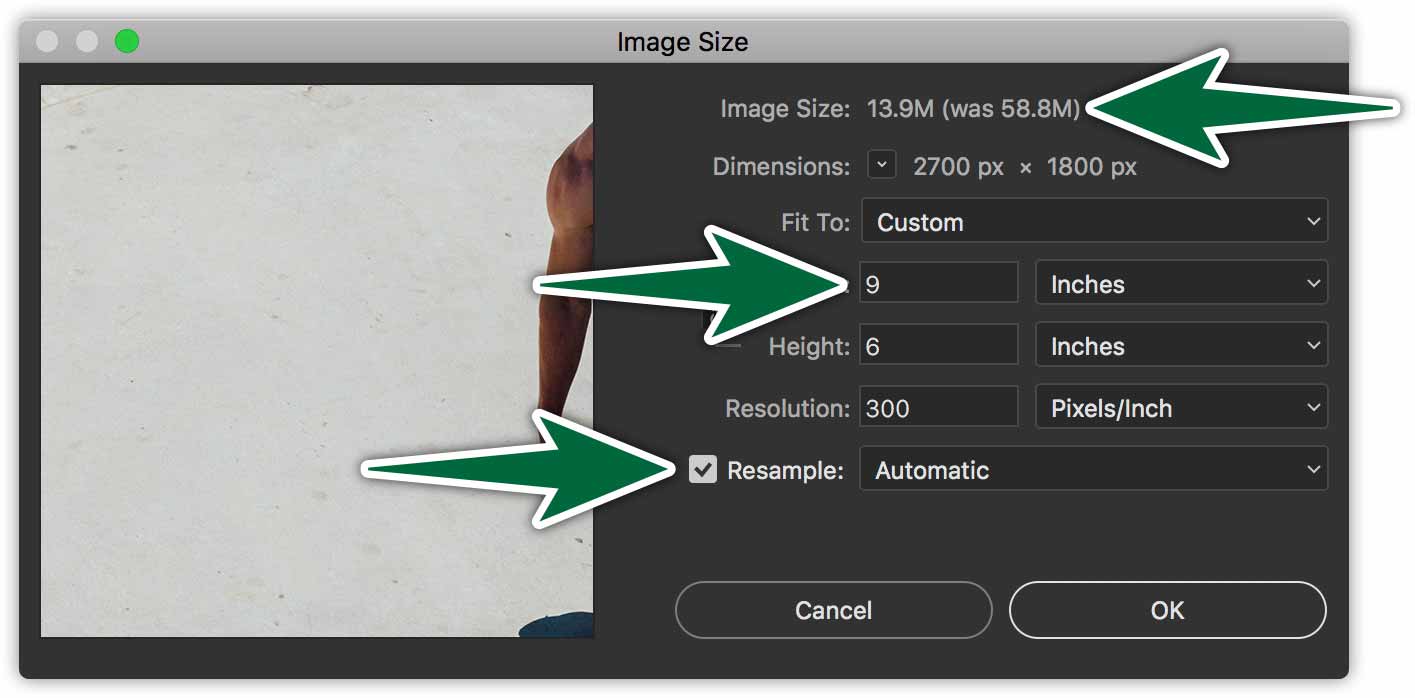
- The image’s size on disk goes from 58.8MB to 13.9MB. Proof that we’re removing data.
- The Height & Width values should always remain locked to avoid distorting the image.
- The Resample checkbox is checked. This means we’re removing pixels, so this is destructive.
The operation we’re performing here is resampling. This means that we’re removing pixels from the image, which is a destructive process. If you were to save and close this image, that data would be lost forever.
Resizing
When you resize an image and do not resample it, you change the image’s size without changing the amount of data in that image. Resizing without resampling changes the image’s physical size without changing the pixel dimensions in the image. No data is added to or removed from the image. Adobe
Let’s say we have a photo to use on a large format banner to hang on a building wall. I would want the dimensions to be large. Our sign company tells us the desired resolution can be as low as 100dpi.
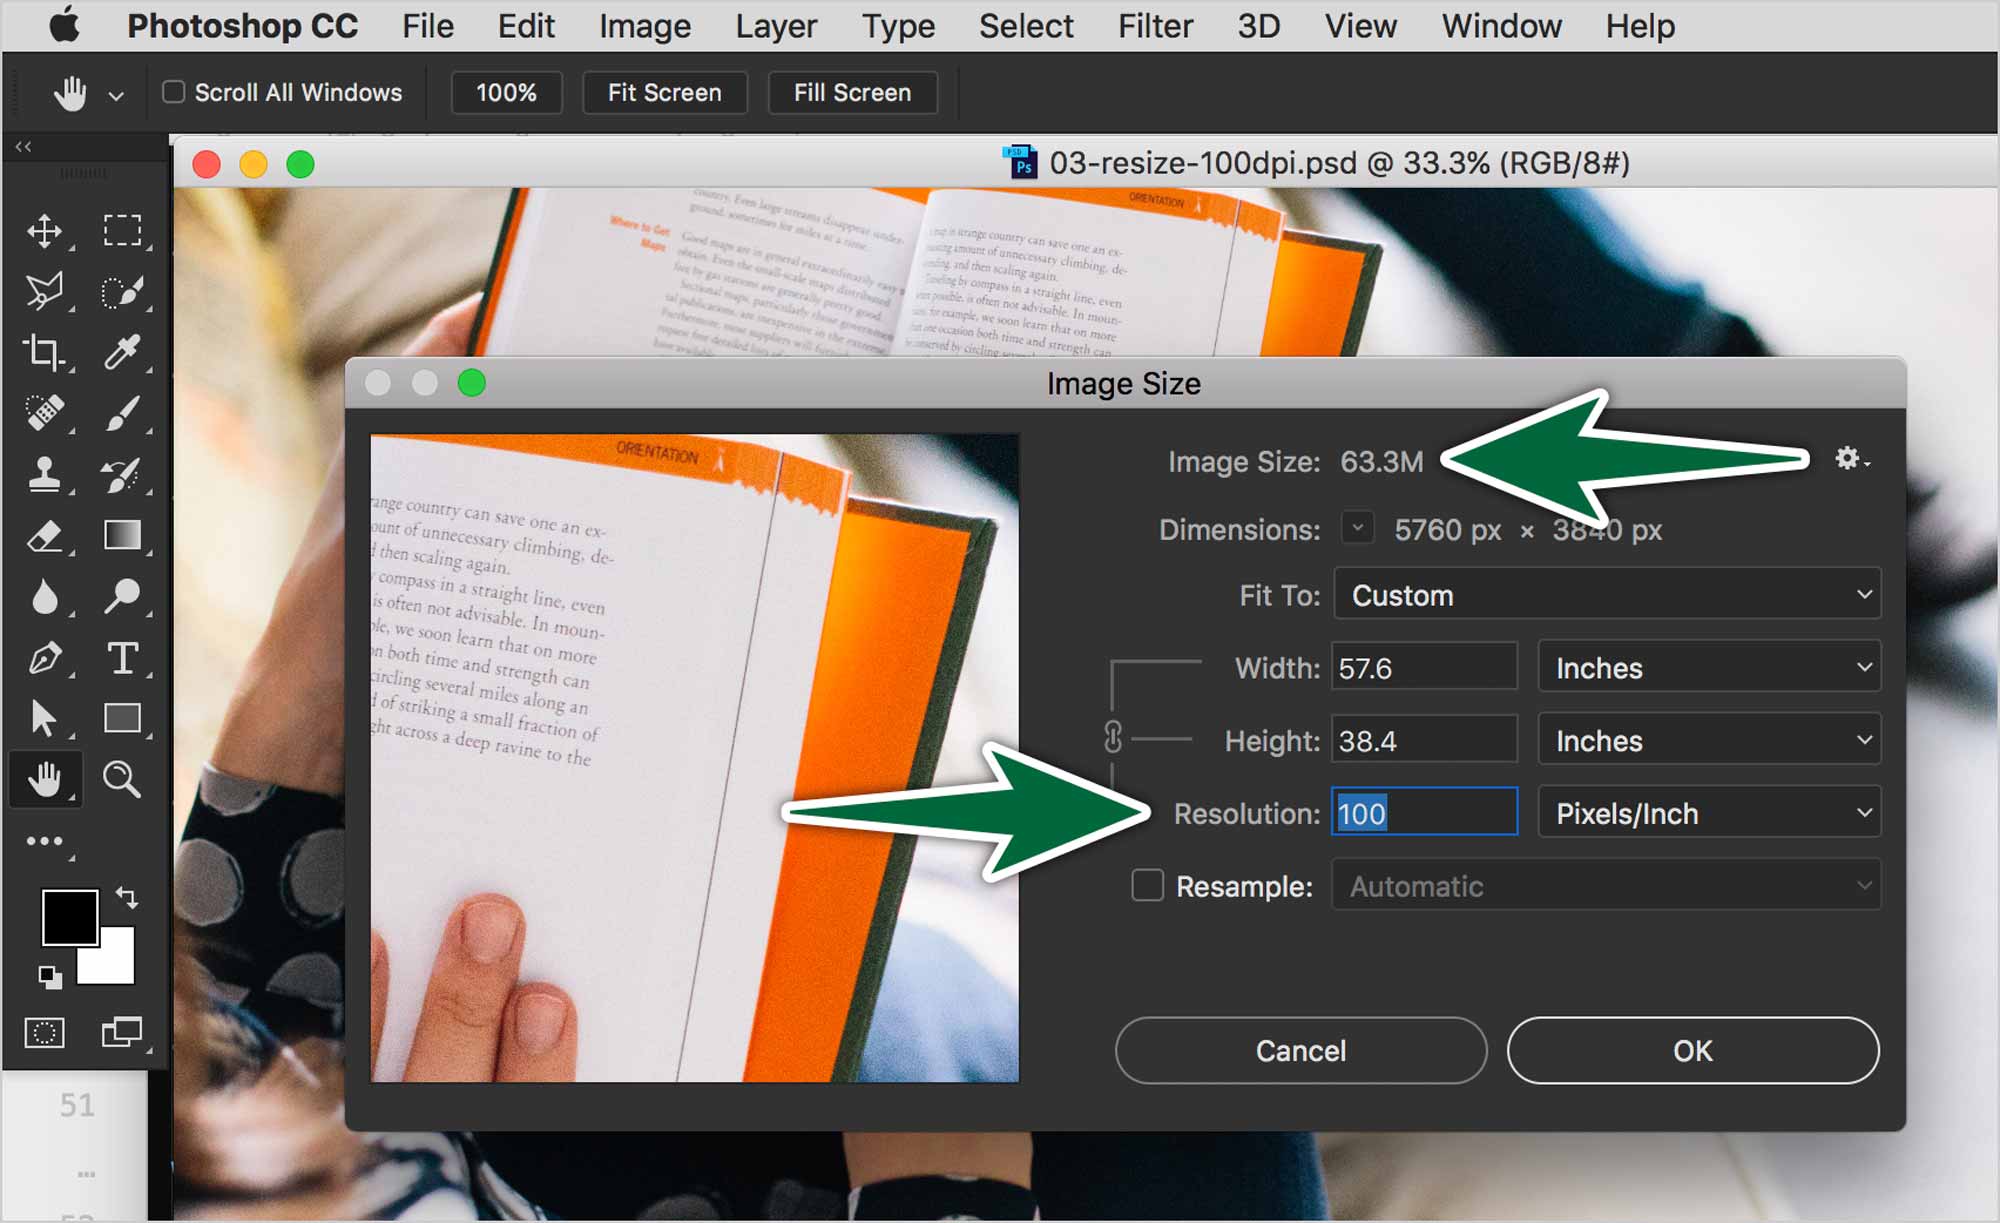
Let’s resize image 03-resize-100dpi.psd as big as we can get it at 100dpi. Uncheck the Resample box. Enter a value of 100 for the resolution. This will cause the dimensions to increase from 19” wide to 57” wide.
Notice the following:
- The Resample checkbox is unchecked, which means we’re resizing.
- The image size remains unchanged.
- The Height, Width and the Resolution values become linked when the Resample checkbox is unchecked.
The operation we’re performing here is resizing This means that we’re not changing the number of pixels in the file. The file size on disk remains the same at 63.3 megabytes. This is a non-destructive process. You can resize images up and down to your heart’s content. You’ll never lose data.
You can resize a very large, low resolution image smaller, thus shrinking its pixels into a smaller area, which raises its resolution. Conversely, you can take a very high resolution low pixel dimension image and stretch its pixels over a much larger area to make a large, low resolution image for large format output.
InDesign: Placing Images
When you place an image on a page in an InDesign document, there’s a link to the original file on your hard drive. What you’re seeing is a picture of the image in InDesign. InDesign’s command for importing a graphic onto a page is called Place rather than import.
In InDesign (as in Illustrator) to get a raster image onto a page, you need to use the File > Place… command.

Once you do so, you should click and drag to size the photo to the dimensions you want.
If you wish to place a series of images at once, you can use the File > Place… command, then choose multiple images. Once you do so, you’ll get a cursor loaded with all the images. Then, you can click and drag them onto your pages one after the other.
Resizing Images in InDesign
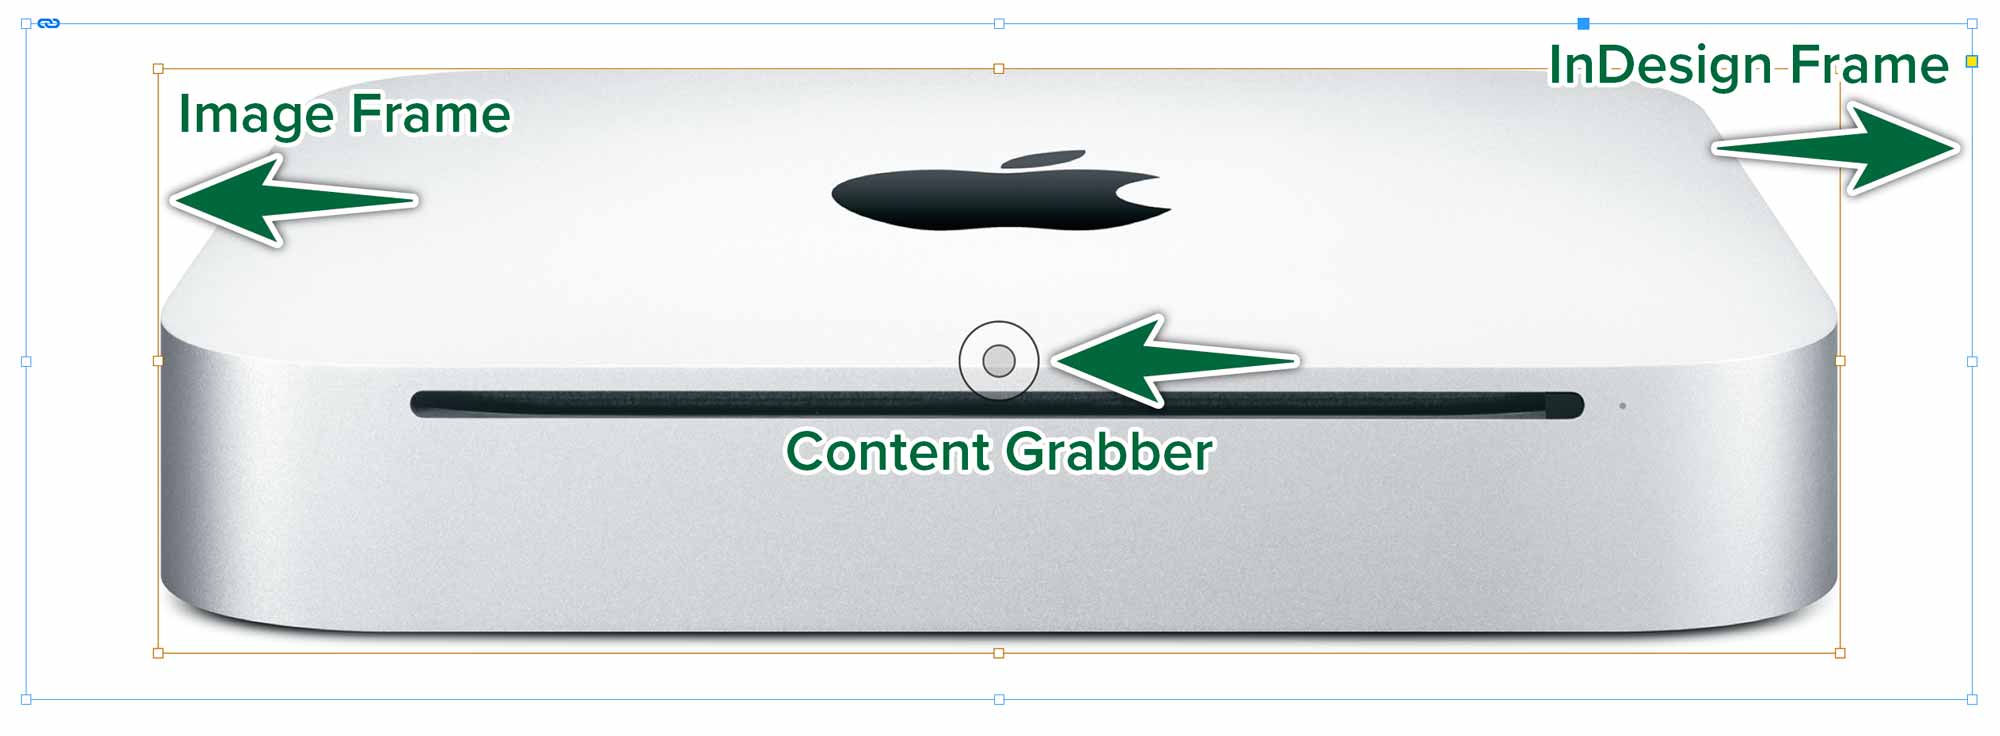
When a graphic or a photo is placed on the page in InDesign, it’s inside and InDesign frame. The brown frame is the graphic itself. The blue one is the InDesign frame which contains it. Both can be resized individually.
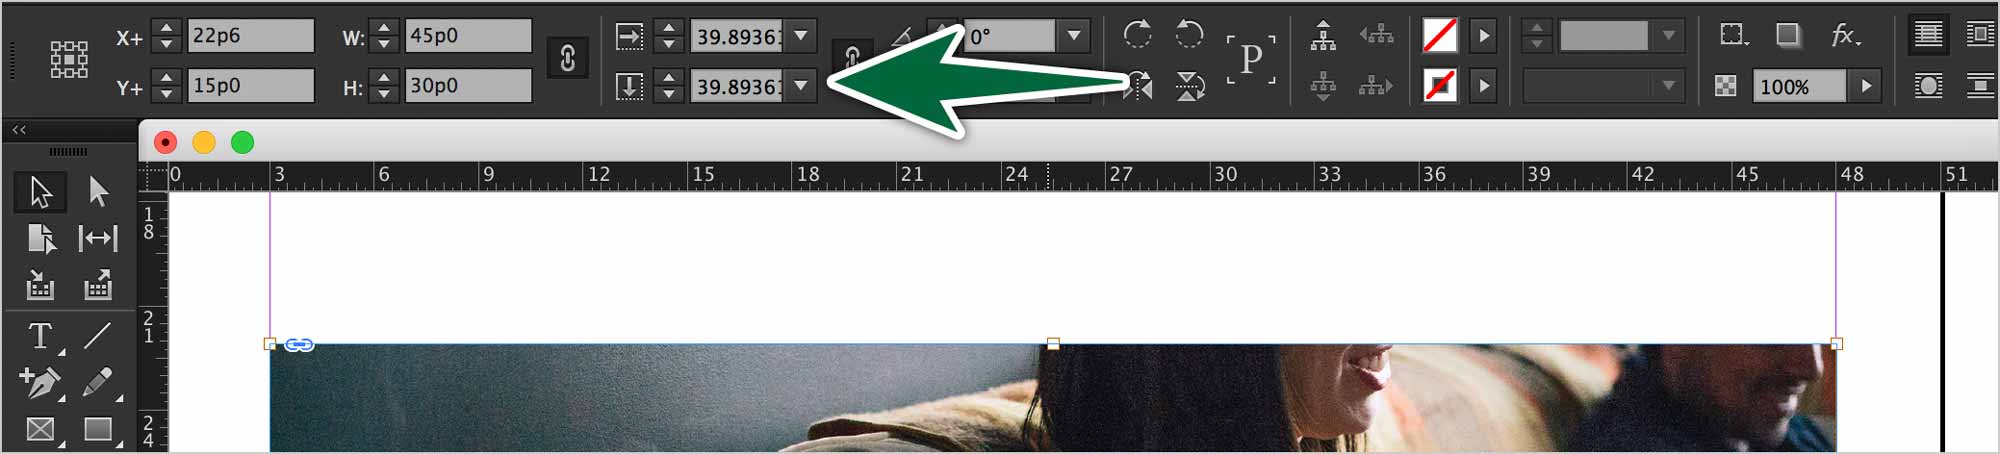
You usually want to resize the frame containing the image after you’ve placed it. To do so, grab a corner of the InDesign frame with your Selection Tool.
- Hold only Shift to scale the InDesign frame, but not the image.
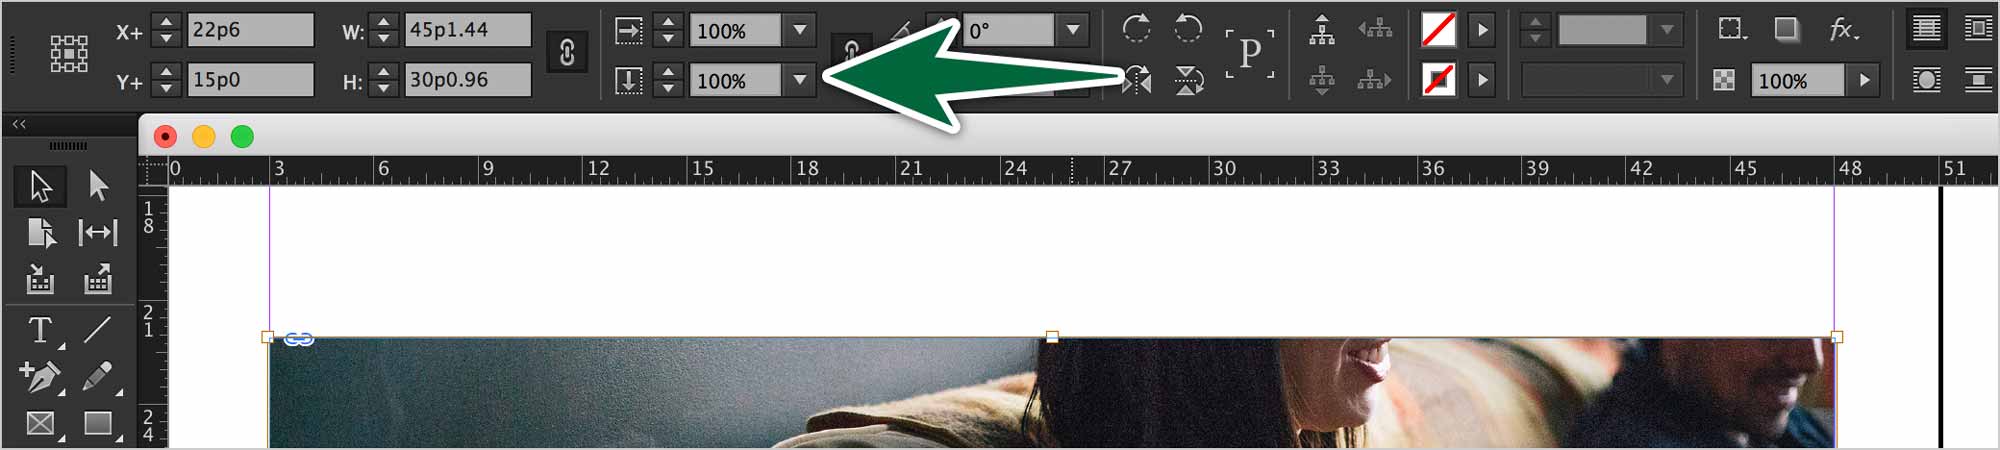
- Hold ⌘-Shift and drag to scale the frame and the image.
- Hold Option-⌘-Shift to scale the frame and the image from the center.
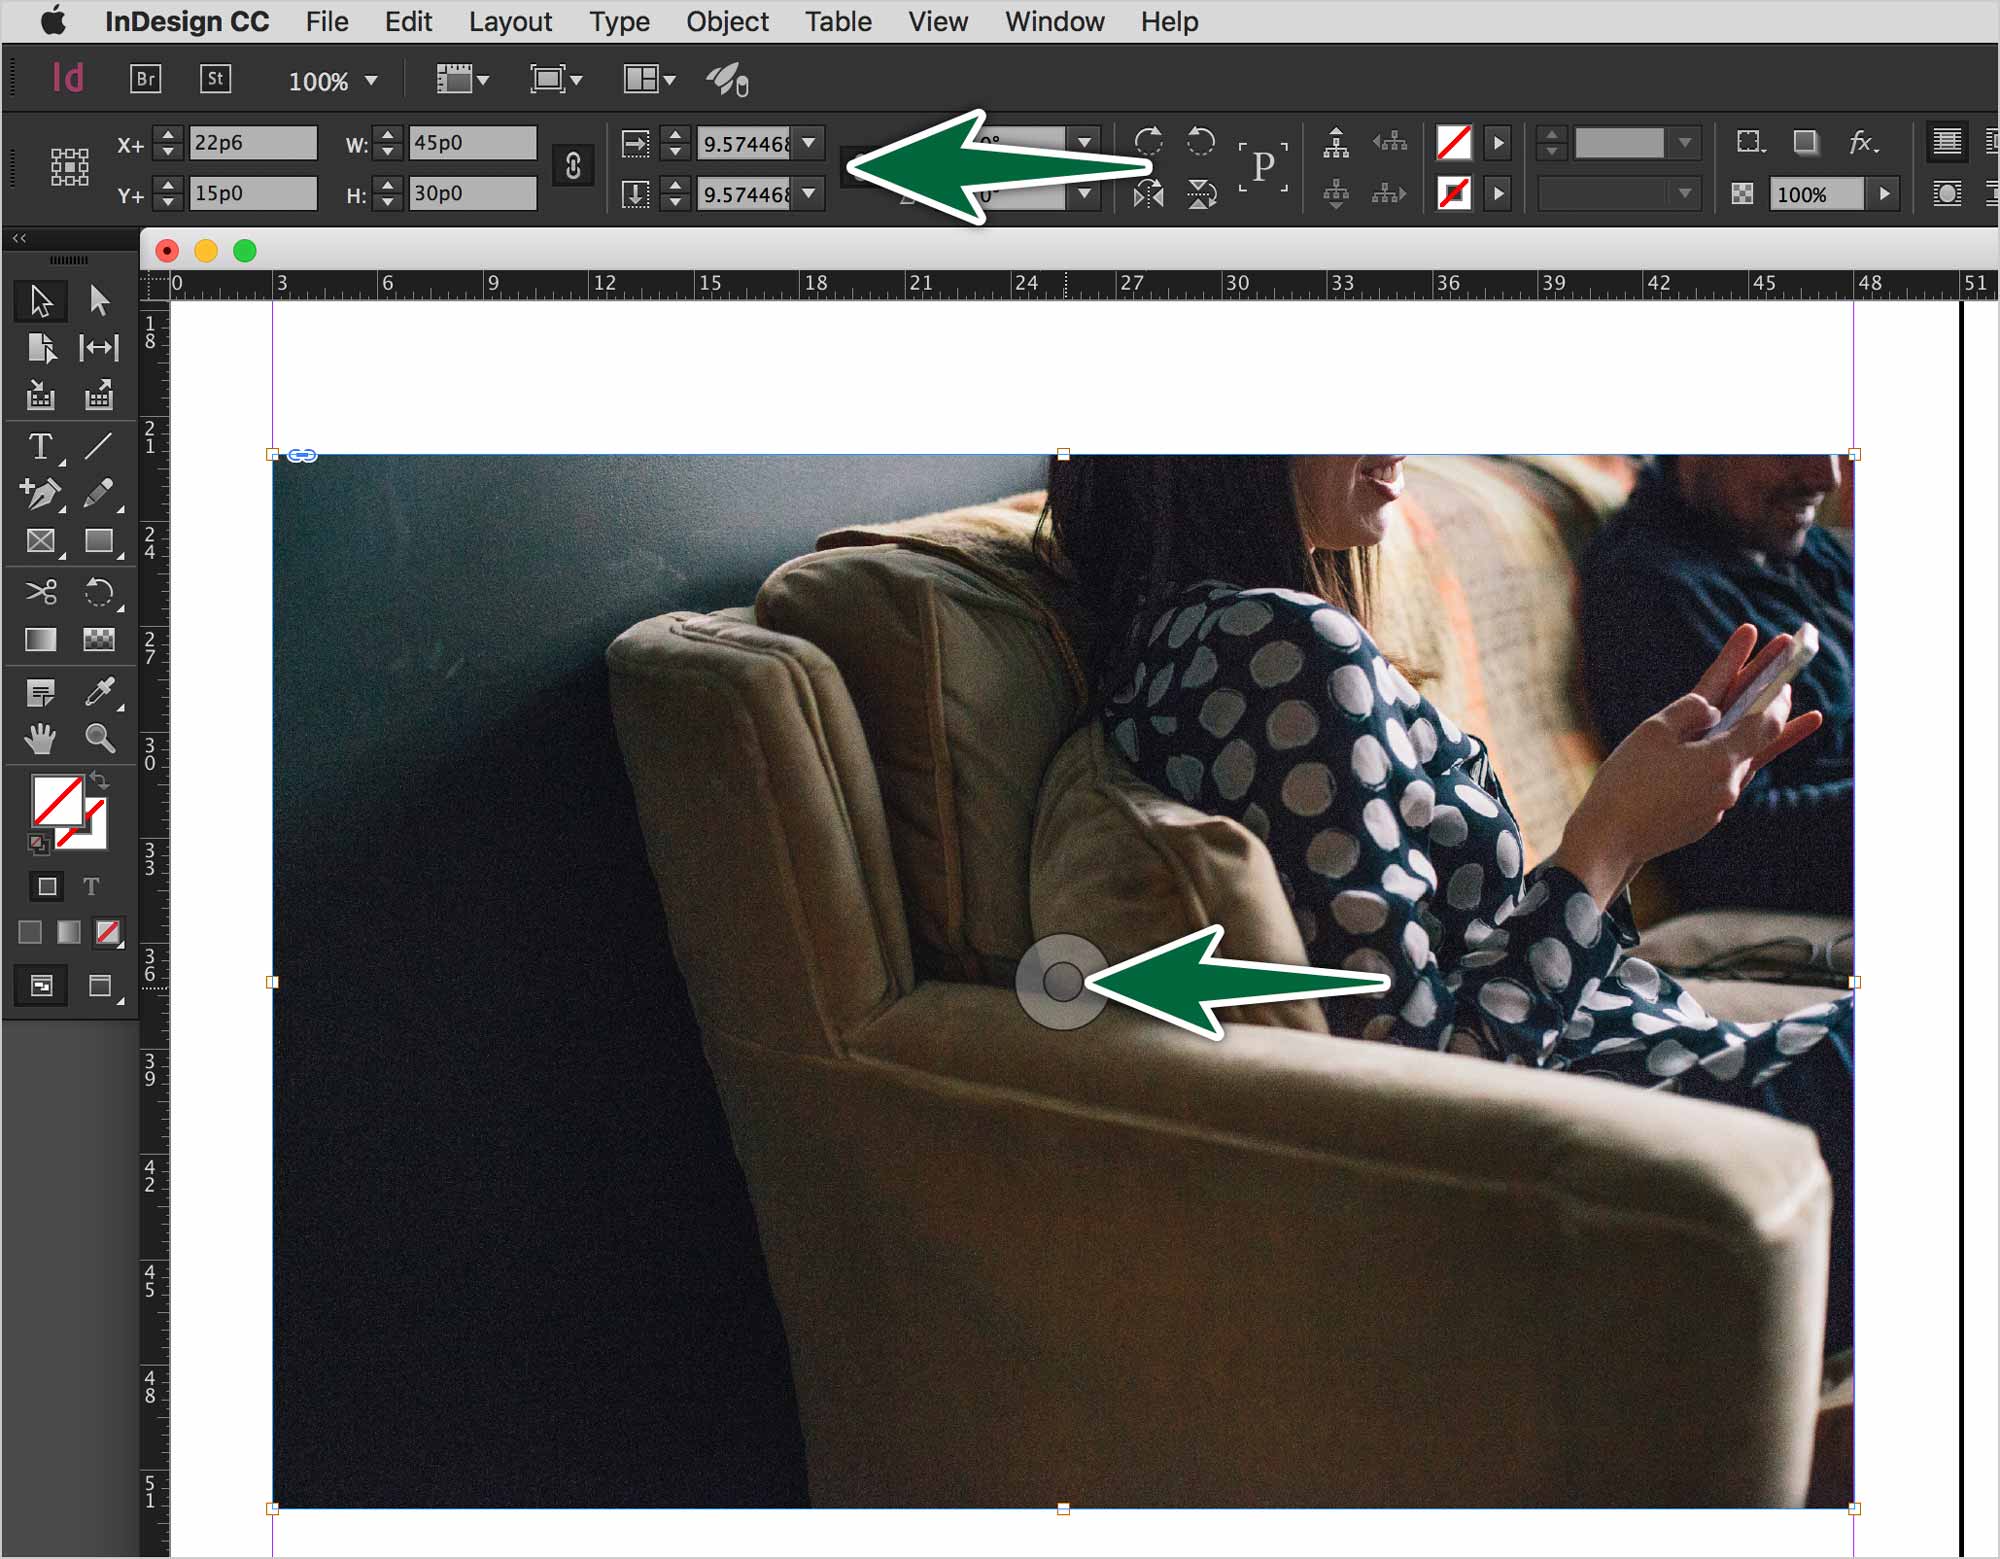
When you select an image in InDesign, a circle appears at its center. This is called the Content Grabber. It allows you to drag the image around inside the InDesign frame. This can be useful for cropping an image inside the frame.
Links
The Links panel lists all the images you’ve placed in your document. There’s a ton of information in the lower part of the panel about each image.
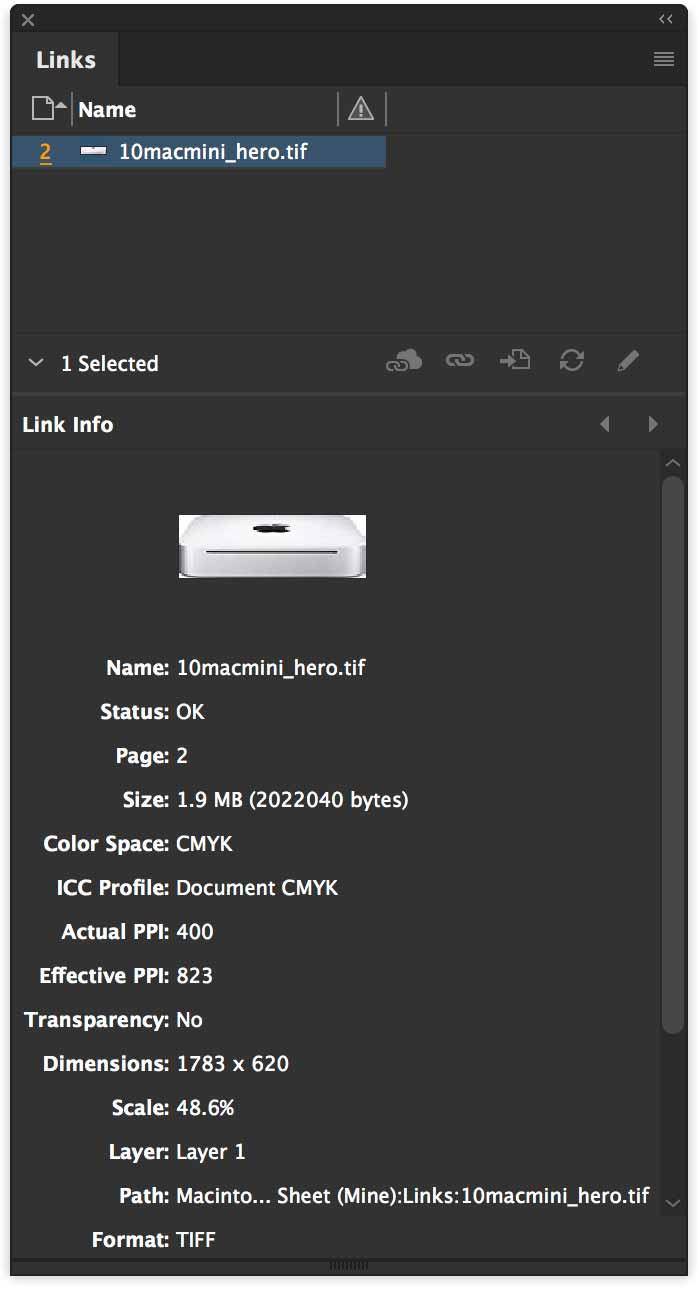
It’s important to keep image files well organized in your project folder because InDesign will reference that location to find the linked files. If you rename or move an image in Finder after its been placed, InDesign will lose track of the image. This means that it won’t be packaged with the rest of the files, which makes your document rather useless.
What Does 100% Mean?
When we place raster images in InDesign, it’s fine to resize them at will while we’re designing our document. When our design is completed, you should resize your images to 100% before sending files for reproduction. The 100% means that the print size in Photoshop matches the print size in InDesign.
Let’s see what that process looks like. Create a new page in our InDesign document with Shift-⌘-P. Place the 04-100-percent.psd image on the full width of the margins. This means you need to drag while placing.
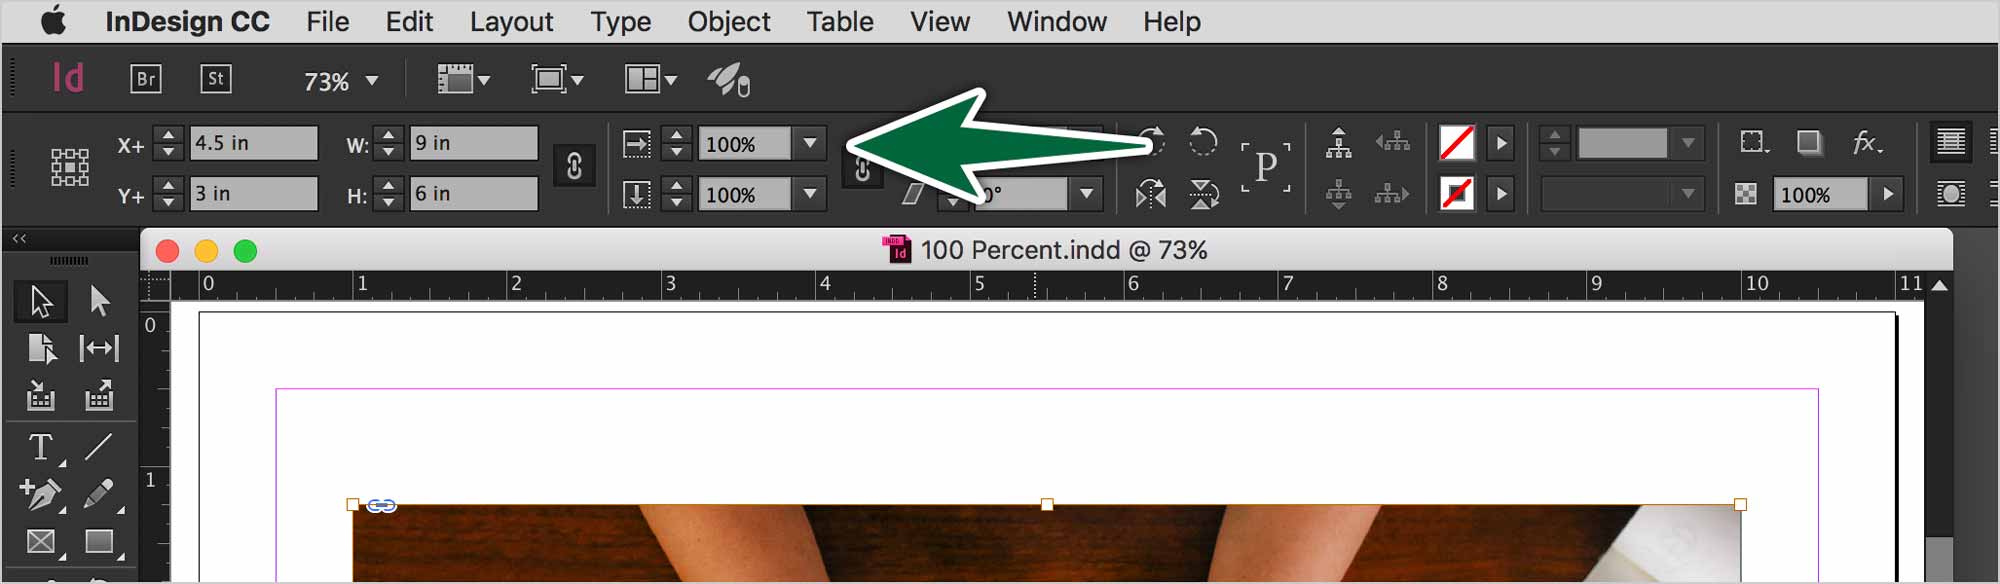
Click on the content grabber, then check the Control Bar’s size value to see what’s going on. You can see that it’s scaled to a small percentage in InDesign. We need to make this number 100%, with the image resolution at 300dpi.

Open the placed image in Photoshop, then go Image > Image Size…. If we uncheck Resample, then set the resolution to 300, the dimensions go down. Let’s save, leave the image open, then switch to InDesign.
When we switch to InDesign, it’s now reporting that the image is placed at about 40%. Let’s go back to Photoshop to resample to image to 40% of its size.

Make sure that Resample is checked. Switch the units of measure to Percent. Enter a value of 40. You see that the image size went from 60.7 megabytes to 9.71 megabytes. Again, resampling is a destructive process.
Let’s save the image, leave it open and return to InDesign.
You can see that the image is at 100%. Our photo now prints the same size in InDesign as it does in Photoshop. This is our goal.
Low-Rez Images for Print?
I’m sure you’ve heard before that it’s not possible to use an image from the web in print; that you can’t use a 72dpi image in print. That’s not completely true. If an image’s pixel dimensions are large enough, you can use that to get a higher resolution.
This is like taking a really large sand box with very little sand in it, then shrinking in its walls towards the center. As the sand box gets smaller, the sand will get deeper. The deeper sand is a metaphore for higher resolution.
Let’s open 04-resize web to print.psd. In the Image Size dialogue, you see that it’s a huge image. If you were to print it as-is, it would measure 80 inches wide. The quality wouldn’t be so great because of the 72dpi resolution.

Our goal is to get this image to print 9” wide at 300dpi. The first step is to resize the image, so uncheck the Resample checkbox. Set the resolution to 300dpi. Now check the Resample checkbox again to resample the image dimensions to 9” wide.
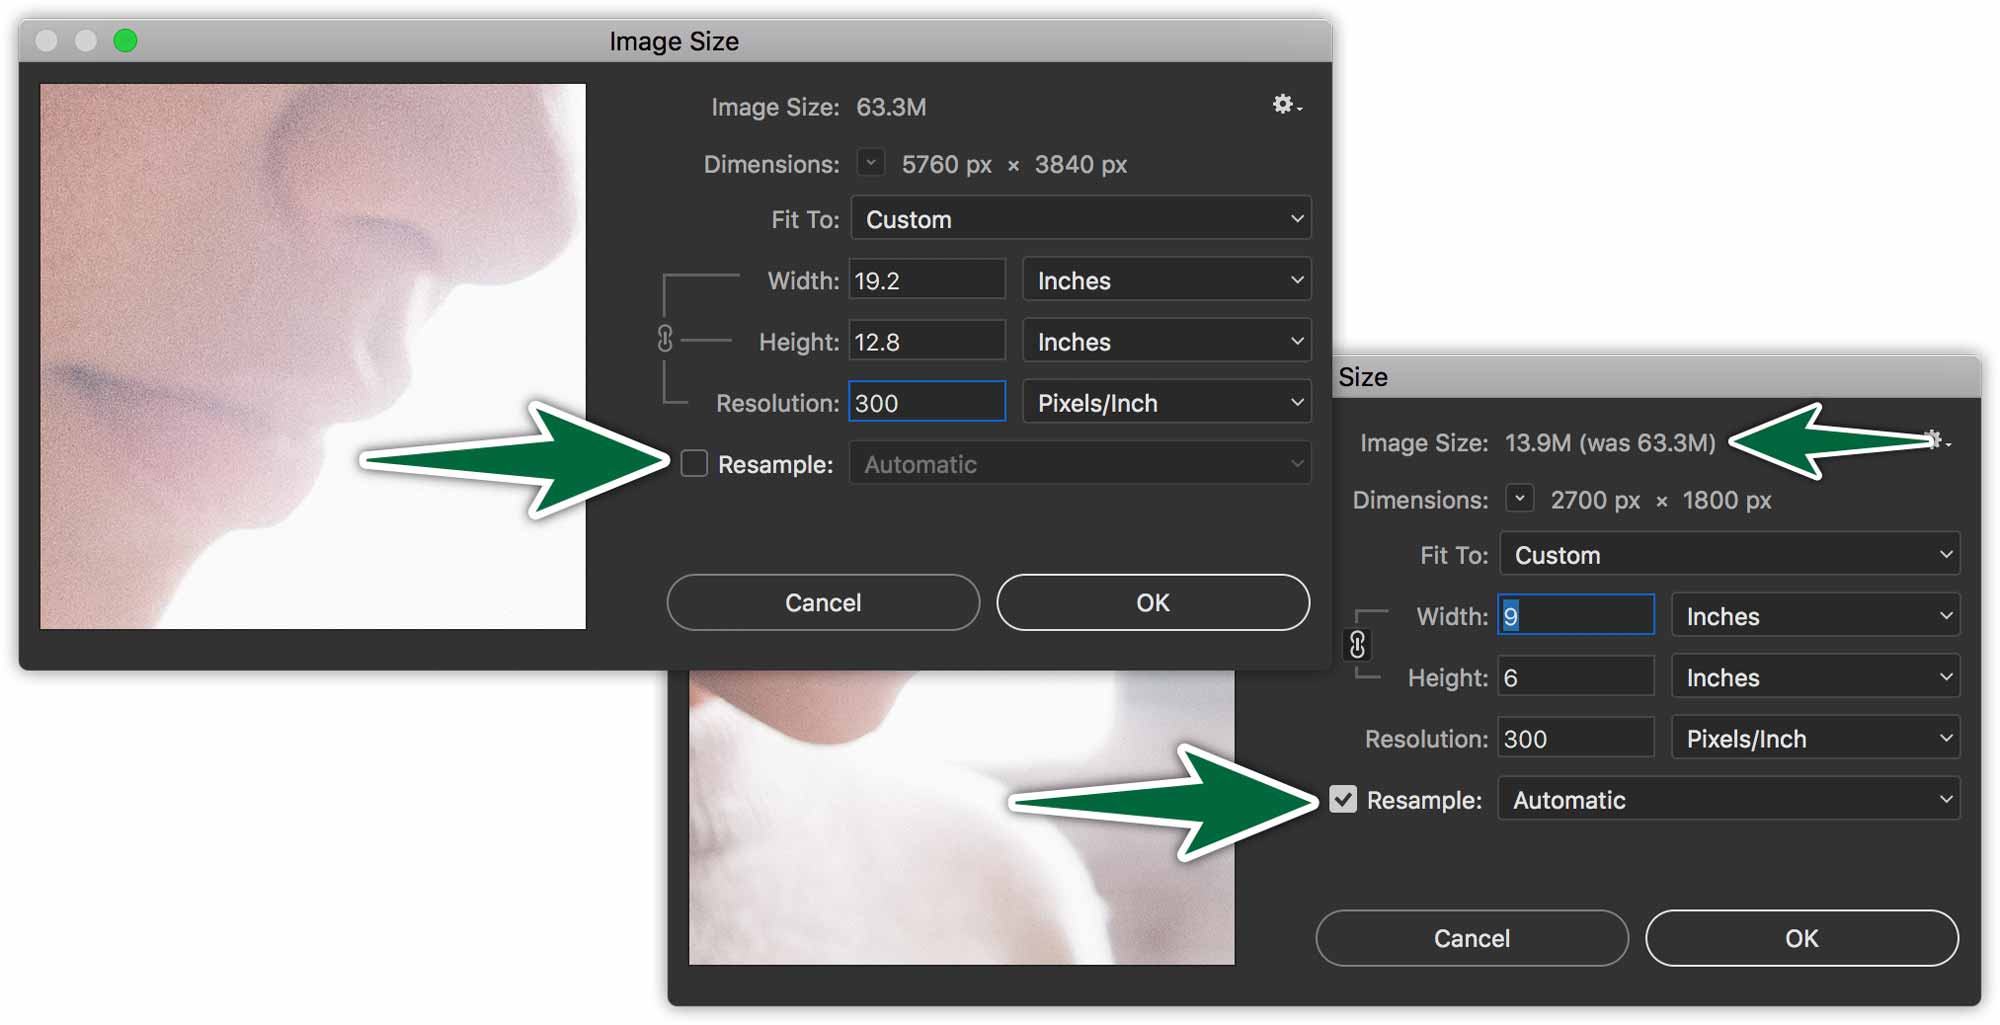
In the second dialogue, you can see that the image went from 63.3 megabytes to 13.9 megabytes. Clearly, data was removed from the image when we resampled it. That’s what downsampling is.
So we’ve successfully taken a 72dpi image and made safe for high-quality print output at 9” wide at 300dpi.
HiDPI (Retina™) Pixels
HiDPI or Apple’s Retina™ screens display one image pixel using four or more device pixels.
If you were desigining icons to be used in an app for iOS, you’d need to produce a minimum of three sizes for each. An old (non-Retina) iPhone will use one device pixel to display one image pixel. An iPhone with a Retina screen will use four device pixels to display one image pixel. A plus-sized iPhone will use 9 device pixels to display one image pixel.
The camera icons above all appear the same size on the devices. The fact is that there’s a small, a medium and a large one. It’s just that they’re being displayed with increasingly dense pixels. The 1x one looks the least clear, while the 3x button appears super-sharp on-screen.
Your MacBook Pro doubles pixels. That means that each image pixel is displayed with two device pixels. The proof is that when you take a screen grab, then open it in Photoshop, the image measures twice the pixel dimensions as Finder says.
Output for Screens
Open the provided file in Illustrator. Go Window > Asset Export. Drag the camera icon into the panel. Rename the asset icon-camera. Click on iOS. This will set up the three sizes for your graphic, plus a vector .SVG file. Save them into the provided 06-app-icon folder. Go see in the folder, you should have three files that are increasing in dimensions.
Formative Activity
Resampling

Resample the first image to 9” wide by 6” tall.
Resizing

Resize the image to be 300dpi.
Place at 100%
Place the image in the provided InDesign document at 9” wide by 6” tall at 300dpi. That means at 100% in InDesign. Remember, you need to do this in two steps. Resize it to 300dpi first. Click OK. Check InDesign for the new percentage value. Go back to Photoshop to resample it to that percetage. Save in Photoshop. Go back to InDesign to check that it’s at 100%.
Save Icon for App Design
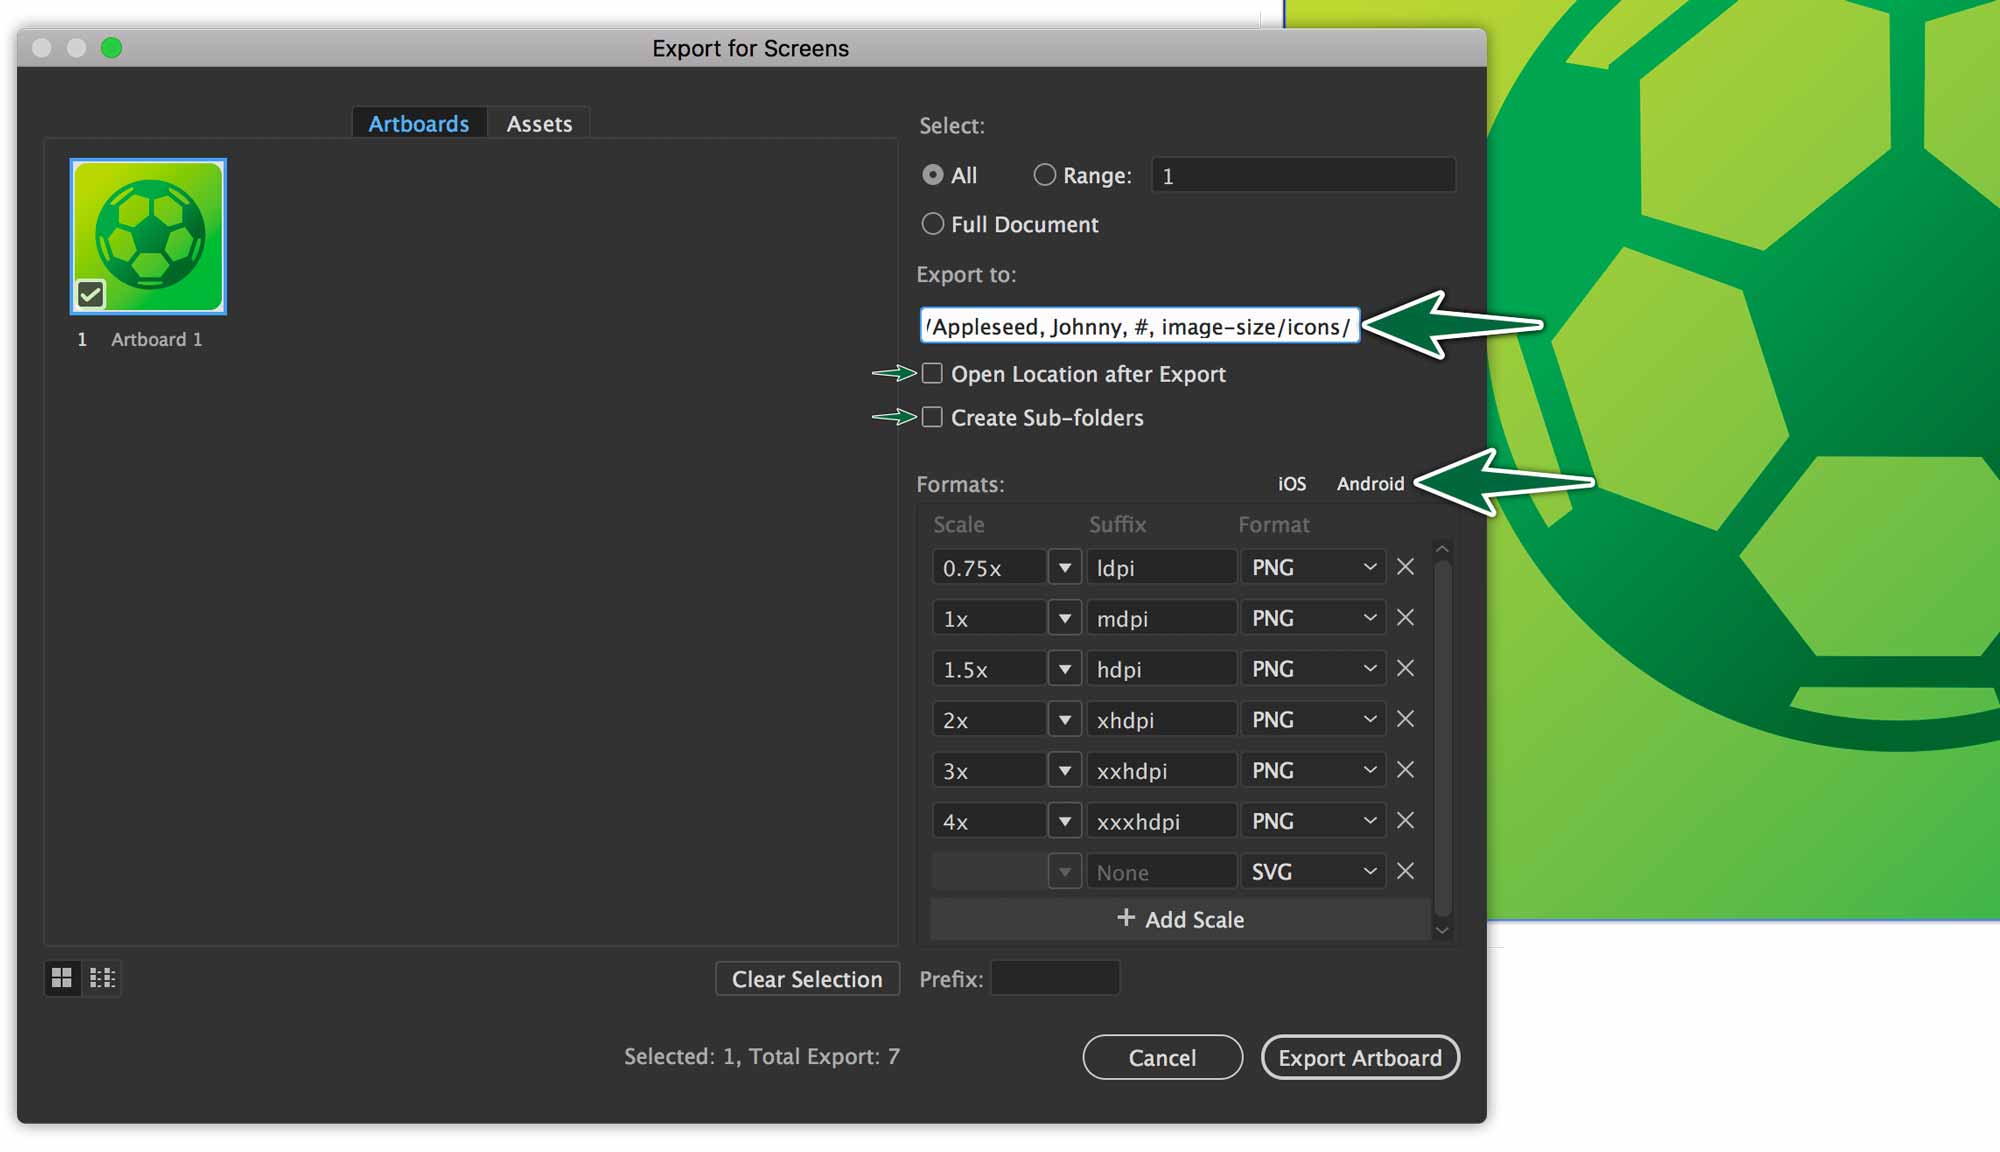
Open the provided icon in Illustrator, then use Save for Screens… to export it for Android OS. Make sure to name the asset in the panel first! Name it icon-soccer.
