Topics
This assignment will be a skills refresher on top of learning the InDesign Book skills. We’ll build a document with:
- Automatic page numbers
- Custom colour swatches
- Paragraph styles
- Character Styles
- Defined number lists
- Chapter titles
- Running headers
- Table of contents
You’ve done all this before. The beauty of using these features with a book file is that they all sync across documents.
Why Book Files?
![]()
Working with books in InDesign is useful when you’re creating a very long document. You can break your publication into separate documents, which improves performance. Once you have a book file, you can synchronize features like colour swatches, text styles and more. Books files also make exporting and packaging long documents easier.
Collaboration is smoother with book files, since the book file is a container for the included InDesign documents. Many different designers can work on separate InDesign documents which make up a single book. All the files’ attributes will stay in sync.
Reserve the use of book files to very long documents; let’s say over 100 or 150 pages. You can also create a book file for a shorter book that’s built with many, short InDesign documents. It’s not necessary to have all that extra book functionality for a document you can easily manage in one file.
Create a book file
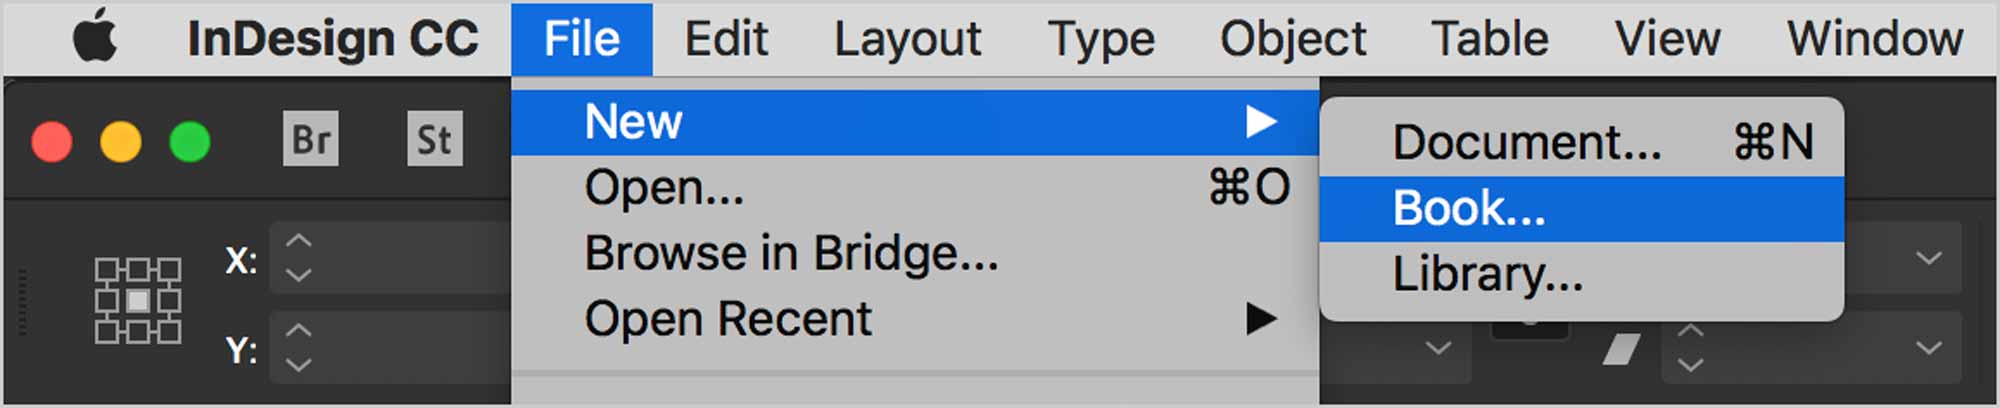
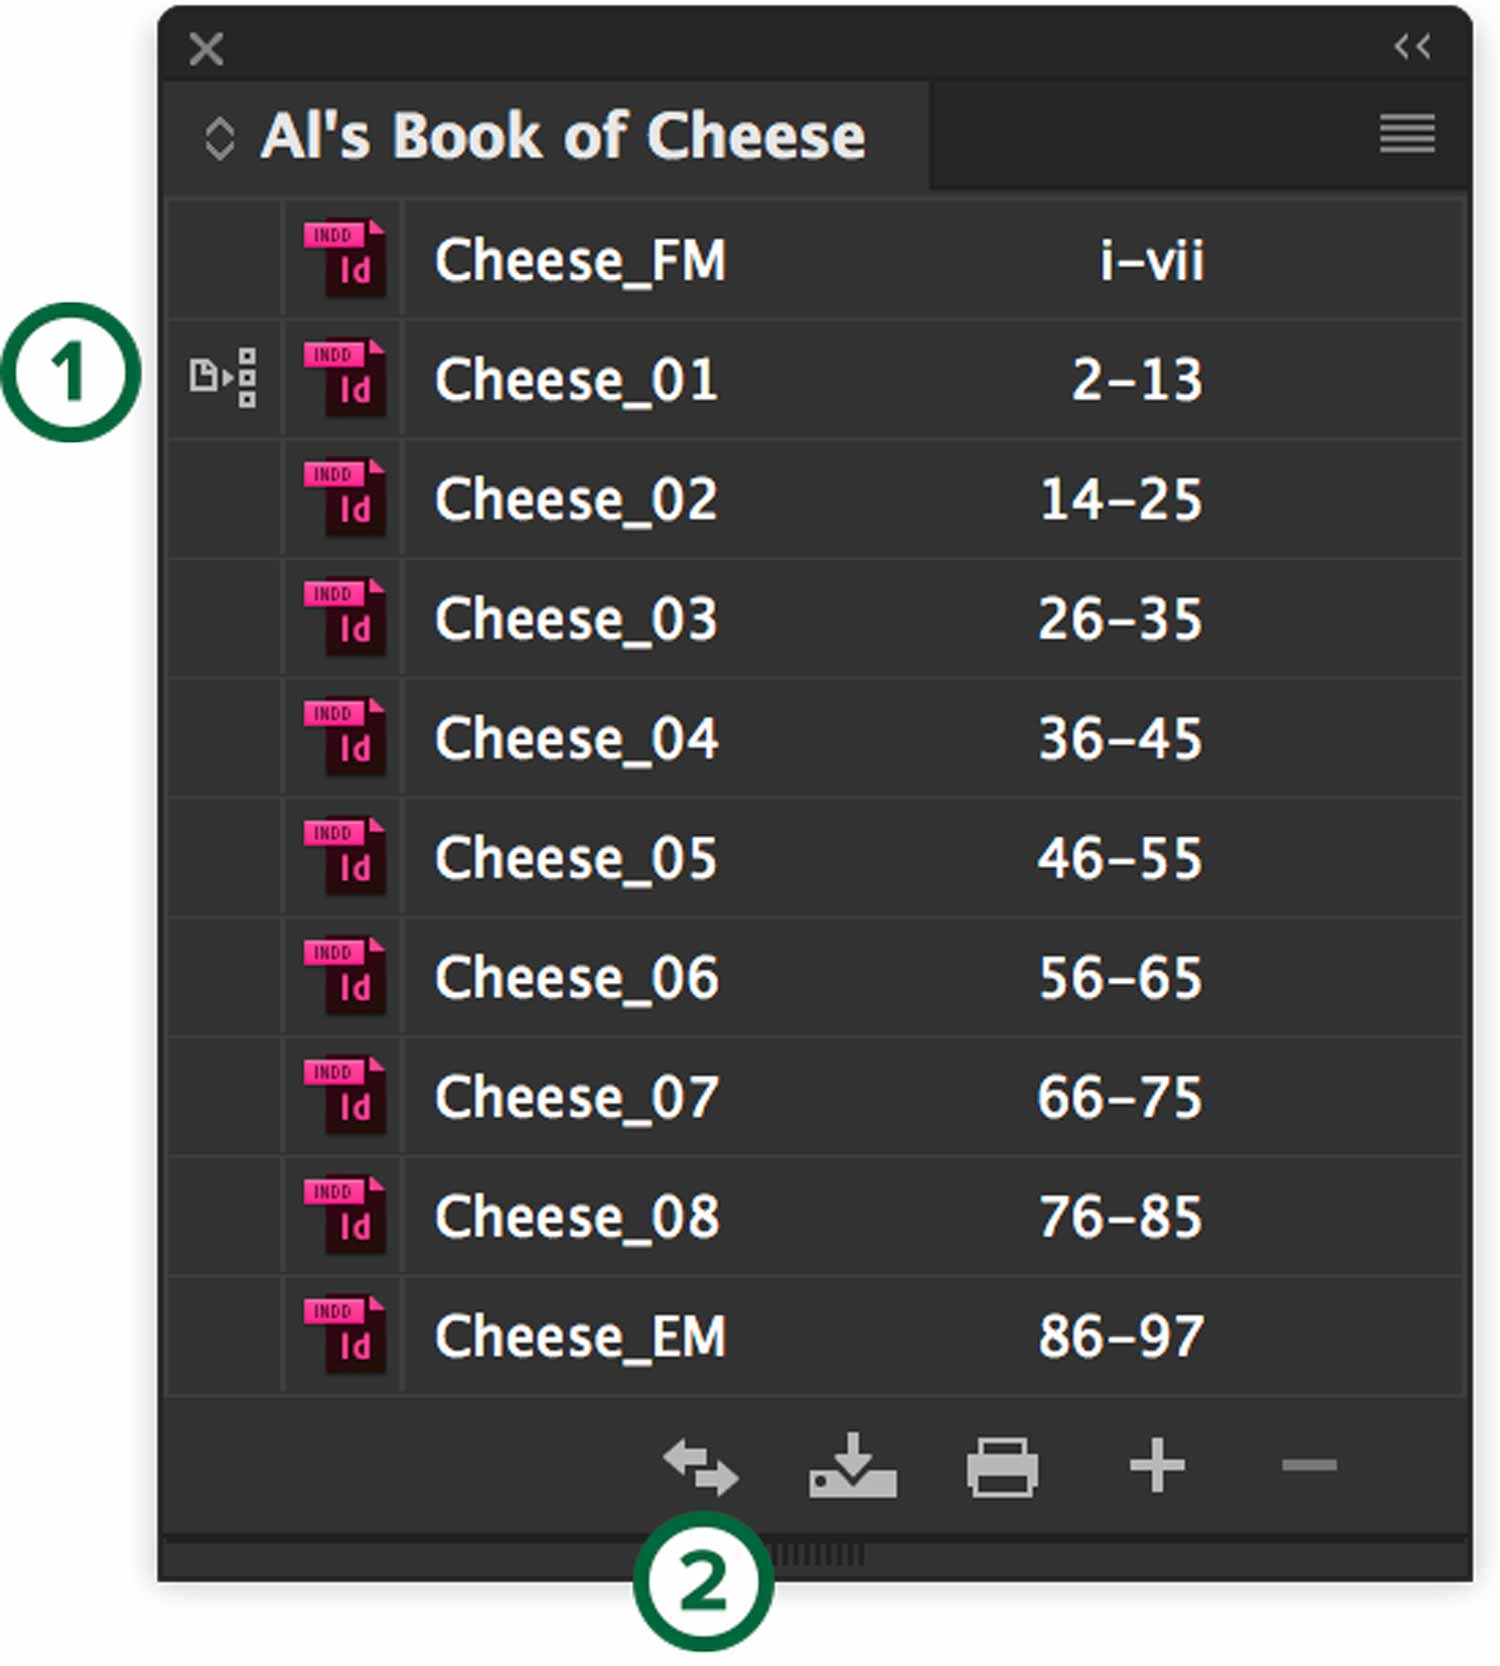
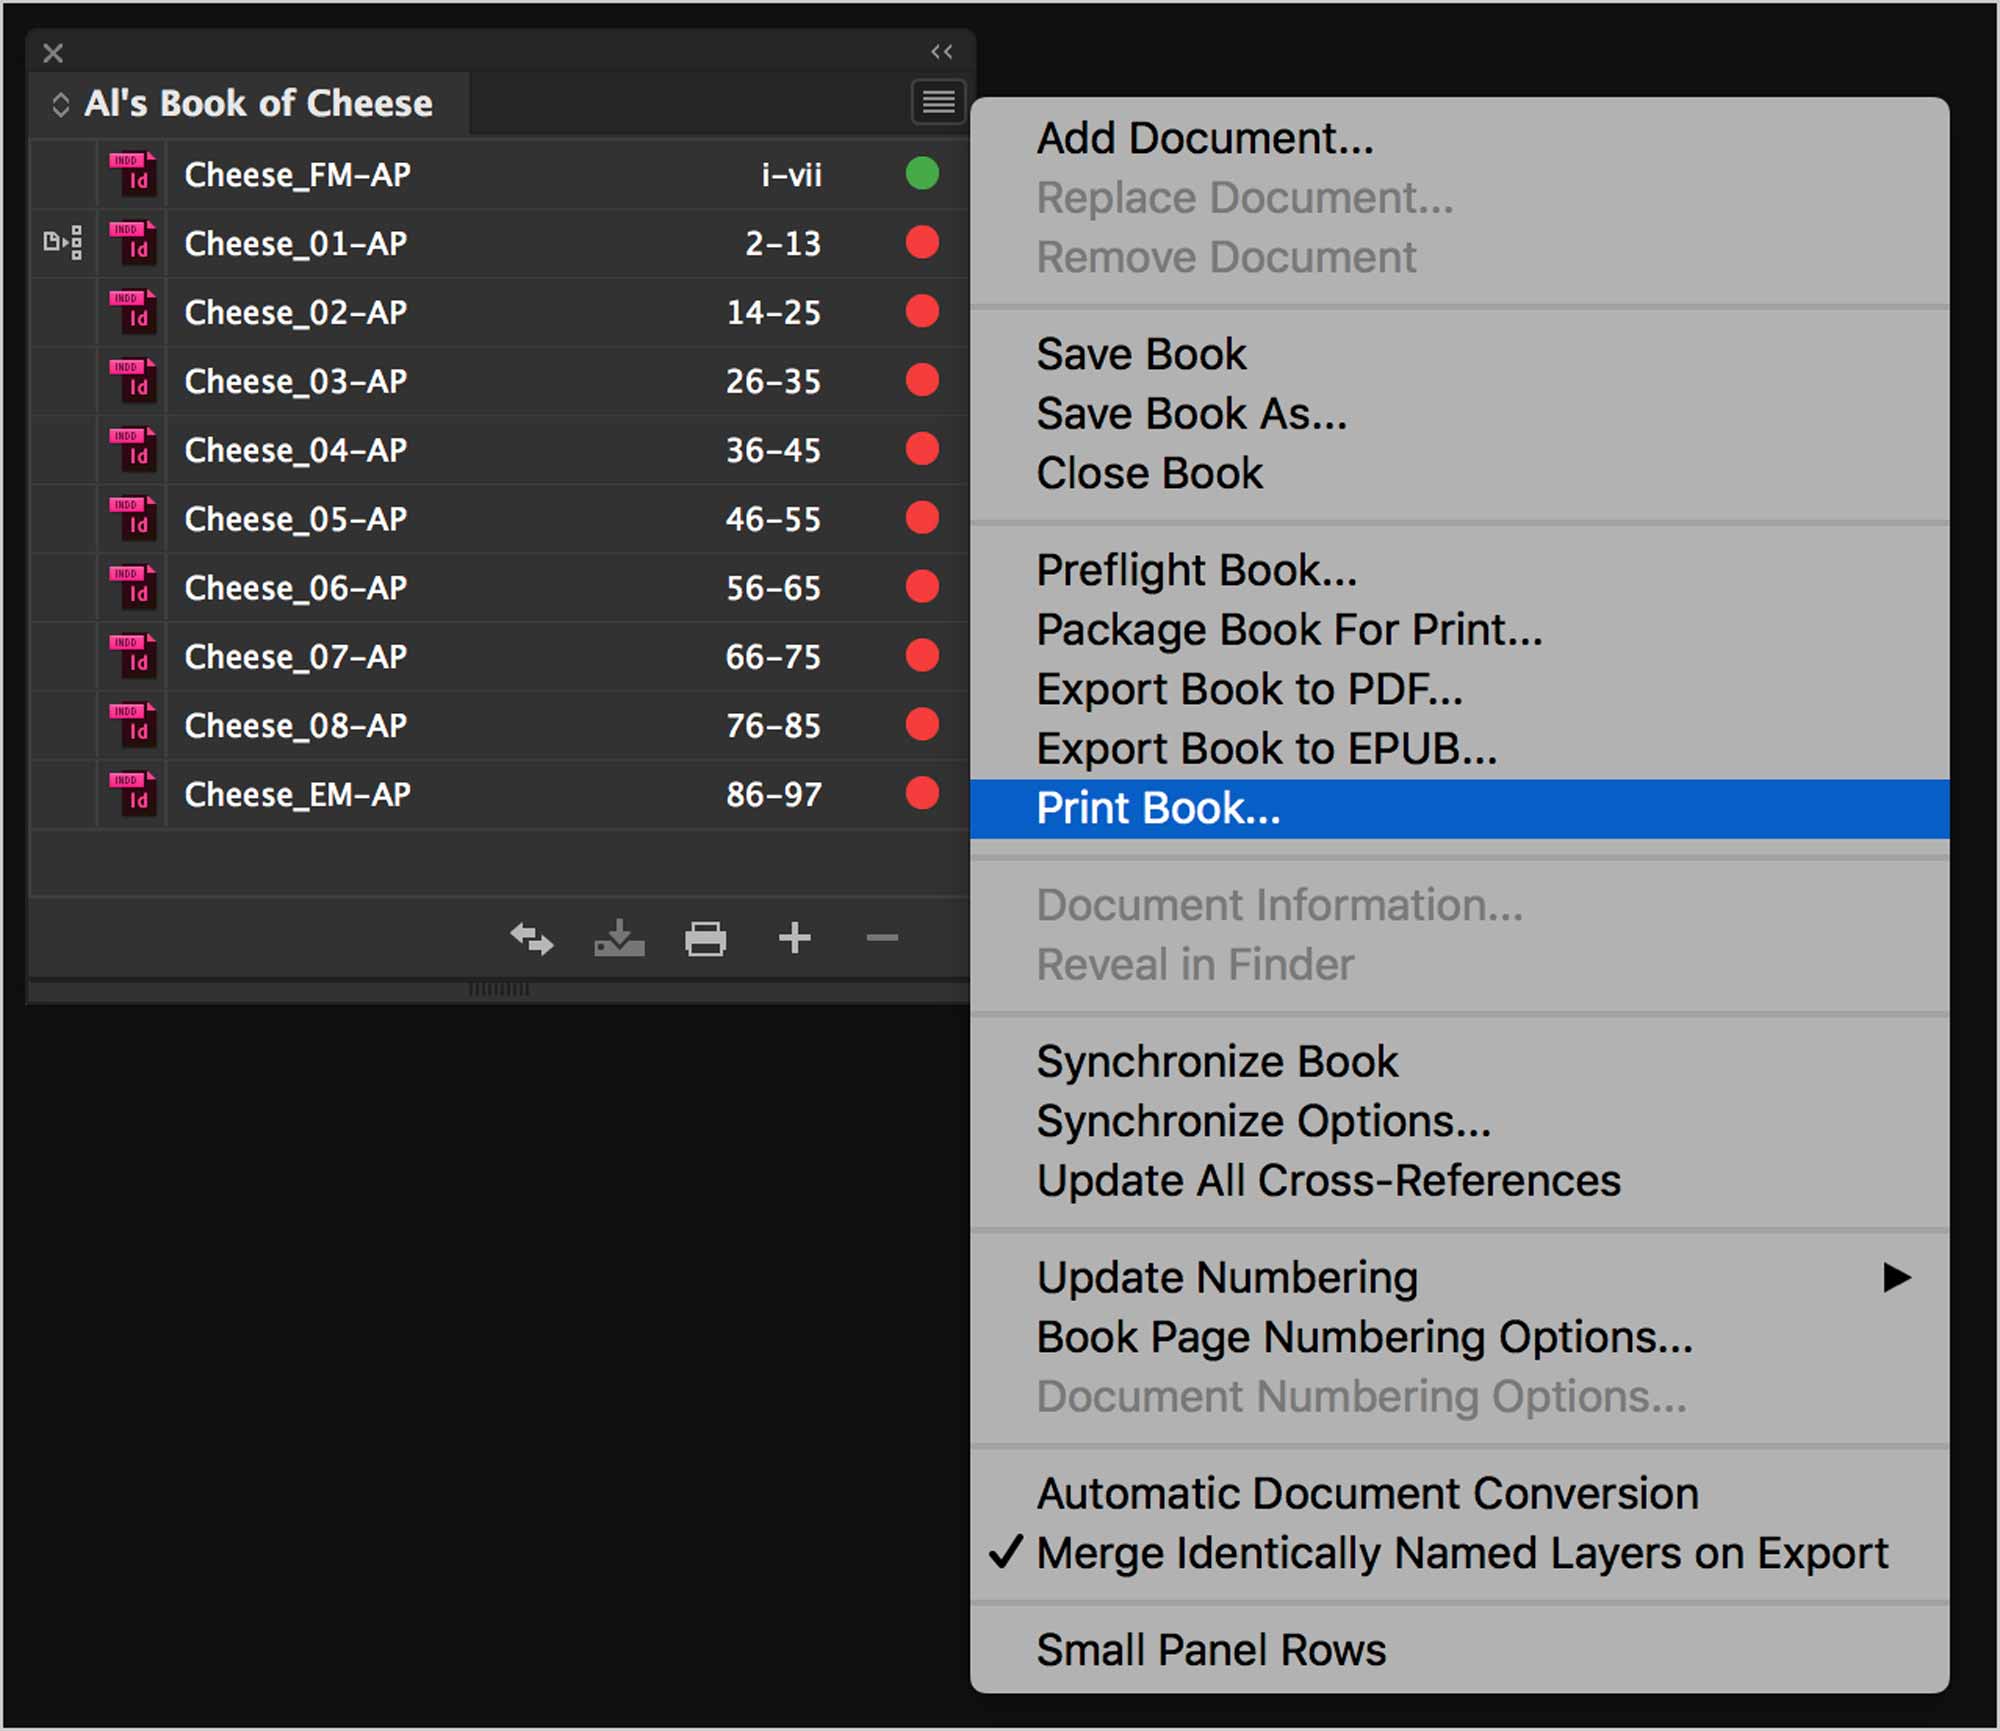
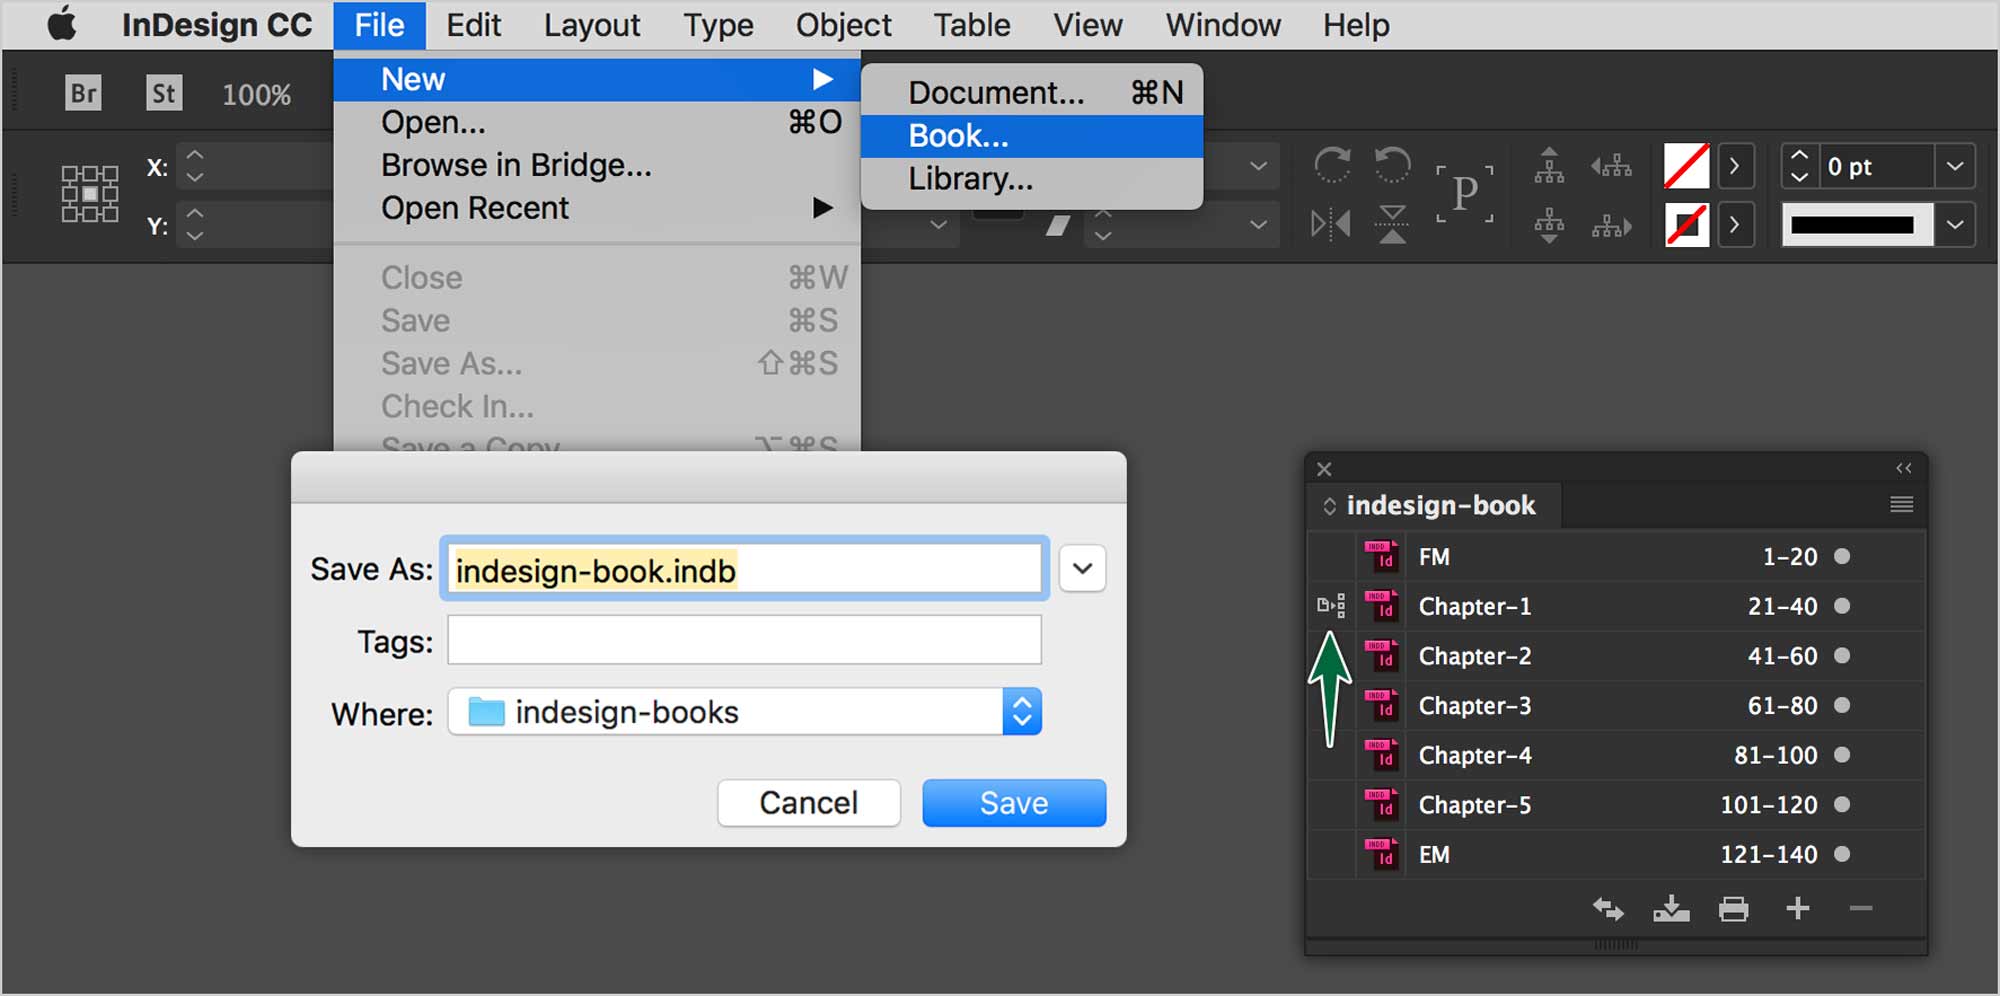
To create a book file, go File > New > Book…. What appears is the Book panel. It’s a container for InDesign documents.
Not a Panel, Not a Document
Despite the appearance of the Book panel. It doesn’t actually behave like a panel. For instance, you cannot find it in the Window menu to open the panel. It actually behaves more like a document. It has a Save command. To open it, you either double-click on its icon in Finder or you use the File > Open… command.
You can also have more than one book file open at a time.
Add documents to a book file
To add files to the book, click on the ➕ button at the bottom of the Book panel. Navigate on your Mac to your InDesign documents, then open them.
They may not get added in the order you want. Simply click and drag it into the right order.
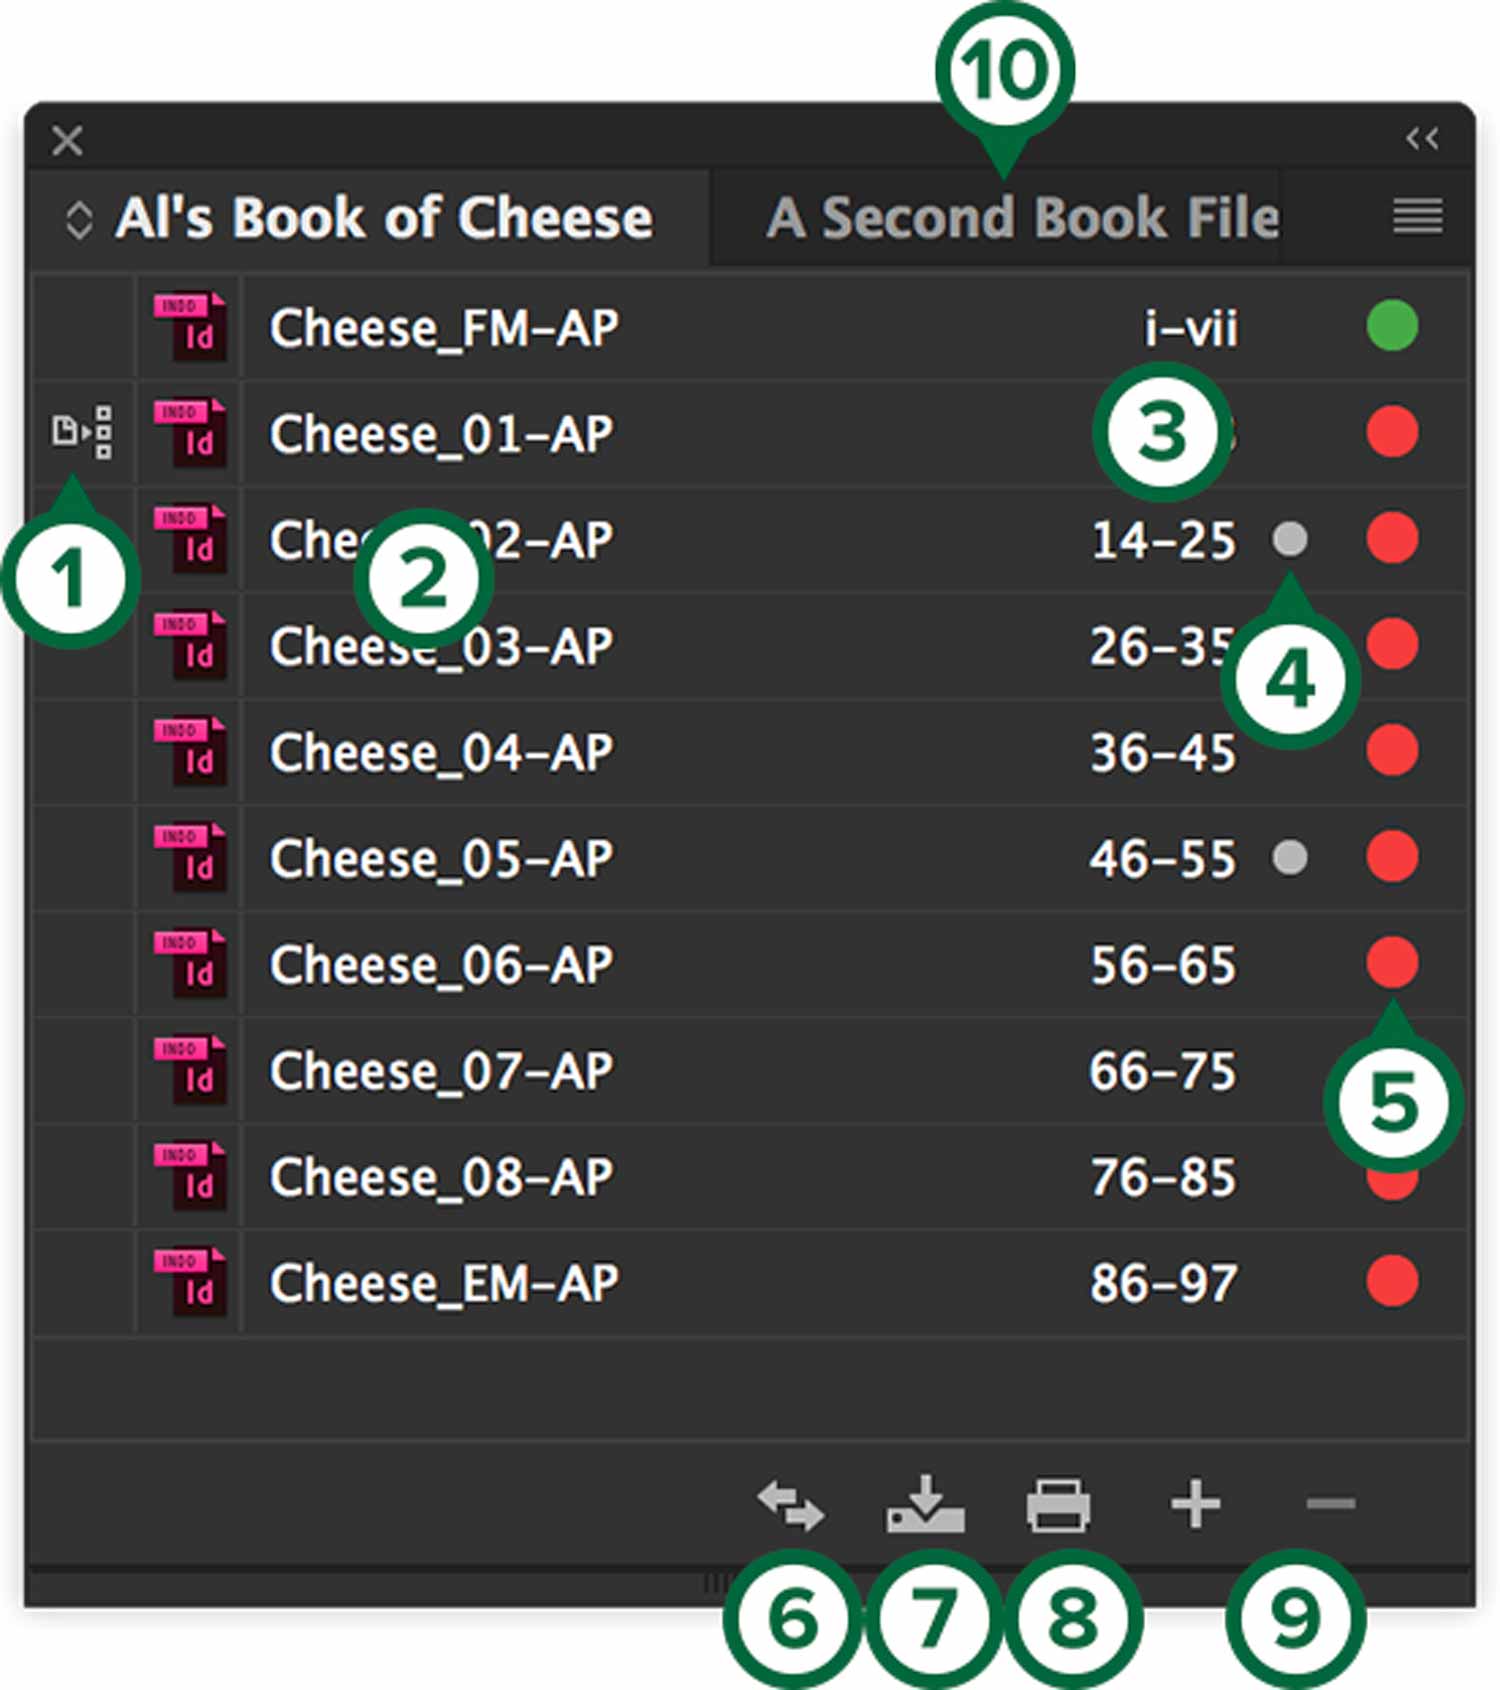
- Style source
- Document Title
- Page range
- Document open status
- Preflight status
- Synchronize documents
- Save book
- Print/Export book
- Add/Remove documents
- A second open book file
On the left side of the panel, there’s a column where you can establish the style source for the book. The style source is the parent document for the book. It’s used to set the source for styles, swatches, parent pages, lists, text variables and more.
To the right, we see the page range. To the right of that there’s a column for the document’s open status. To the right of that, there’s a column for the document’s preflight status.
The Book panel’s menu is full of useful commands for managing books.
Manage book files
With InDesign books, you can establish numbering in a parent document, then have them sync across all the files in the book. You can add or remove documents in the Book panel. You can also re-order them by dragging them up and down the panel.
Remember that the Book panel only refers to the InDesign documents it contains. If you move or delete the originals from your computer, the panel will lose control of them.
Numbering Pages
The numbering options are found in the Book panel menu. You can edit settings for a single document in the book or for the whole book. All the regular numbering options are there. You can set roman numerals or arabic numerals and so on.
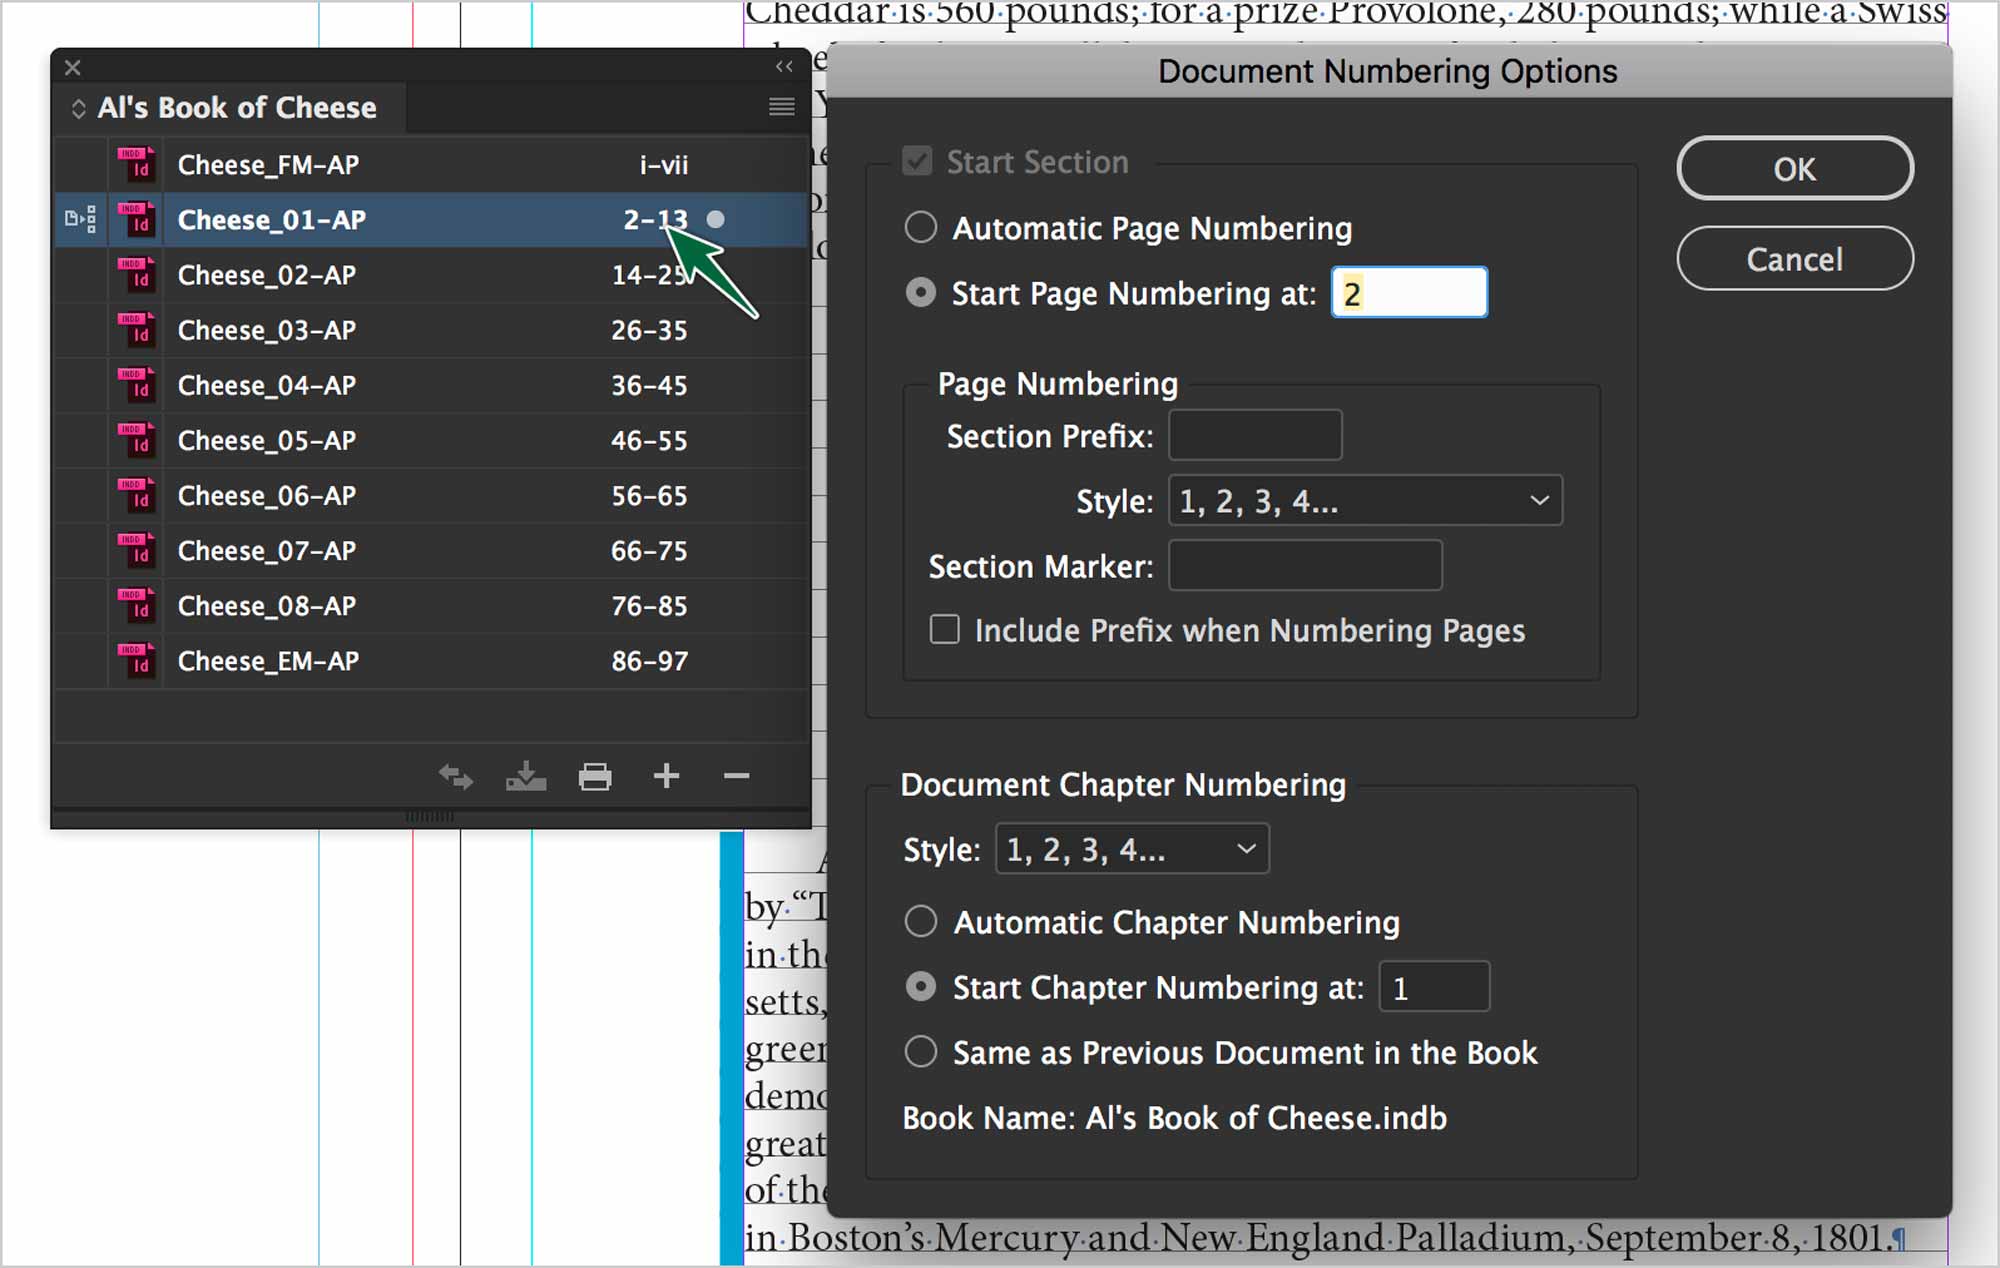
When editing the book page numbering options, you can set the page order. You can even set the start of a chapter to always be on a right-hand page. InDesign can automatically insert a blank page to make that happen.
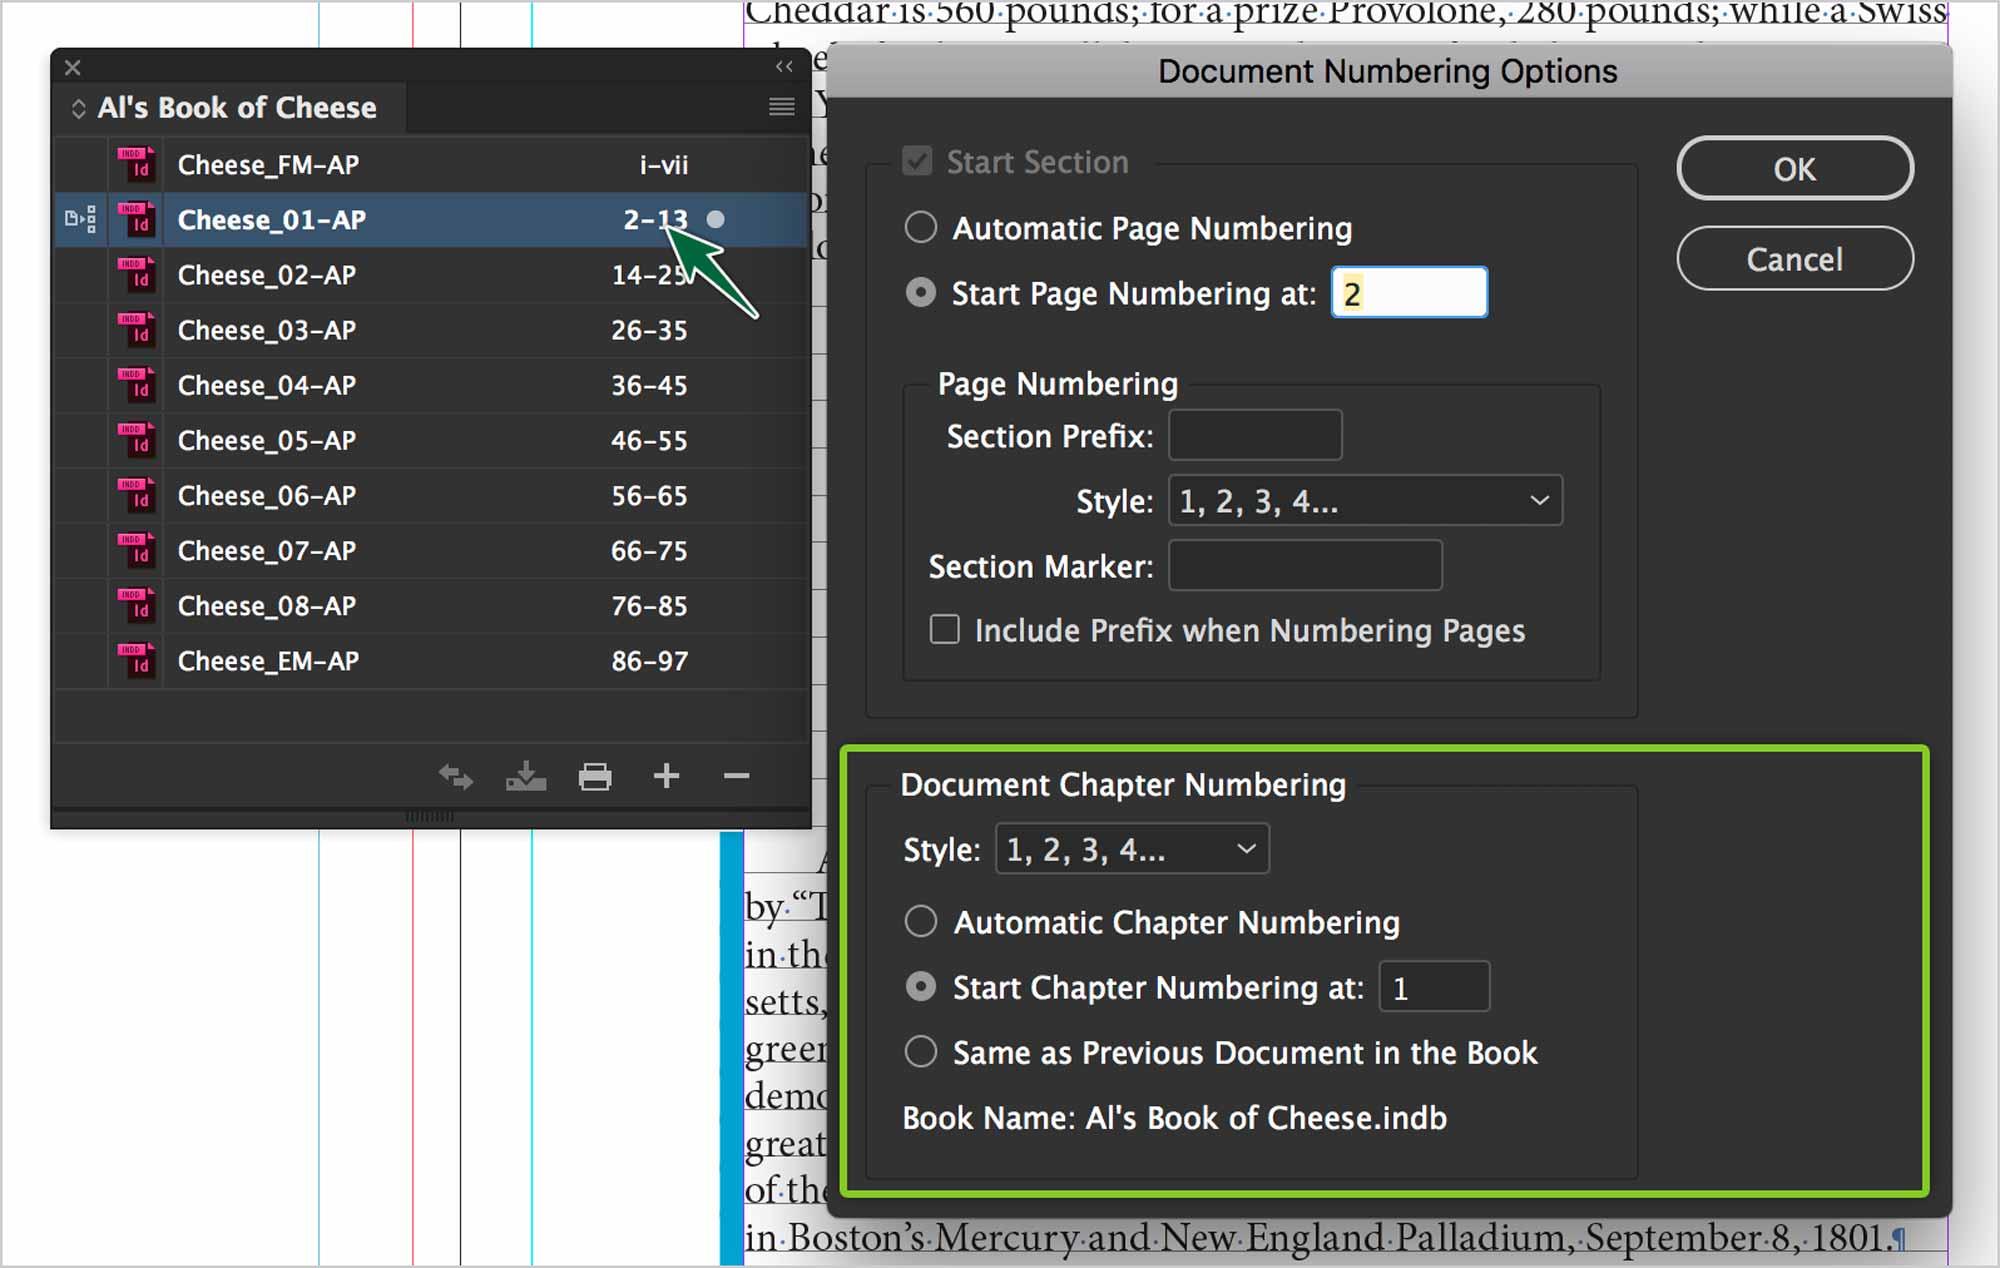
Chapter numbering is accessed in the Document Numbering Options. Numbering can be forced or can be set automatically. Each document can only have one chapter number. We’d set up our book so that each document contains a single chapter. You could also make it so one chapter is composed of multiple documents. We’d use Same as Previous Document.
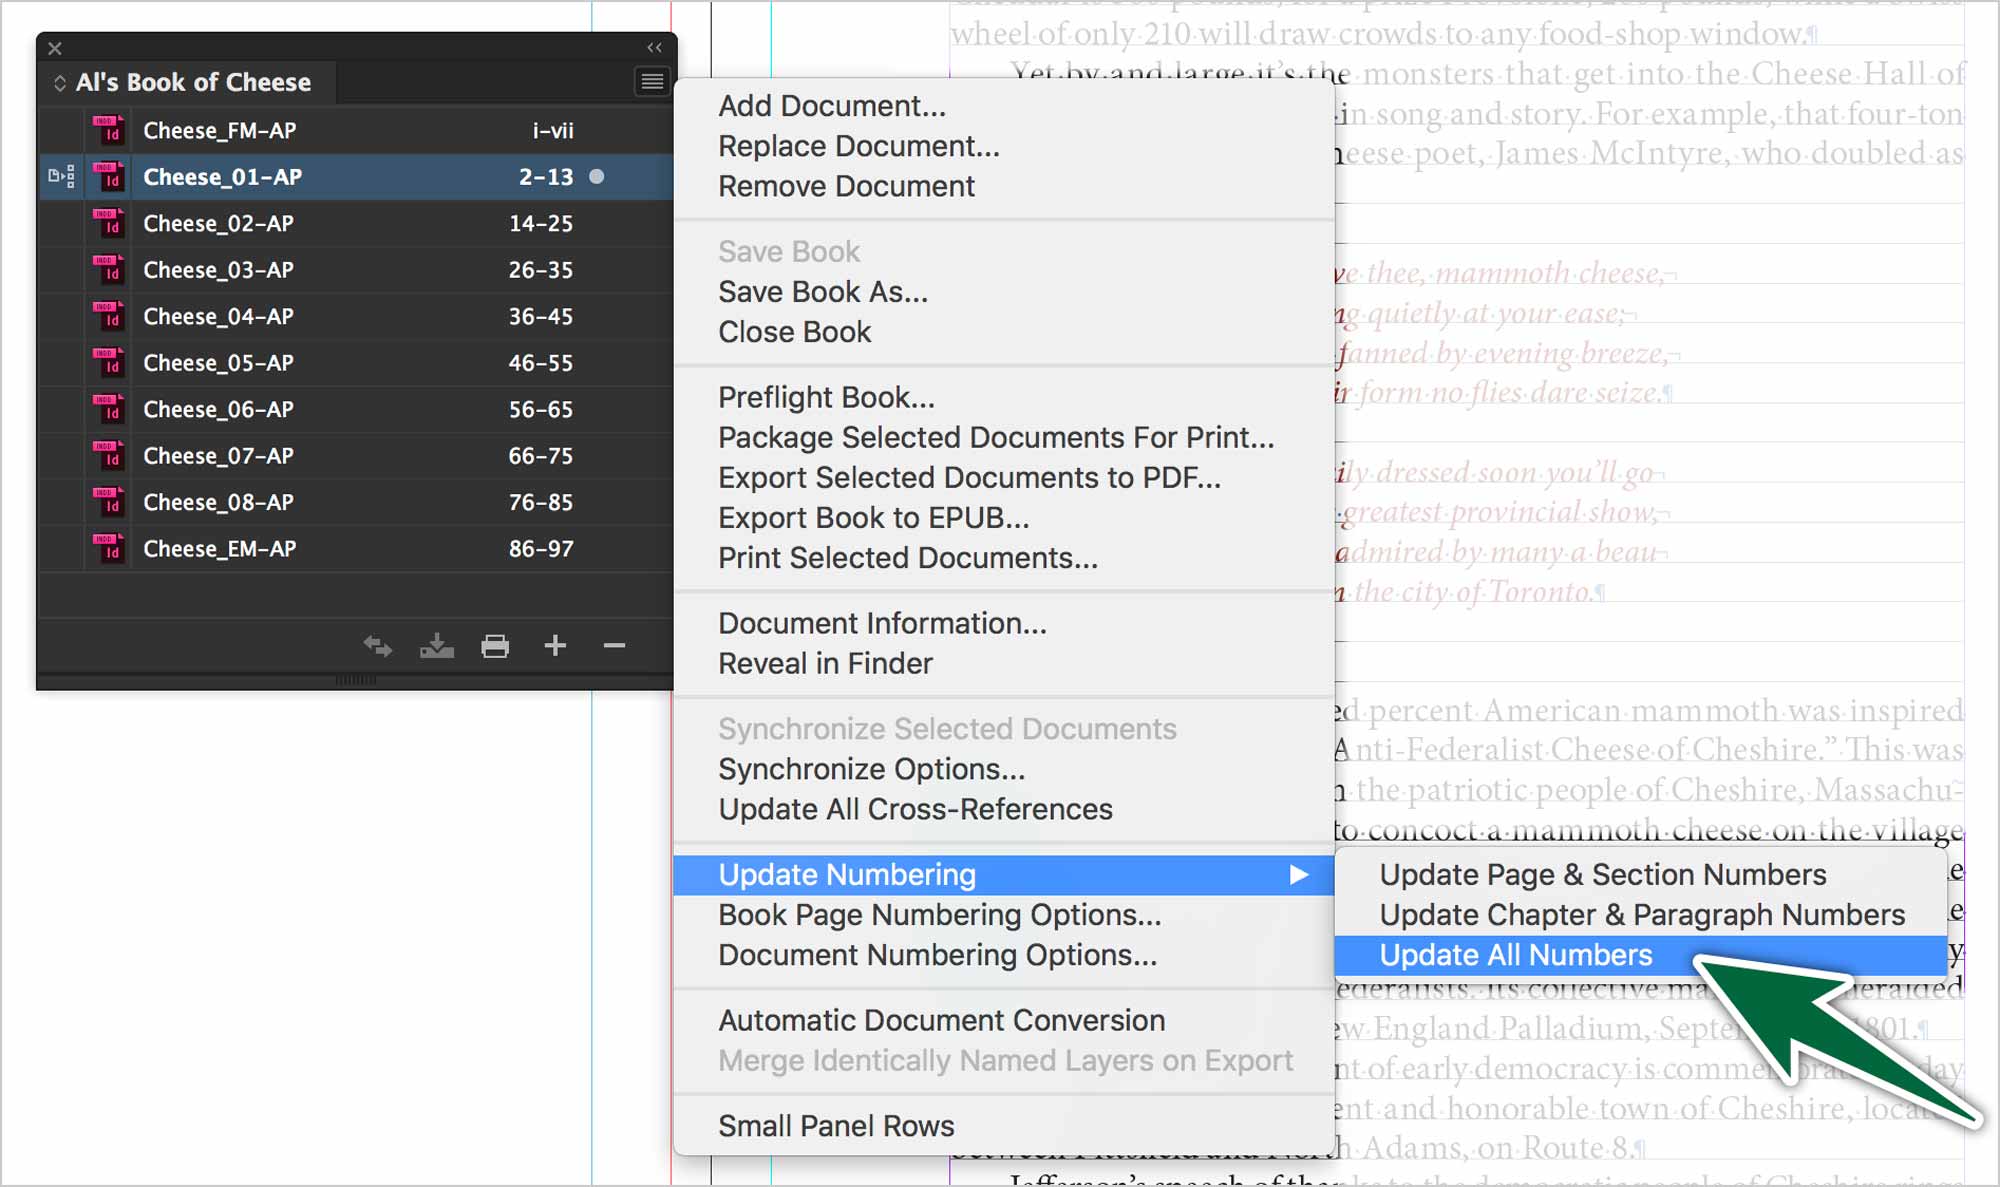
Imagine that you have a numbered list that continues throughout multiple documents in a book. You can control whether numbers conitnue from one document to another within a book. For some reason, InDesign calls number lists paragraph numbers.
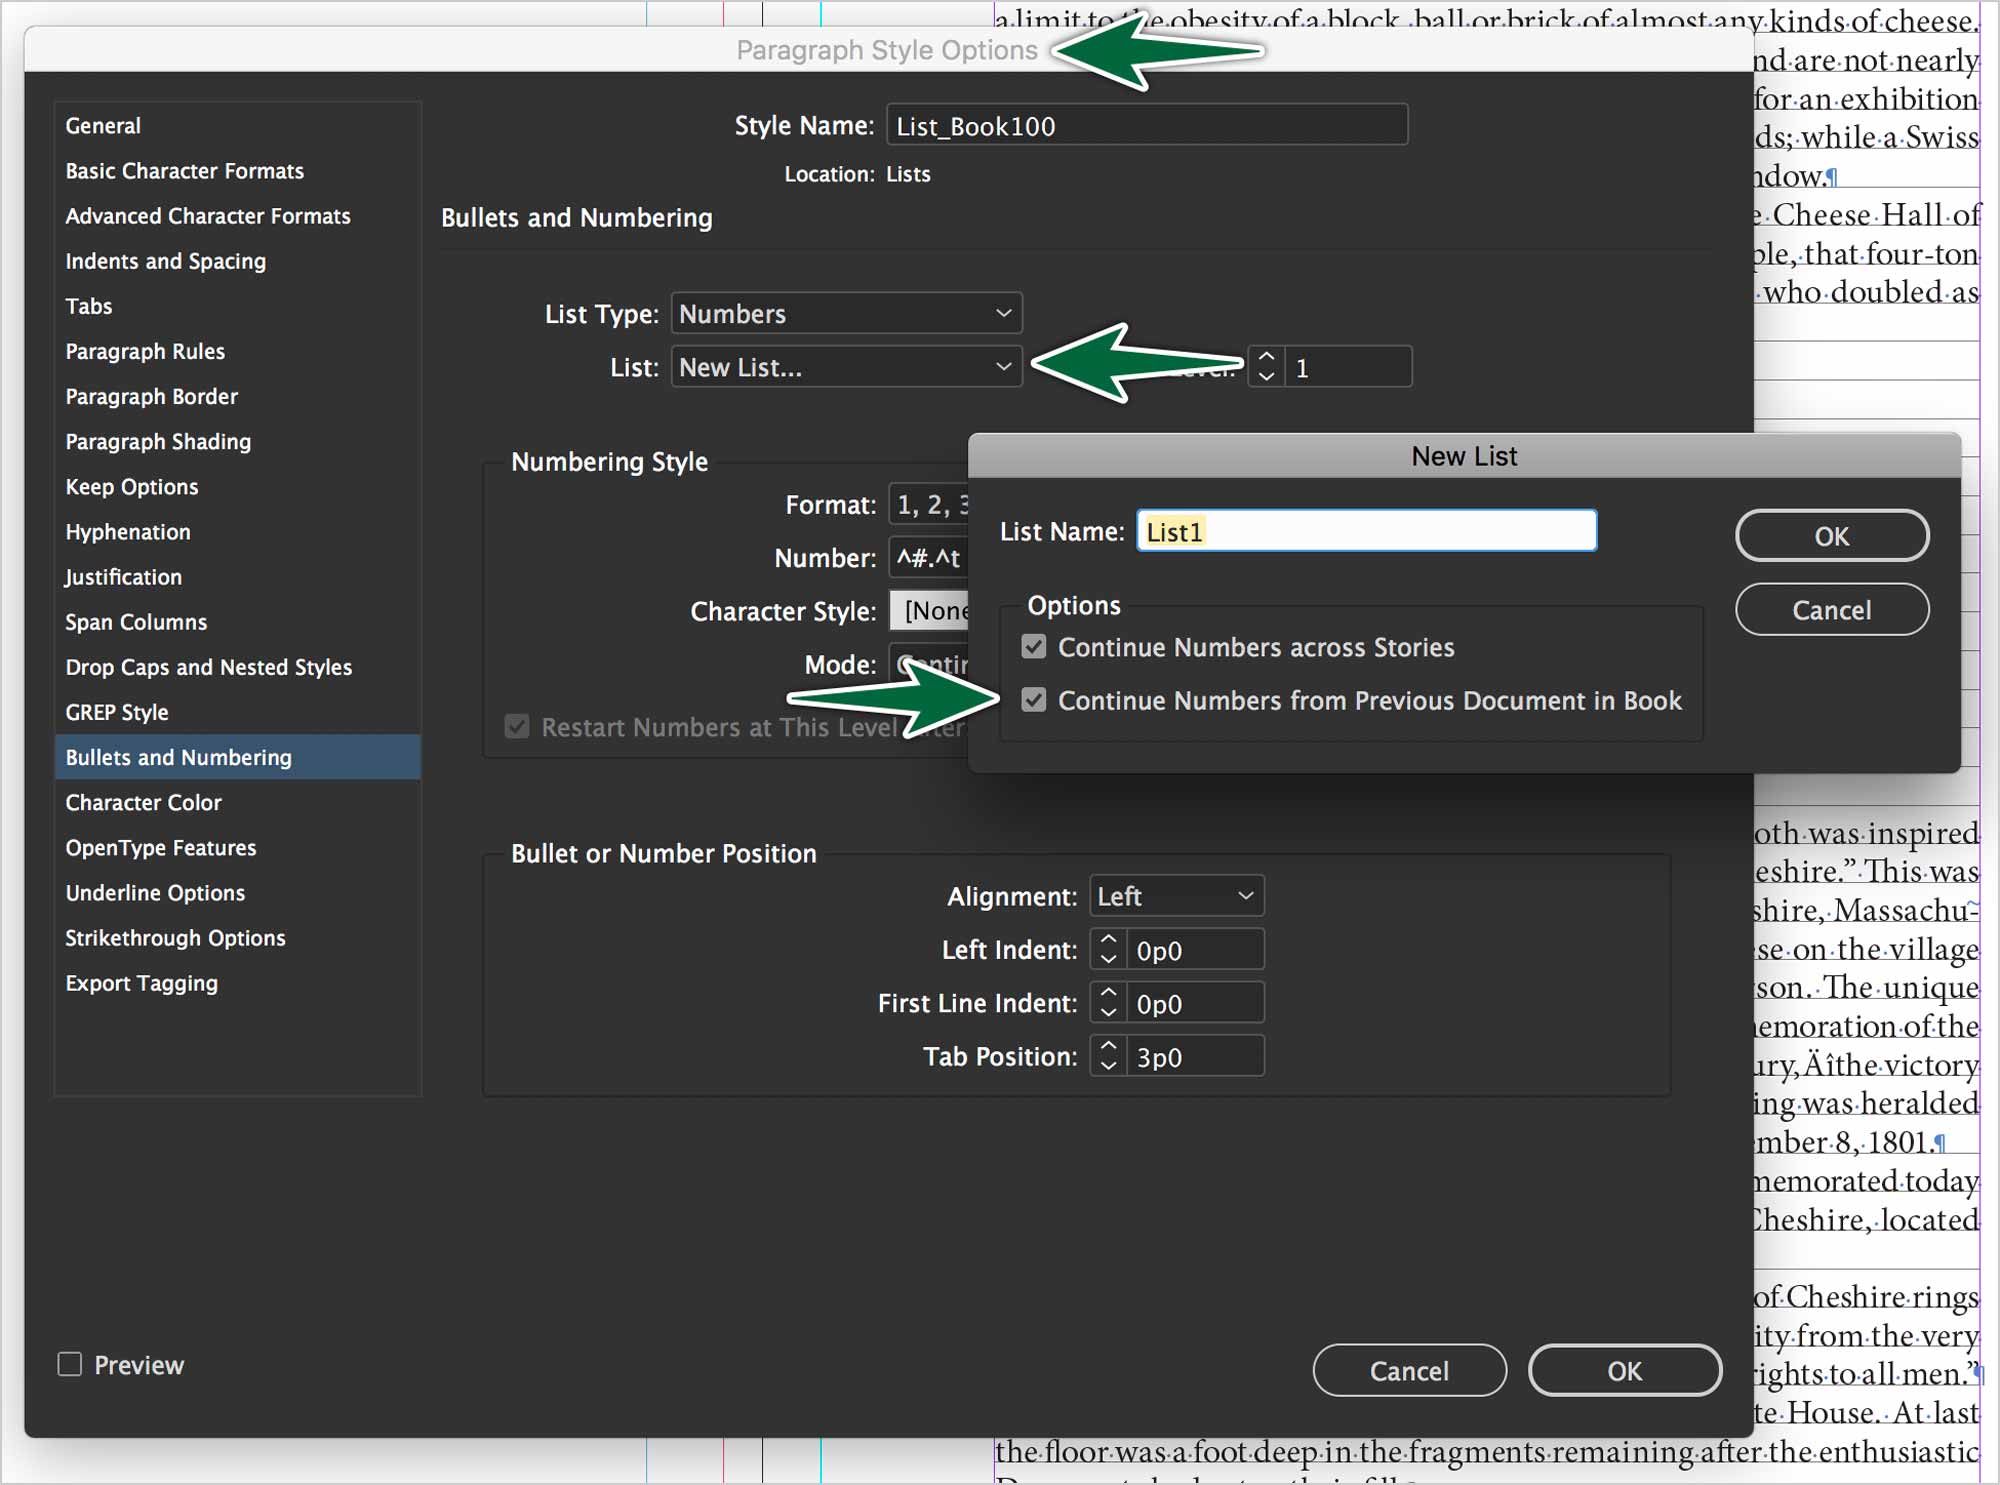
To do so, you need to define a numbered list. You create a defined number list in the paragraph styles panel, in Bullets & Numbering. Read lots about lists here.
Colour Swatches
Book files can sync colour swatch properties across their documents. If you’re using CMYK colours, it’s best to give them a name. It could something like Algonquin Green. Pantone will sync normally. Never edit a Pantone colour’s name.
Tables of Contents
When you build a TOC using InDesign’s Layout > Table of Contents… feature, it can take all the individual book documents into account.
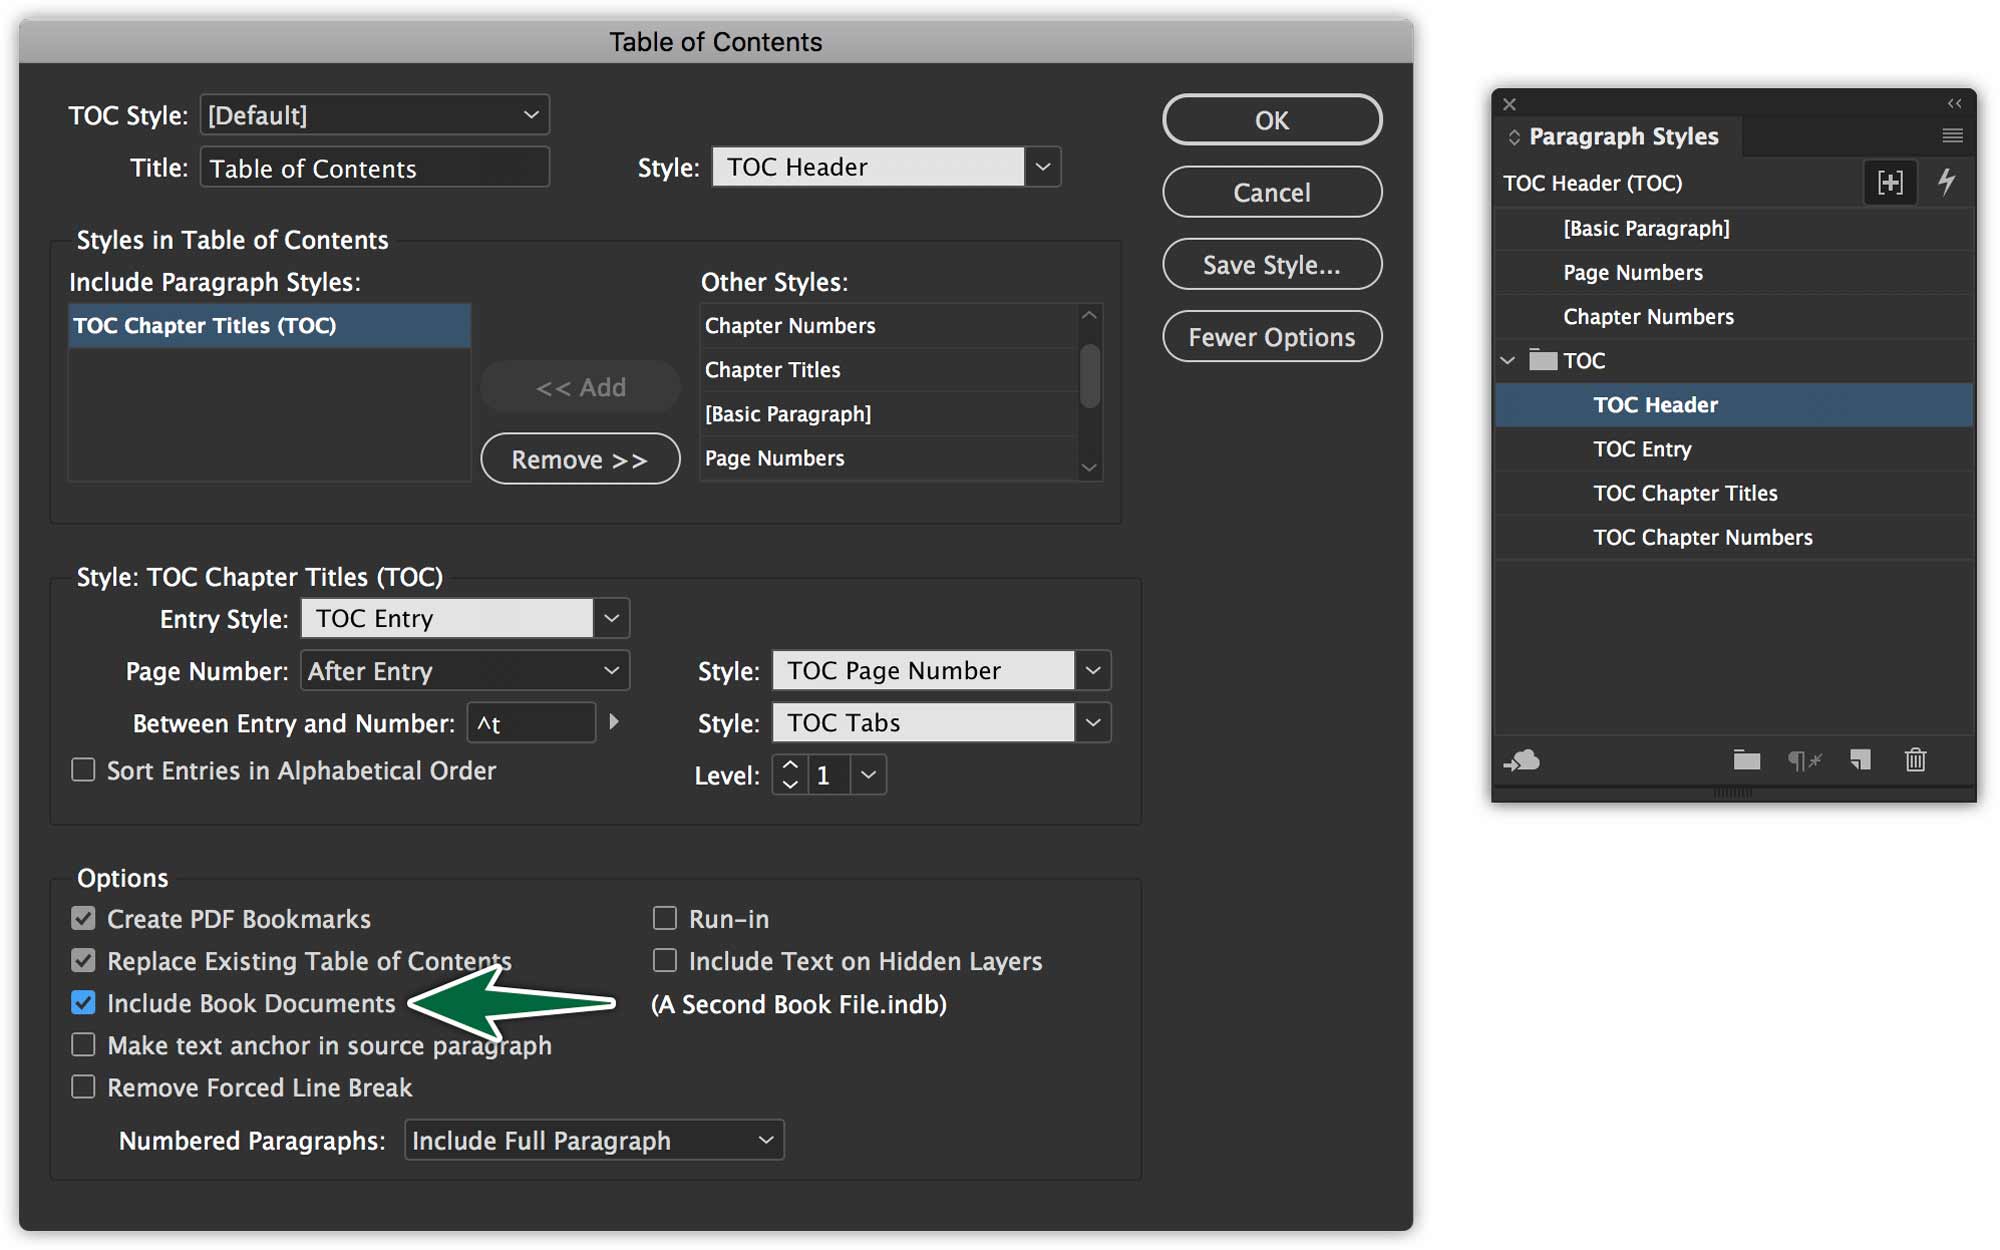
If you make changes to content in the book files, simply update the TOC from the Layout menu.
Synchronize book documents
One of the great benefits of working with book files in InDesign is the ability to synchronize paragraph styles and more across documents in a book.
- Indicates style source
- Synchronize styles & swatches
Sync is a really difficult thing to program. You’ll undoubtedly find issues you need to fix. That’s why Adobe made it non-destructive. It tends to add across documents more than deleting. Note that if you rename styles or swatches, you’ll break InDesign’s ability to sync that item. You may need to do some manual clean-up.
What Will Sync?
You can choose what to synchronize across all your book’s documents. Everything important can sync.
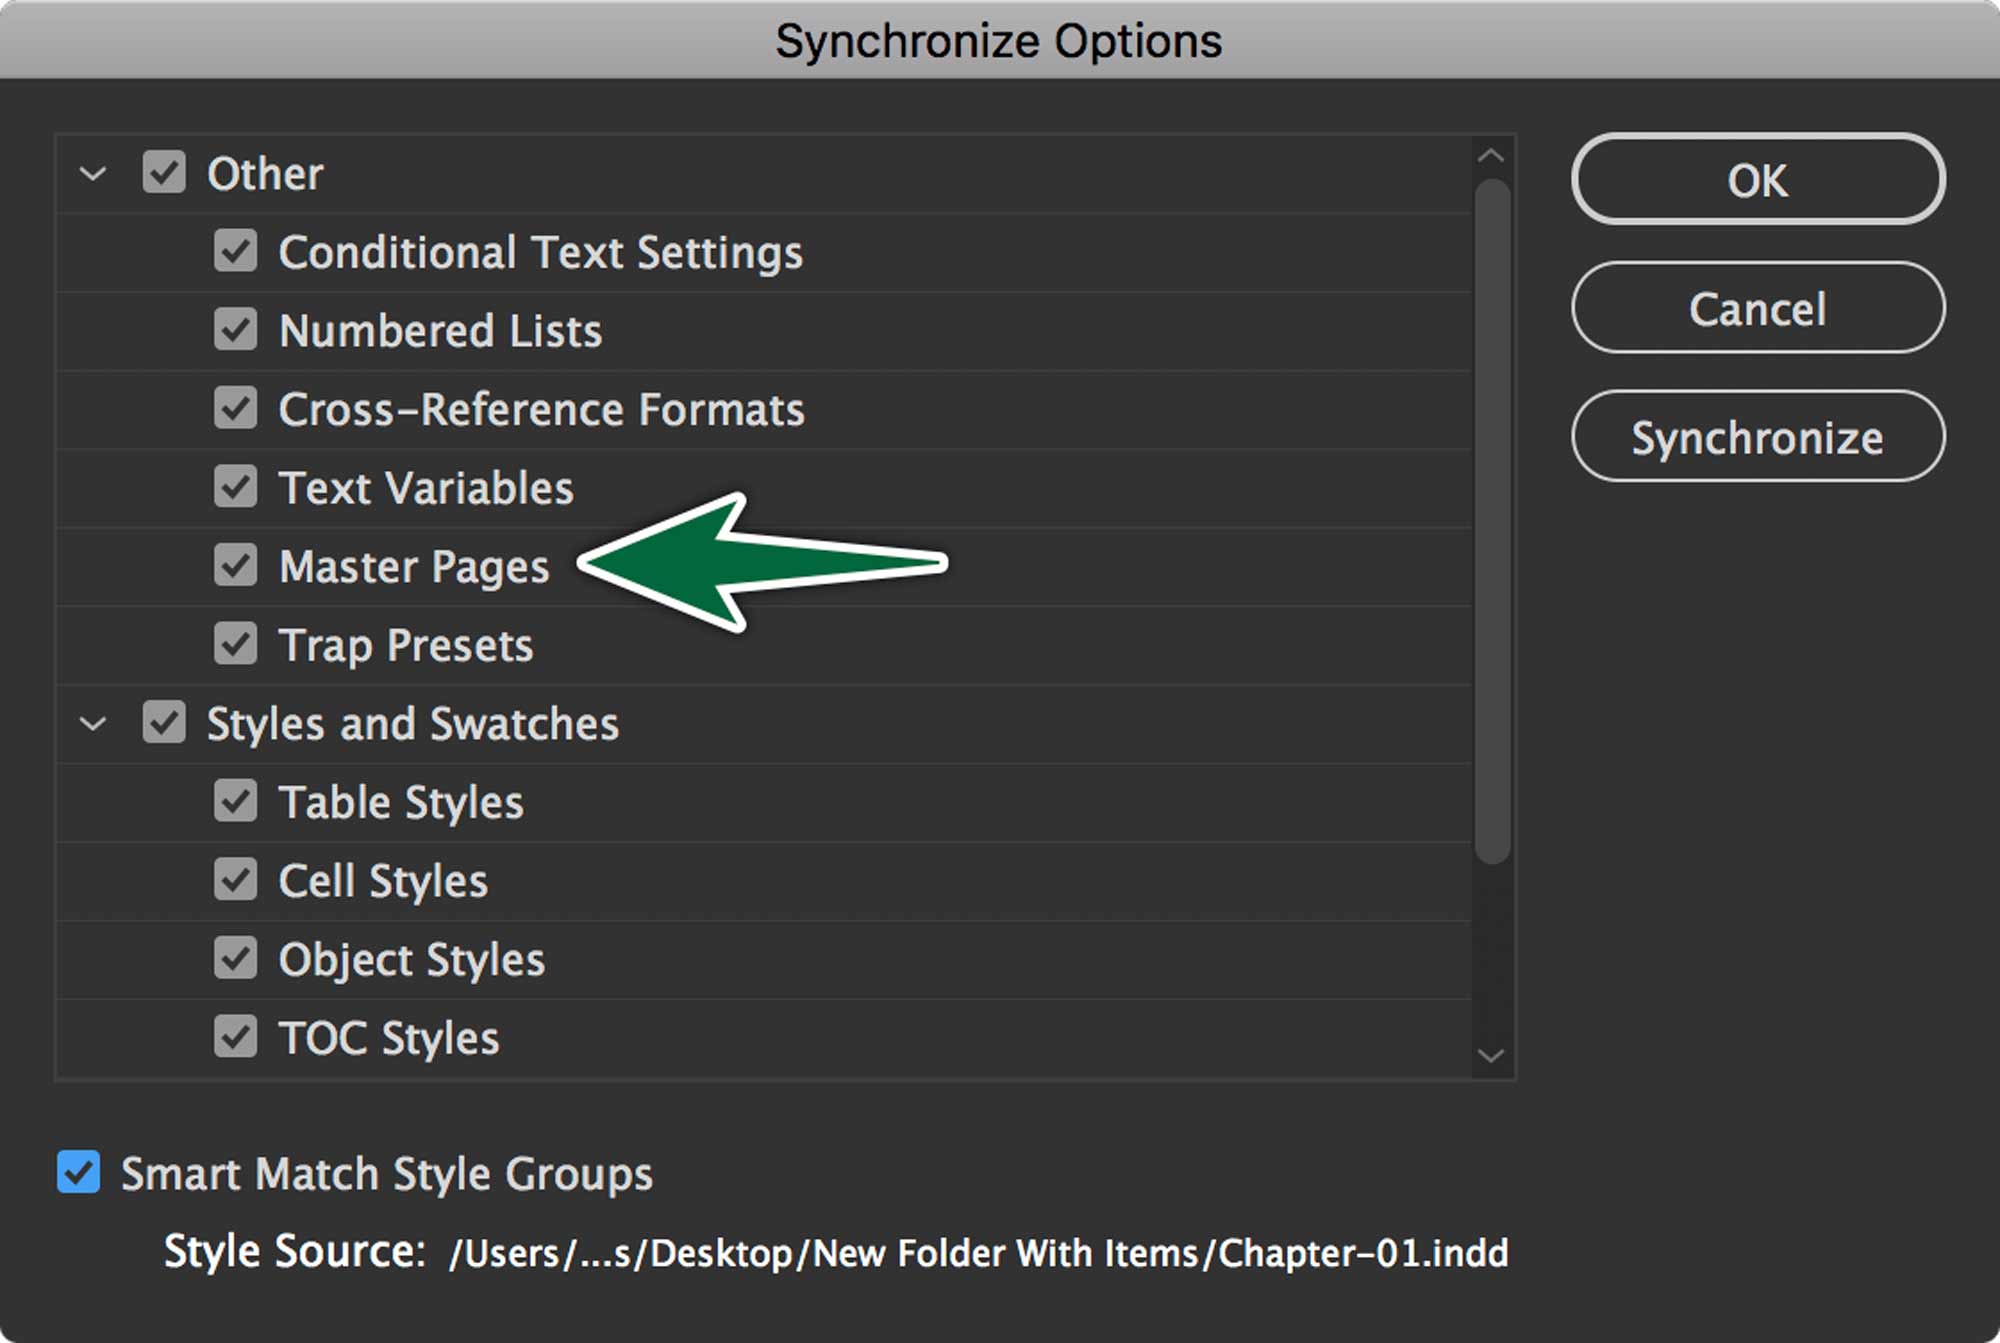
You’ll notice that layers don’t sync. The trick to get around this is simply to put an item from each layer on a Parent Page, then sync Parent Pages. That will make them sync.
Print or output a book file
Preflighting
You can really make the most of InDesign’s Preflight feature by running it on all the documents in a book.
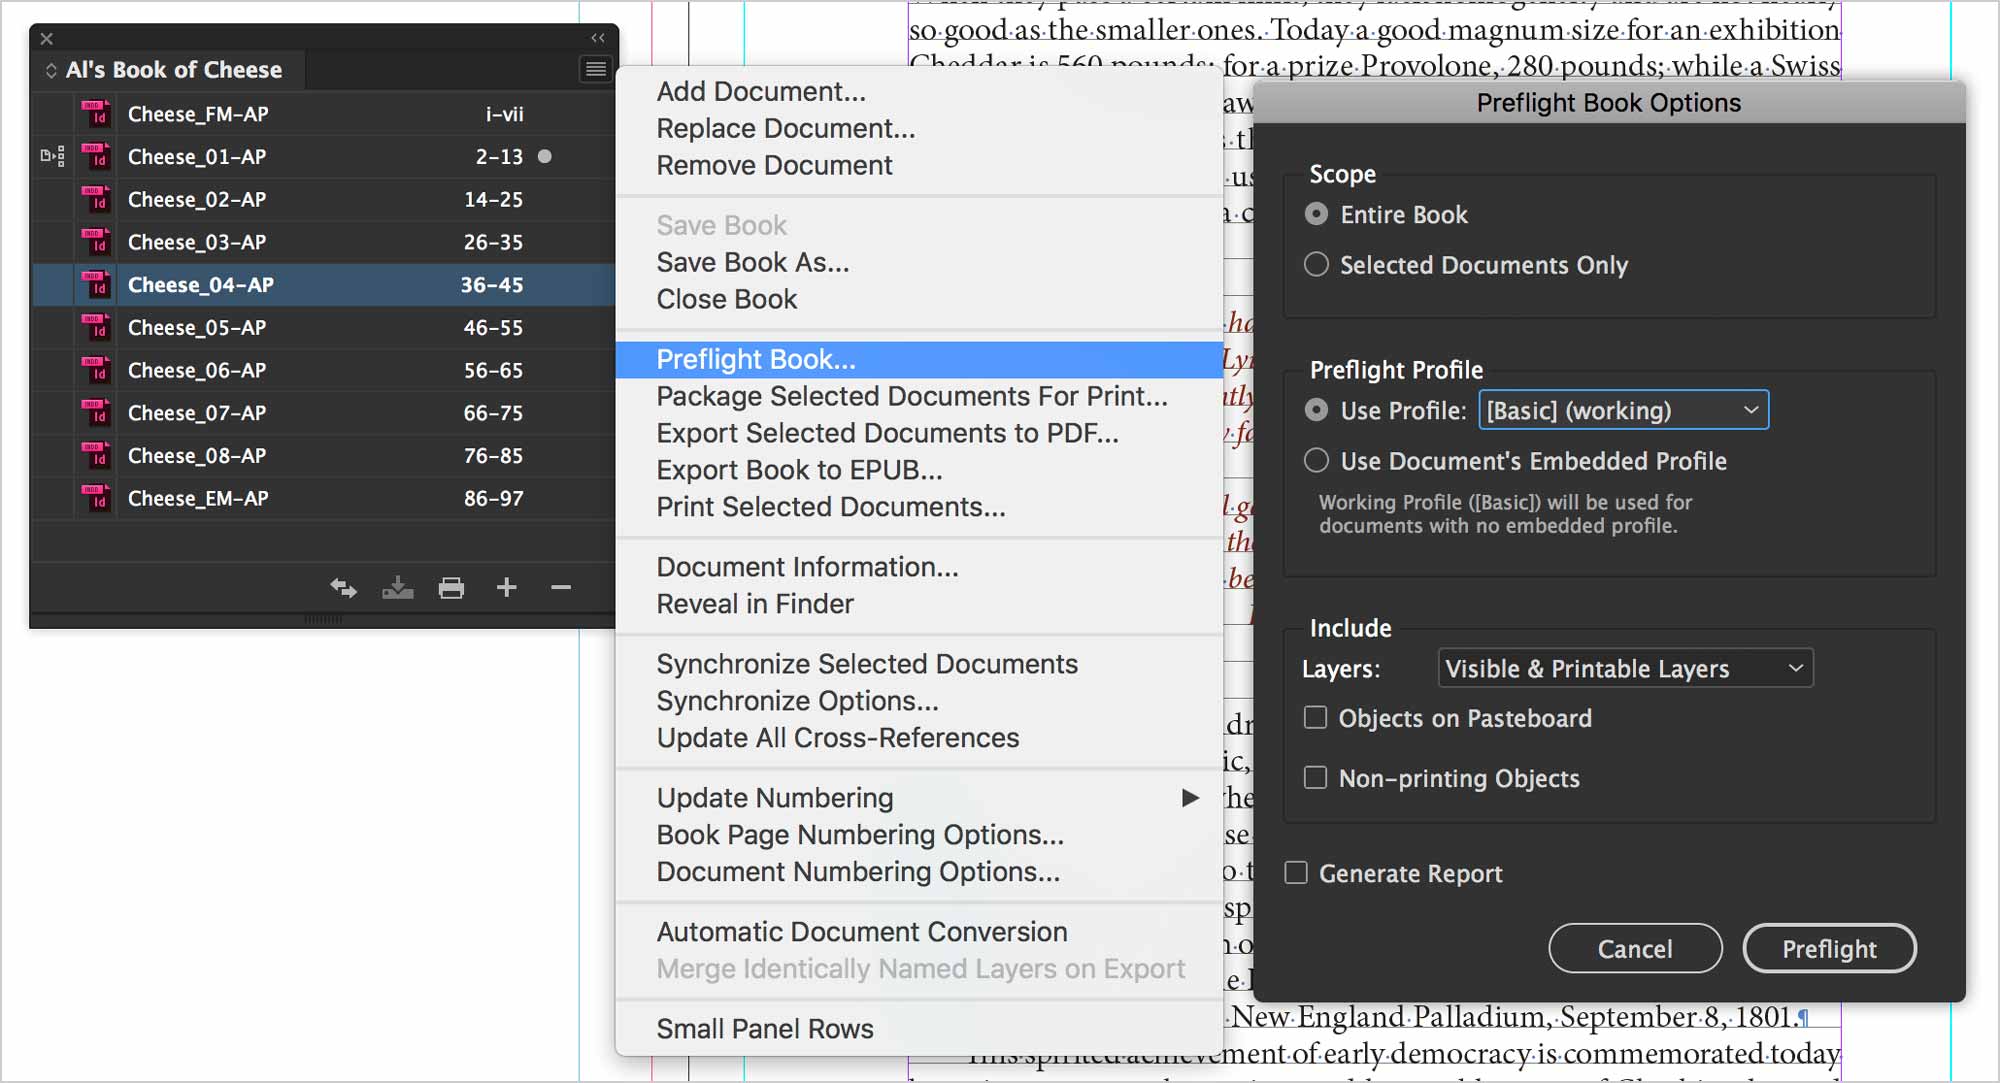
There are a number of options you can choose to preflight. Either way, once it’s done its thing, you’ll get a green light if your documents are okay or a red light if they’re not.
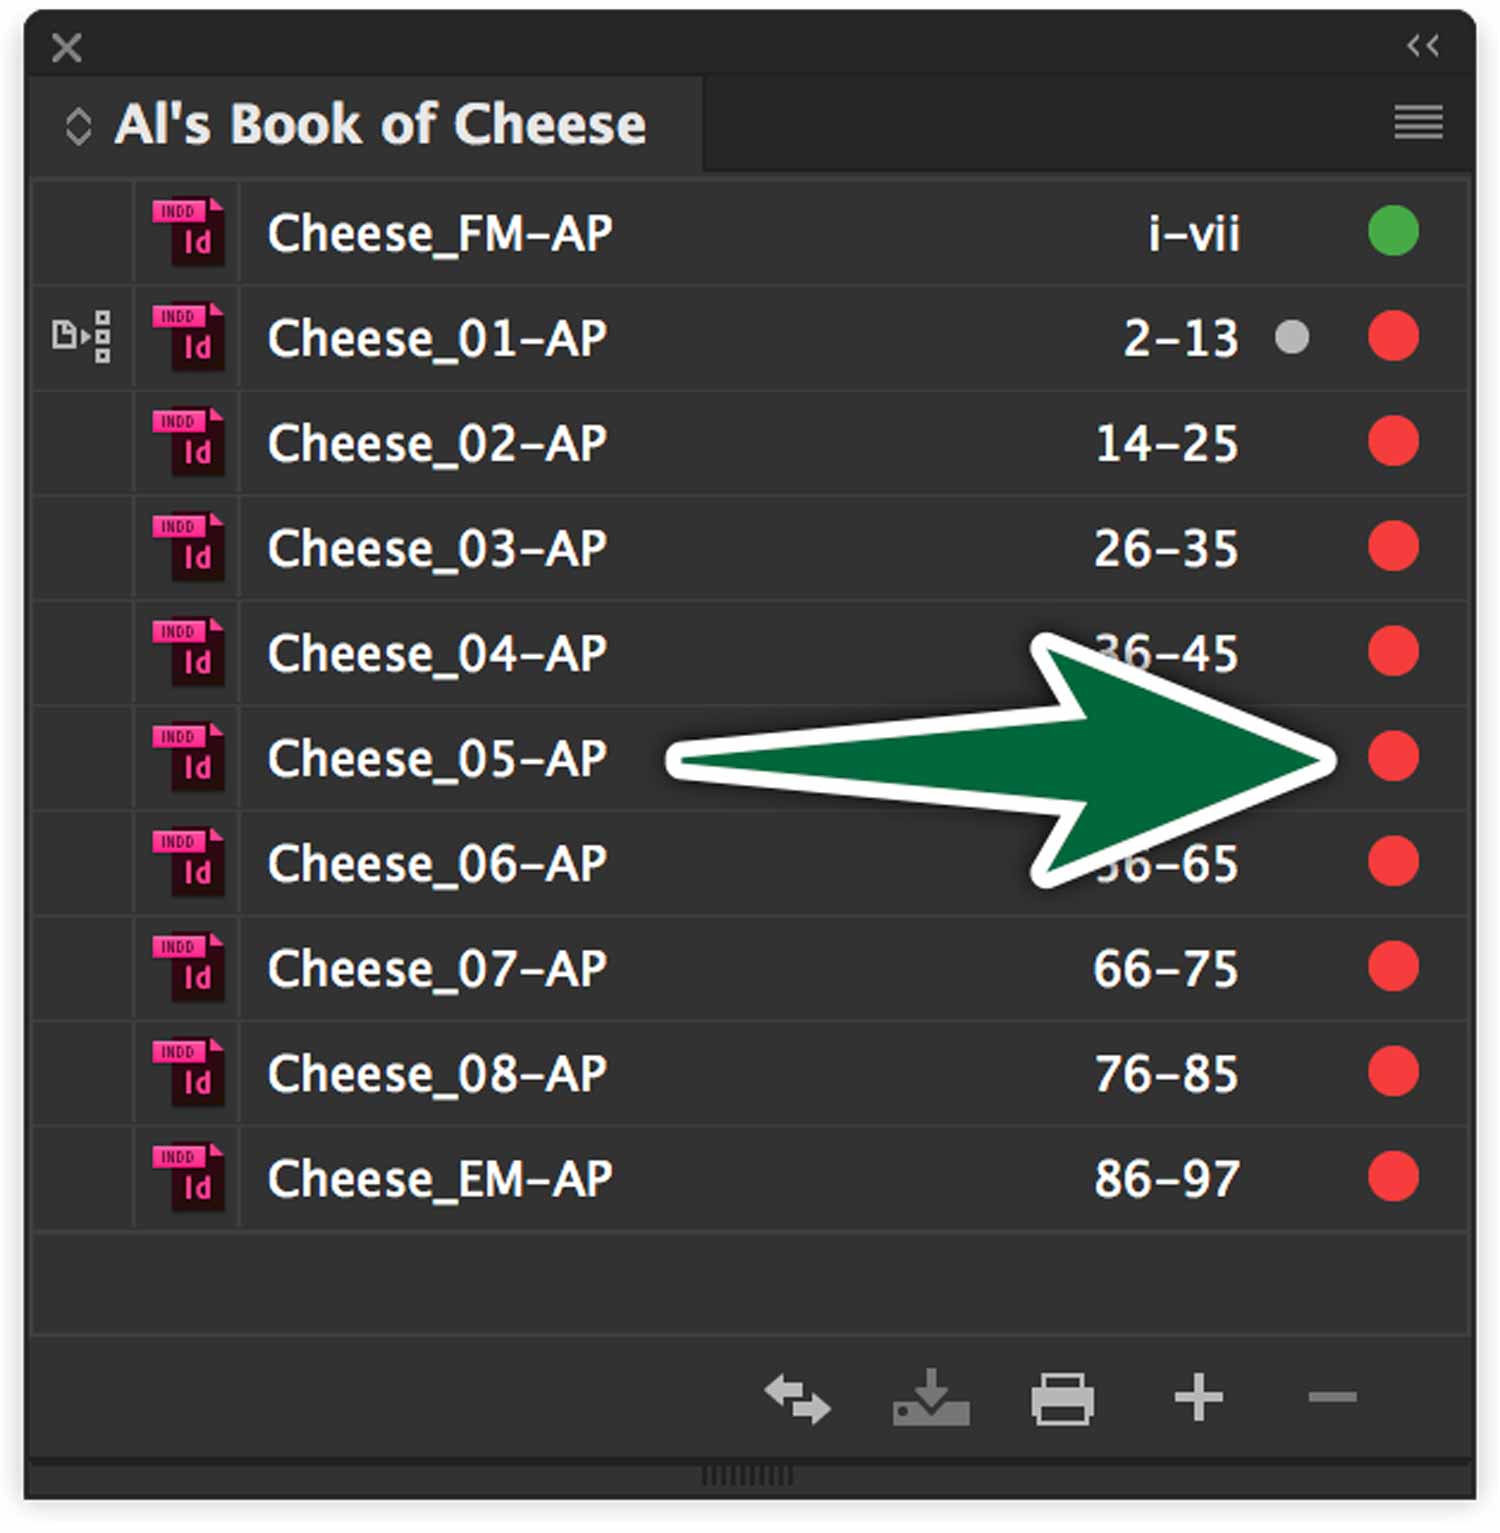
We need to open each of this book’s documents to resolve each issue. Once we’re done, we’ll need to run the preflight feature again until we get green lights across the board.
Output Your Book
⌘-P won’t work to print a book. You need to use the Book panel’s menu to output the book.
As you can see, working with a book file can save a lot of time compared to working with one long document. They’ll help you keep things in sync between documents. You can also preflight and output really easily.
Formative Activity
Our Source Document
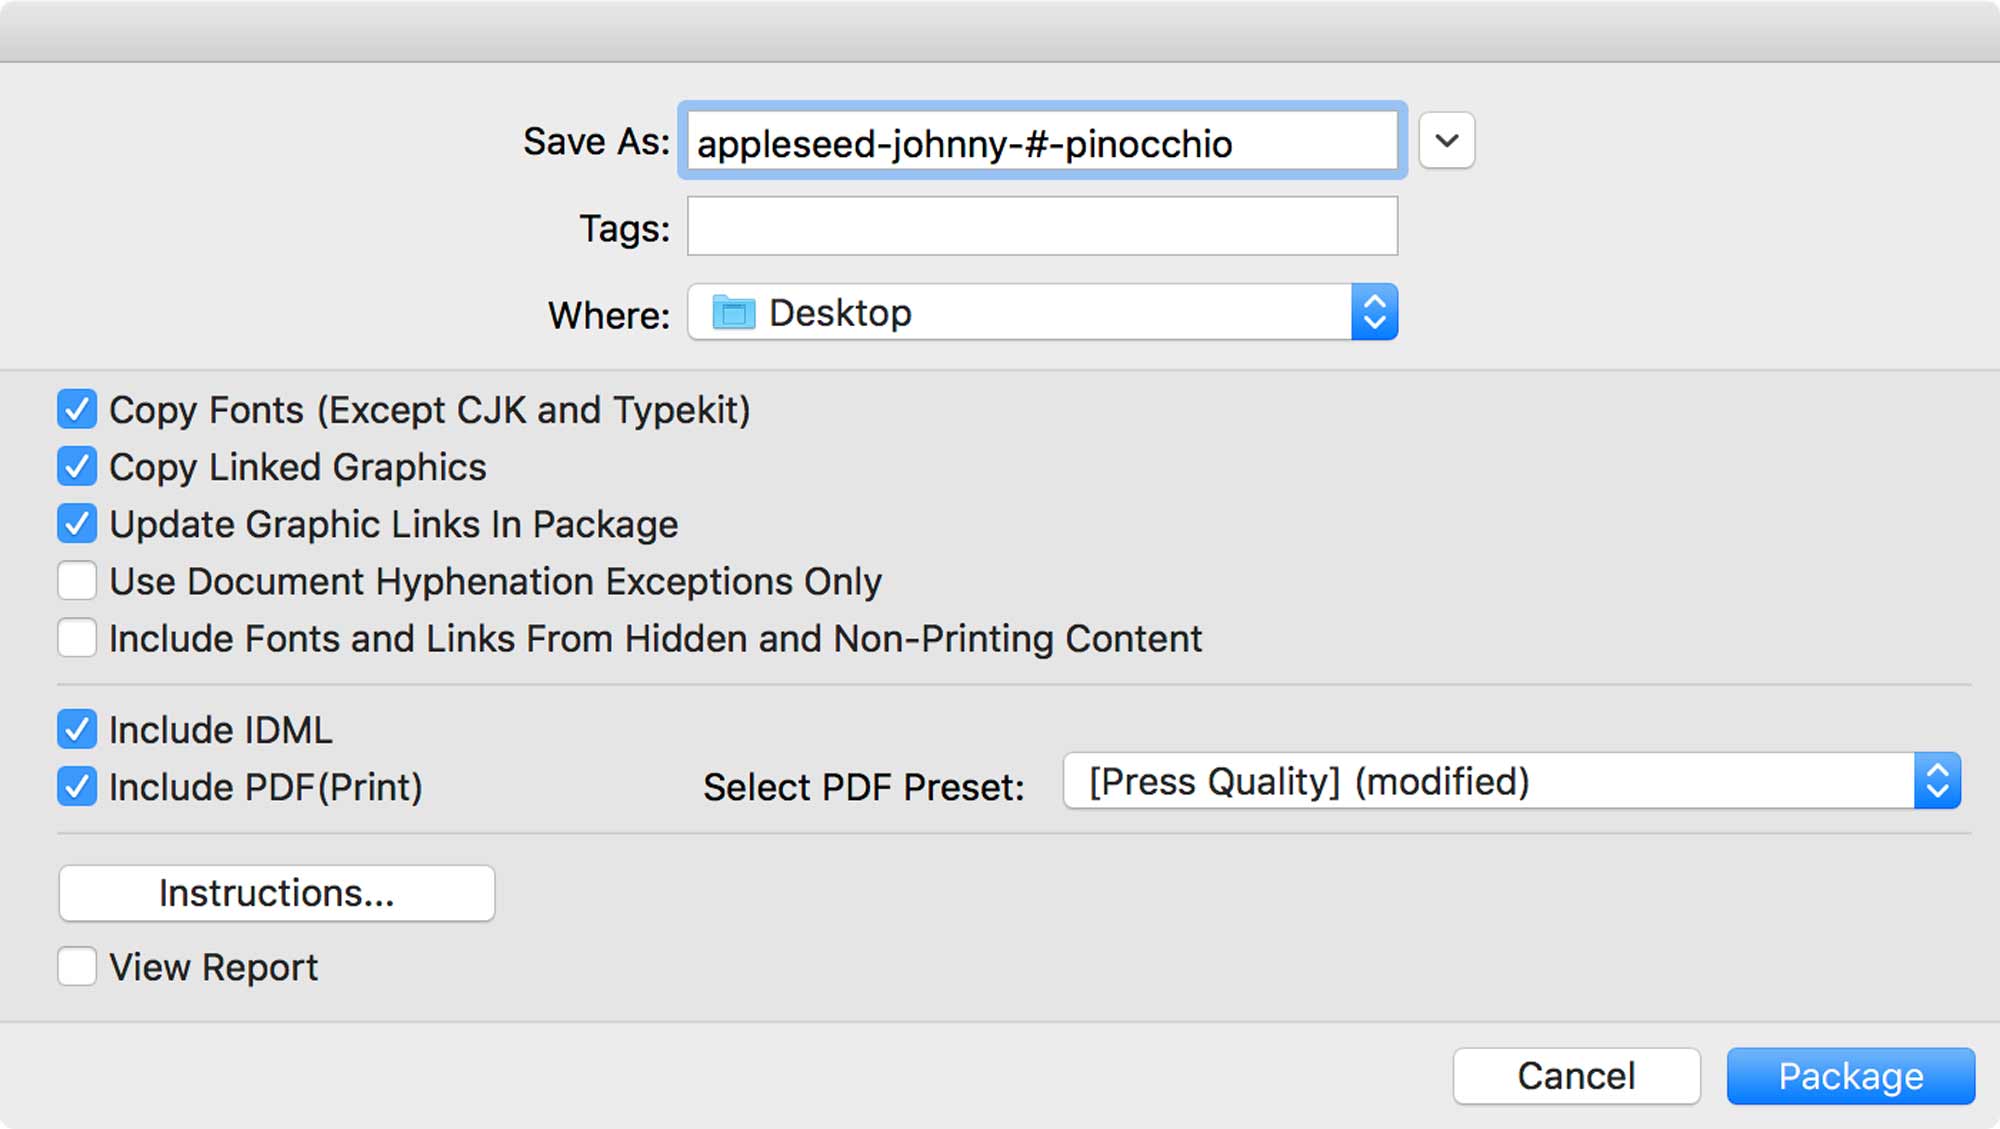
Create a single InDesign document with 20 facing pages. Make sure to use all the settings shown below.
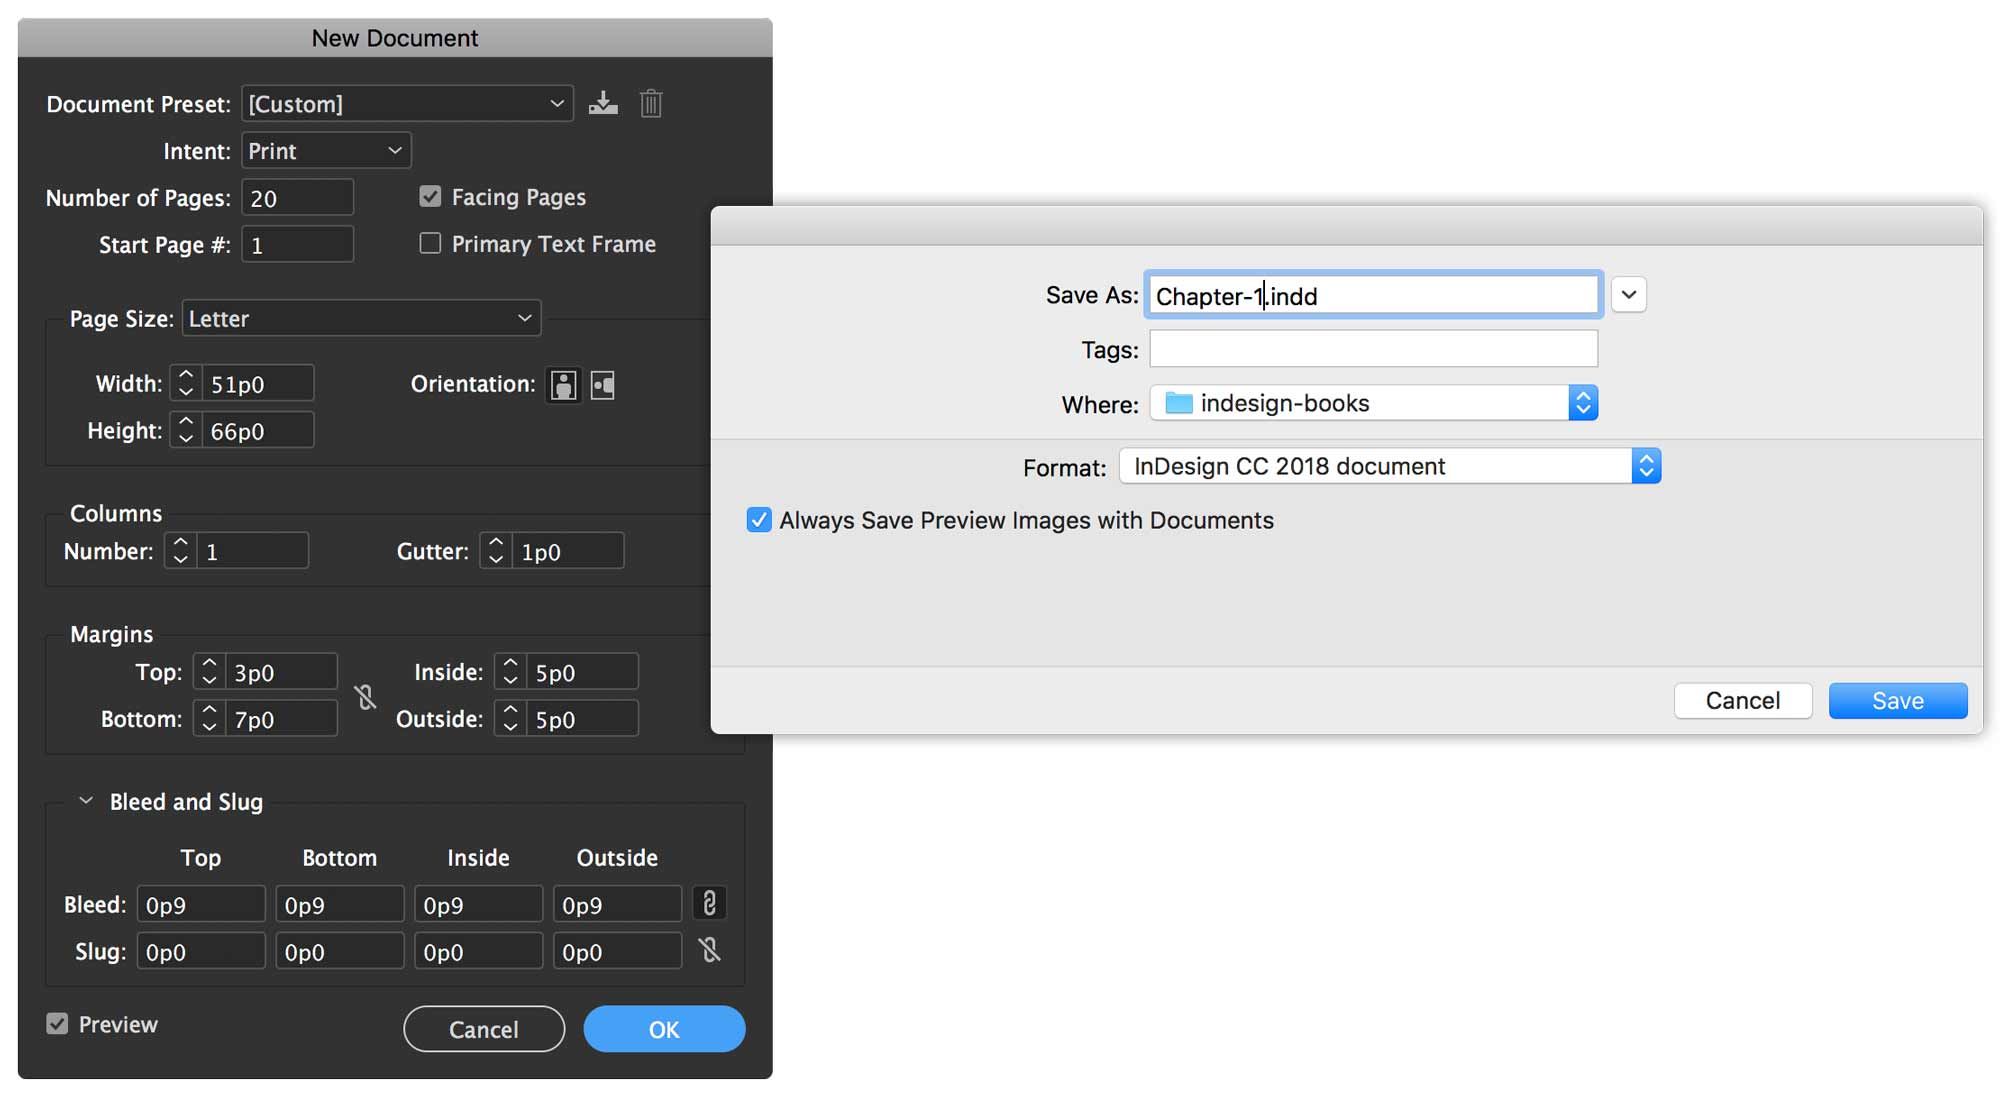
Let’s make some changes to our source document before we create a book. The first document we create is our parent document. It’s going to be the model upon which all the other documents in the book are based. Do this:
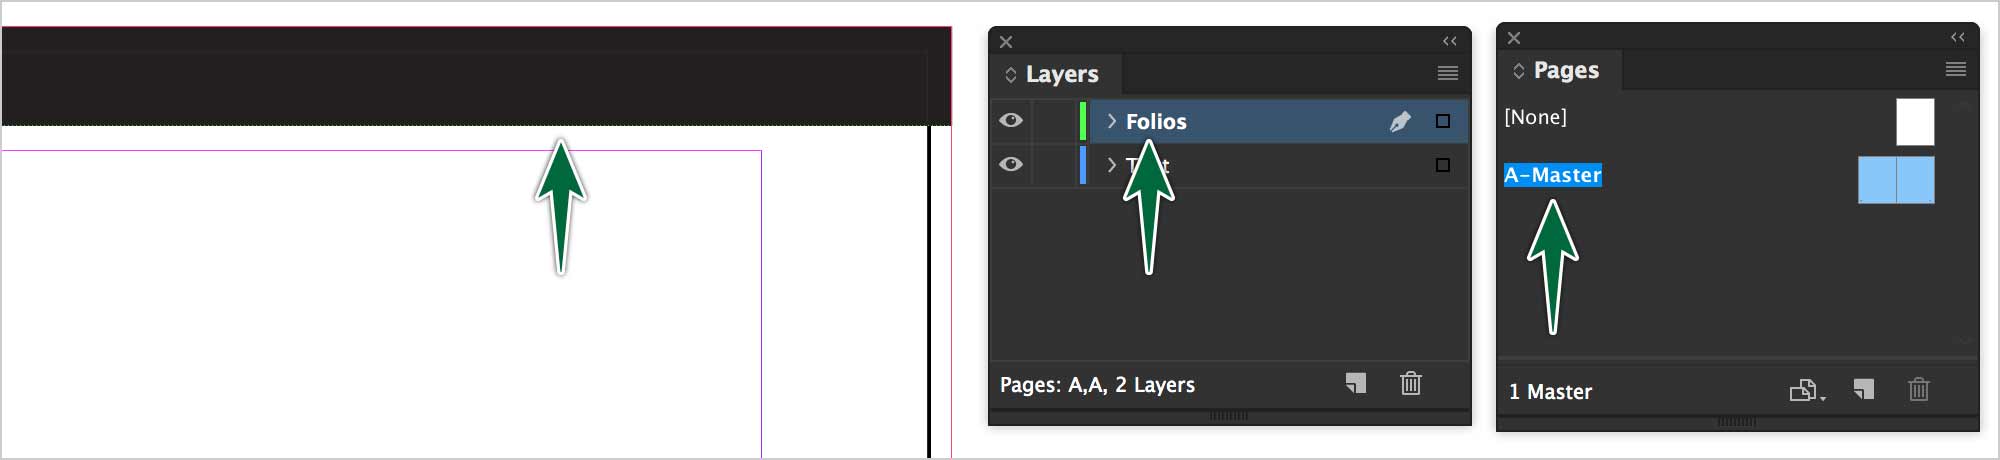
- Rename Layer 1 to ‘Text’. Create new layers ‘Images’ and ‘Folios’. Make sure ‘Text’ is above ‘Images’.
- Change Basic Paragraph style to Minion Pro 9pt.
Swatches
Go to your Swatches panel. Select all unused swatches, then delete them. You should be left with only the basic None, Paper, Registration and Black.
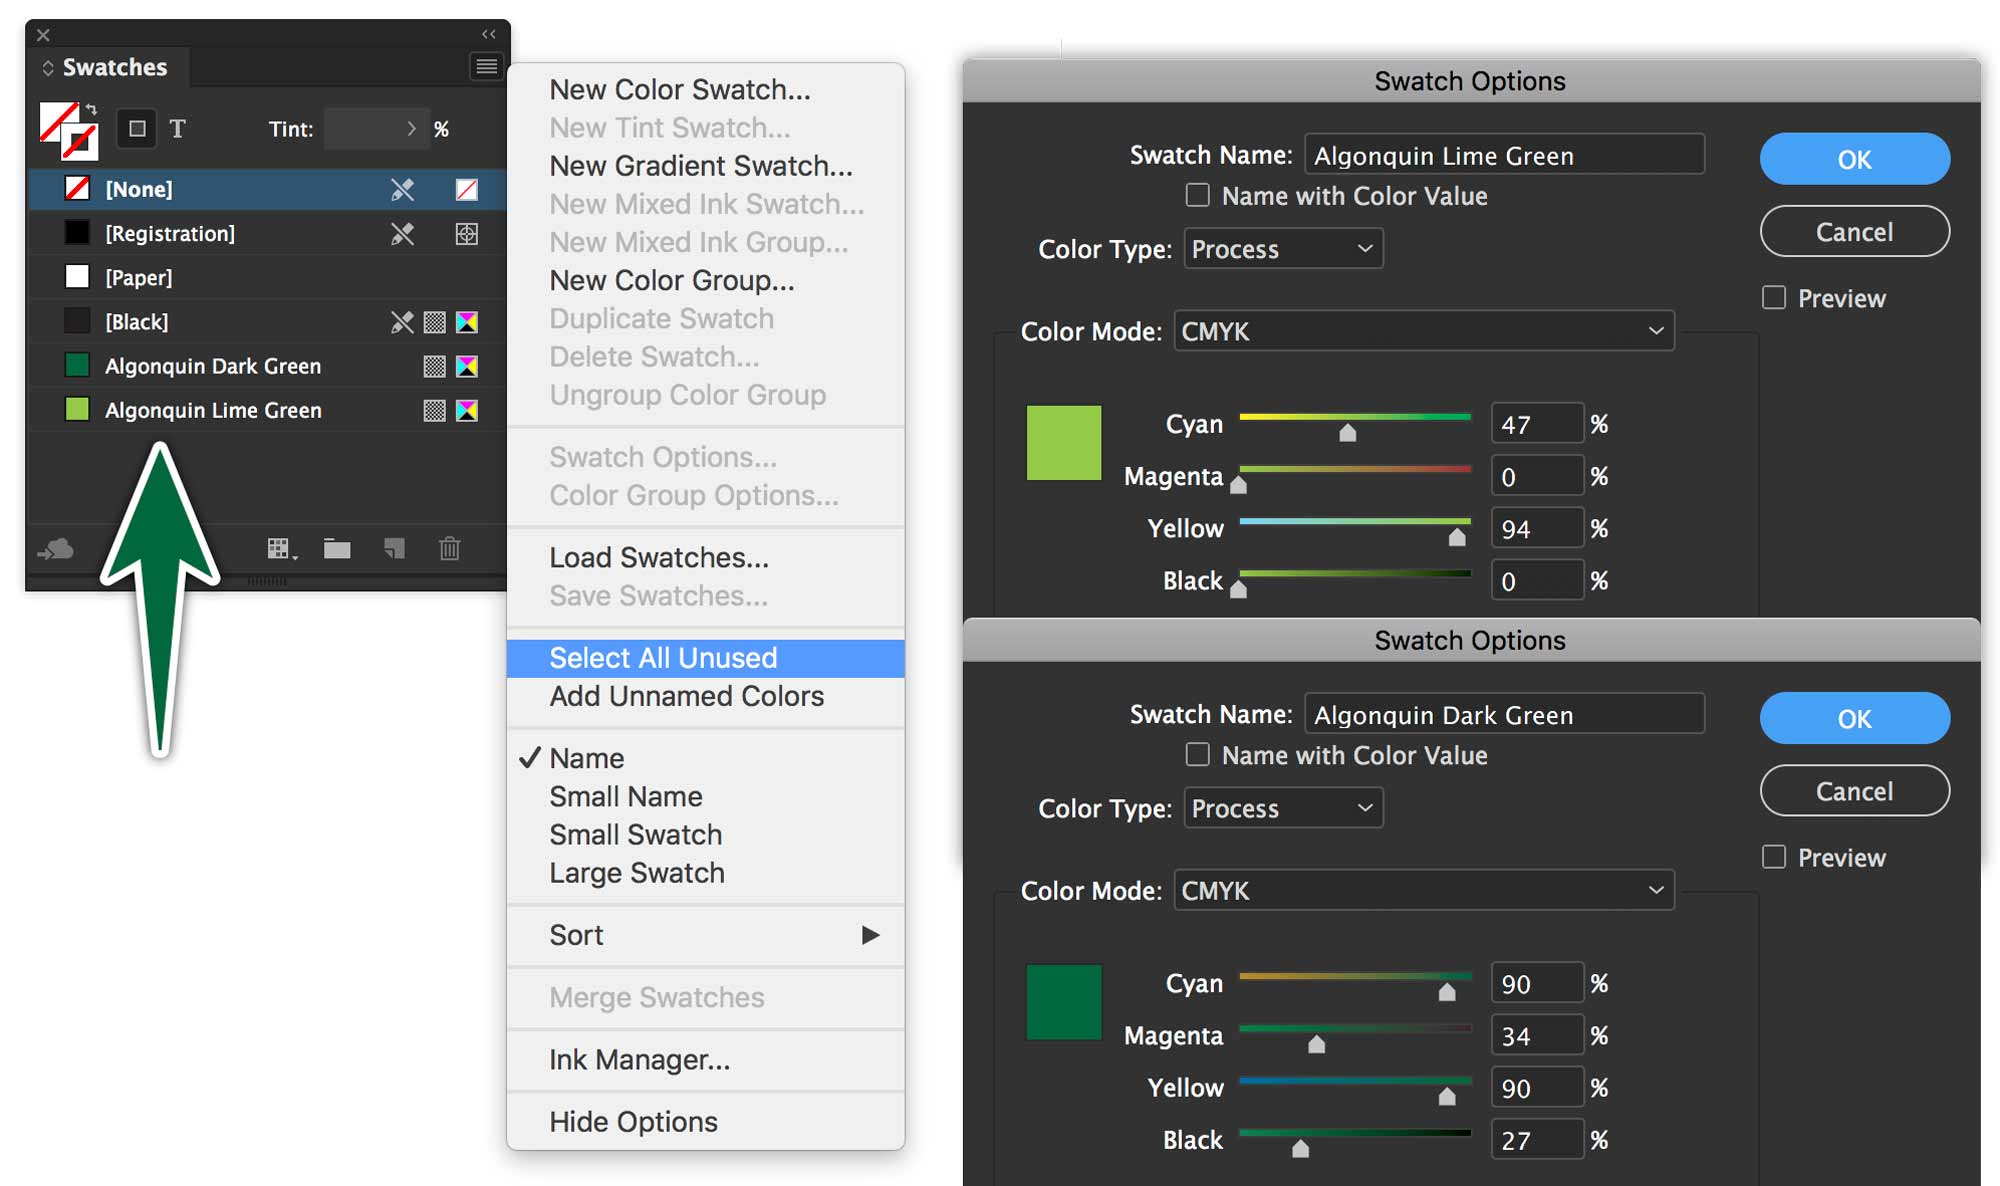
Add the two Algonquin green swatches. The CMYK recipes are pictured above. Make sure you name them. This helps keep things in order when we sync our book file.
Our Book File
Now we can close the Chapter 1 InDesign document. Go to the folder in the Finder, duplicate the InDesign document using ⌘-D. Create seven documents in all. Name them:
- FM.indd (for Front Matter)
- This would be for our Table of Contents, dedication page, etc…
- Chapter-1.indd
- Chapter-2.indd
- Chapter-3.indd
- Chapter-4.indd
- Chapter-5.indd
- EM.indd (for End Matter)
- This document would have our index and anything else that goes at the end of the book.
Let’s create a new book file, then add the InDesign documents to it.
Make Chapter 1 our sync source, then open all the documents in the book. Open your Chapter 1 document.
Now open the Front Matter and End Matter documents. Delete 16 pages from these documents so there are only 4 pages left in them. These are the pages for the table of contents, dedication page, index, etc… Note how the page numbering adjusts across all the doucuments in the book.
You’ll need to Option-click on the Sync button ⇆, then turn on Parent Pages.
Parent Pages
Pagination
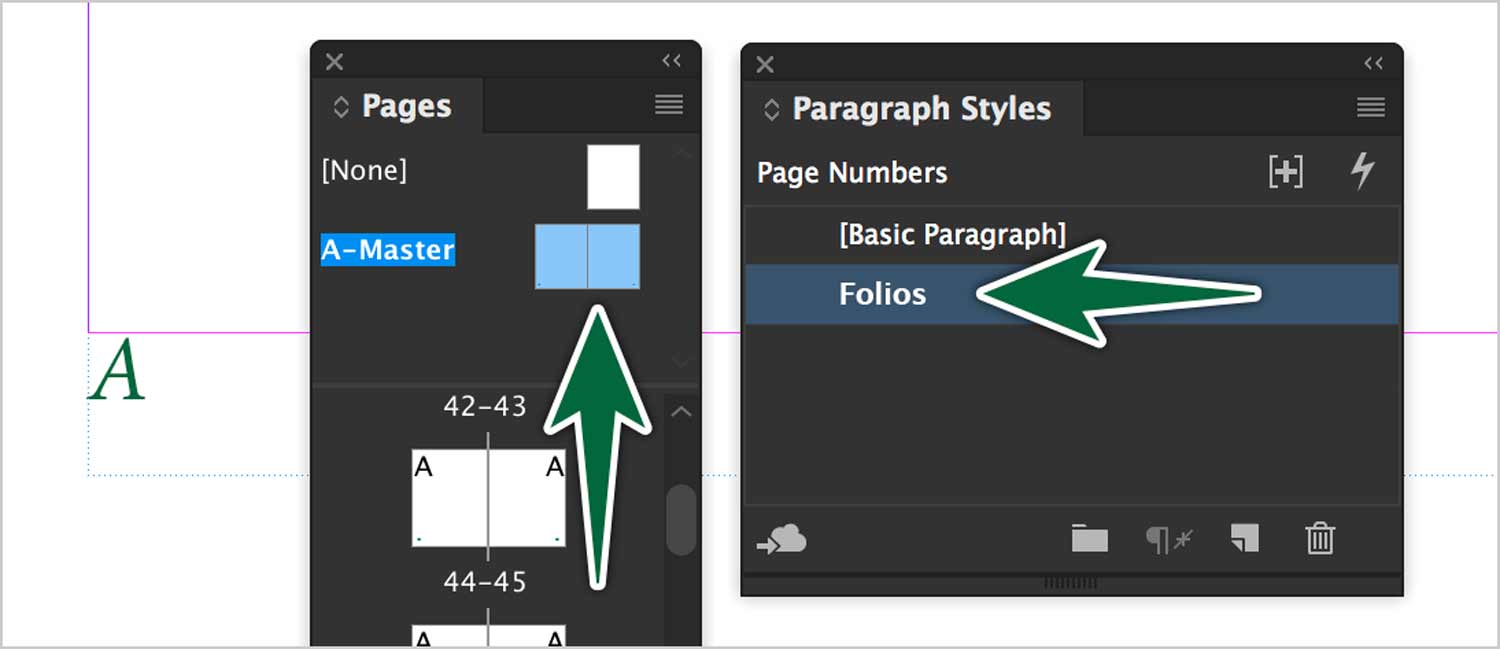
Create a new layer in the Layers panel called Folios. Add page numbers to A-Parent page on the Folios layer. Remember to set text alignment to Away from Spine in the paragraph style.
Let’s Sync Some Content!
Each time you edit the Chapter 1 file, you can hit the sync button ⇆ to propagate the changes to the other files. Just make sure none of the documents are highlighted in the Book panel.
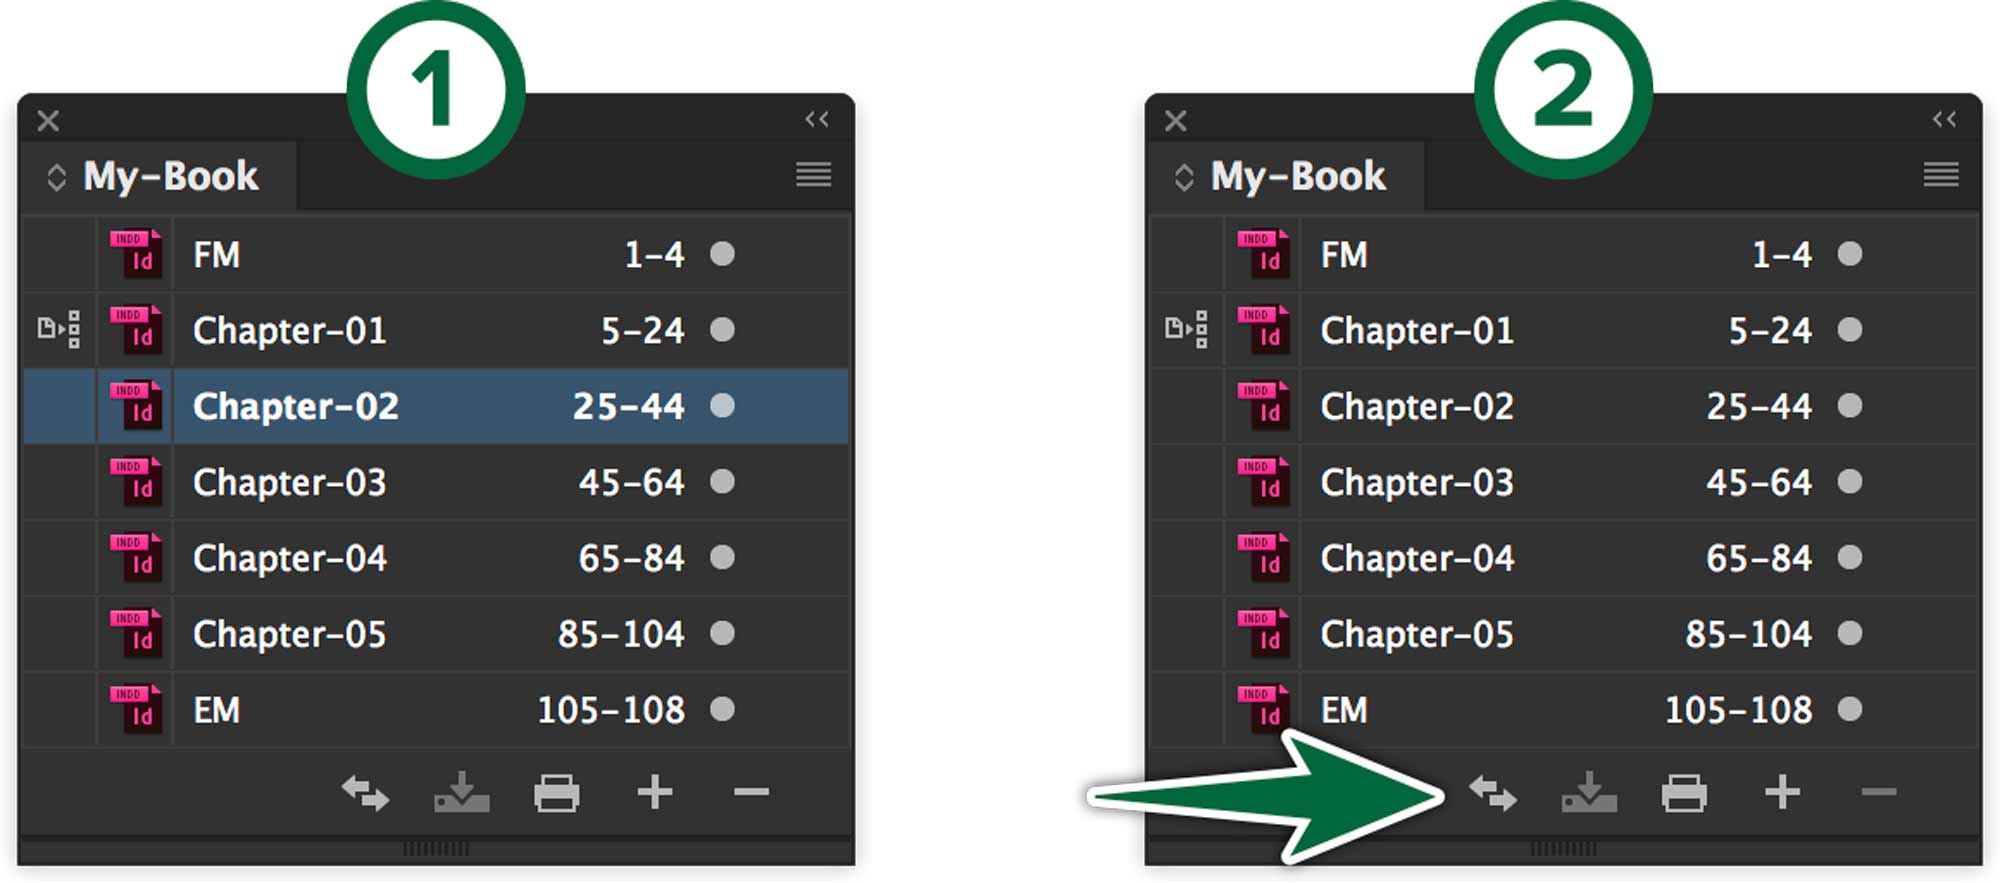
- If a doc is targeted, only that one will sync.
- In this case, they'll all sync.
If you highlight a document in the Book panel, only it will sync with the source file. It’s best to have no files targeted while syncing. I’ll remind you again, keep all documents open in InDesign so you can Undo a sync if you make a mistake.
Page Decorations
On the Folios layer and on the A-Parent, add a 3p0 black bar across the top of the spread using the Rectangle tool. Make sure you reach the bleed line on three sides.
Chapters Titles
We’re going to create automatic chapter numbers across documents in our book. To do so, we need to make the Chapter 1 document the first chapter in the book, otherwise, it’s going to count our Front Matter document as the first chapter.
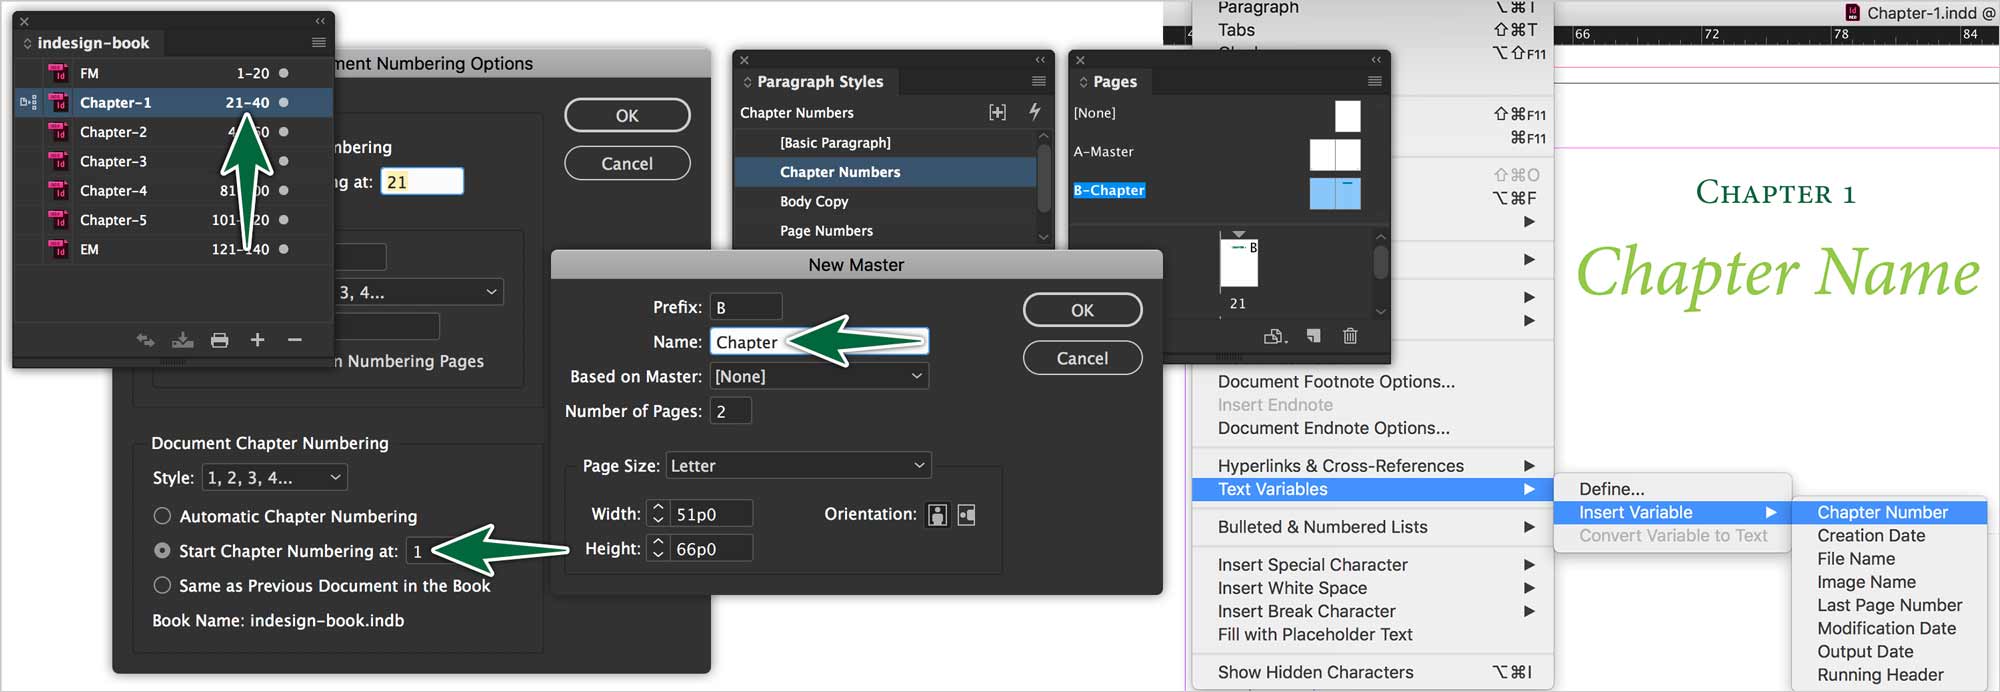
- Hold Option, then double-click on the page numbers for Chapter 1 in the Book panel. Set the numbering to start at 1.
- Create a new Parent Page called B-Chapter.
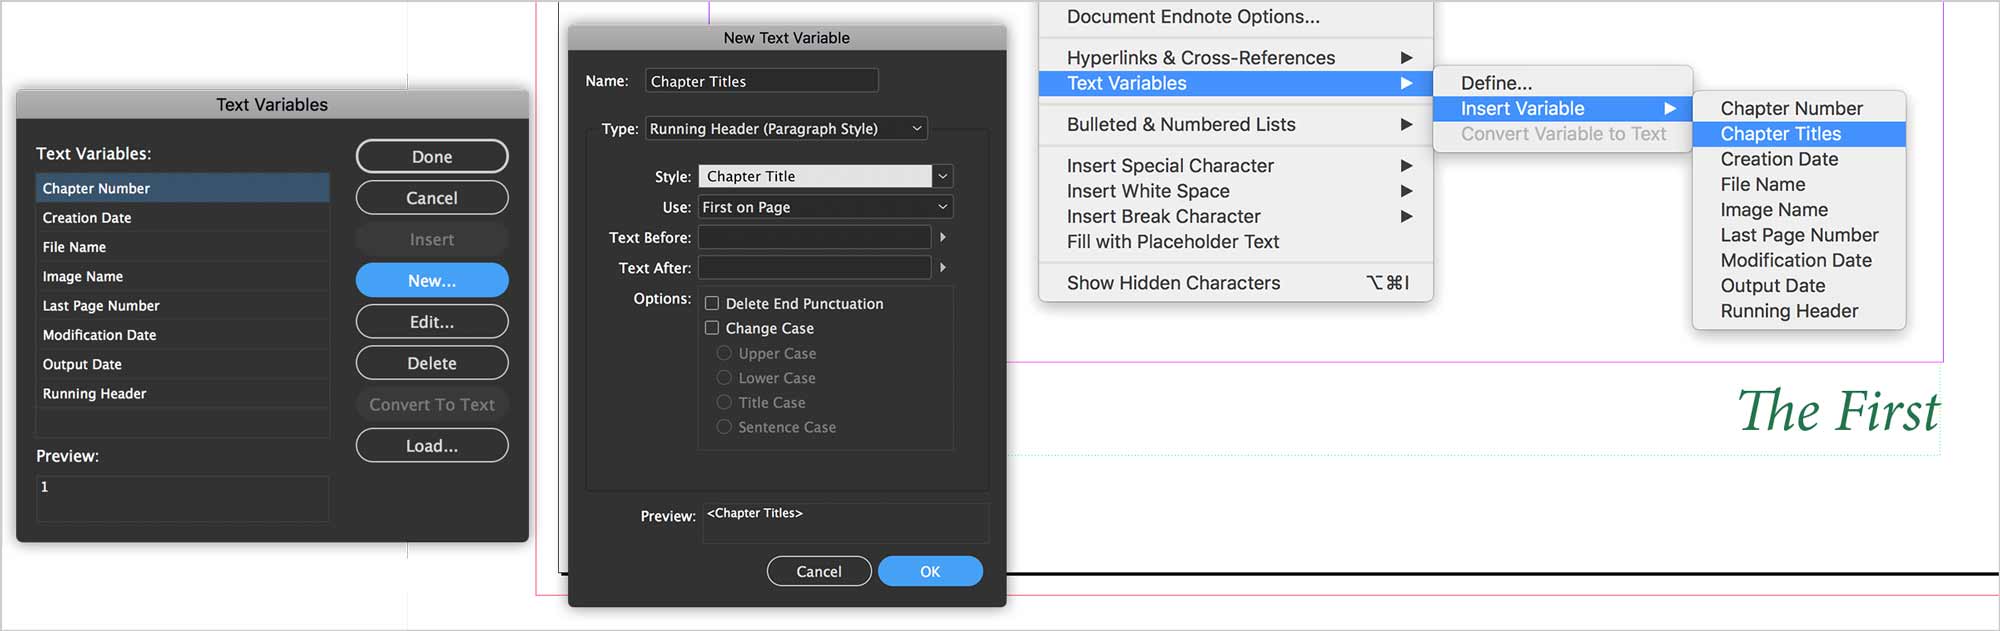
- On the B-Chapter parent page. Create a text frame on the ‘Text’ layer. Type ‘Chapter’. Style it. Insert the text variable as shown.
- Type a chapter name in the same text frame in its own paragraph style. We’ll be using this for a Running Header.
Once you’ve synced the chapter number and title info, you need to go to each document to apply the Chapter parent page to the first page of each document.
Running Headers
Running headers take text in a specific paragraph style, then repeat that text wherever you insert it. It’s great for repeating chapter titles at the bottom of each page.
Go to the A-Parent page. Add a running header in the same text frame as the page number. Simply put your cursor in the frame. Hit Shift-Tab to type a right-aligned tab. Then…
- Go Type > Text Variables > Define…
- Click New
- Name it ‘Chapter Titles’
- Select Running Header (Paragraph Style)
- Select the ‘Chapter Titles’. Click OK.
- Click Insert from the Text Variables dialogue.
You’ll see <Chapter Titles> appear in the text frame. This will reproduce the text that’s in Chapter Titles paragraph style. You’ll need to apply Parent to the first page, then unlock the frame by Shift-⌘-clicking on it.
Now, go to each of your book documents to drag B-Chapter onto the first page’s icon in the Pages panel. Go to the first page, then type in a chapter title. It will automatically populate to all the pages. Magic!
Numbered Lists
Create a defined numbered list with the text below. Make it continue from document Chapter 1 to Chapter 4. Don’t worry, when you copy the text, it won’t grab the bullets.
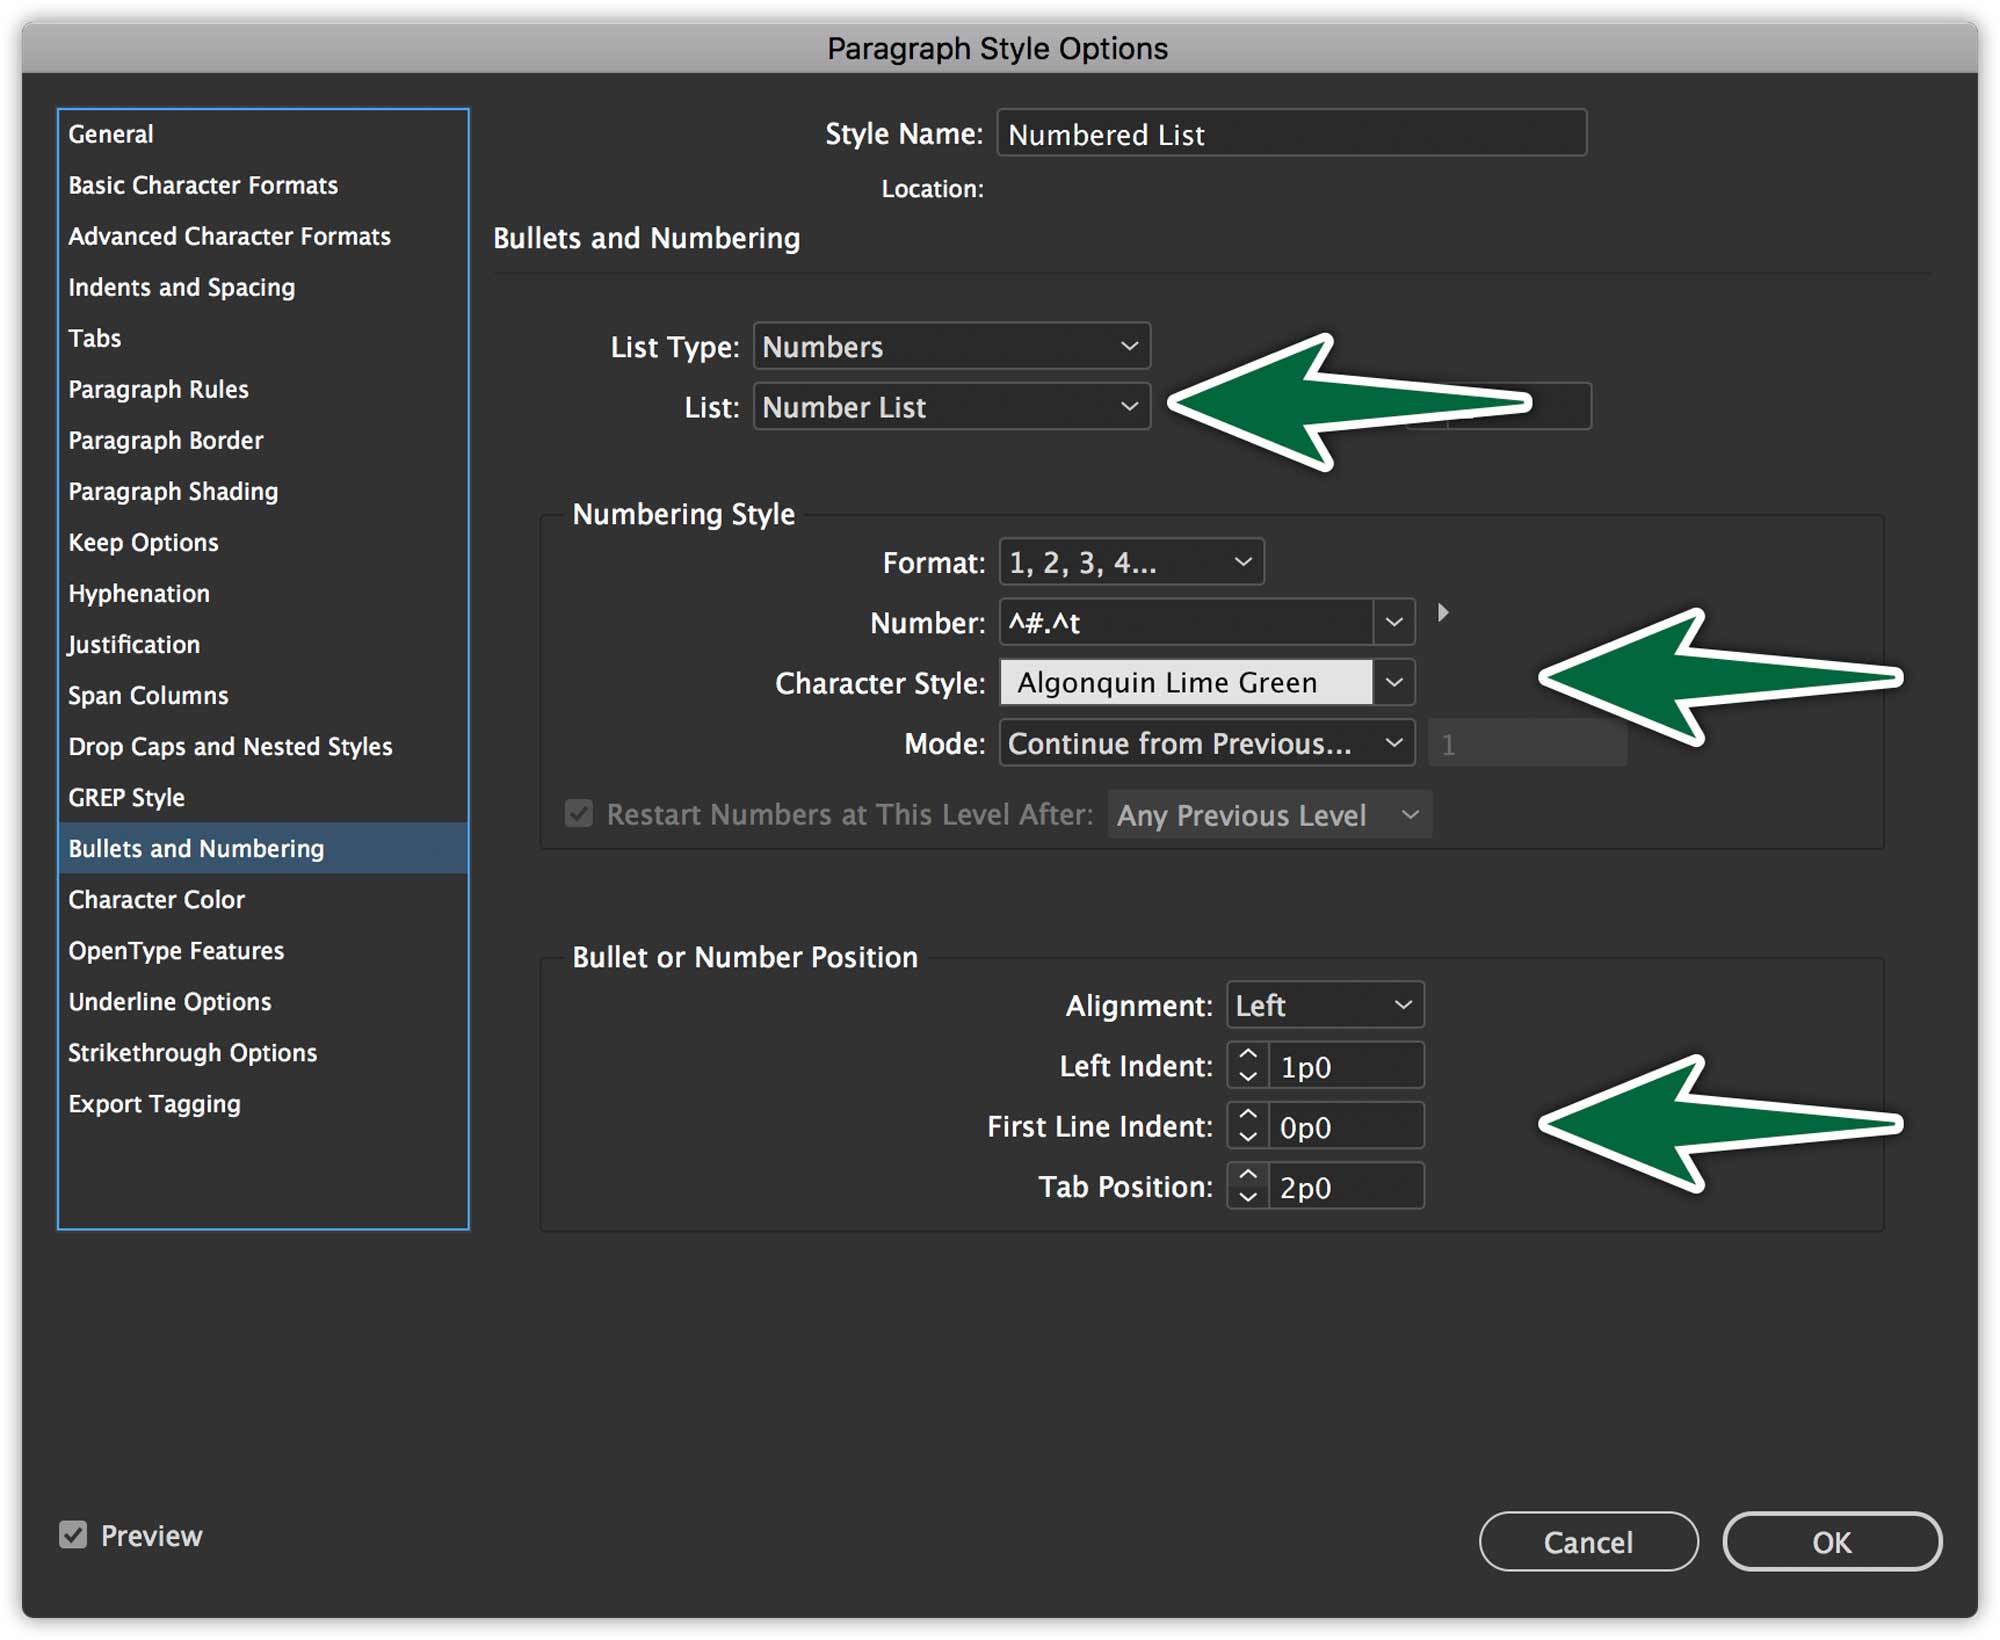
You need to start with the Numbered List paragraph style. Remember to make the Tab space big enough to accommodate a two-digit number. You can even create a Character Style which will style the numbers differently than the text.
Copy the first part below, then paste it onto the Text layer on a page in the Chapter 1 document.
First part of the list
- This is the first list item.
- This is number 2 in the list.
- Never two without three.
- Four’s a croud.
- Five little piggies went to the market.
Switch to the Chapter 4 document. Paste this second part of the list onto one of its pages.
Second part of the list
- This starts the second part of one list.
- Lucky number seven.
- Eight is enough.
- Nine Inch Nails is a great band.
- These have been the ten commandments of design.
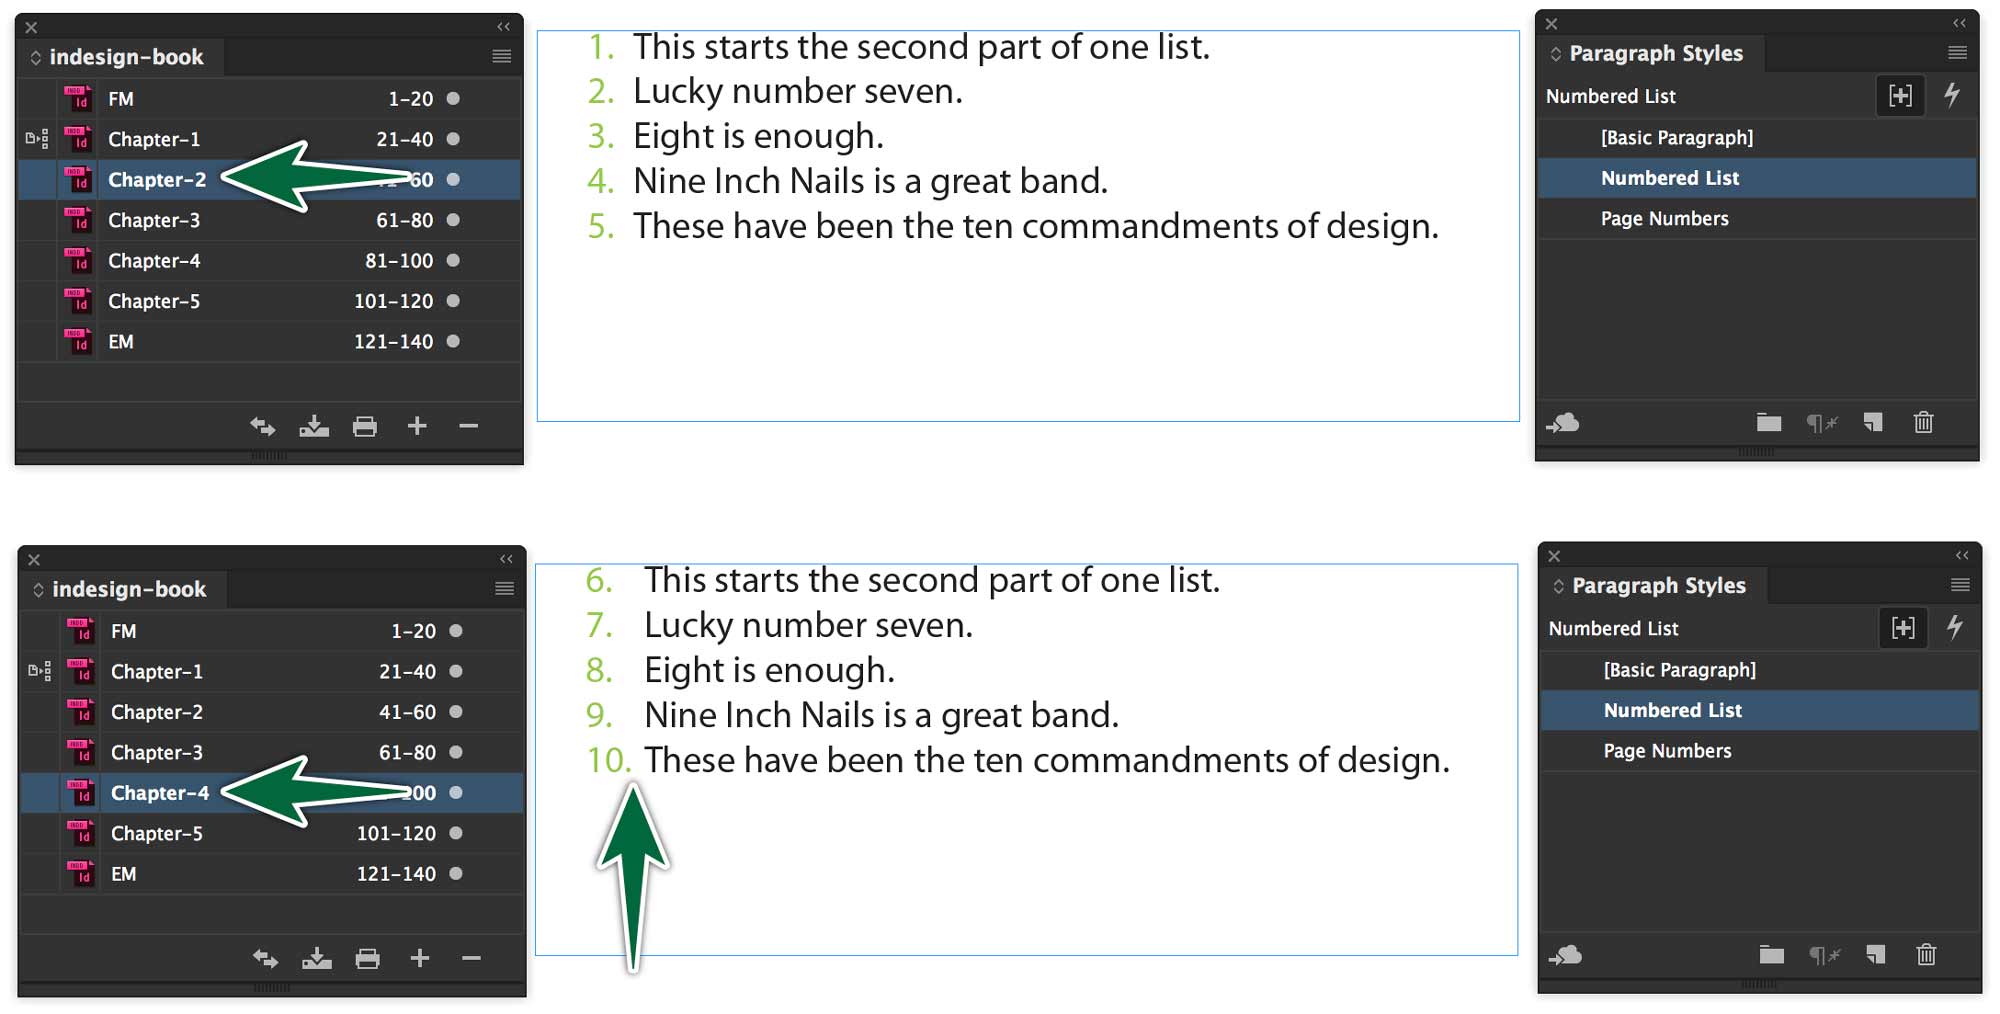
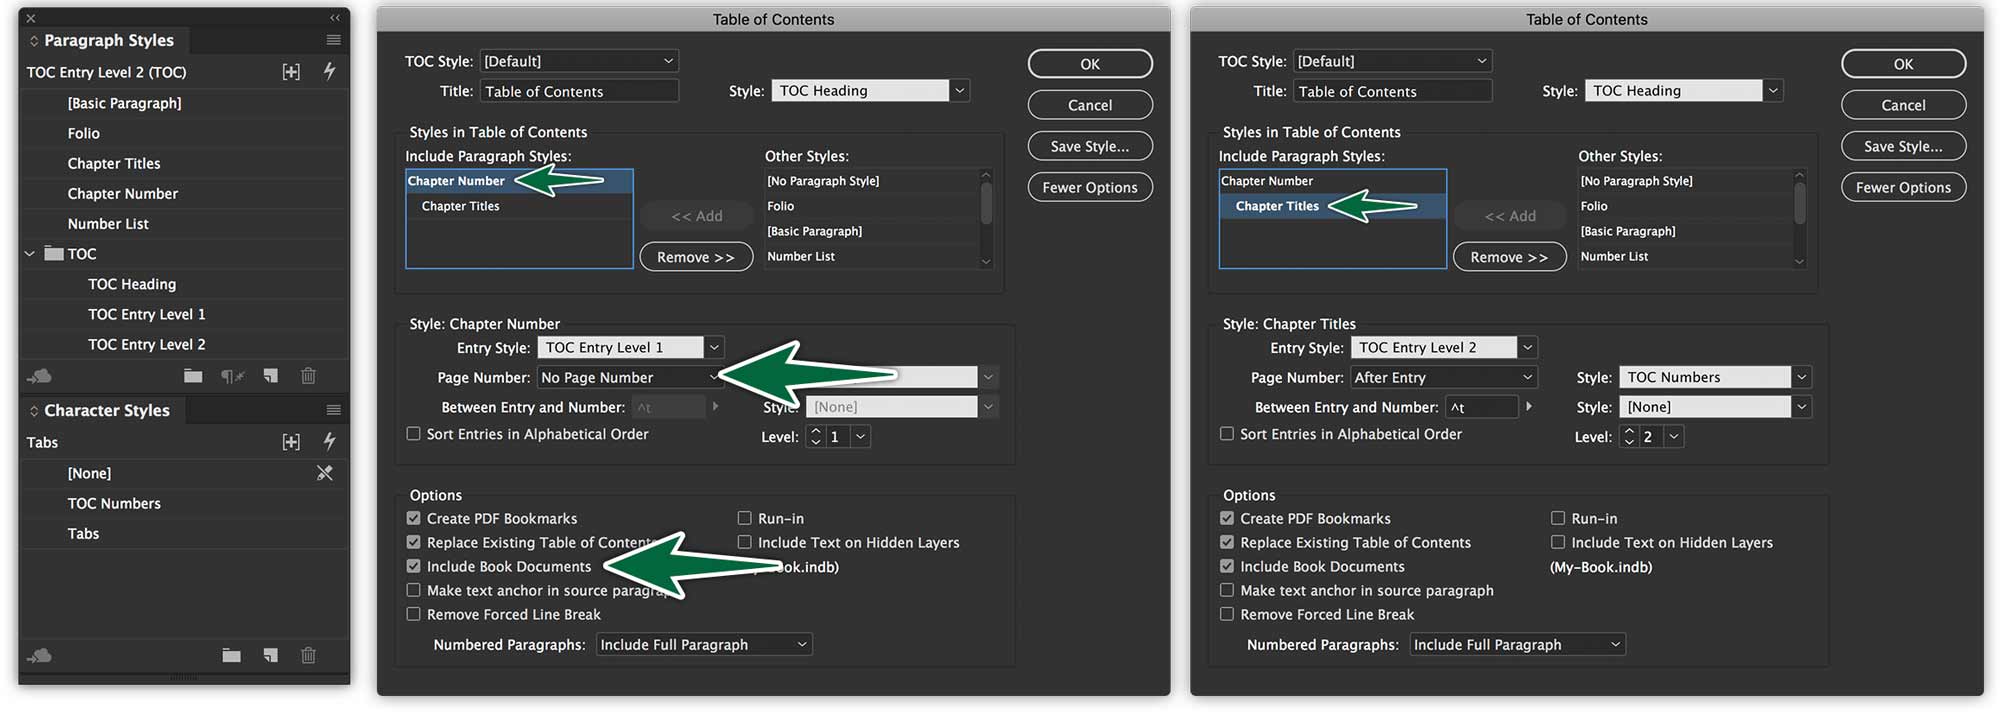
Table of Contents
Build a two-level Table of Contents on the first page of the FM document, including all the chapter numbers and chapter titles in the book file.
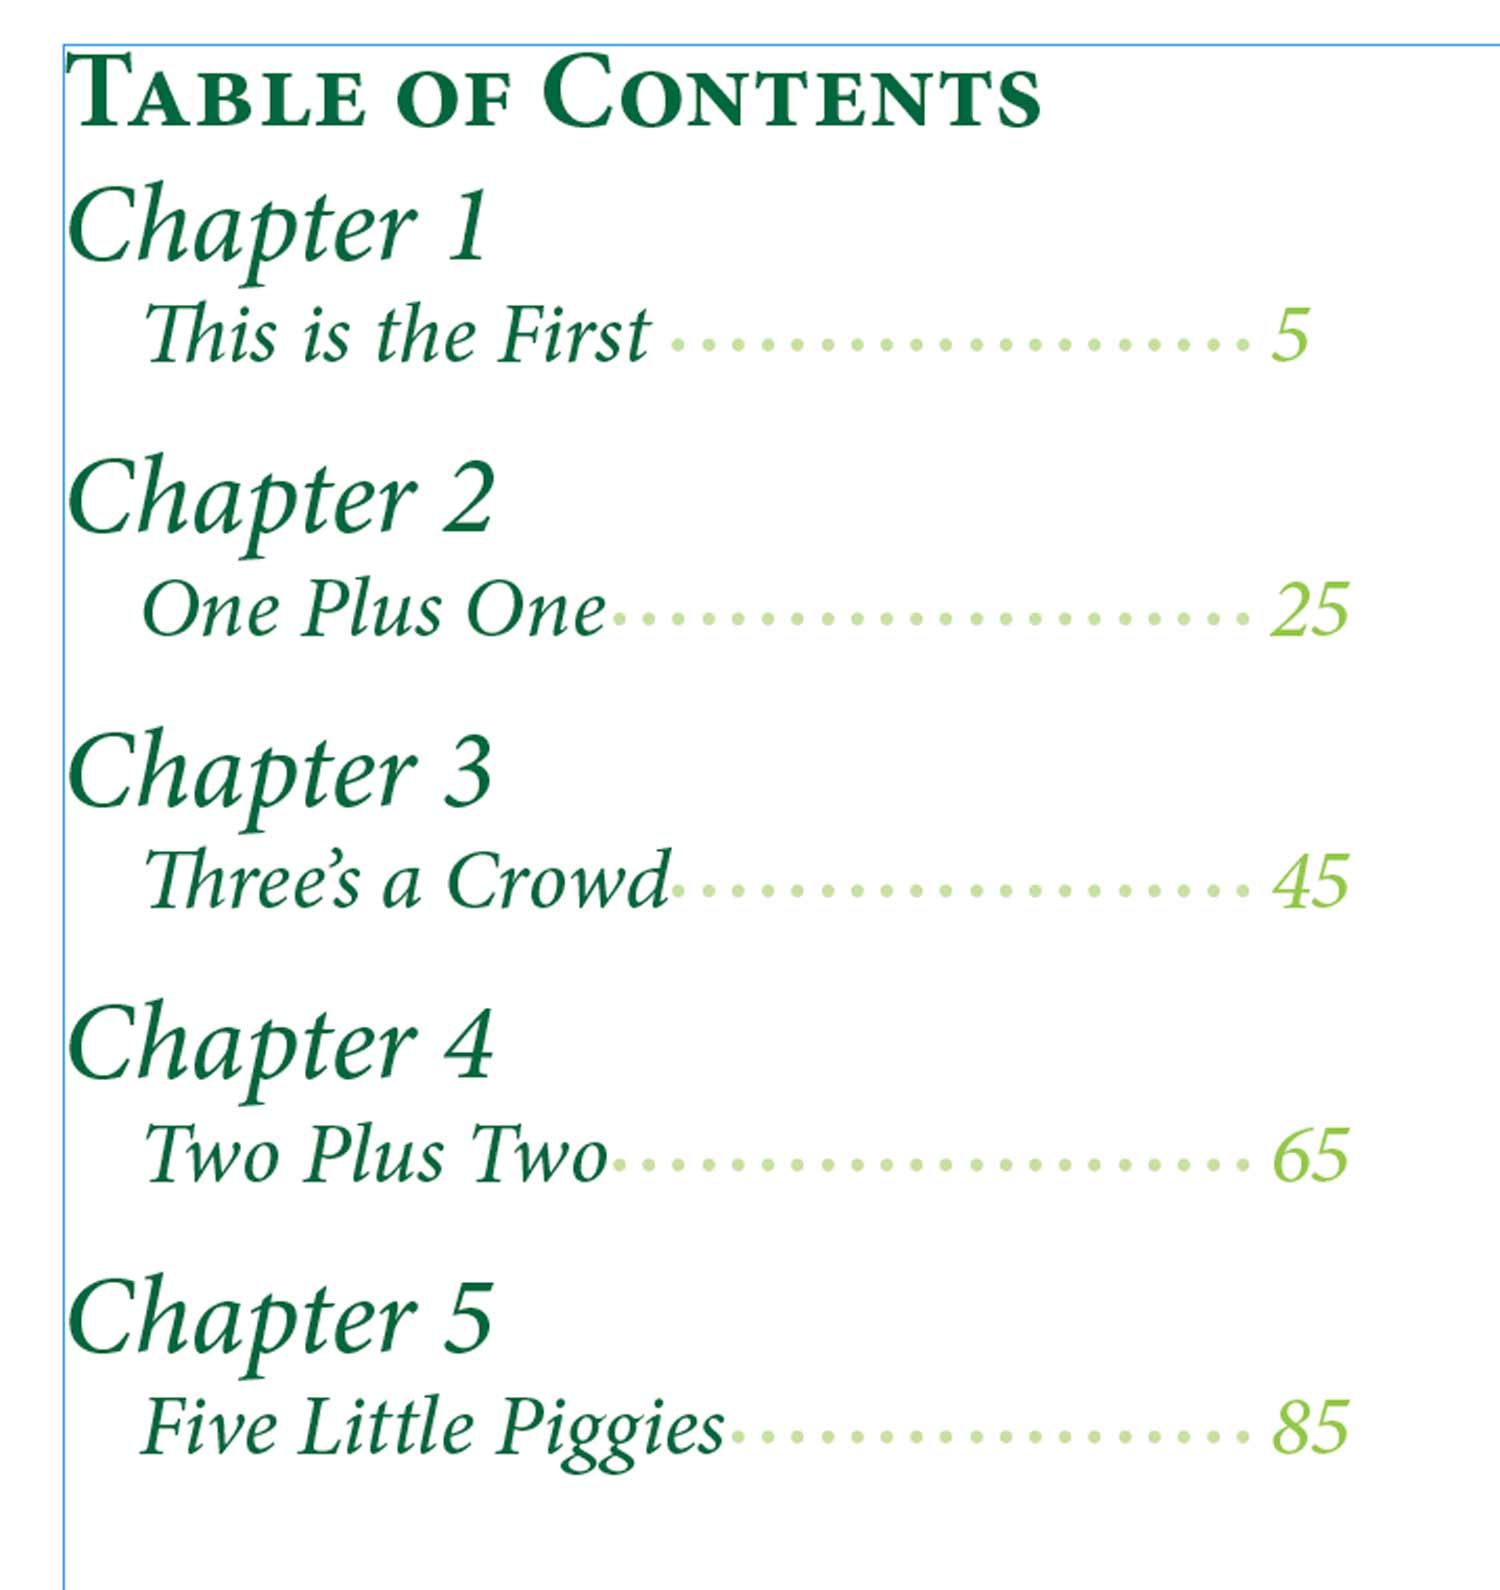
This will likely take a progressive edits. You can place your cursor in the text frame, make changes to the TOC settings. They’ll update automatically.
InDesign books… like a boss.